软件IDE:Arduino 1.6.3
1、库的安装:
从https://github.com/jcw/ethercard 下载源码包,解压,复制ethercard-master文件夹到Arduino的安装目录所在的库文件夹下:D:Program Files (x86)Arduinolibraries,并且重命名为EtherCard
2、打开Arduino
复制相关代码,保存,编译,上传。
#include <EtherCard.h>

static byte mymac[] = {0xDD,0xDD,0xDD,0x00,0x00,0x01};  //这里是问题所在
static byte myip[] = {192,168,2,1};
byte Ethernet::buffer[700];

const int ledPin = 2;
boolean ledStatus;

char* on = "ON";
char* off = "OFF";
char* statusLabel;
char* buttonLabel;

void setup () {

  Serial.begin(57600);
  Serial.println("WebLed Demo");

  if (!ether.begin(sizeof Ethernet::buffer, mymac, 53))
    Serial.println( "Failed to access Ethernet controller");
 else
   Serial.println("Ethernet controller initialized");

  if (!ether.staticSetup(myip))
    Serial.println("Failed to set IP address");
  Serial.println();

  pinMode(ledPin, OUTPUT);
  digitalWrite(ledPin, LOW);
  ledStatus = false;
}

void loop() {

  word len = ether.packetReceive();
  word pos = ether.packetLoop(len);

  if(pos) {

    if(strstr((char *)Ethernet::buffer + pos, "GET /?status=ON") != 0) {
      Serial.println("Received ON command");
      ledStatus = true;
    }

    if(strstr((char *)Ethernet::buffer + pos, "GET /?status=OFF") != 0) {
      Serial.println("Received OFF command");
      ledStatus = false;
    }

    if(ledStatus) {
      digitalWrite(ledPin, HIGH);
      statusLabel = on;
      buttonLabel = off;
    } else {
      digitalWrite(ledPin, LOW);
      statusLabel = off;
      buttonLabel = on;
    }

    BufferFiller bfill = ether.tcpOffset();
    bfill.emit_p(PSTR("HTTP/1.0 200 OK
"
      "Content-Type: text/html
Pragma: no-cache

"
      "<html><head><title>WebLed</title></head>"
      "<body>LED Status: $S "
      "<a><input type="button" value="$S" onClick="location.href='/?status=$S';"></a>"
      "</body></html>"
      ), statusLabel, buttonLabel, buttonLabel);
    ether.httpServerReply(bfill.position());
  }
}
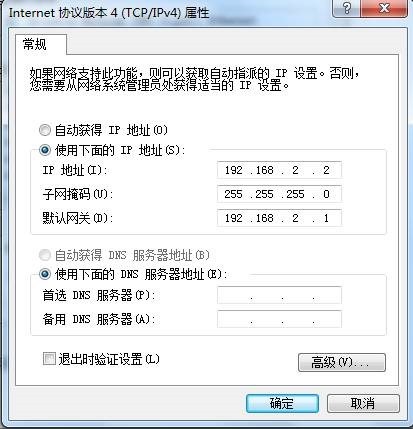
3、设置电脑ip为192.168.2.2
4、浏览器登录192.168.2.1
参考:
lucadentella.it – enc28J60 and Arduino (1)
http://www.lucadentella.it/en/2012/02/12/enc28j60-e-arduino-1/
[已解决]enc28J60 网页控制LED灯 - Powered by Discuz!
http://www.geek-workshop.com/forum.php?mod=viewthread&tid=14620&highlight=enc28j60
相关代码下载:

