此文章基于第三篇。
一、新建一个layout.xml文件,创建方法不再赘述,在Design界面右击LinearLayout,点击Convert LinearLayout to ConstraintLayout,选择ok。
二、将main.java中setContentView(R.layout.layout);删掉,换成setContentView(R.layout.layout2);即用新建的cpntrainlayout xml文件。
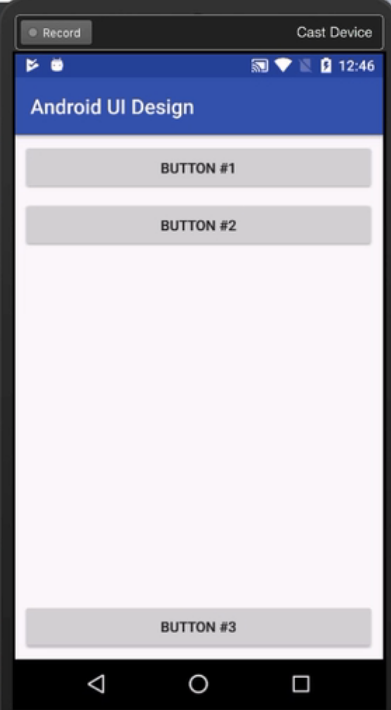
三、切换到layout2.xml,拖动Button到手机预览界面的右下角,会发现上面有个红色的感叹号,点击可以看到说没有设置位置。将鼠标放在Button上,可以看见上下左右有四个小圆圈,可以通过这四个小圆圈用鼠标将其连在对应的墙壁,控制Button的位置,如果想将其放在右下角,那么就将右边的小圆圈按住鼠标左键拉到右边的墙壁,Button右侧就和墙壁贴在一起,同理,将下面的小圆圈和界面底部连接,Buttonjiu 固定在右下角了。如果想取消之前的连接,将鼠标放在已经连接的小圆圈上,会发现小圆圈填充了红色,并显示Delete Connection,点一下就可以取消连接了。如果全都不设置连接,默认是从上到下,从左到右。将四个圆圈全部连接,Button就会出现在正中间。选择layout_width为match_constraint,button就会占一整行。写入text为Button #1。取消下方的连接,Button#1就会跑到最上面。
拖动另一个Button到预览界面,连接左右两面,将text变为Button #2。并将Button #2上方的小圆圈连接Button #1下方的小圆圈,并改变layout_width为match_constraint,那么Button #2就会出现在Button #1的下方了。拖动第三个Button按钮,连接左右下方向,将text变为Button #3,改变layout_width为match_constraint,此时Button #3出现在底部。
效果图:
layout2.xml代码如下:
<?xml version="1.0" encoding="utf-8"?>
<android.support.constraint.ConstraintLayout xmlns:android="http://schemas.android.com/apk/res/android"
    xmlns:app="http://schemas.android.com/apk/res-auto"
    xmlns:tools="http://schemas.android.com/tools"
    android:id="@+id/linearLayout"
    android:layout_width="match_parent"
    android:layout_height="match_parent">

    <Button
        android:id="@+id/button5"
        android:layout_width="0dp"
        android:layout_height="wrap_content"
        android:layout_marginStart="8dp"
        android:layout_marginTop="8dp"
        android:layout_marginEnd="8dp"
        android:text="Button #1"
        app:layout_constraintEnd_toEndOf="parent"
        app:layout_constraintStart_toStartOf="parent"
        app:layout_constraintTop_toTopOf="parent" />

    <Button
        android:id="@+id/button6"
        android:layout_width="0dp"
        android:layout_height="wrap_content"
        android:layout_marginStart="8dp"
        android:layout_marginTop="8dp"
        android:layout_marginEnd="8dp"
        android:text="Button #2"
        app:layout_constraintEnd_toEndOf="parent"
        app:layout_constraintStart_toStartOf="parent"
        app:layout_constraintTop_toBottomOf="@+id/button5" />

    <Button
        android:id="@+id/button7"
        android:layout_width="0dp"
        android:layout_height="wrap_content"
        android:layout_marginStart="8dp"
        android:layout_marginEnd="8dp"
        android:layout_marginBottom="8dp"
        android:text="Button"
        app:layout_constraintBottom_toBottomOf="parent"
        app:layout_constraintEnd_toEndOf="parent"
        app:layout_constraintStart_toStartOf="parent" />
</android.support.constraint.ConstraintLayout>
至此,ConstraintLayout部分完成了。可以运行。