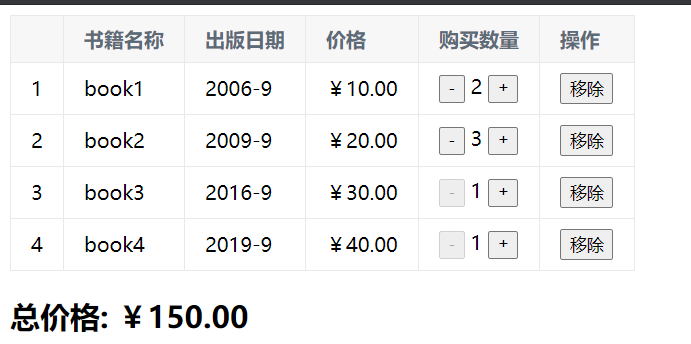
1、书馆购物案例
代码:


<body>
  <div id="app">
    <div v-if="books.length">
      <table>
        <thead>
          <tr>
            <th></th>
            <th>书籍名称</th>
            <th>出版日期</th>
            <th>价格</th>
            <th>购买数量</th>
            <th>操作</th>
          </tr>
        </thead>

        <tbody>
          <tr v-for="(item,index) in books">
            <!-- <td v-for="value in item">{{value}}</td> -->

            <td>{{item.id}}</td>
            <td>{{item.name}}</td>
            <td>{{item.date}}</td>
            <!-- 直接算 -->
            <!-- <td>{{'¥' + item.price.toFixed(2)}}</td> -->

            <!-- 使用methods -->
            <!-- <td>{{getFinalPrice(item.price)}}</td> -->

            <!-- 使用过滤器 -->
            <td>{{item.price | showPrice}}</td>

            <td>
              <!-- disabled 如果为true则不能再点击 -->
              <button @click="decrement(index)" v-bind:disabled="item.count <= 1">-</button>
              {{item.count}}
              <button @click="increment(index)">+</button>
            </td>
            <td>
              <button @click="removeHandle(index)">移除</button>
            </td>
          </tr>
        </tbody>
      </table>
      <h2>总价格: {{totalPrice | showPrice}}</h2>
    </div>

    <div v-else>
      <h2>购物车为空</h2>
    </div>
  </div>

  <!-- 要用的一定要放在前面!!!! -->
  <script src="../../js/vue.js"></script>
  <script src="./main.js"></script>
</body>
const app = new Vue({
  el: '#app',
  data: {
    books: [
      {
        id: 1,
        name: 'book1',
        date: '2006-9',
        price: 10.00,
        count: 1
      },

      {
        id: 2,
        name: 'book2',
        date: '2009-9',
        price: 20.00,
        count: 1
      },

      {
        id: 3,
        name: 'book3',
        date: '2016-9',
        price: 30.00,
        count: 1
      },

      {
        id: 4,
        name: 'book4',
        date: '2019-9',
        price: 40.00,
        count: 1
      },
    ]
  },

  methods: {
    getFinalPrice(price){
      return '¥' + price.toFixed(2);
    },

    decrement(index){
      // console.log("decrement");

      this.books[index].count--
    },

    increment(index){
      // console.log("increment");

      this.books[index].count++
    },

    removeHandle(index){
      this.books.splice(index, 1)
    }

  },

  computed: {
    totalPrice(){
      let totalPrice = 0;
      for(let i in this.books){
        totalPrice += this.books[i].count * this.books[i].price;
      }

      return totalPrice;
    }
  },

  filters: {
    showPrice(price){
      return '¥' + price.toFixed(2);
    }
  }

})
table {
  border: 1px solid #e9e9e9;
  border-collapse: collapse;
  border-spacing: 0;
}

th, td{
  padding: 8px 16px;
  border: 1px solid #e9e9e9;
  text-align: left;
}

th{
  background-color: #f7f7f7;
  color: #5c6b77;
  font-weight: 600;
}

style.css
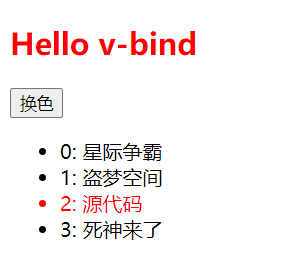
2、属性动态绑定
代码:
<body>
    <script src="../../js/vue.js"></script>

    <div id="text">
        <h2 :class="{textcolor: color}">Hello {{message}}</h2>
        <button @click="conventColor">换色</button>
    </div>

    <div id="movies">
        <ul>
            <li :class="{textcolor: currentIndex === index}" v-for="(m, index) in movies" @click="conventColor(index)">{{index}}: {{m}}</li>
        </ul>

    </div>

    <script>
        let text = new Vue({
            el: '#text',
            data: {
                message: 'v-bind',
                color: true,


            },

            methods: {
                conventColor() {
                    this.color = !this.color;
                }
            }
        });


        let movies = new Vue({
            el: '#movies',
            data: {
                movies: ['星际争霸', '盗梦空间', '源代码', '死神来了'],
                currentIndex: 0,
            },

            methods: {
                conventColor(num) {
                    this.currentIndex = num;
                }
            }
        })
    </script>
</body>
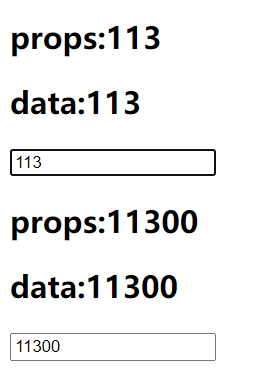
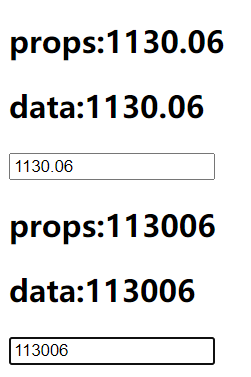
3、父子组件通信案例
代码:
<body>
  <div id="app">
    <cpn :number1="num1" :number2="num2" @num1change="num1change" @num2change="num2change"></cpn>
  </div>

  <template id="cpn">
    <div>
      <h2>props:{{number1}}</h2>
      <h2>data:{{dnumber1}}</h2>
      <!-- <input type="text" v-model="dnumber1"> -->
      <input type="text" :value="dnumber1" @input="num1Input">
      <h2>props:{{number2}}</h2>
      <h2>data:{{dnumber2}}</h2>
      <!-- <input type="text" v-model="dnumber2"> -->
      <input type="text" :value="dnumber2" @input="num2Input">
    </div>
  </template>


  <script>
    //创建Vue实例,得到 ViewModel
    const vm = new Vue({
      el: '#app',
      data: {
        num1: 1,
        num2: 0
      },
      methods: {
        num1change(value) {
          // 默认为string
          // parseInt(value)
          // parseFloat(value)
          this.num1 = value * 1
        },
        num2change(value) {
          this.num2 = value * 1
        },
      },
      computed: {

      },
      components: {
        cpn: {
          template: '#cpn',
          // 不要直接修改,放到data中来做
          props: {
            number1: Number,
            number2: Number
          },
          data() {
            return {
              dnumber1: this.number1,
              dnumber2: this.number2
            }
          },
          methods: {
            num1Input(event) {
              this.dnumber1 = event.target.value;
              this.$emit('num1change', this.dnumber1)

              // 始终让number2是number1的100倍
              this.dnumber2 = this.dnumber1 * 100
              this.$emit('num2change', this.dnumber2)
            },
            num2Input(event) {
              this.dnumber2 = event.target.value;
              this.$emit('num2change', this.dnumber2)

              this.dnumber1 = this.dnumber2 / 100
              this.$emit('num1change', this.dnumber1)
            }
          },
        }
      },
    });
  </script>

</body>
4、作用域插槽案例
代码:
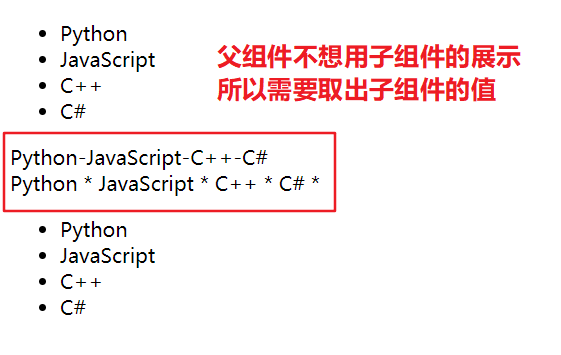
<body>
  <div id="app">
    <cpn></cpn>
    <!-- 父组件想对子组件的数据进行操作,但是不能直接拿(前一章作用域问题) -->
    <!-- 获取子组件数据用不同方式展示 2.5.x一下必须使用template,以上可以用div-->
    <cpn>
      <template slot-scope="slot">
        <!-- <span v-for="item in slot.data">{{item}} - </span> -->
        <span>{{slot.data1.join('-')}}</span>
      </template>

    </cpn>

    <cpn>
      <div slot-scope="slot">
        <span v-for="item in slot.data1">{{item}} * </span>
      </div>
    </cpn>

    <cpn></cpn>

  </div>

  <template id="cpn">
    <div>
      <!-- 作用域插槽,在这里绑定数据好在父组件使用 -->
      <slot :data1="pLanguages">
        <ul>
          <li v-for="item in pLanguages">{{item}}</li>
        </ul>
      </slot>
    </div>
  </template>
  <script>
    //创建Vue实例,得到 ViewModel
    const vm = new Vue({
      el: '#app',
      data: {
        message: 'Smallstars',
      },
      methods: {},
      computed: {},
      components: {
        cpn: {
          template: '#cpn',
          data() {
            return {
              pLanguages: ['Python', 'JavaScript', 'C++', 'C#']
            }
          },
        }
      },
    });
  </script>
</body>
5、路由导航案例
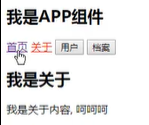
实现保留第一个界面界面,从其他页面跳转回仍是点击后的界面
 ==>
==> ==>
==> ==>
==>
代码:
<!-- -->
<template>
<div>
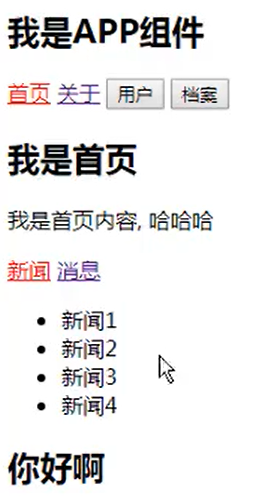
<h2>Home</h2>
<!-- 少些/会叠加出错 -->
<router-link to="/home/news">新闻</router-link>
<router-link to="/home/message">消息</router-link>
<!-- 渲染占位 -->
<router-view></router-view>
</div>
</template>
<script>
export default {
name: "Home",
data() {
return {
path: "/home/news",
};
},
// 生命周期
created() {
// this.$router.replace("/home/news");
},
destroyed() {},
// 使用keep-alive才会有
activated() {
console.log("Home activate");
// 取消了router中的默认路径,在这里创建时重定向
this.$router.replace(this.path);
},
deactivated() {
console.log("Home deactivated");
// 这里已经是记录之后的路径了
// this.path = this.$route.path;
},
beforeRouteLeave(to, from, next) {
this.path = this.$route.path;
next();
},
};
</script>
<style scoped>
</style>
6、Vuex案例
代码:
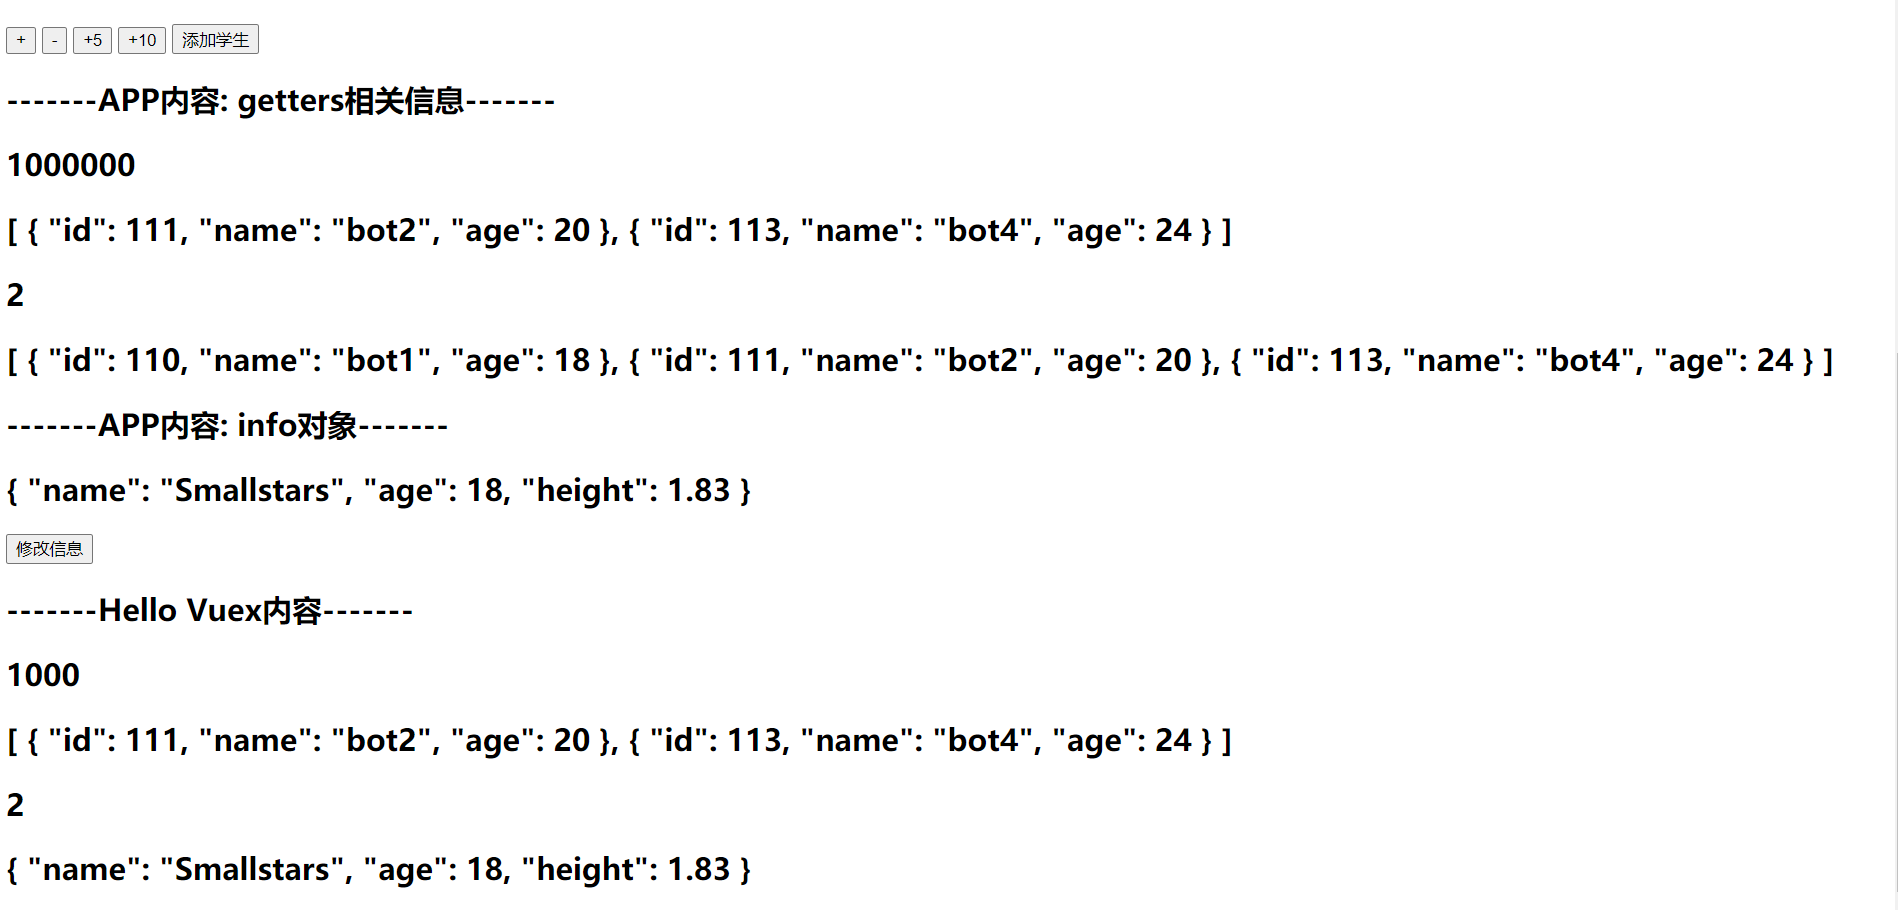
<template>
<div id="app">
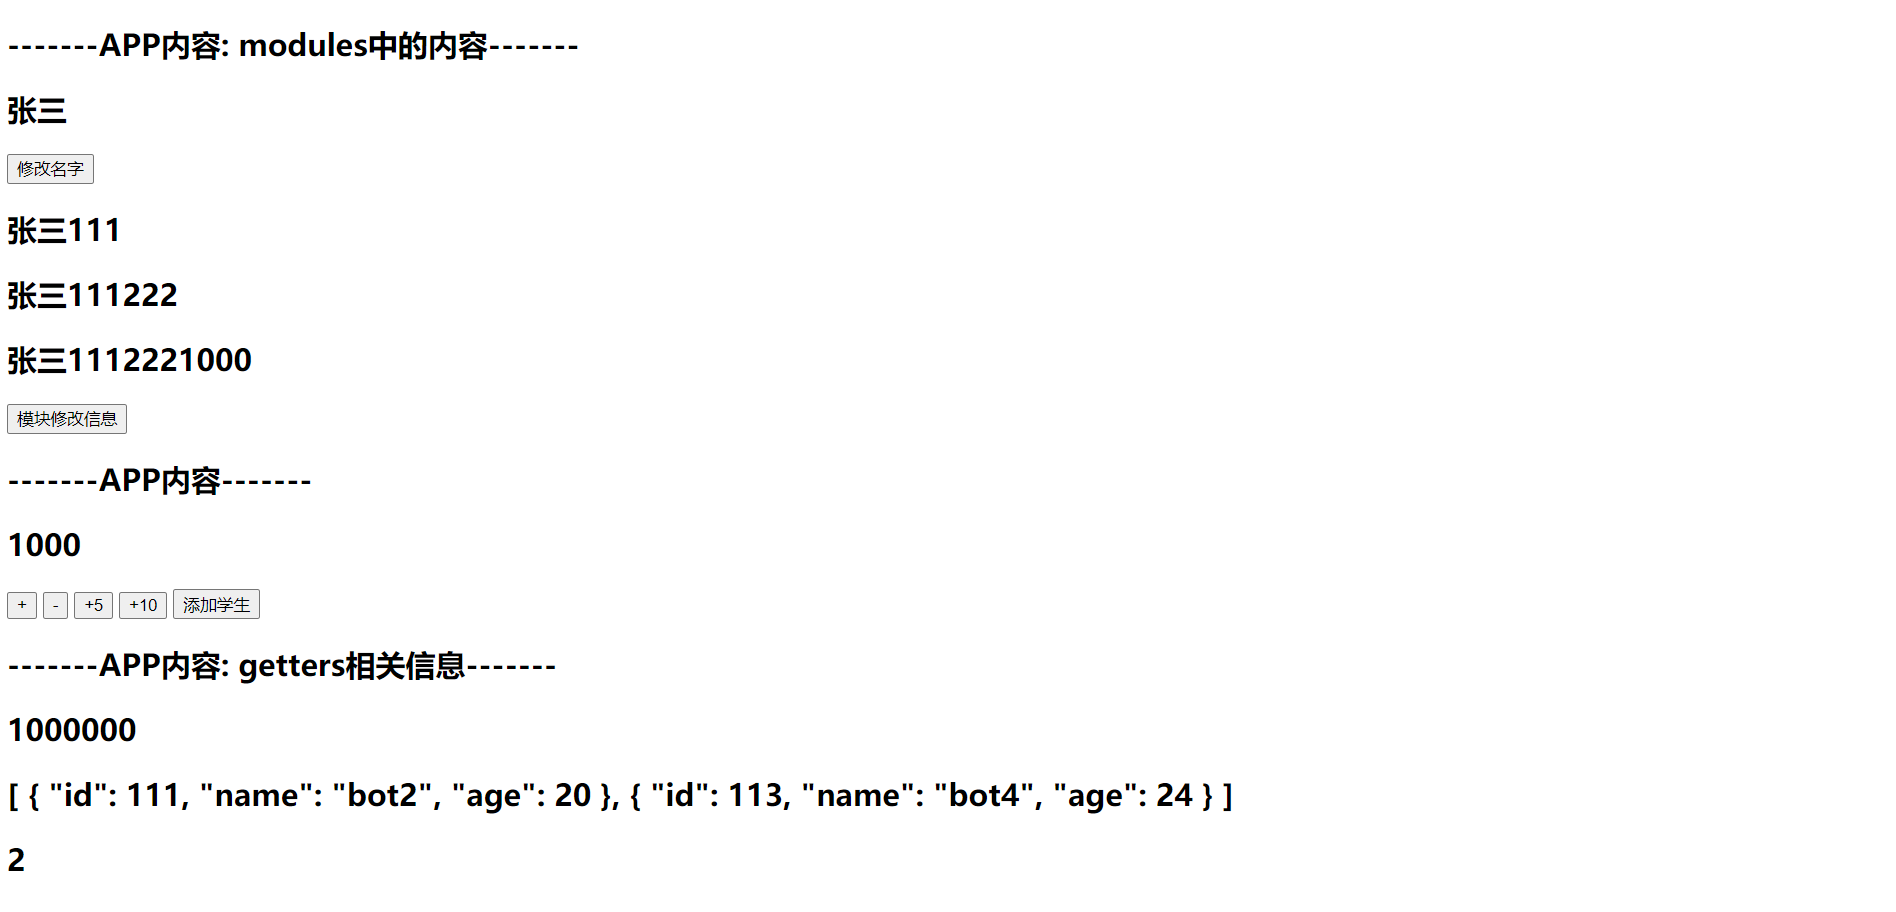
<h2>-------APP内容: modules中的内容-------</h2>
<!-- 属性要解析到模块 -->
<h2>{{ $store.state.a.name }}</h2>
<!-- 同步方法从主模块开始寻找 -->
<button @click="updateName">修改名字</button>
<!-- 直接解析即可 -->
<h2>{{ $store.getters.fullName }}</h2>
<h2>{{ $store.getters.fullName2 }}</h2>
<h2>{{ $store.getters.fullName3 }}</h2>
<button @click="asyncUpdateName">模块修改信息</button>
<h2>-------APP内容-------</h2>
<h2>{{ $store.state.counter }}</h2>
<button @click="addition">+</button>
<button @click="subtraction">-</button>
<button @click="addCount(5)">+5</button>
<button @click="addCount(10)">+10</button>
<button @click="addStuden">添加学生</button>
<h2>-------APP内容: getters相关信息-------</h2>
<h2>{{ $store.getters.powerCounter }}</h2>
<h2>{{ $store.getters.more18stu }}</h2>
<h2>{{ $store.getters.more18stuLength }}</h2>
<h2>{{ $store.getters.moreAgeStu(15) }}</h2>
<h2>-------APP内容: info对象-------</h2>
<h2>{{ $store.state.info }}</h2>
<button @click="updateInfo">修改信息</button>
<h2>-------Hello Vuex内容-------</h2>
<HelloVuex />
<h2>{{ $store.state.info }}</h2>
</div>
</template>
<script>
import HelloVuex from "./components/HelloVuex";
import { INCREMENT } from "./store/mutations-types";
export default {
name: "App",
components: {
HelloVuex
},
computed: {},
methods: {
addition() {
this.$store.commit(INCREMENT);
},
subtraction() {
this.$store.commit("decrement");
},
addCount(count) {
// 1.普通提交
// this.$store.commit("incrementCount", count);
// 2.特殊提交
this.$store.commit({
type: "incrementCount",
count
});
},
addStuden() {
const stu = { id: 114, name: "bot5", age: 29 };
this.$store.commit("addStuden", stu);
},
updateInfo() {
this.$store.commit({
type: "updateInfo"
});
},
updateName() {
this.$store.commit("updateName", "李四");
},
asyncUpdateName() {
this.$store.dispatch("aUpdateName");
}
}
};
</script>
<style></style>
未分离的Vuex代码,大家可以自己尝试分离
import Vue from 'vue'
import Vuex from 'vuex';
import {
  INCREMENT
} from './mutations-types'
Vue.use(Vuex);

const moduleA = {
  state: {
    name: '张三'
  },
  mutations: {
    updateName(state, payload) {
      state.name = payload
    }
  },
  getters: {
    fullName(state) {
      return state.name + '111'
    },
    fullName2(state, getters) {
      return getters.fullName + '222'
    },
    // 模块中可以有第三个模块 rootState是主模块
    fullName3(state, getters, rootState) {
      return getters.fullName2 + rootState.counter
    }
  },
  actions: {
    aUpdateName(context) {
      // 主模块都是commit本身中的mutations
      setTimeout(() => {
        return new Promise((resolve, reject) => {
          context.commit('updateName', '王五')
          resolve
        })
      }, 1000);
    }
  },

}

const store = new Vuex.Store({
  state: {
    counter: 1000,
    students: [{
        id: 110,
        name: 'bot1',
        age: 18
      },
      {
        id: 111,
        name: 'bot2',
        age: 20
      },
      {
        id: 112,
        name: 'bot3',
        age: 14
      },
      {
        id: 113,
        name: 'bot4',
        age: 24
      }

    ],
    info: {
      name: 'Smallstars',
      age: 18,
      height: 1.83
    }
  },
  // 状态更新
  mutations: {
    // 同步方法
    // 通过mutations-types.js进行统一,错了也能用qwq
    [INCREMENT](state) {
      state.counter++;
    },
    decrement(state) {
      state.counter--;
    },
    // 用特殊提交参数变成一个对象
    incrementCount(state, payload) {
      state.counter += payload.count
    },
    addStuden(state, stu) {
      state.students.push(stu)
    },
    updateInfo() {
      store.dispatch('aUpdateInfo', '我是携带信息').then(
        res => {
          console.log('完成提交');
          console.log(res);
        }
      )
      // this.state.info.name = 'BlackAngel'
      // this.$store.dispatch('aUpdateInfo', ')
    },
  },

  actions: {
    // 异步操作
    // 默认为上下文不再是state
    aUpdateInfo(context, payload) {
      return new Promise((resolve, reject) => {
        setTimeout(() => {
          // 通过mutations更改
          context.commit('updateInfo')
          console.log(payload);
          resolve('1111')
        }, 1000);
      })
    }
  },
  getters: {
    powerCounter(state) {
      return state.counter * state.counter
    },
    more18stu(state) {
      return state.students.filter(s => s.age > 18);
    },
    more18stuLength(state, getters) {
      return getters.more18stu.length;
    },
    moreAgeStu(state) {
      // return function (age) {
      //   return state.students.filter(s => s.age > age)
      // }
      return age => {
        return state.students.filter(s => s.age > age)
      }
    }

  },
  modules: {
    // 再进行模块划分
    a: moduleA
  }

});
export default store