这里主要涉及到五张表:用户表,角色表(用户所拥有的角色),权限表(角色所涉及到的权限),用户-角色表(用户和角色是多对多的),角色-权限表(角色和权限是多对多的).表结构建立的sql语句如下:


CREATE TABLE `module` (
  `mid` int(11) NOT NULL AUTO_INCREMENT,
  `mname` varchar(255) DEFAULT NULL,
  PRIMARY KEY (`mid`)
) ENGINE=InnoDB AUTO_INCREMENT=5 DEFAULT CHARSET=utf8;

-- ----------------------------
-- Records of module
-- ----------------------------
INSERT INTO `module` VALUES ('1', 'add');
INSERT INTO `module` VALUES ('2', 'delete');
INSERT INTO `module` VALUES ('3', 'query');
INSERT INTO `module` VALUES ('4', 'update');

-- ----------------------------
-- Table structure for module_role
-- ----------------------------
DROP TABLE IF EXISTS `module_role`;
CREATE TABLE `module_role` (
  `rid` int(11) DEFAULT NULL,
  `mid` int(11) DEFAULT NULL,
  KEY `rid` (`rid`),
  KEY `mid` (`mid`),
  CONSTRAINT `mid` FOREIGN KEY (`mid`) REFERENCES `module` (`mid`),
  CONSTRAINT `rid` FOREIGN KEY (`rid`) REFERENCES `role` (`rid`)
) ENGINE=InnoDB DEFAULT CHARSET=utf8;

-- ----------------------------
-- Records of module_role
-- ----------------------------
INSERT INTO `module_role` VALUES ('1', '1');
INSERT INTO `module_role` VALUES ('1', '2');
INSERT INTO `module_role` VALUES ('1', '3');
INSERT INTO `module_role` VALUES ('1', '4');
INSERT INTO `module_role` VALUES ('2', '1');
INSERT INTO `module_role` VALUES ('2', '3');

-- ----------------------------
-- Table structure for role
-- ----------------------------
DROP TABLE IF EXISTS `role`;
CREATE TABLE `role` (
  `rid` int(11) NOT NULL AUTO_INCREMENT,
  `rname` varchar(255) DEFAULT NULL,
  PRIMARY KEY (`rid`)
) ENGINE=InnoDB AUTO_INCREMENT=3 DEFAULT CHARSET=utf8;

-- ----------------------------
-- Records of role
-- ----------------------------
INSERT INTO `role` VALUES ('1', 'admin');
INSERT INTO `role` VALUES ('2', 'customer');

-- ----------------------------
-- Table structure for user
-- ----------------------------
DROP TABLE IF EXISTS `user`;
CREATE TABLE `user` (
  `uid` int(11) NOT NULL AUTO_INCREMENT,
  `username` varchar(255) DEFAULT NULL,
  `password` varchar(255) DEFAULT NULL,
  PRIMARY KEY (`uid`)
) ENGINE=InnoDB AUTO_INCREMENT=3 DEFAULT CHARSET=utf8;

-- ----------------------------
-- Records of user
-- ----------------------------
INSERT INTO `user` VALUES ('1', 'wulifu', '123456');
INSERT INTO `user` VALUES ('2', 'root', '123456');

-- ----------------------------
-- Table structure for user_role
-- ----------------------------
DROP TABLE IF EXISTS `user_role`;
CREATE TABLE `user_role` (
  `uid` int(11) DEFAULT NULL,
  `rid` int(11) DEFAULT NULL,
  KEY `u_fk` (`uid`),
  KEY `r_fk` (`rid`),
  CONSTRAINT `r_fk` FOREIGN KEY (`rid`) REFERENCES `role` (`rid`),
  CONSTRAINT `u_fk` FOREIGN KEY (`uid`) REFERENCES `user` (`uid`)
) ENGINE=InnoDB DEFAULT CHARSET=utf8;

-- ----------------------------
-- Records of user_role
-- ----------------------------
INSERT INTO `user_role` VALUES ('1', '1');
INSERT INTO `user_role` VALUES ('2', '2');
二、功能要求
admin要求只有具有admin角色的用户才能访问,update需要有update权限的用户才能访问,login、loginUser都不做拦截。
预期目标:
wulifu是有admin角色和所有权限,所以用wulifu登录后,可以访问update和admin,但是不能访问guest;而root是customer角色,只有add和query权限,所以不能访问admin和update。
三、添加依赖,配置文件
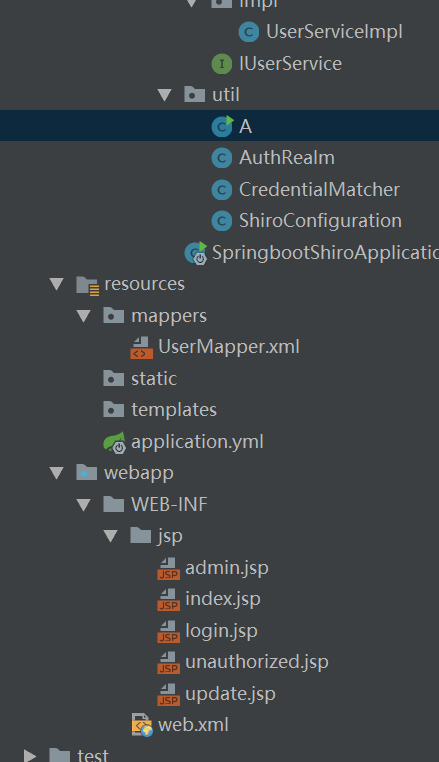
1、springboot项目,项目结构如下:
2、添加依赖
<parent>
        <groupId>org.springframework.boot</groupId>
        <artifactId>spring-boot-starter-parent</artifactId>
        <version>2.0.6.RELEASE</version>
        <relativePath/> <!-- lookup parent from repository -->
    </parent>

    <properties>
        <project.build.sourceEncoding>UTF-8</project.build.sourceEncoding>
        <project.reporting.outputEncoding>UTF-8</project.reporting.outputEncoding>
        <java.version>1.8</java.version>
    </properties>

    <dependencies>
        <dependency>
            <groupId>org.springframework.boot</groupId>
            <artifactId>spring-boot-starter-web</artifactId>
        </dependency>
        <dependency>
            <groupId>org.mybatis.spring.boot</groupId>
            <artifactId>mybatis-spring-boot-starter</artifactId>
            <version>1.3.2</version>
        </dependency>

        <dependency>
            <groupId>mysql</groupId>
            <artifactId>mysql-connector-java</artifactId>
            <scope>runtime</scope>
        </dependency>
        <dependency>
            <groupId>org.springframework.boot</groupId>
            <artifactId>spring-boot-starter-tomcat</artifactId>
            <scope>provided</scope>
        </dependency>
        <dependency>
            <groupId>org.springframework.boot</groupId>
            <artifactId>spring-boot-starter-test</artifactId>
            <scope>test</scope>
        </dependency>
        <dependency>
            <groupId>org.apache.shiro</groupId>
            <artifactId>shiro-core</artifactId>
            <version>1.2.3</version>
        </dependency>
        <dependency>
            <groupId>org.apache.shiro</groupId>
            <artifactId>shiro-spring</artifactId>
            <version>1.2.3</version>
        </dependency>
        <dependency>
            <groupId>com.alibaba</groupId>
            <artifactId>druid</artifactId>
            <version>1.0.20</version>
        </dependency>
        <!--常用的工具包-->
        <dependency>
            <groupId>org.apache.commons</groupId>
            <artifactId>commons-lang3</artifactId>
            <version>3.4</version>
        </dependency>
        <!--spring的上下文工具包-->
        <dependency>
            <groupId>org.springframework</groupId>
            <artifactId>spring-context-support</artifactId>
            <version>4.1.7.RELEASE</version>
        </dependency>
        <!--对jsp的处理-->
        <dependency>
            <groupId>org.apache.tomcat.embed</groupId>
            <artifactId>tomcat-embed-jasper</artifactId>
        </dependency>
        <dependency>
            <groupId>javax.servlet</groupId>
            <artifactId>jstl</artifactId>
        </dependency>
        <dependency>
            <groupId>javax.servlet</groupId>
            <artifactId>javax.servlet-api</artifactId>
        </dependency>
    </dependencies>
3、application.yml
server:
  port: 8010
  tomcat.uri-encoding: UTF-8

spring:
  datasource:
    type: com.alibaba.druid.pool.DruidDataSource
    driver-class-name: com.mysql.jdbc.Driver
    url: jdbc:mysql://localhost:3306/shiro?characterEncoding=UTF-8
    username: root
    password: 123456
  mvc:
    view:
      prefix: /WEB-INF/jsp/
      suffix: .jsp
mybatis:
  mapper-locations: mappers/*.xml
  # mapper.xml中的resultType中经常会用到一些自定义POJO,你可以用完全限定名来指定这些POJO的引用,例如
  #  <select id="getUsers" resultType="com.majing.learning.mybatis.entity.User">,
  # 又或者你可以通过在application.yml中指定POJO扫描包来让mybatis自动扫描到自定义POJO,如下:
  #  mybatis:type-aliases-package: com.majing.learning.mybatis.entity
  type-aliases-package: com.example.springbootshiro.pojo
三、项目设计
1、pojo层
User.java
public class User implements Serializable {
    private Integer uid;
    private String username;
    private String password;
    private Set<Role> roles = new HashSet<>();
}
Role.java
public class Role implements Serializable {
    private  Integer rid;
    private  String rname;
    private Set<Module> modules = new HashSet<>();
}
Module.java
public class Module implements Serializable {
    private  Integer mid;
    private  String mname;
}
2、dao层
UserMapper.java
import com.example.springbootshiro.pojo.User;
import org.springframework.stereotype.Repository;

@Repository
public interface UserMapper {
    User findByUserName(String username);
}
UserMapper.xml
<?xml version="1.0" encoding="UTF-8" ?>
<!DOCTYPE mapper
        PUBLIC "-//mybatis.org//DTD Mapper 3.0//EN"
        "http://mybatis.org/dtd/mybatis-3-mapper.dtd">
<mapper namespace="com.example.springbootshiro.dao.UserMapper">

    <resultMap id="userMap" type="com.example.springbootshiro.pojo.User">
        <id property="uid" column="uid"/>
        <result property="username" column="username"/>
        <result property="password" column="password"/>
        <collection property="roles" ofType="com.example.springbootshiro.pojo.Role">
            <id property="rid" column="rid"/>
            <result property="rname" column="rname"/>
            <collection property="modules" ofType="com.example.springbootshiro.pojo.Module">
                <id property="mid" column="mid"/>
                <result property="mname" column="mname"/>
            </collection>
        </collection>
    </resultMap>

    <select id="findByUserName" parameterType="string" resultMap="userMap">
        SELECT u.*,r.*,m.* FROM user u
        inner join user_role ur on ur.uid=u.uid
        inner join role r on r.rid=ur.rid
        inner join module_role mr on mr.rid=r.rid
        inner join module m on mr.mid=m.mid
        WHERE username=#{username};
    </select>

</mapper>

图中红框内可能会报错,但是依然可以正常运行。
3、service层
IUserService.Interface
public interface IUserService {
    User findByUserName(String username);
}
UserServiceImpl.java
@Service("iUserService")
public class UserServiceImpl implements IUserService {
    @Autowired
    private UserMapper userMapper;

    @Override
    public User findByUserName(String username) {
        return userMapper.findByUserName(username);
    }
}
4、controller层
TestController.java
@Controller
public class TestController {

    @RequestMapping("/login")
    public String login(){
        return "login";
    }

    @RequestMapping("/index")
    public String index(){
        return "index";
    }

    @RequestMapping("/unauthorized")
    public String unauthorized() {
        return "unauthorized";
    }

    /**
     * 拥有admin角色的人才能访问
     * @return
     */
    @RequestMapping("/admin")
    public String admin(){
        return "admin";
    }

    /**
     * 拥有update权限的人才能访问
     * @return
     */
    @RequestMapping("/update")
    public String update(){
        return "update";
    }


    @RequestMapping("/logout")
    public String logout(){
        Subject subject = SecurityUtils.getSubject();//取出当前验证主体
        if(subject != null){
            subject.logout(); //执行一次logout的操作,将session全部清空
        }
        return "login";
    }

    /**
     *  整个form表单的验证流程:
     *  将登陆的用户/密码传入UsernamePasswordToken,当调用subject.login(token)开始,
     *  调用Relam的doGetAuthenticationInfo方法,开始密码验证
     *  此时这个时候执行我们自己编写的CredentialMatcher(密码匹配器),
     *  执行doCredentialsMatch方法,具体的密码比较实现在这实现
     */
    @RequestMapping(value = "/loginUser")
    public String loginUser(@RequestParam("username") String username,
                            @RequestParam("password") String password,
                            HttpSession session) {
        UsernamePasswordToken token = new UsernamePasswordToken(username, password);
        Subject subject = SecurityUtils.getSubject();
        try {
            subject.login(token); //登陆成功的话,放到session中
            User user = (User) subject.getPrincipal();
            session.setAttribute("user", user);
            return "index";
        }catch (Exception e) {
            return "login";
        }
    }
}
5、jsp页面
login.jsp(登录页面)
<%@ page contentType="text/html;charset=UTF-8" language="java" %>
<html>
<head>
    <title>login</title>
</head>
<body>
<form action="/loginUser" method="post">
    <input type="text" name="username"> <br>
    <input type="password" name="password"> <br>
    <input type="submit" value="提交">
</form>
</body>
</html>
index.jsp(登录成功后跳转的页面)
<%@ page contentType="text/html;charset=UTF-8" language="java" %>
<html>
<head>
    <title>登录</title>
</head>
<body>
<h1> 欢迎登录, ${user.username} </h1>
</body>
</html>
unauthorized.jsp (无权访问跳转的页面)
<%@ page contentType="text/html;charset=UTF-8" language="java" %>
<html>
<head>
    <title>Title</title>
</head>
<body>
Unauthorized!
</body>
</html>
admin.jsp
<%@ page contentType="text/html;charset=UTF-8" language="java" %>
<html>
<head>
    <title>admin</title>
</head>
<body>
admin!
</body>
</html>
update.jsp
<%@ page contentType="text/html;charset=UTF-8" language="java" %>
<html>
<head>
    <title>update</title>
</head>
<body>
update!
</body>
</html>
四、配置Shiro
1、核心配置类:ShiroConfiguration.java
import org.apache.shiro.mgt.SecurityManager;
import org.apache.shiro.spring.LifecycleBeanPostProcessor;
import org.apache.shiro.spring.security.interceptor.AuthorizationAttributeSourceAdvisor;
import org.apache.shiro.spring.web.ShiroFilterFactoryBean;
import org.apache.shiro.web.mgt.DefaultWebSecurityManager;
import org.springframework.aop.framework.autoproxy.DefaultAdvisorAutoProxyCreator;
import org.springframework.beans.factory.annotation.Qualifier;
import org.springframework.context.annotation.Bean;
import org.springframework.context.annotation.Configuration;

import java.util.LinkedHashMap;

@Configuration
public class ShiroConfiguration {

    /**
     *  @Qualifier("XXX") Spring的Bean注入配置注解,该注解指定注入的Bean的名称,
     *  Spring框架使用byName方式寻找合格的bean,这样就消除了byType方式产生的歧义。
     */
    @Bean("shiroFilter")
    public ShiroFilterFactoryBean shiroFilter(@Qualifier("securityManager") SecurityManager manager) {
        ShiroFilterFactoryBean bean = new ShiroFilterFactoryBean();
        System.out.println(bean);
        bean.setSecurityManager(manager);

        bean.setLoginUrl("/login"); //提供登录到url
        bean.setSuccessUrl("/index"); //提供登陆成功的url
        bean.setUnauthorizedUrl("/unauthorized");

        /**
         * 可以看DefaultFilter,这是一个枚举类,定义了很多的拦截器authc,anon等分别有对应的拦截器
         */
        //配置访问权限
        LinkedHashMap<String, String> filterChainDefinitionMap = new LinkedHashMap<>();
        filterChainDefinitionMap.put("/index", "authc"); //代表着前面的url路径,用后面指定的拦截器进行拦截
        filterChainDefinitionMap.put("/login", "anon");
        filterChainDefinitionMap.put("/loginUser", "anon");
        filterChainDefinitionMap.put("/admin", "roles[admin]"); //admin的url,要用角色是admin的才可以登录,对应的拦截器是RolesAuthorizationFilter
        filterChainDefinitionMap.put("/update", "perms[update]"); //拥有update权限的用户才有资格去访问
        //filterChainDefinitionMap.put("/druid/**", "anon"); //所有的druid请求,不需要拦截,anon对应的拦截器不会进行拦截
        filterChainDefinitionMap.put("/**", "user"); //所有的路径都拦截,被UserFilter拦截,这里会判断用户有没有登陆
        bean.setFilterChainDefinitionMap(filterChainDefinitionMap);//设置一个拦截器链

        return bean;
    }

    /**
     * 定义安全管理器securityManager,注入自定义的realm
     * @param authRealm
     * @return
     */
    @Bean("securityManager")
    public SecurityManager securityManager(@Qualifier("authRealm") AuthRealm authRealm) {
        //这个DefaultWebSecurityManager构造函数,会对Subject,realm等进行基本的参数注入
        DefaultWebSecurityManager manager = new DefaultWebSecurityManager();
        manager.setRealm(authRealm);//往SecurityManager中注入Realm,代替原本的默认配置
        return manager;
    }


    //自定义的Realm
    @Bean("authRealm")
    //@DependsOn("lifecycleBeanPostProcessor") //可选
    public AuthRealm authRealm(@Qualifier("credentialsMatcher") CredentialMatcher matcher) {
        AuthRealm authRealm = new AuthRealm();
        //这边可以选择是否将认证的缓存到内存中,现在有了这句代码就将认证信息缓存的内存中了
        //authRealm.setCacheManager(new MemoryConstrainedCacheManager());
        //最简单的情况就是明文直接匹配,然后就是加密匹配,这里的匹配工作则就是交给CredentialsMatcher来完成
        authRealm.setCredentialsMatcher(matcher);
        return authRealm;
    }

    /**
     * Realm在验证用户身份的时候,要进行密码匹配
     * 最简单的情况就是明文直接匹配,然后就是加密匹配,这里的匹配工作则就是交给CredentialsMatcher来完成
     * 支持任意数量的方案,包括纯文本比较、散列比较和其他方法。除非该方法重写,否则默认值为
     * @return
     */
    @Bean("credentialsMatcher")
    public CredentialMatcher credentialsMatcher() {
        CredentialMatcher credentialsMatcher = new CredentialMatcher();
        return credentialsMatcher;
    }


    /**
     * 配置shiro跟spring的关联
     * 以下AuthorizationAttributeSourceAdvisor,DefaultAdvisorAutoProxyCreator两个类是为了支持shiro注解
     * @param securityManager
     * @return
     */
    @Bean
    public AuthorizationAttributeSourceAdvisor authorizationAttributeSourceAdvisor(@Qualifier("securityManager") SecurityManager securityManager) {
        AuthorizationAttributeSourceAdvisor advisor = new AuthorizationAttributeSourceAdvisor();
        advisor.setSecurityManager(securityManager);
        return advisor;
    }

    /**
     * Spring的一个bean , 由Advisor决定对哪些类的方法进行AOP代理
     * @return
     */
    @Bean
    public DefaultAdvisorAutoProxyCreator defaultAdvisorAutoProxyCreator() {
        DefaultAdvisorAutoProxyCreator creator = new DefaultAdvisorAutoProxyCreator();
        creator.setProxyTargetClass(true);
        return creator;
    }

    /**
     * lifecycleBeanPostProcessor是负责生命周期的 , 初始化和销毁的类
     * (可选)
     * @return
     */
    @Bean("lifecycleBeanPostProcessor")
    public LifecycleBeanPostProcessor lifecycleBeanPostProcessor() {
        return new LifecycleBeanPostProcessor();
    }

}
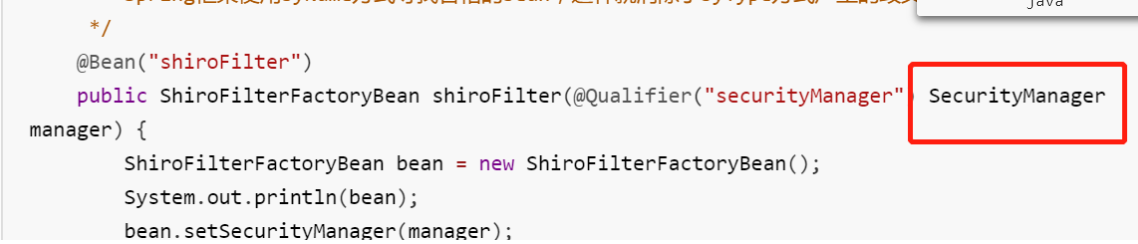
这个SecurityManager的导包是org.apache.shiro.mgt.SecurityManager,不要导了java的包。
2、自定义域:AuthRealm.java
编写AuthRealm完成根据用户名去数据库的查询,并且将用户信息放入shiro中,供核心配置类:ShiroConfiguration调用。有认证与授权的方法。
import com.example.springbootshiro.pojo.Module;
import com.example.springbootshiro.pojo.Role;
import com.example.springbootshiro.pojo.User;
import com.example.springbootshiro.service.IUserService;
import org.apache.shiro.authc.*;
import org.apache.shiro.authz.AuthorizationInfo;
import org.apache.shiro.authz.SimpleAuthorizationInfo;
import org.apache.shiro.realm.AuthorizingRealm;
import org.apache.shiro.subject.PrincipalCollection;
import org.springframework.beans.factory.annotation.Autowired;

import java.util.*;

//AuthenticatingRealm是抽象类,用于认证授权
public class AuthRealm extends AuthorizingRealm {

    @Autowired
    private IUserService iUserService;

    /**
     * 用户授权
     * @param principals
     * @return
     */
    @Override
    protected AuthorizationInfo doGetAuthorizationInfo(PrincipalCollection principals) {
        //获取前端输入的用户信息,封装为User对象
        User userweb = (User) principals.getPrimaryPrincipal();
        //获取前端输入的用户名
        String username = userweb.getUsername();
        //根据前端输入的用户名查询数据库中对应的记录
        User user = iUserService.findByUserName(username);
        if(user != null){
            SimpleAuthorizationInfo info = new SimpleAuthorizationInfo();
            //因为addRoles和addStringPermissions方法需要的参数类型是Collection
            //所以先创建两个collection集合
            Collection<String> rolesCollection = new HashSet<String>();
            Collection<String> perStringCollection = new HashSet<String>();
            //获取user的Role的set集合
            Set<Role> roles = user.getRoles();
            //遍历集合
            for (Role role : roles){
                //将每一个role的name装进collection集合
                rolesCollection.add(role.getRname());
                //获取每一个Role的permission的set集合
                Set<Module> permissionSet =  role.getModules();
                //遍历集合
                for (Module permission : permissionSet){
                    //将每一个permission的name装进collection集合
                    perStringCollection.add(permission.getMname());
                    System.out.println(permission.getMname());
                }
                //为用户授权
                info.addStringPermissions(perStringCollection);
            }
            //为用户授予角色
            info.addRoles(rolesCollection);
            return info;

        }
        return null;
    }

    /**
     * 用于认证登录,认证接口实现方法,该方法的回调一般是通过subject.login(token)方法来实现的
     * AuthenticationToken 用于收集用户提交的身份(如用户名)及凭据(如密码):
     * AuthenticationInfo是包含了用户根据username返回的数据信息,用于在匹马比较的时候进行相互比较
     *
     * shiro的核心是java servlet规范中的filter,通过配置拦截器,使用拦截器链来拦截请求,如果允许访问,则通过。
     * 通常情况下,系统的登录、退出会配置拦截器。登录的时候,调用subject.login(token),token是用户验证信息,
     * 这个时候会在Realm中doGetAuthenticationInfo方法中进行认证。这个时候会把用户提交的验证信息与数据库中存储的认证信息,将所有的数据拿到,在匹配器中进行比较
     * 这边是我们自己实现的CredentialMatcher类的doCredentialsMatch方法,返回true则一致,false则登陆失败
     * 退出的时候,调用subject.logout(),会清除回话信息
     * @param token
     * @return
     * @throws AuthenticationException
     */
    @Override
    protected AuthenticationInfo doGetAuthenticationInfo(AuthenticationToken token) throws AuthenticationException {
        //token携带了用户信息
        UsernamePasswordToken usernamePasswordToken = (UsernamePasswordToken) token;
        //获取前端输入的用户名
        String username  = usernamePasswordToken.getUsername();
        //根据用户名查询数据库中对应的记录
        User user = iUserService.findByUserName(username);

        /*//当前realm对象的name
        String realmName = getName();
        //盐值
        ByteSource credentialsSalt = ByteSource.Util.bytes(user.getUsername());
        //封装用户信息,构建AuthenticationInfo对象并返回
        AuthenticationInfo authcInfo = new SimpleAuthenticationInfo(user, user.getPassword(),
                credentialsSalt, realmName);*/
        return new SimpleAuthenticationInfo(user,user.getPassword(),this.getClass().getName());
    }

}
3、数据库密码为明文时密码匹配类:CredentialMatcher.java
import org.apache.shiro.authc.AuthenticationInfo;
import org.apache.shiro.authc.AuthenticationToken;
import org.apache.shiro.authc.UsernamePasswordToken;
import org.apache.shiro.authc.credential.SimpleCredentialsMatcher;

public class CredentialMatcher extends SimpleCredentialsMatcher {
    @Override
    public boolean doCredentialsMatch(AuthenticationToken token, AuthenticationInfo info) {
        UsernamePasswordToken utoken=(UsernamePasswordToken) token;
        //获得用户输入的密码:(可以采用加盐(salt)的方式去检验)
        String inPassword = new String(utoken.getPassword());
        //获得数据库中的密码
        String dbPassword=(String) info.getCredentials();
        //进行密码的比对
        return this.equals(inPassword, dbPassword);
    }
}
4、数据库为加密加盐时
authRealm引用的密码匹配需要更换。

以下密码匹配直接写在核心配置类:ShiroConfiguration.java中
    /**
     * 密码校验规则HashedCredentialsMatcher
     * 这个类是为了对密码进行编码的 ,
     * 防止密码在数据库里明码保存 , 当然在登陆认证的时候 ,
     * 这个类也负责对form里输入的密码进行编码
     * 处理认证匹配处理器:如果自定义需要实现继承HashedCredentialsMatcher
     */
    @Bean("hashedCredentialsMatcher")
    public HashedCredentialsMatcher hashedCredentialsMatcher() {
        HashedCredentialsMatcher credentialsMatcher = new HashedCredentialsMatcher();
        //指定加密方式为MD5
        credentialsMatcher.setHashAlgorithmName("MD5");
        //加密次数
        credentialsMatcher.setHashIterations(1024);
        credentialsMatcher.setStoredCredentialsHexEncoded(true);
        return credentialsMatcher;
    }
附上明文转密文的代码:
public static void main(String[] args) {
        String hashAlgorithName = "MD5";
        String password = "登录时输入的密码";
        int hashIterations = 1;//加密次数
        ByteSource credentialsSalt = ByteSource.Util.bytes("登录时输入的用户名");
        Object obj = new SimpleHash(hashAlgorithName, password, credentialsSalt, hashIterations);
        System.out.println(obj);
    }