仅作为入门测试。。。。。。
使用maven项目
<!-- 上传文件的支持 -->
    <dependency>
      <groupId>commons-fileupload</groupId>
      <artifactId>commons-fileupload</artifactId>
      <version>1.3.1</version>
    </dependency>
    <dependency>
      <groupId>commons-io</groupId>
      <artifactId>commons-io</artifactId>
      <version>2.4</version>
    </dependency>
    <dependency>
      <groupId>commons-codec</groupId>
      <artifactId>commons-codec</artifactId>
      <version>1.10</version>
    </dependency>
    <!-- org.json -->
    <!--JSON is a light-weight, language independent, data interchange format. See http://www.JSON.org/-->
    <dependency>
      <groupId>org.json</groupId>
      <artifactId>json</artifactId>
      <version>20160212</version>
    </dependency>

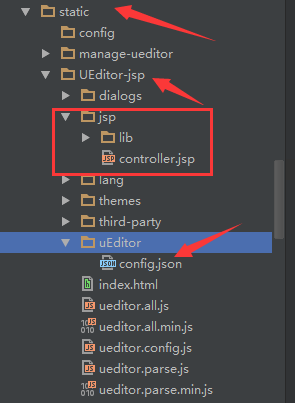
在此我将它们都放在/webapp/static/UEditor-jsp目录下,进行搞事情,毕竟需要弄清楚路径的配置。
新增jsp页面
<script src="/static/UEditor-jsp/ueditor.config.js"></script>
<script src="/static/UEditor-jsp/ueditor.all.min.js"></script>
<script src="/static/UEditor-jsp/lang/zh-cn/zh-cn.js"></script>
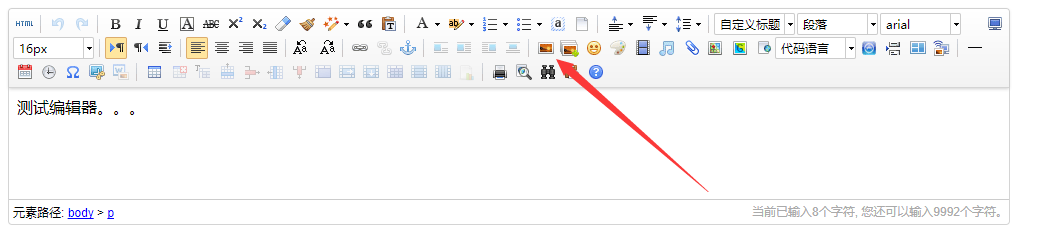
<script id="container" name="content" type="text/plain">测试编辑器。。。</script>
<script type="text/javascript">
var editor = UE.getEditor('container');
</script>
修改 ueditor.config.js 服务器请求接口路径

默认请求地址为jsp/controller.jsp
<%@ page language="java" contentType="text/html; charset=UTF-8"
	import="com.baidu.ueditor.ActionEnter"
    pageEncoding="UTF-8"%>
<%@ page trimDirectiveWhitespaces="true" %>
<%

    request.setCharacterEncoding( "utf-8" );
	response.setHeader("Content-Type" , "text/html");

	String rootPath = application.getRealPath( "/" );

	out.write( new ActionEnter( request, rootPath ).exec() );

%>
请求地址改为springMVC的请求路径,基本完全照搬翻译。
@Controller
@RequestMapping("/uEditor")
public class UEditorController {

    @RequestMapping(value = "/config")
    public void config(HttpServletRequest request, HttpServletResponse response) {
        response.setContentType("application/json");
   //     String rootPath = request.getSession()
                .getServletContext().getRealPath("/");  修改如下
        String rootPath = request.getSession()
                .getServletContext().getRealPath("/static/UEditor-jsp");
        try {
            String exec = new ActionEnter(request, rootPath).exec();
            PrintWriter writer = response.getWriter();
            writer.write(exec);
            writer.flush();
            writer.close();
        } catch (IOException e) {
            e.printStackTrace();
        }
    }
}
如下是获取config.json 配置的方式
ConfigManager

跟踪代码
String exec = new ActionEnter(request, rootPath).exec();

----->

this.configManager = ConfigManager.getInstance( this.rootPath, this.contextPath, request.getRequestURI() );

----->

private ConfigManager ( String rootPath, String contextPath, String uri ) throws FileNotFoundException, IOException {

	rootPath = rootPath.replace( "\", "/" );

	this.rootPath = rootPath;
	this.contextPath = contextPath;

// 路径会稍有不一样,请各自调试查看
	if ( contextPath.length() > 0 ) {
		this.originalPath = this.rootPath + uri.substring( contextPath.length() );
	} else {
		this.originalPath = this.rootPath + uri;
	}

	this.initEnv();

}


------>

initEnv()

------>

private void initEnv () throws FileNotFoundException, IOException {

	File file = new File( this.originalPath );

	if ( !file.isAbsolute() ) {
		file = new File( file.getAbsolutePath() );
	}

	this.parentPath = file.getParent();

	String configContent = this.readFile( this.getConfigPath() );
// 此处再次进行路径更改获取到的是 parent

	try{
		JSONObject jsonConfig = new JSONObject( configContent );
		this.jsonConfig = jsonConfig;
	} catch ( Exception e ) {
		this.jsonConfig = null;
	}

}
最后根据返回的路径将config,json 移动到相应的目录,此处根据个人情况特殊进行操作。
在此就可以进行图片的上传了。
不过还需要修改配置中的路径配置,否则会上传成功却不能显示。

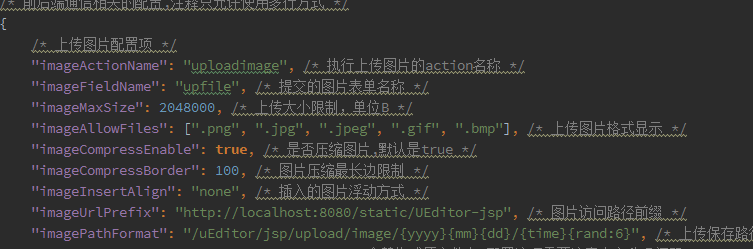
默认路径:
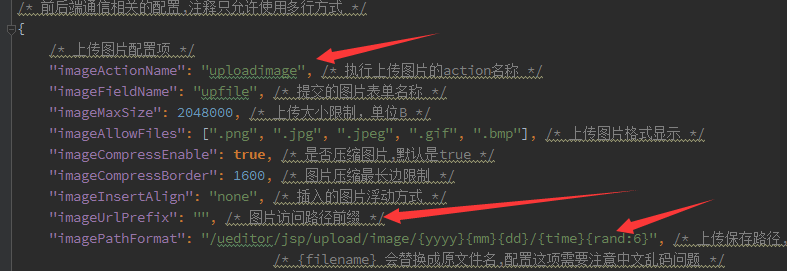
修改如下,主要修改 imageUrlPrefix imagePathFormat