---恢复内容开始---
在Android布局中,有五种常用的布局,下面我们就来学习一下这几种布局的使用方式
1) 线性布局:LinearLayout
2) 帧布局: FrameLayout
3) 相对布局: RelativeLayout
4) 表格布局: TableLayout
5) 绝对布局: AbsoluteLayout(此布局官方不推荐使用)
6)GridLayout(此布局为4.0系统以后新推出的布局)
1. 线性布局
属性说明
| 属性 | 描述 |
| wrap_content | 填满父控件的空白 |
| fill_parent match_parent |
表示大小刚好足够显示当前控件里的内容Android中fill_parent和match_parent是一样的。 在Android2.2中启动match_parent,不用fill_parent |
android:layout_weight权重的描述:
layout_weight 用于给一个线性布局中的诸多视图的重要度赋值。 所有的视图都有一个layout_weight值,默认为零,意思是需要显示多大的视图就占据多大的屏幕空间。若赋一个高于零的值,则将父视图中的可用空间分割,分割大小具体取决于每一个视图的layout_weight 值以及该值在当前屏幕布局的整体 layout_weight值和在其它视图屏幕布局的layout_weight值中所占的比率而定。
[注意]:在进行权重的设计时,如果两个控件的权重比例不是一样的,要留意android:layout_width 属性,如果设计成:"wrap_content" 当文本字体很多的时候,权重就无效了,所以如果要防止这种情况发生,建议直接设置成:android:layout_width="0dp"
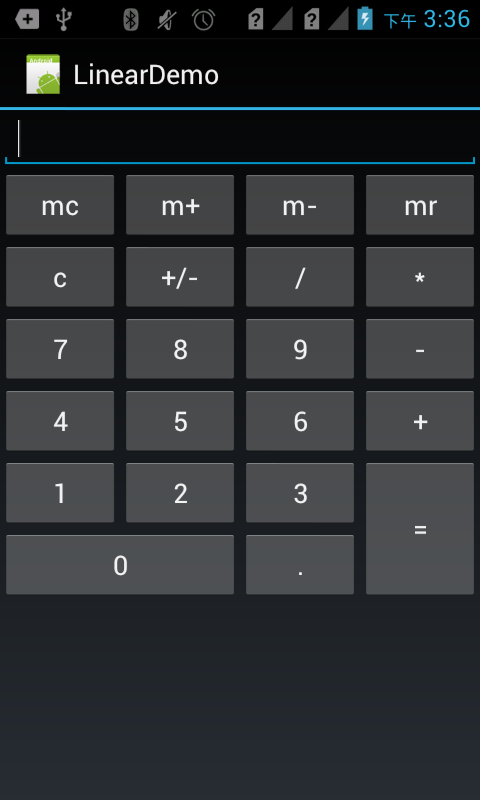
程序Demo:
<?xml version="1.0" encoding="utf-8"?>
<LinearLayout xmlns:android="http://schemas.android.com/apk/res/android"
    android:layout_width="fill_parent"
    android:layout_height="fill_parent"
    android:orientation="vertical" >

    <EditText
        android:id="@+id/msg"
        android:layout_width="fill_parent"
        android:layout_height="wrap_content" />

    <LinearLayout
        android:layout_width="fill_parent"
        android:layout_height="wrap_content"
        android:orientation="horizontal" >

        <Button
            android:layout_width="fill_parent"
            android:layout_height="wrap_content"
            android:layout_weight="1"
            android:text="mc" />

        <Button
            android:layout_width="fill_parent"
            android:layout_height="wrap_content"
            android:layout_weight="1"
            android:text="m+" />

        <Button
            android:layout_width="fill_parent"
            android:layout_height="wrap_content"
            android:layout_weight="1"
            android:text="m-" />

        <Button
            android:layout_width="fill_parent"
            android:layout_height="wrap_content"
            android:layout_weight="1"
            android:text="mr" />
    </LinearLayout>

    <LinearLayout
        android:layout_width="fill_parent"
        android:layout_height="wrap_content"
        android:orientation="horizontal" >

        <Button
            android:layout_width="fill_parent"
            android:layout_height="wrap_content"
            android:layout_weight="1"
            android:text="c" />

        <Button
            android:layout_width="fill_parent"
            android:layout_height="wrap_content"
            android:layout_weight="1"
            android:text="+/-" />

        <Button
            android:layout_width="fill_parent"
            android:layout_height="wrap_content"
            android:layout_weight="1"
            android:text="/" />

        <Button
            android:layout_width="fill_parent"
            android:layout_height="wrap_content"
            android:layout_weight="1"
            android:text="*" />
    </LinearLayout>

    <LinearLayout
        android:layout_width="fill_parent"
        android:layout_height="wrap_content"
        android:orientation="horizontal" >

        <Button
            android:layout_width="fill_parent"
            android:layout_height="wrap_content"
            android:layout_weight="1"
            android:text="7" />

        <Button
            android:layout_width="fill_parent"
            android:layout_height="wrap_content"
            android:layout_weight="1"
            android:text="8" />

        <Button
            android:layout_width="fill_parent"
            android:layout_height="wrap_content"
            android:layout_weight="1"
            android:text="9" />

        <Button
            android:layout_width="fill_parent"
            android:layout_height="wrap_content"
            android:layout_weight="1"
            android:text="-" />
    </LinearLayout>

    <LinearLayout
        android:layout_width="fill_parent"
        android:layout_height="wrap_content"
        android:orientation="horizontal" >

        <Button
            android:layout_width="fill_parent"
            android:layout_height="wrap_content"
            android:layout_weight="1"
            android:text="4" />

        <Button
            android:layout_width="fill_parent"
            android:layout_height="wrap_content"
            android:layout_weight="1"
            android:text="5" />

        <Button
            android:layout_width="fill_parent"
            android:layout_height="wrap_content"
            android:layout_weight="1"
            android:text="6" />

        <Button
            android:layout_width="fill_parent"
            android:layout_height="wrap_content"
            android:layout_weight="1"
            android:text="+" />
    </LinearLayout>

    <LinearLayout
        android:layout_width="fill_parent"
        android:layout_height="wrap_content"
        android:orientation="horizontal" >

        <LinearLayout
            android:layout_width="wrap_content"
            android:layout_height="wrap_content"
            android:layout_weight="3"
            android:orientation="vertical" >

            <LinearLayout
                android:layout_width="fill_parent"
                android:layout_height="wrap_content"
                android:orientation="horizontal" >

                <Button
                    android:layout_width="fill_parent"
                    android:layout_height="wrap_content"
                    android:layout_weight="1"
                    android:text="1" />

                <Button
                    android:layout_width="fill_parent"
                    android:layout_height="wrap_content"
                    android:layout_weight="1"
                    android:text="2" />

                <Button
                    android:layout_width="fill_parent"
                    android:layout_height="wrap_content"
                    android:layout_weight="1"
                    android:text="3" />
            </LinearLayout>

            <LinearLayout
                android:layout_width="fill_parent"
                android:layout_height="wrap_content"
                android:orientation="horizontal" >

                <Button
                    android:layout_width="0dp"
                    android:layout_height="wrap_content"
                    android:layout_weight="2"
                    android:text="0" />

                <Button
                    android:layout_width="0dp"
                    android:layout_height="wrap_content"
                    android:layout_weight="1"
                    android:text="." />
            </LinearLayout>
        </LinearLayout>

        <LinearLayout
            android:layout_width="wrap_content"
            android:layout_height="fill_parent"
            android:layout_weight="1"
            android:orientation="horizontal" >

            <Button
                android:layout_width="fill_parent"
                android:layout_height="fill_parent"
                android:layout_weight="1"
                android:text="=" />
        </LinearLayout>
    </LinearLayout>

</LinearLayout>

2. 帧布局
帧布局是最简单的布局方式、所有添加到这个布局中的视图都是以层叠的方式显示。第一个添加到框架布局中的视图显示在最底层,最后一个被放在最顶层,上一层的视图会覆盖下一层的视图,因此框架布局类似堆栈布局。
| 属性值 | 描述 |
| top | 将视图放到屏幕的顶端 |
| Buttom | 将视图放到屏幕的底端 |
| Left | 将视图放在屏幕的左侧 |
| Right | 将视图放在屏幕的右侧 |
| Center_vertical | 将视图按照垂直方向居中显示 |
| horizontal_vertical | 将视图按照水平方向居中显示 |
程序Demo:
<?xml version="1.0" encoding="utf-8"?>
<FrameLayout xmlns:android="http://schemas.android.com/apk/res/android"
    android:layout_width="fill_parent"
    android:layout_height="fill_parent"
    android:orientation="vertical" >

    <ImageView
        android:layout_width="fill_parent"
        android:layout_height="wrap_content"
        android:layout_gravity="center"
        android:background="@drawable/bre" />

    <ImageView
        android:layout_width="63dp"
        android:layout_height="46dp"
        android:layout_marginTop="80dp"
        android:background="@drawable/one" />

    <ImageView
        android:layout_width="85dp"
        android:layout_height="85dp"
        android:layout_marginTop="80dp"
        android:background="@drawable/two"
        android:layout_gravity="center"
        android:layout_marginBottom="80dp" />

</FrameLayout>

3. 相对布局
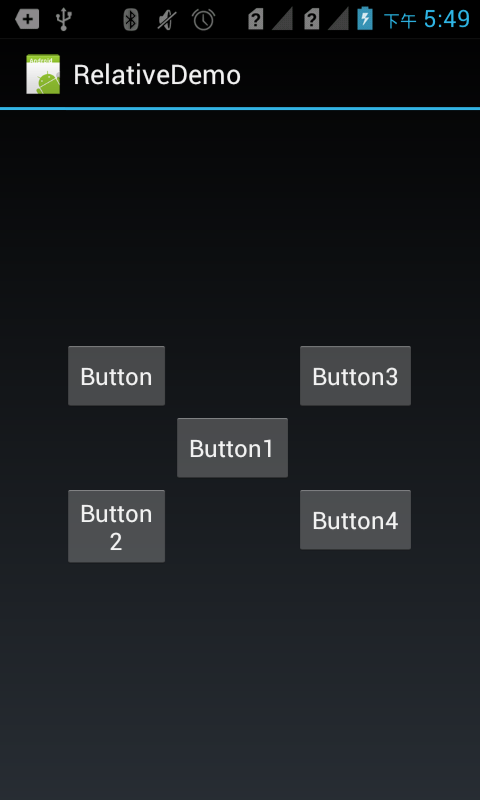
RelativeLayout可以设置某一个视图相对于其他视图的位置,这些位置可以包括上下左右等

程序Demo:
<?xml version="1.0" encoding="utf-8"?>
<RelativeLayout xmlns:android="http://schemas.android.com/apk/res/android"
    android:layout_width="fill_parent"
    android:layout_height="fill_parent"
    android:gravity="center" >

    <Button
        android:id="@+id/button"
        android:layout_width="wrap_content"
        android:layout_height="wrap_content"
        android:text="Button"
        android:textSize="16dp" />

    <Button
        android:id="@+id/button1"
        android:layout_width="wrap_content"
        android:layout_height="wrap_content"
        android:layout_below="@id/button"
        android:layout_toRightOf="@id/button"
        android:text="Button1"
        android:textSize="16dp" />

    <Button
        android:id="@+id/button2"
        android:layout_width="wrap_content"
        android:layout_height="wrap_content"
        android:layout_below="@id/button1"
        android:layout_toLeftOf="@id/button1"
        android:text="Button2"
        android:textSize="16dp" />

    <Button
        android:id="@+id/button3"
        android:layout_width="wrap_content"
        android:layout_height="wrap_content"
        android:layout_above="@id/button1"
        android:layout_toRightOf="@id/button1"
        android:text="Button3"
        android:textSize="16dp" />

    <Button
        android:id="@+id/button4"
        android:layout_width="wrap_content"
        android:layout_height="wrap_content"
        android:layout_below="@id/button1"
        android:layout_toRightOf="@id/button1"
        android:text="Button4"
        android:textSize="16dp" />

</RelativeLayout>

4. 表格布局
在TableLayout布局中,一个列的宽度由该列中最宽的那个单元格指定,而表格的宽度是由父容器指定的。
在TableLayout中,可以为列设置三种属性:
1) Shrinkable: 如果一个列被标识为Shrinkable,则该列的宽度可以进行收缩,以使表格能够适应其父容器的大小。
2) Stretchable:如果一个列被标识为Stretchable,则该列的宽度可以进行拉伸,以使填满表格中的空闲空间。
3) Collapsed: 如果一个列被标识为Collapsed,则该列会被隐藏
注意:一个列可以同时具有Shrinkable属性和Stretchable属性,在这种情况下,该列的宽度将任意拉伸或收缩以适应父容器
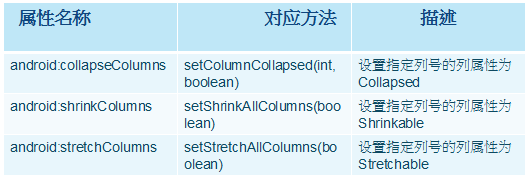
TableLayout继承自LinearLayout类,除了继承来自父类的属性和方法,TableLayout类中还包含表格布局所特有的属性和方法,如下表:

注意:TableLayout中所谓的列序号是从0开始计算的。setShrinkAllColumns和setStretchAllColumns实现的功能是将表格中的所有列设置为Shrinkable或Stretchable。
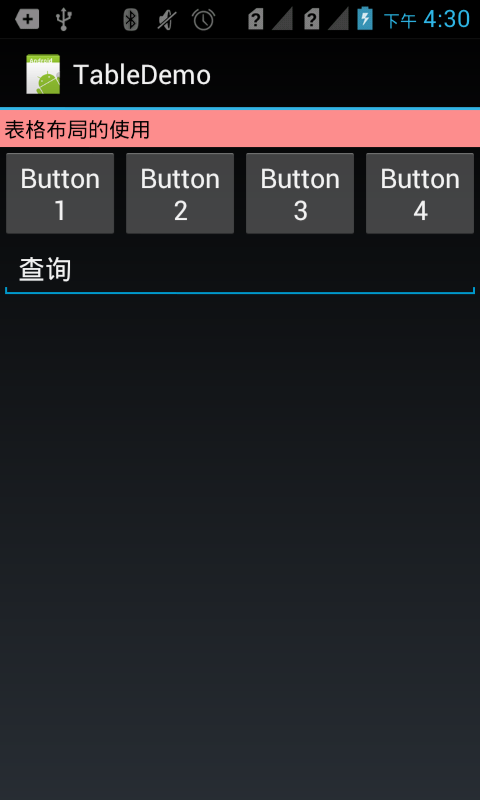
程序Demo:
<?xml version="1.0" encoding="utf-8"?>
<LinearLayout xmlns:android="http://schemas.android.com/apk/res/android"
    android:layout_width="fill_parent"
    android:layout_height="fill_parent"
    android:orientation="vertical" >

    <TableLayout
        android:id="@+id/tablelayout1"
        android:layout_width="fill_parent"
        android:layout_height="wrap_content"
        android:background="#FFFFFF"
        android:stretchColumns="0" >

        <TableRow
            android:id="@+id/tablerow1"
            android:layout_width="fill_parent"
            android:layout_height="wrap_content" >

            <TextView
                android:id="@+id/textview1"
                android:layout_width="wrap_content"
                android:layout_height="wrap_content"
                android:layout_centerInParent="true"
                android:background="#fd8d8d"
                android:padding="4px"
                android:text="表格布局的使用"
                android:textColor="#000000" />
        </TableRow>
    </TableLayout>

    <TableLayout
        android:id="@+id/tablelayout2"
        android:layout_width="fill_parent"
        android:layout_height="wrap_content"
        android:stretchColumns="0,1,2,3" >

        <TableRow
            android:id="@+id/tablerow2"
            android:layout_width="fill_parent"
            android:layout_height="wrap_content" >

            <Button
                android:id="@+id/button1"
                android:layout_width="0dp"
                android:layout_height="wrap_content"
                android:layout_weight="1"
                android:text="Button1" />

            <Button
                android:id="@+id/button1"
                android:layout_width="0dp"
                android:layout_height="wrap_content"
                android:layout_weight="1"
                android:text="Button2" />

            <Button
                android:id="@+id/button1"
                android:layout_width="0dp"
                android:layout_height="wrap_content"
                android:layout_weight="1"
                android:text="Button3" />

            <Button
                android:id="@+id/button1"
                android:layout_width="0dp"
                android:layout_height="wrap_content"
                android:layout_weight="1"
                android:text="Button4" />
        </TableRow>
    </TableLayout>

    <TableLayout
        android:id="@+id/tablelayout3"
        android:layout_width="fill_parent"
        android:layout_height="wrap_content"
        android:stretchColumns="0" >

        <TableRow
            android:id="@+id/tablerow3"
            android:layout_width="fill_parent"
            android:layout_height="wrap_content" >

            <EditText
                android:layout_width="fill_parent"
                android:layout_height="fill_parent"
                android:text="查询" />
        </TableRow>
    </TableLayout>

</LinearLayout>
