最近项目用到了protobuf,使用起来不难,有些细节地方简单记录下
1. protobuf介绍
Protobuf(Google Protocol Buffers)是google开发的的一套用于数据存储,网络通信时用于协议编解码的工具库.它和XML和Json数据差不多,把数据已某种形式保存起来.Protobuf相对与XML和Json的不同之处,它是一种二进制的数据格式,具有更高的传输,打包和解包效率。另外c++,java和python都可以解析Protobuf的数据,工作中可以用来在不同语言间进行数据交互。
2. python使用protobuf
2.1 下载和安装protubuf
下载地址:https://github.com/protocolbuffers/protobuf/releases
从上面链接中下载对应的版本并解压,将bin目录添加到环境变量。随后命令行输入如下命令,查看protoc版本,验证是否安装成功
protoc --version #查看protoc的版本
2.2 编写.proto格式文件
官方文档:https://developers.google.com/protocol-buffers/docs/overview
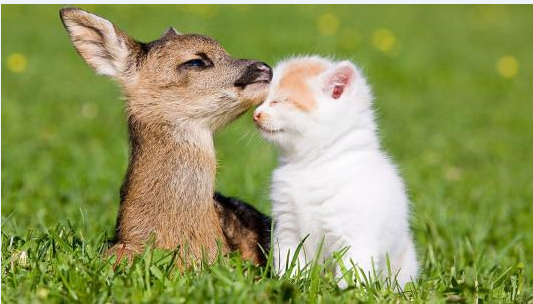
根据protobuf的语法规则,编写一个proto文件,制定协议和规则,规定数据的格式和类型。例如在做目标检测时,下面图片中有两个目标(鹿和猫),对于检测返回的数据格式,可以制定一个proto文件,命名为TargetDetection.proto,其格式如下:


syntax = "proto3";
/* option optimize_for = LITE_RUNTIME; */
package TargetDetection.proto;

/* 矩形 */
message Rect {
    int32 x1 = 1; //矩形左上角的X坐标
    int32 y1 = 2; //矩形左上角的Y坐标
    int32 x2 = 3; //矩形右下角的X坐标
    int32 y2 = 4; //矩形右下角的Y坐标
}


/*目标的信息*/
message TargetInfo{
    int32 targetId = 1;    //目标编号
    Rect box = 2;           //目标在图片中的位置
    float boxScore = 3;     //目标检测的分数
    string labelType = 4;   //目标的分类
    bytes imageData = 5;    //将目标裁剪后保存成图片数据
    string imageType = 6;   //图片类型: jpg, png...
    string otherData= 9;    //其他备注信息
}

/* 目标检测 */
message TargetDetection{
    string ImageName = 1;        //图片名称
    int64 timestamp = 2;        //时间戳
    int32 width = 3;        //图片宽度
    int32 height = 4;        //图片高度
    repeated TargetInfo TargetList = 5; //目标列表
}
2.3 编译.proto输出py文件
写好TargetDetection.proto协议文件后,就可以导出成python可以使用的文件。在命令行输入如下命令,读取TargetDetection.proto文件,在当前路径下会生成一个TargetDetection_pb2.py,利用这个文件就可以进行数据序列化了
protoc ./TargetDetection.proto --python_out=./ #--python_out表示生成TargetDetection_pb2.py文件的存放路径,通过-h可以查看相关参数
2.4 python进行序列化和反序列化
在python中使用protobuf,还需要安装python对应的protobuf包(否则会报错:No module named goofgle):
pip install protobuf==3.12.0
有了TargetDetection_pb2.py文件就可以愉快的使用了,当得到模型检测数据后,可以进行序列化并传输出去
下面是对模型检测数据的序列化:
import TargetDetection_pb2
import time
import cv2
import os
import zmq

def serialize(detection_data, img_dir=r"./"):
    detection_event = TargetDetection_pb2.TargetDetection()  #创建一个detection检测事件
    detection_event.ImageName = detection_data["img_name"]
    detection_event.timestamp = int(detection_data["timestamp"])  #协议定义的int64
    detection_event.width = detection_data["width"]
    detection_event.height = detection_data["height"]

    for target in detection_data["targetLitst"]:
        target_event = detection_event.TargetList.add()  #列表添加一个target事件
        target_event.targetId = target['id']
        target_event.box.x1 = target['rect'][0]       #复合类型的赋值
        target_event.box.y1 = target['rect'][1]
        target_event.box.x2 = target['rect'][2]
        target_event.box.y2 = target['rect'][3]
        target_event.boxScore = target['score']
        target_event.labelType = target['type']
        img = cv2.imread(os.path.join(img_dir,detection_data["img_name"]))
        x1, y1, x2, y2 = target['rect']
        imgbytes = cv2.imencode(".jpg", img[y1:y2, x1:x2, :])[1].tobytes()   #切割目标小图并转化为字节数据
        target_event.imageData = imgbytes
        target_event.imageType = "jpg"
        target_event.otherData = ""

    bytesdata = detection_event.SerializeToString()   #最后将整个事件序列化为字节
    return bytesdata


if __name__ == "__main__":

    detection_data = {"img_name": "animal.jpg", "timestamp": "1615882332331", "width": 1920, "height": 1080,
                      "targetLitst": [{"id": 1, "rect": [150, 50, 960, 893], "score": 0.93, "type": "deer"},
                                      {"id": 2, "rect": [945, 40, 1820, 931], "score": 0.85, "type": "cat"}]}

    bytesdata = serialize(detection_data)
下面是对序列化数据的解析示例:
import TargetDetection_pb2
import time
import cv2
import os
import zmq

def serialize(detection_data, img_dir=r"./"):
    detection_event = TargetDetection_pb2.TargetDetection()  #创建一个detection检测事件
    detection_event.ImageName = detection_data["img_name"]
    detection_event.timestamp = int(detection_data["timestamp"])  #协议定义的int64
    detection_event.width = detection_data["width"]
    detection_event.height = detection_data["height"]

    for target in detection_data["targetLitst"]:
        target_event = detection_event.TargetList.add()  #列表添加一个target事件
        target_event.targetId = target['id']
        target_event.box.x1 = target['rect'][0]       #复合类型的赋值
        target_event.box.y1 = target['rect'][1]
        target_event.box.x2 = target['rect'][2]
        target_event.box.y2 = target['rect'][3]
        target_event.boxScore = target['score']
        target_event.labelType = target['type']
        img = cv2.imread(os.path.join(img_dir,detection_data["img_name"]))
        x1, y1, x2, y2 = target['rect']
        imgbytes = cv2.imencode(".jpg", img[y1:y2, x1:x2, :])[1].tobytes()   #切割目标小图并转化为字节数据
        target_event.imageData = imgbytes
        target_event.imageType = "jpg"
        target_event.otherData = ""

def deserialize(bytesdata):
    detection_event = TargetDetection_pb2.TargetDetection()  # 创建一个detection检测事件
    detection_event.ParseFromString(bytesdata)
    print(detection_event.ImageName)
    print(detection_event.timestamp)
    print(detection_event.width)
    print(detection_event.height)
    for target_event in detection_event.TargetList:
        print(target_event.targetId)
        print(target_event.box)
        print(target_event.boxScore)
        print(target_event.labelType)


if __name__ == "__main__":

    detection_data = {"img_name": "animal.jpg", "timestamp": "1615882332331", "width": 1920, "height": 1080,
                      "targetLitst": [{"id": 1, "rect": [150, 50, 960, 893], "score": 0.93, "type": "deer"},
                                      {"id": 2, "rect": [945, 40, 1820, 931], "score": 0.85, "type": "cat"}]}

    bytesdata = serialize(detection_data)
    deserialize(bytesdata)
2.5 实际应用
在项目中得到protobuf序列化的数据后,一般会通过zmq等通讯工具将数据发送出去,或者写入到本地。
zmq发送数据
关于zmq的使用,参见之前的文章https://www.cnblogs.com/silence-cho/p/12657234.html
下面是将protobuf序列化的数据发送出去的示例:
import TargetDetection_pb2
import time
import cv2
import os
import zmq

def set_zmq(topic, url, requestPort, responsePort):
    ctx = zmq.Context().instance()
    recvsocket = ctx.socket(zmq.SUB)
    recvsocket.subscribe(topic)
    requestUrl = "tcp://{}:{}".format(url, requestPort)
    recvsocket.connect(requestUrl)
    print('recvsocket bind to', requestUrl)

    sendsocket = ctx.socket(zmq.PUB)
    responseUrl = "tcp://{}:{}".format(url, responsePort)
    sendsocket.connect(responseUrl)
    print('sendsocket bind to', responseUrl)

    return sendsocket, recvsocket


def serialize(detection_data, img_dir=r"./"):
    detection_event = TargetDetection_pb2.TargetDetection()  #创建一个detection检测事件
    detection_event.ImageName = detection_data["img_name"]
    detection_event.timestamp = int(detection_data["timestamp"])  #协议定义的int64
    detection_event.width = detection_data["width"]
    detection_event.height = detection_data["height"]

    for target in detection_data["targetLitst"]:
        target_event = detection_event.TargetList.add()  #列表添加一个target事件
        target_event.targetId = target['id']
        target_event.box.x1 = target['rect'][0]       #复合类型的赋值
        target_event.box.y1 = target['rect'][1]
        target_event.box.x2 = target['rect'][2]
        target_event.box.y2 = target['rect'][3]
        target_event.boxScore = target['score']
        target_event.labelType = target['type']
        img = cv2.imread(os.path.join(img_dir,detection_data["img_name"]))
        x1, y1, x2, y2 = target['rect']
        imgbytes = cv2.imencode(".jpg", img[y1:y2, x1:x2, :])[1].tobytes()   #切割目标小图并转化为字节数据
        target_event.imageData = imgbytes
        target_event.imageType = "jpg"
        target_event.otherData = ""

    bytesdata = detection_event.SerializeToString()   #最后将整个事件序列化为字节
    return bytesdata


def save_event(new_data, name, save_dir="./"):
    frames = 3
    save_bytes = frames.to_bytes(4, byteorder='big')
    for i in new_data:
        # print(len(i))
        temp = len(i)
        save_bytes += temp.to_bytes(4, byteorder='big')
        save_bytes += i
    with open(os.path.join(save_dir,name), "wb") as f:
        f.write(save_bytes)

def read_event(event_path):
    result = []
    with open(event_path, "rb") as f:
        data = f.read()
        frames = int.from_bytes(data[:4], byteorder='big')  #读取前四个字节,得到共有几帧数据
        start_pos = 4
        for i in range(frames):
            end_pos = start_pos + 4
            data_length = int.from_bytes(data[start_pos:end_pos], byteorder='big')  #读取前4字节,获取该帧数据的长度
            # data_str = data[end_pos:end_pos+data_length].decode("utf-8")
            data_str = data[end_pos:end_pos+data_length]
            result.append(data_str)
            start_pos = end_pos + data_length
    print(result)
    return result


def deserialize(bytesdata):
    detection_event = TargetDetection_pb2.TargetDetection()  # 创建一个detection检测事件
    detection_event.ParseFromString(bytesdata)
    print(detection_event.ImageName)
    print(detection_event.timestamp)
    print(detection_event.width)
    print(detection_event.height)
    for target_event in detection_event.TargetList:
        print(target_event.targetId)
        print(target_event.box)
        print(target_event.boxScore)
        print(target_event.labelType)


if __name__ == "__main__":
    topic = "animal.detection"
    url = "127.0.0.1"
    requestPort = 4601
    responsePort = 4600
    sendsocket, recvsocket = set_zmq(topic, url, requestPort, responsePort)

    detection_data = {"img_name": "animal.jpg", "timestamp": "1615882332331", "width": 1920, "height": 1080,
                      "targetLitst": [{"id": 1, "rect": [150, 50, 960, 893], "score": 0.93, "type": "deer"},
                                      {"id": 2, "rect": [945, 40, 1820, 931], "score": 0.85, "type": "cat"}]}

    bytesdata = serialize(detection_data)
    timestamp = int(time.time() * 1000)
    data = [topic.encode("utf-8"), str(timestamp).encode("utf-8"), bytesdata]

    #通过zmq将数据发送出去
    sendsocket.send_multipart(data)
写入本地
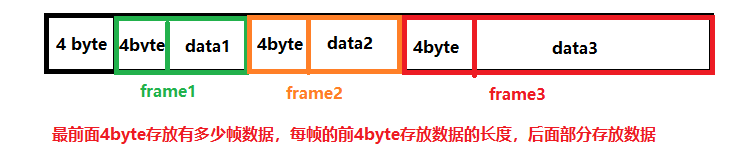
在项目中一般会将发送的zmq数据写入本地作为日志一部分,zmq数据会有多帧,所以写入数据时,一般会定义一个数据报文格式,类似tcp报文那种,但比较简单,如下面是一个三帧数据的报文格式
下面是完整示例代码:
import TargetDetection_pb2
import time
import cv2
import os
import zmq

def set_zmq(topic, url, requestPort, responsePort):
    ctx = zmq.Context().instance()
    recvsocket = ctx.socket(zmq.SUB)
    recvsocket.subscribe(topic)
    requestUrl = "tcp://{}:{}".format(url, requestPort)
    recvsocket.connect(requestUrl)
    print('recvsocket bind to', requestUrl)

    sendsocket = ctx.socket(zmq.PUB)
    responseUrl = "tcp://{}:{}".format(url, responsePort)
    sendsocket.connect(responseUrl)
    print('sendsocket bind to', responseUrl)

    return sendsocket, recvsocket


def serialize(detection_data, img_dir=r"./"):
    detection_event = TargetDetection_pb2.TargetDetection()  #创建一个detection检测事件
    detection_event.ImageName = detection_data["img_name"]
    detection_event.timestamp = int(detection_data["timestamp"])  #协议定义的int64
    detection_event.width = detection_data["width"]
    detection_event.height = detection_data["height"]

    for target in detection_data["targetLitst"]:
        target_event = detection_event.TargetList.add()  #列表添加一个target事件
        target_event.targetId = target['id']
        target_event.box.x1 = target['rect'][0]       #复合类型的赋值
        target_event.box.y1 = target['rect'][1]
        target_event.box.x2 = target['rect'][2]
        target_event.box.y2 = target['rect'][3]
        target_event.boxScore = target['score']
        target_event.labelType = target['type']
        img = cv2.imread(os.path.join(img_dir,detection_data["img_name"]))
        x1, y1, x2, y2 = target['rect']
        imgbytes = cv2.imencode(".jpg", img[y1:y2, x1:x2, :])[1].tobytes()   #切割目标小图并转化为字节数据
        target_event.imageData = imgbytes
        target_event.imageType = "jpg"
        target_event.otherData = ""

    bytesdata = detection_event.SerializeToString()   #最后将整个事件序列化为字节
    return bytesdata


def save_event(new_data, name, save_dir="./"):
    frames = 3
    save_bytes = frames.to_bytes(4, byteorder='big')
    for i in new_data:
        # print(len(i))
        temp = len(i)
        save_bytes += temp.to_bytes(4, byteorder='big')
        save_bytes += i
    with open(os.path.join(save_dir,name), "wb") as f:
        f.write(save_bytes)

def read_event(event_path):
    result = []
    with open(event_path, "rb") as f:
        data = f.read()
        frames = int.from_bytes(data[:4], byteorder='big')  #读取前四个字节,得到共有几帧数据
        start_pos = 4
        for i in range(frames):
            end_pos = start_pos + 4
            data_length = int.from_bytes(data[start_pos:end_pos], byteorder='big')  #读取前4字节,获取该帧数据的长度
            # data_str = data[end_pos:end_pos+data_length].decode("utf-8")
            data_str = data[end_pos:end_pos+data_length]
            result.append(data_str)
            start_pos = end_pos + data_length
    print(result)
    return result


def deserialize(bytesdata):
    detection_event = TargetDetection_pb2.TargetDetection()  # 创建一个detection检测事件
    detection_event.ParseFromString(bytesdata)
    print(detection_event.ImageName)
    print(detection_event.timestamp)
    print(detection_event.width)
    print(detection_event.height)
    for target_event in detection_event.TargetList:
        print(target_event.targetId)
        print(target_event.box)
        print(target_event.boxScore)
        print(target_event.labelType)


if __name__ == "__main__":
    topic = "animal.detection"
    url = "127.0.0.1"
    requestPort = 4601
    responsePort = 4600
    sendsocket, recvsocket = set_zmq(topic, url, requestPort, responsePort)

    detection_data = {"img_name": "animal.jpg", "timestamp": "1615882332331", "width": 1920, "height": 1080,
                      "targetLitst": [{"id": 1, "rect": [150, 50, 960, 893], "score": 0.93, "type": "deer"},
                                      {"id": 2, "rect": [945, 40, 1820, 931], "score": 0.85, "type": "cat"}]}

    bytesdata = serialize(detection_data)
    timestamp = int(time.time() * 1000)
    data = [topic.encode("utf-8"), str(timestamp).encode("utf-8"), bytesdata]

    #通过zmq将数据发送出去
    # sendsocket.send_multipart(data)

    #将数据保存到本地
    save_dir = r"F:eventdetection_event"
    name = topic + "_" + str(timestamp)
    # save_event(data, name, save_dir)
    save_event(data, name)

    #读取数据并反序列化
    event_path = r"./animal.detection_1615885149114"
    results_list = read_event(event_path)
    deserialize(results_list[-1])
参考:https://blog.csdn.net/u013210620/article/details/81317731
https://www.cnblogs.com/silence-cho/p/12657234.html