一、简介
Apache Flume 是一个分布式,高可用的数据收集系统,可以从不同的数据源收集数据,经过聚合后发送到分布式计算框架或者存储系统中。Spark Straming 提供了以下两种方式用于 Flume 的整合。
二、推送式方法
在推送式方法 (Flume-style Push-based Approach) 中,Spark Streaming 程序需要对某台服务器的某个端口进行监听,Flume 通过 avro Sink 将数据源源不断推送到该端口。这里以监听日志文件为例,具体整合方式如下:
2.1 配置日志收集Flume
新建配置 netcat-memory-avro.properties,使用 tail 命令监听文件内容变化,然后将新的文件内容通过 avro sink 发送到 hadoop001 这台服务器的 8888 端口:
#指定agent的sources,sinks,channels
a1.sources = s1
a1.sinks = k1
a1.channels = c1

#配置sources属性
a1.sources.s1.type = exec
a1.sources.s1.command = tail -F /tmp/log.txt
a1.sources.s1.shell = /bin/bash -c
a1.sources.s1.channels = c1

#配置sink
a1.sinks.k1.type = avro
a1.sinks.k1.hostname = hadoop001
a1.sinks.k1.port = 8888
a1.sinks.k1.batch-size = 1
a1.sinks.k1.channel = c1

#配置channel类型
a1.channels.c1.type = memory
a1.channels.c1.capacity = 1000
a1.channels.c1.transactionCapacity = 100
2.2 项目依赖
项目采用 Maven 工程进行构建,主要依赖为 spark-streaming 和 spark-streaming-flume。
<properties>
    <scala.version>2.11</scala.version>
    <spark.version>2.4.0</spark.version>
</properties>

<dependencies>
    <!-- Spark Streaming-->
    <dependency>
        <groupId>org.apache.spark</groupId>
        <artifactId>spark-streaming_${scala.version}</artifactId>
        <version>${spark.version}</version>
    </dependency>
    <!-- Spark Streaming 整合 Flume 依赖-->
    <dependency>
        <groupId>org.apache.spark</groupId>
        <artifactId>spark-streaming-flume_${scala.version}</artifactId>
        <version>2.4.3</version>
    </dependency>
</dependencies>
2.3 Spark Streaming接收日志数据
调用 FlumeUtils 工具类的 createStream 方法,对 hadoop001 的 8888 端口进行监听,获取到流数据并进行打印:
import org.apache.spark.SparkConf
import org.apache.spark.streaming.{Seconds, StreamingContext}
import org.apache.spark.streaming.flume.FlumeUtils

object PushBasedWordCount {

  def main(args: Array[String]): Unit = {
    val sparkConf = new SparkConf()
    val ssc = new StreamingContext(sparkConf, Seconds(5))
    // 1.获取输入流
    val flumeStream = FlumeUtils.createStream(ssc, "hadoop001", 8888)
    // 2.打印输入流的数据
    flumeStream.map(line => new String(line.event.getBody.array()).trim).print()

    ssc.start()
    ssc.awaitTermination()
  }
}
2.4 项目打包
因为 Spark 安装目录下是不含有 spark-streaming-flume 依赖包的,所以在提交到集群运行时候必须提供该依赖包,你可以在提交命令中使用 --jar 指定上传到服务器的该依赖包,或者使用 --packages org.apache.spark:spark-streaming-flume_2.12:2.4.3 指定依赖包的完整名称,这样程序在启动时会先去中央仓库进行下载。
这里我采用的是第三种方式:使用 maven-shade-plugin 插件进行 ALL IN ONE 打包,把所有依赖的 Jar 一并打入最终包中。需要注意的是 spark-streaming 包在 Spark 安装目录的 jars 目录中已经提供,所以不需要打入。插件配置如下:
<build>
    <plugins>
        <plugin>
            <groupId>org.apache.maven.plugins</groupId>
            <artifactId>maven-compiler-plugin</artifactId>
            <configuration>
                <source>8</source>
                <target>8</target>
            </configuration>
        </plugin>
        <!--使用 shade 进行打包-->
        <plugin>
            <groupId>org.apache.maven.plugins</groupId>
            <artifactId>maven-shade-plugin</artifactId>
            <configuration>
                <createDependencyReducedPom>true</createDependencyReducedPom>
                <filters>
                    <filter>
                        <artifact>*:*</artifact>
                        <excludes>
                            <exclude>META-INF/*.SF</exclude>
                            <exclude>META-INF/*.sf</exclude>
                            <exclude>META-INF/*.DSA</exclude>
                            <exclude>META-INF/*.dsa</exclude>
                            <exclude>META-INF/*.RSA</exclude>
                            <exclude>META-INF/*.rsa</exclude>
                            <exclude>META-INF/*.EC</exclude>
                            <exclude>META-INF/*.ec</exclude>
                            <exclude>META-INF/MSFTSIG.SF</exclude>
                            <exclude>META-INF/MSFTSIG.RSA</exclude>
                        </excludes>
                    </filter>
                </filters>
                <artifactSet>
                    <excludes>
                        <exclude>org.apache.spark:spark-streaming_${scala.version}</exclude>
                        <exclude>org.scala-lang:scala-library</exclude>
                        <exclude>org.apache.commons:commons-lang3</exclude>
                    </excludes>
                </artifactSet>
            </configuration>
            <executions>
                <execution>
                    <phase>package</phase>
                    <goals>
                        <goal>shade</goal>
                    </goals>
                    <configuration>
                        <transformers>
                            <transformer
                              implementation="org.apache.maven.plugins.shade.resource.ServicesResourceTransformer"/>
                            <transformer
                              implementation="org.apache.maven.plugins.shade.resource.ManifestResourceTransformer">
                            </transformer>
                        </transformers>
                    </configuration>
                </execution>
            </executions>
        </plugin>
        <!--打包.scala 文件需要配置此插件-->
        <plugin>
            <groupId>org.scala-tools</groupId>
            <artifactId>maven-scala-plugin</artifactId>
            <version>2.15.1</version>
            <executions>
                <execution>
                    <id>scala-compile</id>
                    <goals>
                        <goal>compile</goal>
                    </goals>
                    <configuration>
                        <includes>
                            <include>**/*.scala</include>
                        </includes>
                    </configuration>
                </execution>
                <execution>
                    <id>scala-test-compile</id>
                    <goals>
                        <goal>testCompile</goal>
                    </goals>
                </execution>
            </executions>
        </plugin>
    </plugins>
</build>
本项目完整源码见:spark-streaming-flume
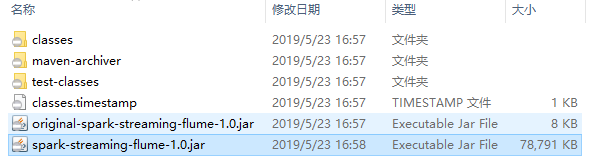
使用 mvn clean package 命令打包后会生产以下两个 Jar 包,提交 非 original 开头的 Jar 即可。
2.5 启动服务和提交作业
启动 Flume 服务:
flume-ng agent
--conf conf
--conf-file /usr/app/apache-flume-1.6.0-cdh5.15.2-bin/examples/netcat-memory-avro.properties
--name a1 -Dflume.root.logger=INFO,console
提交 Spark Streaming 作业:
spark-submit
--class com.heibaiying.flume.PushBasedWordCount
--master local[4]
/usr/appjar/spark-streaming-flume-1.0.jar
2.6 测试
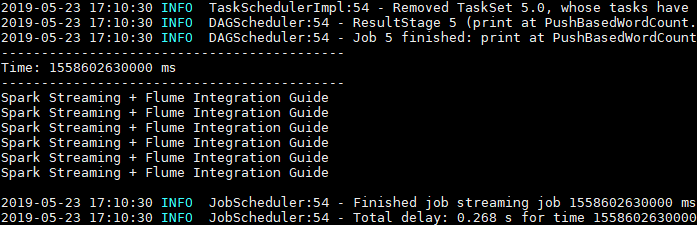
这里使用 echo 命令模拟日志产生的场景,往日志文件中追加数据,然后查看程序的输出:

Spark Streaming 程序成功接收到数据并打印输出:
2.7 注意事项
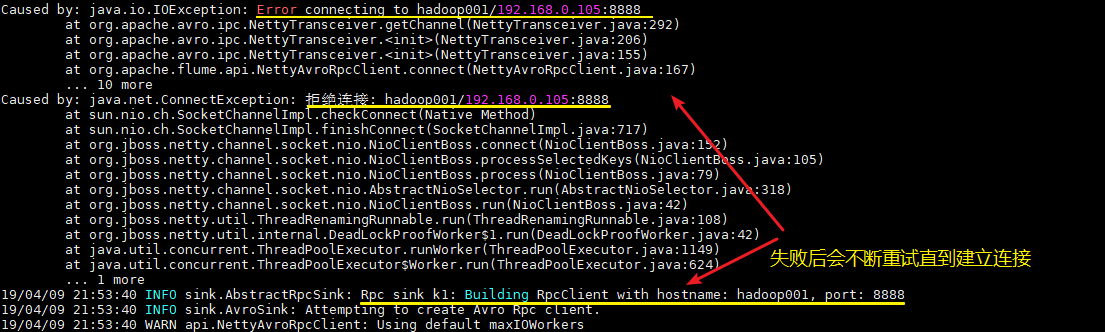
1. 启动顺序
这里需要注意的,不论你先启动 Spark 程序还是 Flume 程序,由于两者的启动都需要一定的时间,此时先启动的程序会短暂地抛出端口拒绝连接的异常,此时不需要进行任何操作,等待两个程序都启动完成即可。
2. 版本一致
最好保证用于本地开发和编译的 Scala 版本和 Spark 的 Scala 版本一致,至少保证大版本一致,如都是 2.11。
三、拉取式方法
拉取式方法 (Pull-based Approach using a Custom Sink) 是将数据推送到 SparkSink 接收器中,此时数据会保持缓冲状态,Spark Streaming 定时从接收器中拉取数据。这种方式是基于事务的,即只有在 Spark Streaming 接收和复制数据完成后,才会删除缓存的数据。与第一种方式相比,具有更强的可靠性和容错保证。整合步骤如下:
3.1 配置日志收集Flume
新建 Flume 配置文件 netcat-memory-sparkSink.properties,配置和上面基本一致,只是把 a1.sinks.k1.type 的属性修改为 org.apache.spark.streaming.flume.sink.SparkSink,即采用 Spark 接收器。
#指定agent的sources,sinks,channels
a1.sources = s1
a1.sinks = k1
a1.channels = c1

#配置sources属性
a1.sources.s1.type = exec
a1.sources.s1.command = tail -F /tmp/log.txt
a1.sources.s1.shell = /bin/bash -c
a1.sources.s1.channels = c1

#配置sink
a1.sinks.k1.type = org.apache.spark.streaming.flume.sink.SparkSink
a1.sinks.k1.hostname = hadoop001
a1.sinks.k1.port = 8888
a1.sinks.k1.batch-size = 1
a1.sinks.k1.channel = c1

#配置channel类型
a1.channels.c1.type = memory
a1.channels.c1.capacity = 1000
a1.channels.c1.transactionCapacity = 100
2.2 新增依赖
使用拉取式方法需要额外添加以下两个依赖:
<dependency>
    <groupId>org.scala-lang</groupId>
    <artifactId>scala-library</artifactId>
    <version>2.12.8</version>
</dependency>
<dependency>
    <groupId>org.apache.commons</groupId>
    <artifactId>commons-lang3</artifactId>
    <version>3.5</version>
</dependency>
注意:添加这两个依赖只是为了本地测试,Spark 的安装目录下已经提供了这两个依赖,所以在最终打包时需要进行排除。
2.3 Spark Streaming接收日志数据
这里和上面推送式方法的代码基本相同,只是将调用方法改为 createPollingStream。
import org.apache.spark.SparkConf
import org.apache.spark.streaming.{Seconds, StreamingContext}
import org.apache.spark.streaming.flume.FlumeUtils

object PullBasedWordCount {

  def main(args: Array[String]): Unit = {

    val sparkConf = new SparkConf()
    val ssc = new StreamingContext(sparkConf, Seconds(5))
    // 1.获取输入流
    val flumeStream = FlumeUtils.createPollingStream(ssc, "hadoop001", 8888)
    // 2.打印输入流中的数据
    flumeStream.map(line => new String(line.event.getBody.array()).trim).print()
    ssc.start()
    ssc.awaitTermination()
  }
}
2.4 启动测试
启动和提交作业流程与上面相同,这里给出执行脚本,过程不再赘述。
启动 Flume 进行日志收集:
flume-ng agent
--conf conf
--conf-file /usr/app/apache-flume-1.6.0-cdh5.15.2-bin/examples/netcat-memory-sparkSink.properties
--name a1 -Dflume.root.logger=INFO,console
提交 Spark Streaming 作业:
spark-submit
--class com.heibaiying.flume.PullBasedWordCount
--master local[4]
/usr/appjar/spark-streaming-flume-1.0.jar
参考资料
- streaming-flume-integration
- 关于大数据应用常用的打包方式可以参见:大数据应用常用打包方式