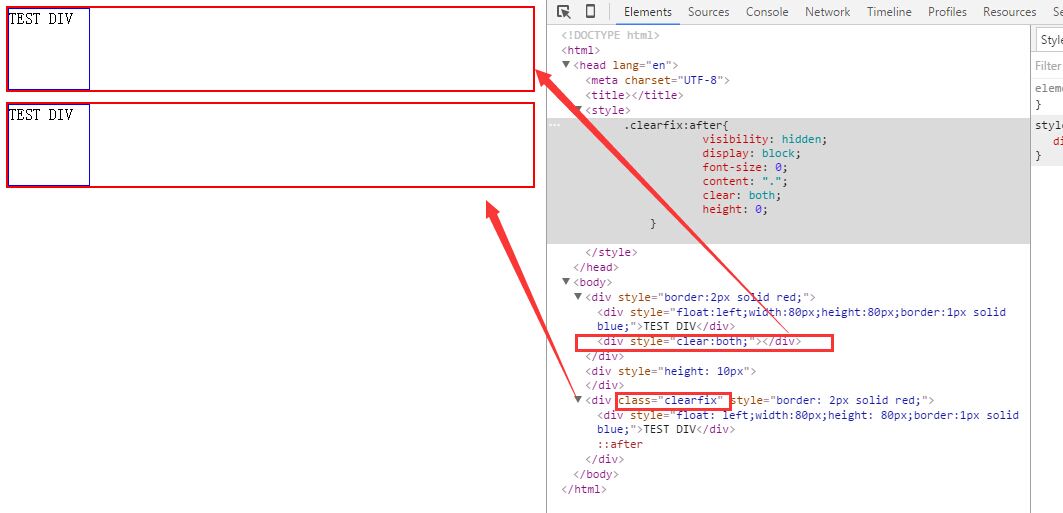
看下我今天一直研究的两个例子吧。希望对自己跟大家有帮助:
例子一:
<!DOCTYPE html>
<html>
<head lang="en">
    <meta charset="UTF-8">
    <title></title>
<style>
    .clearfix:after{
                visibility: hidden;
                display: block;
                font-size: 0;
                content: ".";
                clear: both;
                height: 0;
        }
    </style>
</head>
<body>
    <div style="border:2px solid red;">
        <div style="float:left;80px;height:80px;border:1px solid blue;">TEST DIV</div>
        <div style="clear:both;"></div>
    </div>

<div style="height: 10px">
</div>

    <div class="clearfix" style="border: 2px solid red;">
        <div style="float: left;80px;height: 80px;border:1px solid blue;">TEST DIV</div>
    </div>


</body>
</html>

<div style="clear:both;"></div> 与  class="clearfix"  这个的作用是一样的,让父类的div展开。
Clear:both;其实就是利用清除浮动来把外层的div撑开。你可以将上面的其中一个去掉,看下效果。
所以有时候,我们在将内部div都设置成浮动之后,就会发现,外层div的背景没有显示,原因就是外层的div没有撑开,太小,所以能看到的背景仅限于一条线。


例子二:


<!DOCTYPE html>
<html>
<head lang="en">
    <meta charset="UTF-8">
    <title></title>
    <style>
        body {
            font-family: Tahoma, Geneva, Helvetica, sans-serif !important;
            color: #000 !important;
            height: 100% !important;
            margin: 0 !important;
            padding: 0 !important;
            background-color: #fff !important;
        }
        .clearfix:after {
            content: ".";
            display: block;
            height: 0;
            clear: both;
            visibility: hidden;
        }/* 作用:   与<div style="clear: both"></div>相同,将外层的div撑开         */
    </style>
</head>
<body>

<div style="background-color: #f5fafe; 500px;height: 300px;margin: 20px 20px">  <!--最外层div-->
    <div style="padding: 50px 40px 40px 80px">   <!--用户名/密码的承载层,定义距离父层的距离-->
        <div style="padding: 20px 20px;">         <!--用户名/密码层之间的空间间隔-->
            <div style="float: left; 20%;text-align: right;"><label>用户名:</label></div>   <!--浮动20%-->
            <div style="float: left;position: relative">    <!--与下面children层进行position匹配-->
                <div><input /></div>              <!--定义标签以及错误已经样式-->
                <div style="position: absolute;font-size: 8px;color:#ff0000;background: #FFEBEB;height: 15px;line-height: 15px; 100%">用户名不能为空</div>
            </div>
            <div style="clear: both"></div>        <!--将外层的div撑开,与class='chearfix'作用相同-->
        </div>

        <div class="clearfix" style="padding: 20px 20px;">
            <div style="float: left; 20%;text-align: right;"><label>密码:</label></div>
            <div style="float: left;position: relative">
                <div><input type="password"/></div>
                <div style="position: absolute;font-size: 8px;color:#ff0000;background: #FFEBEB;height: 15px;line-height: 15px; 100%">密码不能为空</div>
            </div>
        </div>
    </div>

</div>

</body>
</html>
例子一有参考:http://blog.sina.com.cn/s/blog_4a3789a70100jfv4.html
