前言
本篇博客说明一下在Android开发中,如何使用JUnit进行单元测试。首先来了解一下什么是JUnit,JUnit测试是白盒测试,即主要是程序员自己对开发的方法进行功能性测试。JUnit是一套框架,Android中也沿用了这一套框架。
JUnit
在Android中使用JUnit测试大致分如下几个步骤:
- 在AndroidManifest.xml中增加对JUnit的支持,并制定测试项目包。
- 在AndroidManifest.xml中<application.../>节点中增加一个<uses-library...>节点,name属性为android.test.runner。
- 在编写待测试方法后,新建一个类,继承AndroidTestCase,在其中编写测试用例代码。
- 鼠标左键在测试用例方法上,Run As→Android JUnit Test。
下面就上面几个步骤,详细讲解一下,新建一个Android项目,在AndroidManifest.xml中,添加一个Instrumentation:

指定Instrumentation的name与TargetPackage:

在<application.../>节点中增加<uses-library android:name="android.test.runner" />
完成后AndroidManifest.xml代码如下:

 1 <?xml version="1.0" encoding="utf-8"?>
 2 <manifest xmlns:android="http://schemas.android.com/apk/res/android"
 3     package="com.example.junittestdemo"
 4     android:versionCode="1"
 5     android:versionName="1.0" >
 6
 7     <uses-sdk
 8         android:minSdkVersion="8"
 9         android:targetSdkVersion="17" />
10
11     <instrumentation
12         android:name="android.test.InstrumentationTestRunner"
13         android:targetPackage="com.example.junittestdemo" >
14     </instrumentation>
15
16     <application
17         android:allowBackup="true"
18         android:icon="@drawable/ic_launcher"
19         android:label="@string/app_name"
20         android:theme="@style/AppTheme" >
21         <uses-library android:name="android.test.runner" />
22
23         <activity
24             android:name="com.example.junittestdemo.MainActivity"
25             android:label="@string/app_name" >
26             <intent-filter>
27                 <action android:name="android.intent.action.MAIN" />
28
29                 <category android:name="android.intent.category.LAUNCHER" />
30             </intent-filter>
31         </activity>
32     </application>
33
34 </manifest>
编写一个简单的进度百分比计算方法:
 1 package com.example.service;
 2
 3 public class ProgressService {
 4     public ProgressService() {
 5
 6     }
 7     public Integer getCurrentProgerss(double current, double max) {
 8         Integer i=(int)((current / max) * 100) ;
 9         return i;
10     }
11 }
编写一个测试类,这个类需要继承AndroidTestCase,针对百分比方法进行测试:
 1 package com.example.junit;
 2
 3 import android.test.AndroidTestCase;
 4 import android.util.Log;
 5
 6
 7 import com.example.service.ProgressService;
 8
 9 public class ProgressServiceJUnit extends AndroidTestCase {
10     private final String TAG="main";
11
12     public ProgressServiceJUnit() {
13         // TODO Auto-generated constructor stub
14     }
15
16     public void getCurrentProgerssTest(){
17         ProgressService progressService=new ProgressService();
18         Integer pro=progressService.getCurrentProgerss(20, 70);
19         Log.i(TAG, pro.toString());
20     }
21 }
左键getCurrentProgerssTest()方法,选中Android JUnit Test,如果需要调试,可以选择Debug As下的Android JUnit Test:

当执行成功后,会显示绿色,如果是其他颜色,则为出错:

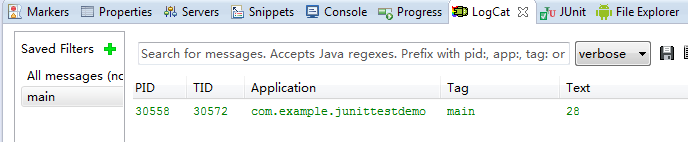
可以在LogCat日志中看到测试结果:
请支持原创,尊重原创,转载请注明出处。谢谢。