Spring MVC快速入门教程
今天给大家介绍一下Spring MVC,让我们学习一下如何利用Spring MVC快速的搭建一个简单的web应用。
更深入地学习Spring MVC,请大家参考Spring MVC实战入门训练。
参考代码请戳右上角,下载下来后可以在Eclipse或者IntelliJ中导入为一个Maven项目。
环境准备
- 一个称手的文本编辑器(例如Vim、Emacs、Sublime Text)或者IDE(Eclipse、Idea Intellij)
- Java环境(JDK 1.7或以上版本)
- Maven 3.0+(Eclipse和Idea IntelliJ内置,如果使用IDE并且不使用命令行工具可以不安装)
一个最简单的Web应用
使用Spring Boot框架可以大大加速Web应用的开发过程,首先在Maven项目依赖中引入spring-boot-starter-web:
pom.xml
<?xml version="1.0" encoding="UTF-8"?>
<project xmlns="http://maven.apache.org/POM/4.0.0" xmlns:xsi="http://www.w3.org/2001/XMLSchema-instance"
         xsi:schemaLocation="http://maven.apache.org/POM/4.0.0 http://maven.apache.org/xsd/maven-4.0.0.xsd">
  <modelVersion>4.0.0</modelVersion>

  <groupId>com.tianmaying</groupId>
  <artifactId>spring-web-demo</artifactId>
  <version>0.0.1-SNAPSHOT</version>
  <packaging>jar</packaging>

  <name>spring-web-demo</name>
  <description>Demo project for Spring WebMvc</description>

  <parent>
    <groupId>org.springframework.boot</groupId>
    <artifactId>spring-boot-starter-parent</artifactId>
    <version>1.2.5.RELEASE</version>
    <relativePath/>
  </parent>

  <properties>
    <project.build.sourceEncoding>UTF-8</project.build.sourceEncoding>
    <java.version>1.8</java.version>
  </properties>

  <dependencies>
    <dependency>
      <groupId>org.springframework.boot</groupId>
      <artifactId>spring-boot-starter-web</artifactId>
    </dependency>
  </dependencies>

  <build>
    <plugins>
      <plugin>
        <groupId>org.springframework.boot</groupId>
        <artifactId>spring-boot-maven-plugin</artifactId>
      </plugin>
    </plugins>
  </build>

</project>
接下来创建src/main/java/com.tmy.Application.java:
package com.tmy;

import org.springframework.boot.SpringApplication;
import org.springframework.boot.autoconfigure.SpringBootApplication;
import org.springframework.web.bind.annotation.RequestMapping;
import org.springframework.web.bind.annotation.RestController;

@SpringBootApplication
@RestController
public class Application {

    @RequestMapping("/")
    public String greeting() {
        return "Hello World!";
    }

    public static void main(String[] args) {
        SpringApplication.run(Application.class, args);
    }
}
运行应用:mvn spring-boot:run或在IDE中运行main()方法,在浏览器中访问http://localhost:8080,Hello World!就出现在了页面中。只用了区区十几行Java代码,一个Hello World应用就可以正确运行了,那么这段代码究竟做了什么呢?我们从程序的入口SpringApplication.run(Application.class, args);开始分析:
-
SpringApplication是Spring Boot框架中描述Spring应用的类,它的run()方法会创建一个Spring应用上下文(Application Context)。另一方面它会扫描当前应用类路径上的依赖,例如本例中发现spring-webmvc(由spring-boot-starter-web传递引入)在类路径中,那么Spring Boot会判断这是一个Web应用,并启动一个内嵌的Servlet容器(默认是Tomcat)用于处理HTTP请求。 -
Spring WebMvc框架会将Servlet容器里收到的HTTP请求根据路径分发给对应的
@Controller类进行处理 -
@RestController该注解为一个组合注解,相当于@Controller和@ResponseBody的组合,注解在类上,意味着,该Controller的所有方法都默认加上了@ResponseBody。它的返回值直接作为HTTP Response的Body部分返回给浏览器。
示例:
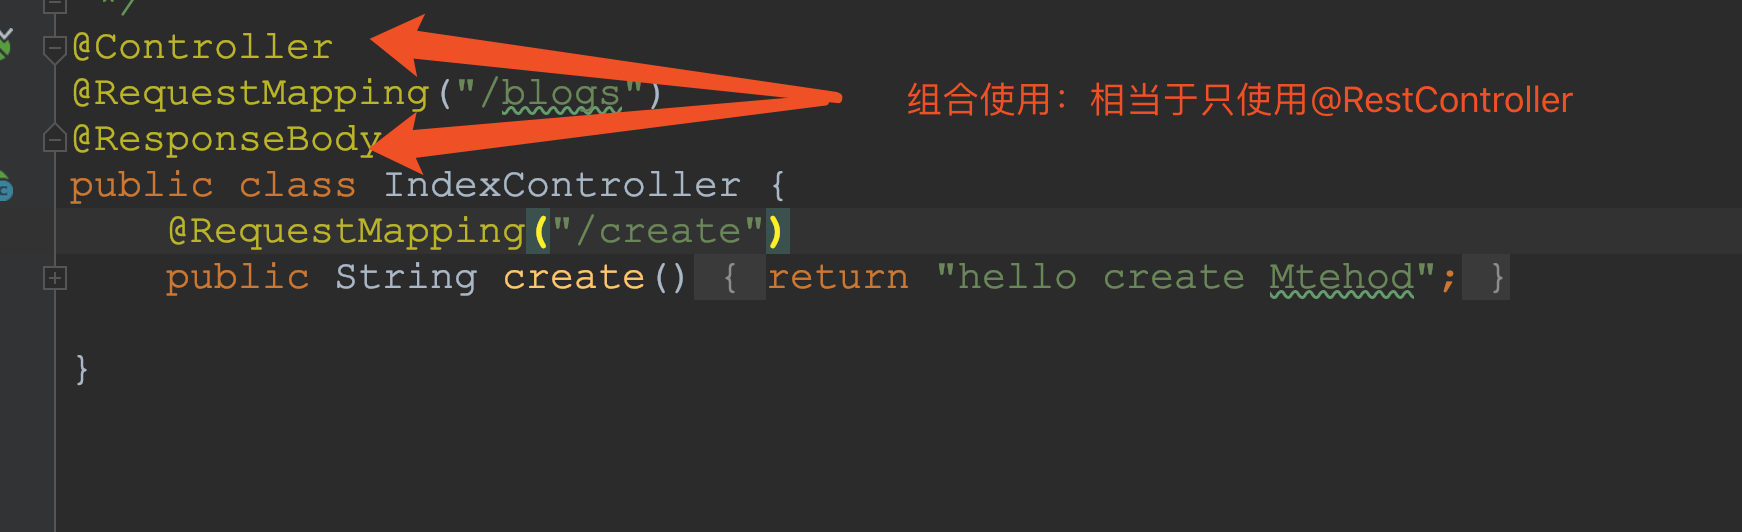
组合使用方式:
package com.hello.shaydemotest.controller;

import org.springframework.stereotype.Controller;
import org.springframework.web.bind.annotation.RequestBody;
import org.springframework.web.bind.annotation.RequestMapping;
import org.springframework.web.bind.annotation.ResponseBody;

/**
 * Description:
 *
 * @author Shay
 * @date Created on 2020-07-15 20:52
 */
@Controller
@RequestMapping("/blogs")
@ResponseBody
public class IndexController {
    @RequestMapping("/create")
    public String create(){
        return "hello create Mtehod";
    }

}
@RestController方式:
package com.hello.shaydemotest.controller;

import org.springframework.web.bind.annotation.*;

/**
 * Description:
 * @author Shay
 * @date Created on 2020-07-16 14:39
 */
@RestController
@RequestMapping("/demo")
public class DemoController {
    @RequestMapping("/hello")
    public String hello(){
        return "demo hello!";
    }

}
4.@RequestMapping注解表明该方法处理那些URL对应的HTTP请求,也就是我们常说的URL路由(routing),请求的分发工作是有Spring完成的。例如上面的代码中http://localhost:8080/ 根路径就被路由至greeting()方法进行处理。如果访问http://localhost:8080/hello ,则会出现 404 Not Found错误,因为我们并没有编写任何方法来处理/hello`请求。
使用@Controller实现URL路由
现代Web应用往往包括很多页面,不同的页面也对应着不同的URL。对于不同的URL,通常需要不同的方法进行处理并返回不同的内容。
匹配多个URL
@RestController
public class Application {

    @RequestMapping("/")
    public String index() {
        return "Index Page";
    }

    @RequestMapping("/hello")
    public String hello() {
        return "Hello World!";
    }
}
@RequestMapping可以注解@Controller类:
@RestController
@RequestMapping("/classPath")
public class Application {
    @RequestMapping("/methodPath")
    public String method() {
        return "mapping url is /classPath/methodPath";
    }
}
method方法匹配的URL是/classPath/methodPath"。
提示
可以定义多个@Controller将不同URL的处理方法分散在不同的类中。
URL中的变量——PathVariable
在Web应用中URL通常不是一成不变的,例如微博两个不同用户的个人主页对应两个不同的URL: http://weibo.com/user1 和 http://weibo.com/user2。 我们不可能对于每一个用户都编写一个被@RequestMapping注解的方法来处理其请求,Spring MVC提供了一套机制来处理这种情况:
@RequestMapping("/users/{username}")
public String userProfile(@PathVariable("username") String username) {
    return String.format("user %s", username);
}

@RequestMapping("/posts/{id}")
public String post(@PathVariable("id") int id) {
    return String.format("post %d", id);
}
在上述例子中,URL中的变量可以用{variableName}来表示,同时在方法的参数中加上@PathVariable("variableName"),那么当请求被转发给该方法处理时,对应的URL中的变量会被自动赋值给被@PathVariable注解的参数(能够自动根据参数类型赋值,例如上例中的int)。
支持HTTP方法
对于HTTP请求除了其URL,还需要注意它的方法(Method)。例如我们在浏览器中访问一个页面通常是GET方法,而表单的提交一般是POST方法。@Controller中的方法同样需要对其进行区分:
@RequestMapping(value = "/login", method = RequestMethod.GET)
public String loginGet() {
    return "Login Page";
}

@RequestMapping(value = "/login", method = RequestMethod.POST)
public String loginPost() {
    return "Login Post Request";
}
Spring MVC最新的版本中提供了一种更加简洁的配置HTTP方法的方式,增加了四个标注:
@PutMapping@GetMapping@PostMapping@DeleteMapping
在Web应用中常用的HTTP方法有四种:
- PUT方法用来添加的资源
- GET方法用来获取已有的资源
- POST方法用来对资源进行状态转换
- DELETE方法用来删除已有的资源
这四个方法可以对应到CRUD操作(Create、Read、Update和Delete),比如博客的创建操作,按照REST风格设计URL就应该使用PUT方法,读取博客使用GET方法,更新博客使用POST方法,删除博客使用DELETE方法。
每一个Web请求都是属于其中一种,在Spring MVC中如果不特殊指定的话,默认是GET请求。
比如@RequestMapping("/")和@RequestMapping("/hello")和对应的Web请求是:
- GET
/ - GET
/hello
实际上@RequestMapping("/")是@RequestMapping("/", method = RequestMethod.GET)的简写,即可以通过method属性,设置请求的HTTP方法。
比如PUT /hello请求,对应于@RequestMapping("/hello", method = RequestMethod.PUT)
基于新的标注@RequestMapping("/hello", method = RequestMethod.PUT)可以简写为@PutMapping("/hello")。
@RequestMapping("/hello")与GetMapping("/hello")等价。
模板渲染
在之前所有的@RequestMapping注解的方法中,返回值字符串都被直接传送到浏览器端并显示给用户。但是为了能够呈现更加丰富、美观的页面,我们需要将HTML代码返回给浏览器,浏览器再进行页面的渲染、显示。
一种很直观的方法是在处理请求的方法中,直接返回HTML代码,但是这样做的问题在于——一个复杂的页面HTML代码往往也非常复杂,并且嵌入在Java代码中十分不利于维护。更好的做法是将页面的HTML代码写在模板文件中,渲染后再返回给用户。为了能够进行模板渲染,需要将@RestController改成@Controller:
import org.springframework.ui.Model;

@Controller
public class HelloController {

    @RequestMapping("/hello/{name}")
    public String hello(@PathVariable("name") String name, Model model) {
        model.addAttribute("name", name);
        return "hello"
    }
}
在上述例子中,返回值"hello"并非直接将字符串返回给浏览器,而是寻找名字为hello的模板进行渲染,我们使用Thymeleaf模板引擎进行模板渲染,需要引入依赖:
<dependency>
  <groupId>org.springframework.boot</groupId>
  <artifactId>spring-boot-starter-thymeleaf</artifactId>
</dependency>
接下来需要在默认的模板文件夹src/main/resources/templates/目录下添加一个模板文件hello.html:
<!DOCTYPE HTML>
<html xmlns:th="http://www.thymeleaf.org">
<head>
    <title>Getting Started: Serving Web Content</title>
    <meta http-equiv="Content-Type" content="text/html; charset=UTF-8" />
</head>
<body>
    <p th:text="'Hello, ' + ${name} + '!'" />
</body>
</html>
th:text="'Hello, ' + ${name} + '!'"也就是将我们之前在@Controller方法里添加至Model的属性name进行渲染,并放入<p>标签中(因为th:text是<p>标签的属性)。模板渲染还有更多的用法,请参考Thymeleaf官方文档。
处理静态文件 和文件上传可以参考https://www.tianmaying.com/tutorial/spring-mvc-quickstart#6
拦截器Interceptor
Spring MVC框架中的Interceptor,与Servlet API中的Filter十分类似,用于对Web请求进行预处理/后处理。通常情况下这些预处理/后处理逻辑是通用的,可以被应用于所有或多个Web请求,例如:
- 记录Web请求相关日志,可以用于做一些信息监控、统计、分析
- 检查Web请求访问权限,例如发现用户没有登录后,重定向到登录页面
- 打开/关闭数据库连接——预处理时打开,后处理关闭,可以避免在所有业务方法中都编写类似代码,也不会忘记关闭数据库连接
Spring MVC请求处理流程

上图是Spring MVC框架处理Web请求的基本流程,请求会经过DispatcherServlet的分发后,会按顺序经过一系列的Interceptor并执行其中的预处理方法,在请求返回时同样会执行其中的后处理方法。
在DispatcherServlet和Controller之间哪些竖着的彩色细条,是拦截请求进行额外处理的地方,所以命名为拦截器(Interceptor)。
HandlerInterceptor接口
Spring MVC中拦截器是实现了HandlerInterceptor接口的Bean:
public interface HandlerInterceptor {
    boolean preHandle(HttpServletRequest request,
                      HttpServletResponse response,
                      Object handler) throws Exception;

    void postHandle(HttpServletRequest request,
                    HttpServletResponse response,
                    Object handler, ModelAndView modelAndView) throws Exception;

    void afterCompletion(HttpServletRequest request,
                         HttpServletResponse response,
                         Object handler, Exception ex) throws Exception;
}
preHandle():预处理回调方法,若方法返回值为true,请求继续(调用下一个拦截器或处理器方法);若方法返回值为false,请求处理流程中断,不会继续调用其他的拦截器或处理器方法,此时需要通过response产生响应;postHandle():后处理回调方法,实现处理器的后处理(但在渲染视图之前),此时可以通过ModelAndView对模型数据进行处理或对视图进行处理afterCompletion():整个请求处理完毕回调方法,即在视图渲染完毕时调用
HandlerInterceptor有三个方法需要实现,但大部分时候可能只需要实现其中的一个方法,HandlerInterceptorAdapter是一个实现了HandlerInterceptor的抽象类,它的三个实现方法都为空实现(或者返回true),继承该抽象类后可以仅仅实现其中的一个方法:
public class Interceptor extends HandlerInterceptorAdapter {

    public boolean preHandle(HttpServletRequest request,
                             HttpServletResponse response,
                             Object handler) throws Exception {
        // 在controller方法调用前打印信息
        System.out.println("This is interceptor.");
        // 返回true,将强求继续传递(传递到下一个拦截器,没有其它拦截器了,则传递给Controller)
        return true;
    }
}
配置Interceptor
定义HandlerInterceptor后,需要创建WebMvcConfigurerAdapter在MVC配置中将它们应用于特定的URL中。一般一个拦截器都是拦截特定的某一部分请求,这些请求通过URL模型来指定。
下面是一个配置的例子:
@Configuration
public class WebConfig extends WebMvcConfigurerAdapter {

    @Override
    public void addInterceptors(InterceptorRegistry registry) {
        registry.addInterceptor(new LocaleInterceptor());
        registry.addInterceptor(new ThemeInterceptor()).addPathPatterns("/**").excludePathPatterns("/admin/**");
        registry.addInterceptor(new SecurityInterceptor()).addPathPatterns("/secure/*");
    }
}
@ModelAttribute
方法使用@ModelAttribute标注
@ModelAttribute标注可被应用在方法或方法参数上。
标注在方法上的@ModelAttribute说明方法是用于添加一个或多个属性到model上。这样的方法能接受与@RequestMapping标注相同的参数类型,只不过不能直接被映射到具体的请求上。
在同一个控制器中,标注了@ModelAttribute的方法实际上会在@RequestMapping方法之前被调用。
以下是示例:
// Add one attribute
// The return value of the method is added to the model under the name "account"
// You can customize the name via @ModelAttribute("myAccount")

@ModelAttribute
public Account addAccount(@RequestParam String number) {
    return accountManager.findAccount(number);
}

// Add multiple attributes

@ModelAttribute
public void populateModel(@RequestParam String number, Model model) {
    model.addAttribute(accountManager.findAccount(number));
    // add more ...
}
@ModelAttribute方法通常被用来填充一些公共需要的属性或数据,比如一个下拉列表所预设的几种状态,或者宠物的几种类型,或者去取得一个HTML表单渲染所需要的命令对象,比如Account等。
@ModelAttribute标注方法有两种风格:
- 在第一种写法中,方法通过返回值的方式默认地将添加一个属性;
- 在第二种写法中,方法接收一个
Model对象,然后可以向其中添加任意数量的属性。
可以在根据需要,在两种风格中选择合适的一种。
一个控制器可以拥有多个@ModelAttribute方法。同个控制器内的所有这些方法,都会在@RequestMapping方法之前被调用。
@ModelAttribute方法也可以定义在@ControllerAdvice标注的类中,并且这些@ModelAttribute可以同时对许多控制器生效。
属性名没有被显式指定的时候又当如何呢?在这种情况下,框架将根据属性的类型给予一个默认名称。举个例子,若方法返回一个
Account类型的对象,则默认的属性名为"account"。可以通过设置@ModelAttribute标注的值来改变默认值。当向Model中直接添加属性时,请使用合适的重载方法addAttribute(..)-即带或不带属性名的方法。
@ModelAttribute标注也可以被用在@RequestMapping方法上。这种情况下,@RequestMapping方法的返回值将会被解释为model的一个属性,而非一个视图名,此时视图名将以视图命名约定来方式来确定。
方法参数使用@ModelAttribute标注
@ModelAttribute标注既可以被用在方法上,也可以被用在方法参数上。
标注在方法参数上的@ModelAttribute说明了该方法参数的值将由model中取得。如果model中找不到,那么该参数会先被实例化,然后被添加到model中。在model中存在以后,请求中所有名称匹配的参数都会填充到该参数中。
这在Spring MVC中被称为数据绑定,一个非常有用的特性,我们不用每次都手动从表格数据中转换这些字段数据。
@RequestMapping(path = "/owners/{ownerId}/pets/{petId}/edit", method = RequestMethod.POST)
public String processSubmit(@ModelAttribute Pet pet) { }
以上面的代码为例,这个Pet类型的实例可能来自哪里呢?有几种可能:
- 它可能因为
@SessionAttributes标注的使用已经存在于model中 - 它可能因为在同个控制器中使用了
@ModelAttribute方法已经存在于model中——正如上一小节所叙述的 - 它可能是由URI模板变量和类型转换中取得的(下面会详细讲解)
- 它可能是调用了自身的默认构造器被实例化出来的
@ModelAttribute方法常用于从数据库中取一个属性值,该值可能通过@SessionAttributes标注在请求中间传递。在一些情况下,使用URI模板变量和类型转换的方式来取得一个属性是更方便的方式。这里有个例子:
@RequestMapping(path = "/accounts/{account}", method = RequestMethod.PUT)
public String save(@ModelAttribute("account") Account account) {

}
这个例子中,model属性的名称("account")与URI模板变量的名称相匹配。如果配置了一个可以将String类型的账户值转换成Account类型实例的转换器Converter<String, Account>,那么上面这段代码就可以工作的很好,而不需要再额外写一个@ModelAttribute方法。
下一步就是数据的绑定。WebDataBinder类能将请求参数——包括字符串的查询参数和表单字段等——通过名称匹配到model的属性上。成功匹配的字段在需要的时候会进行一次类型转换(从String类型到目标字段的类型),然后被填充到model对应的属性中。
进行了数据绑定后,则可能会出现一些错误,比如没有提供必须的字段、类型转换过程的错误等。若想检查这些错误,可以在标注了@ModelAttribute的参数紧跟着声明一个BindingResult参数:
@RequestMapping(path = "/owners/{ownerId}/pets/{petId}/edit", method = RequestMethod.POST)
public String processSubmit(@ModelAttribute("pet") Pet pet, BindingResult result) {
    if (result.hasErrors()) {
        return "petForm";
    }

    // ...

}
拿到BindingResult参数后,可以检查是否有错误,可以通过Spring的<errors>表单标签来在同一个表单上显示错误信息。
BindingResult被用于记录数据绑定过程的错误,因此除了数据绑定外,还可以把该对象传给自己定制的验证器来调用验证。这使得数据绑定过程和验证过程出现的错误可以被搜集到一起,然后一并返回给用户:
@RequestMapping(path = "/owners/{ownerId}/pets/{petId}/edit", method = RequestMethod.POST)
public String processSubmit(@ModelAttribute("pet") Pet pet, BindingResult result) {

    new PetValidator().validate(pet, result);
    if (result.hasErrors()) {
        return "petForm";
    }

    // ...

}
又或者可以通过添加一个JSR-303规范的@Valid标注,这样验证器会自动被调用。
@RequestMapping(path = "/owners/{ownerId}/pets/{petId}/edit", method = RequestMethod.POST)
public String processSubmit(@Valid @ModelAttribute("pet") Pet pet, BindingResult result) {

    if (result.hasErrors()) {
        return "petForm";
    }

    // ...

}
异常处理
Spring MVC框架提供了多种机制用来处理异常,初次接触可能会对他们用法以及适用的场景感到困惑。现在以一个简单例子来解释这些异常处理的机制。
假设现在我们开发了一个博客应用,其中最重要的资源就是文章(Post),应用中的URL设计如下:
- 获取文章列表:
GET /posts/ - 添加一篇文章:
POST /posts/ - 获取一篇文章:
GET /posts/{id} - 更新一篇文章:
PUT /posts/{id} - 删除一篇文章:
DELETE /posts/{id}
这是非常标准的复合RESTful风格的URL设计,在Spring MVC实现的应用过程中,相应也会有5个对应的用@RequestMapping注解的方法来处理相应的URL请求。在处理某一篇文章的请求中(获取、更新、删除),无疑需要做这样一个判断——请求URL中的文章id是否在于系统中,如果不存在需要返回404 Not Found。
使用HTTP状态码
在默认情况下,Spring MVC处理Web请求时如果发现存在没有应用代码捕获的异常,那么会返回HTTP 500(Internal Server Error)错误。但是如果该异常是我们自己定义的并且使用@ResponseStatus注解进行修饰,那么Spring MVC则会返回指定的HTTP状态码:
@ResponseStatus(value = HttpStatus.NOT_FOUND, reason = "No Such Post")//404 Not Found
public class PostNotFoundException extends RuntimeException {
}
在Controller中可以这样使用它:
@RequestMapping(value = "/posts/{id}", method = RequestMethod.GET)
public String showPost(@PathVariable("id") long id, Model model) {
    Post post = postService.get(id);
    if (post == null) throw new PostNotFoundException("post not found");
    model.addAttribute("post", post);
    return "postDetail";
}
这样如果我们访问了一个不存在的文章,那么Spring MVC会根据抛出的PostNotFoundException上的注解值返回一个HTTP 404 Not Found给浏览器。
最佳实践
上述场景中,除了获取一篇文章的请求,还有更新和删除一篇文章的方法中都需要判断文章id是否存在。在每一个方法中都加上if (post == null) throw new PostNotFoundException("post not found");是一种解决方案,但如果有10个、20个包含/posts/{id}的方法,虽然只有一行代码但让他们重复10次、20次也是非常不优雅的。
为了解决这个问题,可以将这个逻辑放在Service中实现:
@Service
public class PostService {

    @Autowired
    private PostRepository postRepository;

    public Post get(long id) {
        return postRepository.findById(id)
                .orElseThrow(() -> new PostNotFoundException("post not found"));
    }
}

这里`PostRepository`继承了`JpaRepository`,可以定义`findById`方法返回一个`Optional<Post>`——如果不存在则Optional为空,抛出异常。
这样在所有的Controller方法中,只需要正常获取文章即可,所有的异常处理都交给了Spring MVC。
在Controller中处理异常
Controller中的方法除了可以用于处理Web请求,还能够用于处理异常处理——为它们加上@ExceptionHandler即可:
@Controller
public class ExceptionHandlingController {

  // @RequestHandler methods
  ...

  // Exception handling methods

  // Convert a predefined exception to an HTTP Status code
  @ResponseStatus(value=HttpStatus.CONFLICT, reason="Data integrity violation")  // 409
  @ExceptionHandler(DataIntegrityViolationException.class)
  public void conflict() {
    // Nothing to do
  }

  // Specify the name of a specific view that will be used to display the error:
  @ExceptionHandler({SQLException.class,DataAccessException.class})
  public String databaseError() {
    // Nothing to do.  Returns the logical view name of an error page, passed to
    // the view-resolver(s) in usual way.
    // Note that the exception is _not_ available to this view (it is not added to
    // the model) but see "Extending ExceptionHandlerExceptionResolver" below.
    return "databaseError";
  }

  // Total control - setup a model and return the view name yourself. Or consider
  // subclassing ExceptionHandlerExceptionResolver (see below).
  @ExceptionHandler(Exception.class)
  public ModelAndView handleError(HttpServletRequest req, Exception exception) {
    logger.error("Request: " + req.getRequestURL() + " raised " + exception);

    ModelAndView mav = new ModelAndView();
    mav.addObject("exception", exception);
    mav.addObject("url", req.getRequestURL());
    mav.setViewName("error");
    return mav;
  }
}
首先需要明确的一点是,在Controller方法中的@ExceptionHandler方法只能够处理同一个Controller中抛出的异常。这些方法上同时也可以继续使用@ResponseStatus注解用于返回指定的HTTP状态码,但同时还能够支持更加丰富的异常处理:
- 渲染特定的视图页面
- 使用
ModelAndView返回更多的业务信息
大多数网站都会使用一个特定的页面来响应这些异常,而不是直接返回一个HTTP状态码或者显示Java异常调用栈。当然异常信息对于开发人员是非常有用的,如果想要在视图中直接看到它们可以这样渲染模板(以JSP为例):
<h1>Error Page</h1>
<p>Application has encountered an error. Please contact support on ...</p>

<!--
Failed URL: ${url}
Exception:  ${exception.message}
<c:forEach items="${exception.stackTrace}" var="ste">    ${ste}
</c:forEach>
-->
全局异常处理
@ControllerAdvice提供了和上一节一样的异常处理能力,但是可以被应用于Spring应用上下文中的所有@Controller:
@ControllerAdvice
class GlobalControllerExceptionHandler {
    @ResponseStatus(HttpStatus.CONFLICT)  // 409
    @ExceptionHandler(DataIntegrityViolationException.class)
    public void handleConflict() {
        // Nothing to do
    }
}
Spring MVC默认对于没有捕获也没有被@ResponseStatus以及@ExceptionHandler声明的异常,会直接返回500,这显然并不友好,可以在@ControllerAdvice中对其进行处理(例如返回一个友好的错误页面,引导用户返回正确的位置或者提交错误信息):
@ControllerAdvice
class GlobalDefaultExceptionHandler {
    public static final String DEFAULT_ERROR_VIEW = "error";

    @ExceptionHandler(value = Exception.class)
    public ModelAndView defaultErrorHandler(HttpServletRequest req, Exception e) throws Exception {
        // If the exception is annotated with @ResponseStatus rethrow it and let
        // the framework handle it - like the OrderNotFoundException example
        // at the start of this post.
        // AnnotationUtils is a Spring Framework utility class.
        if (AnnotationUtils.findAnnotation(e.getClass(), ResponseStatus.class) != null)
            throw e;

        // Otherwise setup and send the user to a default error-view.
        ModelAndView mav = new ModelAndView();
        mav.addObject("exception", e);
        mav.addObject("url", req.getRequestURL());
        mav.setViewName(DEFAULT_ERROR_VIEW);
        return mav;
    }
}
总结
Spring在异常处理方面提供了一如既往的强大特性和支持,那么在应用开发中我们应该如何使用这些方法呢?以下提供一些经验性的准则:
- 不要在
@Controller中自己进行异常处理逻辑。即使它只是一个Controller相关的特定异常,在@Controller中添加一个@ExceptionHandler方法处理。 - 对于自定义的异常,可以考虑对其加上
@ResponseStatus注解 - 使用
@ControllerAdvice处理通用异常(例如资源不存在、资源存在冲突等)
进一步阅读
版权声明本文由Ricky创作,转载需署名作者且注明文章出处参考代码要获取本文的参考代码,请访问: https://www.tianmaying.com/tutorial/spring-mvc-quickstart/repo
参考文档https://www.tianmaying.com/tutorial/spring-mvc-quickstart