教材学习内容总结
一、常见控件
Android控件的可见属性:所有的Android控件都具有这个属性,可以通过android:visibility进行指定,可选值有三种,visible、invisible和gone。visible表示控件是可见的,这个值是默认值,不指定android:visibility时,控件都是可见的。invisible表示控件不可见,但是它仍然占据着原来的位置和大小,可以理解成控件变成透明状态了。gone则表示控件不仅不可见,而且不再占用任何屏幕空间。我们还可以通过代码来设置控件的可见性,使用的是setVisibility()方法,可以传入View.VISIBLE、View.INVISIBLE和View.GONE三种值。
1、TextView:显示文本
<TextView
	android:id="@+id/text_view" //控件ID
	android:layout_width="match_parent"   //文字宽度。fill_parent意义相同,但推荐match_parent
	android:layout_height="wrap_content" //文字高度
	android:text="This is TextView" //文字内容
	android:gravity="center"//文字对齐方式,可选值有top、bottom、left、right、center等,可以用“|”来同时指定多个值,这里我们指定的"center",效果等同于"center_vertical|center_horizontal",表示文字在垂直和水平方向都居中对齐。
	android:textSize="24sp" //文字大小
	android:textColor="#00ff00" //文字颜色  />
2、Button:按钮,可响应点击事件
<Button
	android:id="@+id/button"
	android:layout_width="match_parent"
	android:layout_height="wrap_content"
	android:text="Button" />
java代码:
定义
private Button button;
根据ID获取控件
button = (Button) findViewById(R.id.button);
添加点击事件
button.setOnClickListener(new OnClickListener() {
	@Override
	public void onClick(View v) {
		// 在此处添加逻辑
	}
});
或者 类 implements OnClickListener
button.setOnClickListener(this);
@Override
public void onClick(View v) {
	switch (v.getId()) {
		case R.id.button:
		// 在此处添加逻辑
		break;
		default:
		break;
	}
}
3、EditText:允许用户输入和编辑内容,程序处理内容
<EditText
	android:id="@+id/edit_text"
	android:layout_width="match_parent"
	android:layout_height="wrap_content"
	android:inputType="textPassword"//输入类型为密码
	android:hint="Type something here" //提示性文本,用户输入后消失
	android:maxLines="2" //指定最大行数,超过时文本会滚动显示
/>
java代码:
private EditText editText;
editText = (EditText) findViewById(R.id.edit_text);
String inputText = editText.getText().toString(); //获得输入的内容
4、ImageView:展示图片,图片放在res/drawable里面
<ImageView
	android:id="@+id/image_view"
	android:layout_width="wrap_content"
	android:layout_height="wrap_content"
	android:src="@drawable/ic_launcher" //指定图片资源,也可以通过代码指定
/>
java代码:
private ImageView imageView;
imageView = (ImageView) findViewById(R.id.image_view);
imageView.setImageResource(R.drawable.jelly_bean); //指定图片资源
5、ProgressBar:显示进度条
<ProgressBar
	android:id="@+id/progress_bar"
	android:layout_width="match_parent"
	android:layout_height="wrap_content"
	style="?android:attr/progressBarStyleHorizontal" //水平进度条,不加style是默认圆形的
	android:max="100" />
java代码中动态改变进度条进度:
int progress = progressBar.getProgress();
progress = progress + 10;
progressBar.setProgress(progress);
提示:Clean项目、如果遇到错误,提示如Caused by: java.lang.ClassCastException: android.widget.ProgressBar cannot be cast to android.widget.Button,代码无误的情况下选择eclipse的项目--清理,重构一下项目(重新编译)后程序正常运行。
6、进度条样式
(1)普通圆形
该类型进度条也就是一个表示运转的过程,例如发送短信,连接网络等等,表示一个过程正在执行中。没有设置它的风格,那么它就是圆形的,一直会旋转的进度条。
(2)超大号圆形

style="?android:attr/progressBarStyleLarge"
(3)小号圆形

style="?android:attr/progressBarStyleSmall"
(4)标题型圆形

style="?android:attr/progressBarStyleSmallTitle"
代码实现:
@Override
protected void onCreate(Bundle savedInstanceState) {
    super.onCreate(savedInstanceState);
    requestWindowFeature(Window.FEATURE_INDETERMINATE_PROGRESS);
    //请求窗口特色风格,这里设置成不明确的进度风格
    setContentView(R.layout.second);
    setProgressBarIndeterminateVisibility(true);
    //设置标题栏中的不明确的进度条是否可以显示
}
(5)长方形进度条

<progressBar android:id="@+id/progressbar_updown"
	android:layout_width="200dp"
	android:layout_height="wrap_content"
	style="?android:attr/progressBarStyleHorizontal"
	android:layout_gravity="center_vertical"
	android:max="100"//最大进度值为100
	android:progress="50"//初始化的进度值
	android:secondaryProgress="70"//初始化底层的第二个进度值   />
代码应用:
private ProgressBar myProgressBar;
myProgressBar = (ProgressBar) findViewById(R.id.progressbar_updown);
myProgressBar.incrementProgressBy(5);
//ProgressBar进度值增加5
myProgressBar.incrementProgressBy(-5);
//ProgressBar进度值减少5
myProgressBar.incrementSecondaryProgressBy(5);
//ProgressBar背后的第二个进度条 进度值增加5
myProgressBar.incrementSecondaryProgressBy(-5);
//ProgressBar背后的第二个进度条 进度值减少5
(6)标题中的长进度条

代码实现:
requestWindowFeature(Window.FEATURE_PROGRESS);
//请求一个窗口进度条特性风格
setContentView(R.layout.main);
setProgressBarVisibility(true);
//设置进度条可视
setProgress(myProgressBar.getProgress() * 100);
//设置标题栏中前景的一个进度条进度值
setSecondaryProgress(myProgressBar.getSecondaryProgress() * 100);
//设置标题栏中后面的一个进度条进度值
//ProgressBar.getSecondaryProgress() 是用来获取其他进度条的进度值
7、AlertDialog
在当前的界面弹出一个对话框,能够屏蔽掉其他控件的交互能力。
代码:
AlertDialog.Builder dialog = new AlertDialog.Builder (MainActivity.this);
dialog.setTitle("This is Dialog");
dialog.setMessage("Something important.");
dialog.setCancelable(false);
//确定按钮的点击事件
dialog.setPositiveButton("OK", new DialogInterface. OnClickListener() {
  @Override
	public void onClick(DialogInterface dialog, int which) {
	}
});
//取消按钮的点击事件
dialog.setNegativeButton("Cancel", new DialogInterface. OnClickListener() {
	@Override
	public void onClick(DialogInterface dialog, int which) {
	}
});
dialog.show();
8、ProgressDialog
和alertdialog类似,会在对话框中显示一个进度条,一般是用于表示当前操作比较耗时,让用户耐心地等待。
(1)图形
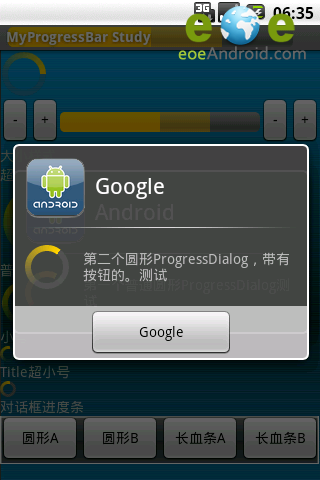
代码实现:
ProgressDialog mypDialog=new ProgressDialog(this);  //实例化
mypDialog.setProgressStyle(ProgressDialog.STYLE_SPINNER);
//设置进度条风格,风格为圆形,旋转的
mypDialog.setTitle("Google");
//设置ProgressDialog 标题
mypDialog.setMessage(getResources().getString(R.string.second));
//设置ProgressDialog 提示信息
mypDialog.setIcon(R.drawable.android);
//设置ProgressDialog 标题图标
mypDialog.setButton("Google",this);
//设置ProgressDialog 的一个Button
mypDialog.setIndeterminate(false);
//设置ProgressDialog 的进度条是否不明确
mypDialog.setCancelable(true);
//设置ProgressDialog 是否可以按退回按键取消
mypDialog.show();
//让ProgressDialog显示
(2)长方形
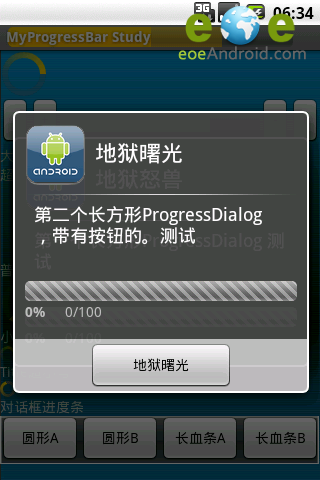
代码实现:
ProgressDialog mypDialog=new ProgressDialog(this);//实例化
mypDialog.setProgressStyle(ProgressDialog.STYLE_HORIZONTAL);
//设置进度条风格,风格为长形,有刻度的
mypDialog.setTitle("地狱怒兽");
//设置ProgressDialog 标题
mypDialog.setMessage(getResources().getString(R.string.second));
//设置ProgressDialog 提示信息
mypDialog.setIcon(R.drawable.android);
//设置ProgressDialog 标题图标
mypDialog.setProgress(59);
//设置ProgressDialog 进度条进度
mypDialog.setButton("地狱曙光",this);
//设置ProgressDialog 的一个Button
mypDialog.setIndeterminate(false);
//设置ProgressDialog 的进度条是否不明确
mypDialog.setCancelable(true);
//设置ProgressDialog 是否可以按退回按键取消
mypDialog.show();
//让ProgressDialog显示
9、ListView
ListView允许用户通过手指上下滑动的方式将屏幕外的数据滚动到屏幕内,同时屏幕上原有的数据则会滚动出屏幕。
二、布局
1、LinearLayout 线性布局
这个布局会将它所包含的控件在线性方向上依次排列。
- android:orientation:指定方向,vertical垂直,horizontal水平。如果LinearLayout的排列方向是horizontal,内部的控件就绝对不能将宽度指定为match_parent,因为这样的话单独一个控件就会将整个水平方向占满,其他的控件就没有可放置的位置了。同样的道理,如果LinearLayout的排列方向是vertical,内部的控件就不能将高度指定为match_parent。

- android:layout_gravity:控件在布局中的对齐方式。当LinearLayout的排列方向是horizontal时,只有垂直方向上的对齐方式才会生效,因为此时水平方向上的长度是不固定的,每添加一个控件,水平方向上的长度都会改变,因而无法指定该方向上的对齐方式。同样的道理,当LinearLayout的排列方向是vertical时,只有水平方向上的对齐方式才会生效。

- android:layout_weight:用权值分配空间,此时宽度/高度应为0。例如两个控件,weight都为1,表示1:1平分空间。
2、RelativeLayout 相对布局
通过相对定位的方式让控件出现在布局的任何位置。
- 相对父布局:android:layout_alignParentLeft、android:layout_alignParentTop、android:layout_alignParentRight、android:layout_alignParentBottom、android:layout_centerInParent:对齐父布局的左上角、右上角、左下角、右下角,居中。

- 相对控件:android:layout_above、android:layout_below、android:layout_toLeftOf、android:layout_toRightOf:在某控件的上下左右,控件一定要定义在某控件的后面。android:layout_alignLeft、android:layout_alignRight、android:layout_alignTop、android:layout_ alignBottom:跟某控件对齐左右上下边缘。
3、FrameLayout 框架布局
所有的控件都会摆放在布局的左上角。可以用来展示图片。
4、TableLayout 表格布局
使用表格的方式来排列控件。
每加入一个TableRow就表示在表格中添加了一行,然后在TableRow中每加入一个控件,就表示在该行中加入了一列,TableRow中的控件是不能指定宽度的。android:layout_span="2":可以让某控件占两列的宽度。
android:stretchColumns:允许将TableLayout中的某一列进行拉伸,以达到自动适应屏幕宽度的作用,android:stretchColumns="0" 指拉伸第一列。
5、AbsoluteLayout 绝对布局
所有控件的位置都是指定的,适应性比较差,不推荐使用。
android:layout_x,android:layout_y指定坐标。
三、单位和尺寸
在布局文件中指定宽高的固定大小有以下常用单位可供选择:px、pt、dp和sp。px是像素的意思,即屏幕中可以显示的最小元素单元。pt是磅数的意思,1磅等于1/72英寸,一般pt都会作为字体的单位来使用。 Android中的密度就是屏幕每英寸所包含的像素数,通常以dpi为单位。代码了解当前密度值:
float xdpi = getResources().getDisplayMetrics().xdpi;

float ydpi = getResources().getDisplayMetrics().ydpi;
dp是密度无关像素的意思,也被称作dip,和px相比,它在不同密度的屏幕中的显示比例将保持一致。 sp是可伸缩像素的意思,它采用了和dp同样的设计理念,解决了文字大小的适配问题。
根据Android的规定,在160dpi的屏幕上,1dp等于1px,而在320dpi的屏幕上,1dp就等于2px。因此,使用dp来指定控件的宽和高,就可以保证控件在不同密度的屏幕中的显示比例保持一致。
四、自定义控件
继承结构图
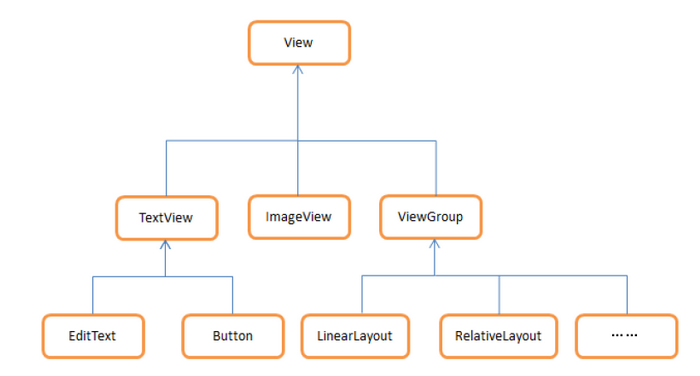
所有控件都是直接或间接继承自View的,所有布局都是直接或间接继承自ViewGroup的。View是Android中一种最基本的UI组件,它可以在屏幕上绘制一块矩形区域,并能响应这块区域的各种事件,因此,我们使用的各种控件其实就是在View的基础之上又添加了各自特有的功能。而ViewGroup则是一种特殊的View,它可以包含很多的子View和子ViewGroup,是一个用于放置控件和布局的容器。
- android:background:为布局/控件指定背景图。
- android:layout_margin:控件在上下左右偏移的距离。(android:layout_marginLeft类推)
1、引入布局
写好一个布局文件,在另外的布局文件中:
<include layout="@layout/title" />
2、自定义控件
写一个专门的类
public class TitleLayout extends LinearLayout {
	public TitleLayout(Context context, AttributeSet attrs) {
		super(context, attrs);
		LayoutInflater.from(context).inflate(R.layout.title, this);
		Button titleBack = (Button) findViewById(R.id.title_back);
		titleBack.setOnClickListener(new OnClickListener() {
			@Override
			public void onClick(View v) {
				((Activity) getContext()).finish();
			}
		});
	}
}
重写了LinearLayout中的带有两个参数的构造函数,在布局中引入TitleLayout控件就会调用这个构造函数。然后在构造函数中需要对标题栏布局进行动态加载,这就要借助LayoutInflater来实现了。通过LayoutInflater的from()方法可以构建出一个LayoutInflater对象,然后调用inflate()方法就可以动态加载一个布局文件,inflate()方法接收两个参数,第一个参数是要加载的布局文件的id,传入R.layout.title,第二个参数是给加载好的布局再添加一个父布局,指定为TitleLayout直接传入this。在自定义的布局中加入按钮和按钮的点击事件。
在布局文件中指明控件的完整类名,包名不可省略:
<com.example.uicustomviews.TitleLayout
	android:layout_width="match_parent"
	android:layout_height="wrap_content" >
</com.example.uicustomviews.TitleLayout>
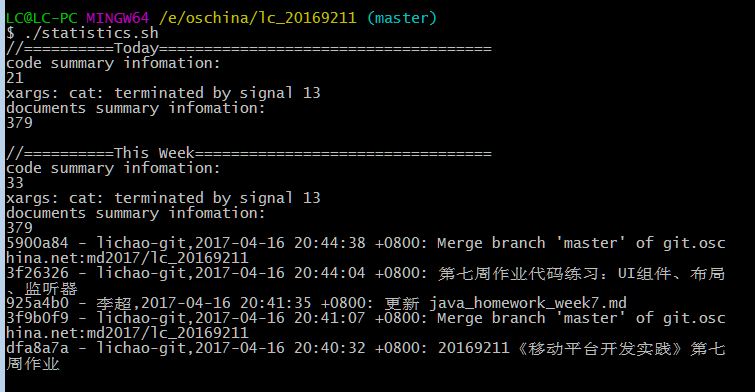
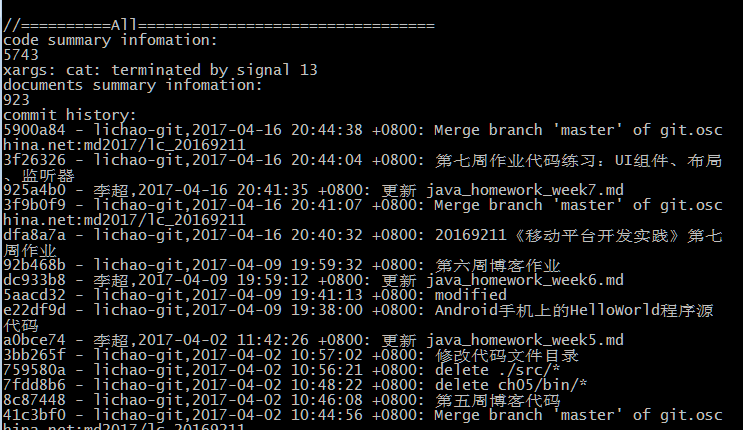
代码托管
学习进度条
| 代码行数(新增/累积) | 博客量(新增/累积) | 学习时间(新增/累积) | 重要成长 | |
|---|---|---|---|---|
| 目标 | 5000行 | 30篇 | 400小时 | |
| 第一周 | 220/220 | 1/1 | 10/10 | |
| 第二周 | 400/620 | 1/2 | 18/28 | |
| 第三周 | 650/1120 | 1/3 | 12/40 | |
| 第四周 | 1443/2563 | 1/4 | 12/52 | |
| 第五周 | 3214/5777 | 1/5 | 20/72 | |
| 第六周 | 33/5800 | 1/6 | 10/82 | |
| 第七周 | 21/5800 | 1/7 | 10/92 |
参考资料
- 《Android Programming: The Big Nerd Ranch Guide(Android 编程:权威指南)》;

- 《Head First Android Development(深入浅出Android 开发)》;

- 《Android 开发艺术探索》;

- 《Android 设计模式源码分析》;

- 《Android 开发精要》;

- 《App 研发录》。