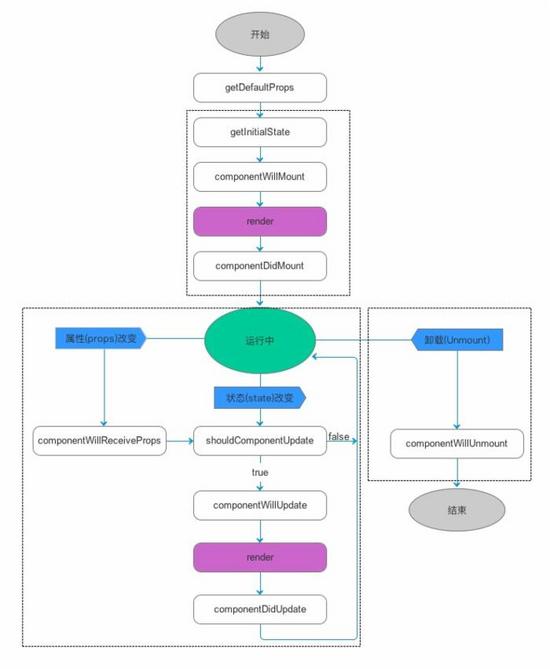
React Native生命周期主要分为三大阶段:实例化阶段(图中上框部分),存在阶段(图中左框部分),销毁阶段(图中右框部分)。
如图:

下面简单讲解一下三大阶段中各自的函数:
实例化阶段:
在日常开发中,最为常用的就是实例化阶段,因为该阶段是组件的构建,展示阶段。
getDefaultProps:
该函数用于初始化一些默认的属性,开发中,通常将一些固定不变的值放在该函数内进行初始化,比如url。可以利用this.props.XXX 来获取该属性值。由于被初始化后,以后就不会再调用getDefaultProps函数,所以不能对props修改,也就是pros是只读属性的。
getInitialState:
该函数用于对组件的一些状态进行初始化,该状态是随时变化的(也就是说该函数会被多次调用),比如ListView的datasource,rowData等等,同样的,可以通过this.state.XXX获取该属性值,同时可以对该值进行修改,通过this.setState修改,如:
this.setState({
    age:11,
    name:'少停'
});
componentWillMount:
该函数类似于iOS中的VillWillAppear,在组件即将加载在视图上调用。
render:
该函数组件必有的,通过返回JSX或其他组件来构成DOM,换言之,就是组件的核心渲染过程。
componentDidMount:
在执行完render函数之后,该函数被执行,我们通常可以在该函数当中做一些复杂操作,如网络请求。
存在阶段:
componentWillReceiveProps:
组件将要修改props或者state
shouldComponentUpdate:
常用于优化
componentWillUpdate:
组件更新时调用
componentDidUpdate:
组件更新完毕时调用
销毁阶段:
componentWillUnmount:
通常做一些清理内容

/**
 * Sample React Native App
 * https://github.com/facebook/react-native
 * 周少停 生命周期:实例化阶段.存在阶段.销毁阶段
 * 2016-09-19
 */

import React, { Component } from 'react';
import {
  AppRegistry,
  StyleSheet,
  Text,
  TouchableOpacity,
  View
} from 'react-native';
//ES5写法 ES5写法和ES6稍有不同
var LifeDate = React.createClass({
  getDefaultProps(){    //初始化一些不可以修改的值,初始化完毕后将不会再次调用,可以通过this.props来获取初始化后的值,不可以修改
    return{
        age:18 //永远18
    };
  },
  getInitialState(){     //初始化一些可以修改的值,会多次调用,可以通过this.state来获取值,通过this.setState来修改修改值
    return {
      isGoodPerson:true,
      content: '我是什么人'
    };
  },
  componentWillMount(){
    return{
                        //相当于iOS中viewWillAppear
    };
  },
  componentDidMount(){
    return{
                        //相当于iOS中的viewDidLoad 可以在这里做一些复杂操作,如网络请求数据
    };
  },
  render() {
    return (
      <View ref="topView" style={styles.container}>
        <TouchableOpacity onPress = {() =>this.dealWithState(this.state.isGoodPerson)}>
          <View style={styles.innerViewStyle}>
            <Text>{this.state.content}</Text>
            <Text>{this.props.age}</Text>
          </View>
        </TouchableOpacity>
      </View>
    );
  },
  dealWithState: function(data:Boolean){
    var isGoodPerson,content;
    if(data){
      isGoodPerson = false,
      content = '我是大好人'
    }else{
      isGoodPerson = true,
      content = '我是坏淫'
    }
    //更新状态机
    this.setState({
      isGoodPerson: isGoodPerson,
      content: content
    });
    //拿到View
    this.refs.topView
  }
});
const styles = StyleSheet.create({
  container: {
    flex: 1,
    justifyContent: 'center',
    alignItems: 'center',
    backgroundColor: '#F5FCFF'
  },
  innerViewStyle: {
    backgroundColor: 'red'
  }
});

AppRegistry.registerComponent('Project', () => LifeDate);
完成源码下载: