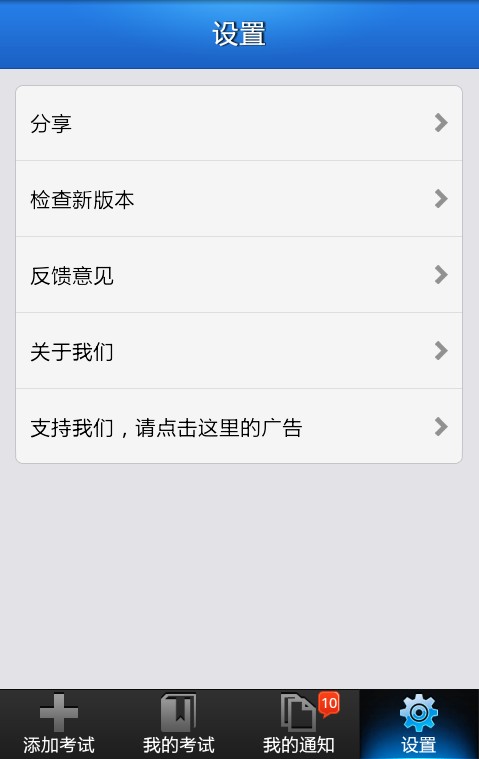
在项目中我们会经常遇到这种圆角效果,因为直角的看起来确实不那么雅观,可能大家会想到用图片实现,试想上中下要分别做三张图片,这样既会是自己的项目增大也会增加内存使用量,所以使用shape来实现不失为一种更好的实现方式。在这里先看一下shape的使用:
- <?xml version="1.0" encoding="utf-8"?>
- <shape xmlns:android="http://schemas.android.com/apk/res/android"
- android:shape="rectangle"
- >
- <!-- 渐变 -->
- <gradient
- android:startColor="#B5E7B8"
- android:endColor="#76D37B"
- android:angle="270"
- />
- <!-- 描边 -->
- <!-- <stroke android:width="1dip"
- android:color="@color/blue"
- /> -->
- <!-- 实心 -->
- <!-- <solid android:color="#FFeaeaea"
- /> -->
- <!-- 圆角 -->
- <corners
- android:bottomRightRadius="4dip"
- android:bottomLeftRadius="4dip"
- android:topLeftRadius="4dip"
- android:topRightRadius="4dip"
- />
- </shape>
solid:实心,就是填充的意思 android:color指定填充的颜色
gradient:渐变 android:startColor和android:endColor分别为起始和结束颜色,ndroid:angle是渐变角度,必须为45的整数倍。 另外渐变默认的模式为android:type="linear",即线性渐变,可以指定渐变为径向渐变,android:type="radial",径向渐变需要指定半径android:gradientRadius="50"。
stroke:描边 android:width="2dp" 描边的宽度,android:color 描边的颜色。
我们还可以把描边弄成虚线的形式,设置方式为: android:dashWidth="5dp" android:dashGap="3dp" 其中android:dashWidth表示'-'这样一个横线的宽度,android:dashGap表示之间隔开的距离。
corners:圆角 android:radius为角的弧度,值越大角越圆。
OK,下面开始自定义listview实现圆角的例子:
首先在drawable下定义只有一项的选择器app_list_corner_round.xml:
- <?xml version="1.0" encoding="utf-8"?>
- <shape xmlns:android="http://schemas.android.com/apk/res/android"
- android:shape="rectangle"
- >
- <!-- 渐变 -->
- <gradient
- android:startColor="#B5E7B8"
- android:endColor="#76D37B"
- android:angle="270"
- />
- <!-- 描边 -->
- <!-- <stroke android:width="1dip"
- android:color="@color/blue"
- /> -->
- <!-- 实心 -->
- <!-- <solid android:color="#FFeaeaea"
- /> -->
- <!-- 圆角 -->
- <corners
- android:bottomRightRadius="4dip"
- android:bottomLeftRadius="4dip"
- android:topLeftRadius="4dip"
- android:topRightRadius="4dip"
- />
- </shape>
如果是顶部第一项,则上面两个角为圆角,app_list_corner_round_top.xml:
- <?xml version="1.0" encoding="utf-8"?>
- <shape xmlns:android="http://schemas.android.com/apk/res/android"
- android:shape="rectangle"
- >
- <gradient
- android:startColor="#B5E7B8"
- android:endColor="#76D37B"
- android:angle="270"
- />
- <!-- <stroke android:width="1dip"
- android:color="@color/blue"
- /> -->
- <!-- <solid android:color="#FFeaeaea"
- /> -->
- <corners
- android:topLeftRadius="4dip"
- android:topRightRadius="4dip"
- />
- </shape>
如果是底部最后一项,则下面两个角为圆角,app_list_corner_round_bottom.xml:
- <?xml version="1.0" encoding="utf-8"?>
- <shape xmlns:android="http://schemas.android.com/apk/res/android"
- android:shape="rectangle"
- >
- <gradient
- android:startColor="#B5E7B8"
- android:endColor="#76D37B"
- android:angle="270"
- />
- <!-- <stroke android:width="1dip"
- android:color="@color/blue"
- /> -->
- <!-- <solid android:color="#FFeaeaea"
- /> -->
- <corners
- android:bottomRightRadius="4dip"
- android:bottomLeftRadius="4dip"
- />
- </shape>
如果是中间项,则应该不需要圆角, app_list_corner_round_center.xml:
- <?xml version="1.0" encoding="utf-8"?>
- <shape xmlns:android="http://schemas.android.com/apk/res/android"
- android:shape="rectangle"
- >
- <gradient
- android:startColor="#B5E7B8"
- android:endColor="#76D37B"
- android:angle="270"
- />
- <!-- <stroke android:width="1dip"
- android:color="@color/blue"
- /> -->
- <!-- <solid android:color="#FFeaeaea"
- /> -->
- <!-- <corners
- android:bottomRightRadius="4dip"
- android:bottomLeftRadius="4dip"
- /> -->
- </shape>
listview的背景图片大家可以使用stroke描述,这里我使用了一张9PNG的图片,因为9PNG图片拉伸不失真。
定义好了圆角的shape接下来是自定义listview的实现:
- package cn.com.karl.view;
- import cn.com.karl.test.R;
- import android.content.Context;
- import android.util.AttributeSet;
- import android.view.MotionEvent;
- import android.widget.AdapterView;
- import android.widget.ListView;
- /**
- * 圆角ListView
- */
- public class CornerListView extends ListView {
- public CornerListView(Context context) {
- super(context);
- }
- public CornerListView(Context context, AttributeSet attrs, int defStyle) {
- super(context, attrs, defStyle);
- }
- public CornerListView(Context context, AttributeSet attrs) {
- super(context, attrs);
- }
- @Override
- public boolean onInterceptTouchEvent(MotionEvent ev) {
- switch (ev.getAction()) {
- case MotionEvent.ACTION_DOWN:
- int x = (int) ev.getX();
- int y = (int) ev.getY();
- int itemnum = pointToPosition(x, y);
- if (itemnum == AdapterView.INVALID_POSITION)
- break;
- else {
- if (itemnum == 0) {
- if (itemnum == (getAdapter().getCount() - 1)) {
- //只有一项
- setSelector(R.drawable.app_list_corner_round);
- } else {
- //第一项
- setSelector(R.drawable.app_list_corner_round_top);
- }
- } else if (itemnum == (getAdapter().getCount() - 1))
- //最后一项
- setSelector(R.drawable.app_list_corner_round_bottom);
- else {
- //中间项
- setSelector(R.drawable.app_list_corner_round_center);
- }
- }
- break;
- case MotionEvent.ACTION_UP:
- break;
- }
- return super.onInterceptTouchEvent(ev);
- }
- }
下面看一下列表布局文件setting。xml:
- <?xml version="1.0" encoding="utf-8"?>
- <LinearLayout xmlns:android="http://schemas.android.com/apk/res/android"
- android:layout_width="fill_parent"
- android:layout_height="fill_parent"
- android:orientation="vertical" >
- <include layout="@layout/head" />
- <cn.com.karl.view.CornerListView
- android:id="@+id/setting_list"
- android:layout_width="fill_parent"
- android:layout_height="wrap_content"
- android:layout_margin="10dip"
- android:background="@drawable/corner_list_bg"
- android:cacheColorHint="#00000000" />
- </LinearLayout>
自定义Listview对应的item文件 main_tab_setting_list_item.xml
- <?xml version="1.0" encoding="utf-8"?>
- <LinearLayout xmlns:android="http://schemas.android.com/apk/res/android"
- android:layout_width="fill_parent"
- android:layout_height="wrap_content">
- <RelativeLayout
- android:layout_width="fill_parent"
- android:layout_height="50dp"
- android:gravity="center_horizontal">
- <TextView
- android:id="@+id/tv_system_title"
- android:layout_width="wrap_content"
- android:layout_height="wrap_content"
- android:layout_alignParentLeft="true"
- android:layout_centerVertical="true"
- android:layout_marginLeft="10dp"
- android:text="分享"
- android:textColor="@color/black"/>
- <ImageView
- android:id="@+id/iv_system_right"
- android:layout_width="wrap_content"
- android:layout_height="wrap_content"
- android:layout_alignParentRight="true"
- android:layout_centerVertical="true"
- android:layout_marginRight="10dp"
- android:src="@drawable/arrow1" />
- </RelativeLayout>
- </LinearLayout>
最后是在activity中填充适配器:
- package cn.com.karl.test;
- import java.util.ArrayList;
- import java.util.HashMap;
- import java.util.List;
- import java.util.Map;
- import cn.com.karl.view.CornerListView;
- import android.os.Bundle;
- import android.view.View;
- import android.widget.SimpleAdapter;
- public class SettingActivity extends BaseActivity {
- private CornerListView cornerListView = null;
- private List<Map<String, String>> listData = null;
- private SimpleAdapter adapter = null;
- @Override
- protected void onCreate(Bundle savedInstanceState) {
- // TODO Auto-generated method stub
- super.onCreate(savedInstanceState);
- setContentView(R.layout.setting);
- cornerListView = (CornerListView)findViewById(R.id.setting_list);
- setListData();
- adapter = new SimpleAdapter(getApplicationContext(), listData, R.layout.main_tab_setting_list_item ,
- new String[]{"text"}, new int[]{R.id.tv_system_title});
- cornerListView.setAdapter(adapter);
- initHead();
- btn_leftTop.setVisibility(View.INVISIBLE);
- tv_head.setText("设置");
- }
- /**
- * 设置列表数据
- */
- private void setListData(){
- listData = new ArrayList<Map<String,String>>();
- Map<String,String> map = new HashMap<String, String>();
- map.put("text", "分享");
- listData.add(map);
- map = new HashMap<String, String>();
- map.put("text", "检查新版本");
- listData.add(map);
- map = new HashMap<String, String>();
- map.put("text", "反馈意见");
- listData.add(map);
- map = new HashMap<String, String>();
- map.put("text", "关于我们");
- listData.add(map);
- map = new HashMap<String, String>();
- map.put("text", "支持我们,请点击这里的广告");
- listData.add(map);
- }
- }
这样就完成了,虽然过程较繁杂,但是当做一个好的模板以后使用会方便很多,最后看一下实现效果和我们用图片实现的一样吗

