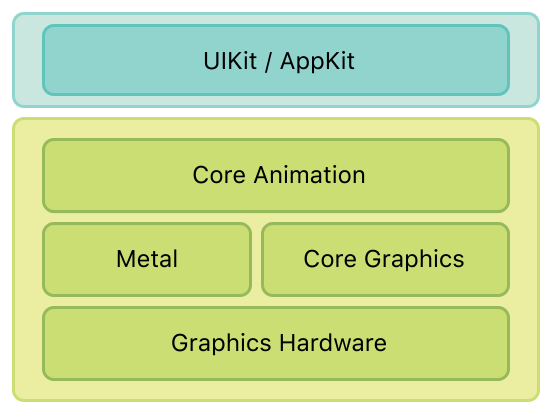
核心动画是一套包含图形绘制,投影,动画的Objective–C类集合。它通过开发人员所熟悉的应用程序套件和Cocoa Touch视图架构的抽象分层模式,同时使用先进的合作效果提供了一套流畅的动画。
使用核心动画,你只需要设置一些参数比如起点和终点,剩下的帧核心动画为你自动完成。
核心动画类有以下分类:
- 提供显示内容的图层类。
- 动画和计时类。
- 布局和约束类。
- 事务类,在原子更新的时候组合图层类。
核心动画的基础类包含在Quartz核心框架(Quartz Core framework)里面。
图层类是核心动画的核心基础,它提供了一套抽象的概念(假如你使用过NSView或者UIView的话,你一定会对它很熟悉)。CALayer是整个图层类的基础,它是所有核心动画图层类的父类。
虽然核心动画的图层和 Cocoa的视图在很大程度上没有一定的相似性,但是他们两者最大的区别是,图层不会直接渲染到屏幕上。
在模型-视图-控制器(model-view-controller)概念里面NSView和UIView是典型的视图部分,但是在核心动画里面图层是模型部分。图层封装了几何、时间、可视化属性,同时它提供了图层现实的内容,但是实际显示的过程则不是由它来完成。
图层树是核心动画里面类似Cocoa视图的层次结构。比如一个NSView或者UIView的实例拥有父视图(superview)和子视图(subview),一个核心动画的图层拥有父图层(suplayer)和子图层(sublayer)
动画类:
一个基础动画仅仅需要要你指定一个开始的值和一个结束的值,或者目前的值,关键帧动画可以使你指定:
每个关键帧的一个数组值,例如,你可以给一个CGColorRef对象的一个数组,用来改变背景的颜色。
在0.0和1.0之间的一个数组值,用来给每个帧指定总时间中所占的百分比的时间。
一个时间功能对象的数组(CAMediaTimingFunction),用来指定每帧动画的时间步调。这个区域会使用一个预设的值来指定,例如kCAMediaTimingFunctionEaseIn,动画出来时慢,然后加速。
关键帧动画真的相当的简单。首先,你需要考虑的是,成功的使用关键帧动画,你需要做的基本步骤:
1.决定你想要做动画的属性(例如,框架,背景,锚点,位置,边框,等等)
2.在动画对象值的区域中,指定开始,结束,和中间的值。这些都是你的关键帧(看清单4-2)
3.使用duration这个字段指定动画的时间
4.通常来讲,通过使用times这个字段,来给每帧动画指定一个时间。如果你没有指定这些,核心动画就会通过你在values这个字段指定的值分割出时间段。
5.通常,指定时间功能来控制步调。
这些都是你需要做的。你创建你的动画和增加他们到层中。调用-addAnimation就开始了动画。
关键帧动画的时间:
[animation setCalculationMode:kCAAnimationLinear];
[animation setKeyTimes:
    [NSArray arrayWithObjects:
        [NSNumbernumberWithFloat:0.0],
        [NSNumbernumberWithFloat:0.25],
        [NSNumber numberWithFloat:0.50],
        [NSNumbernumberWithFloat:0.75],
        [NSNumbernumberWithFloat:1.0],
         nil]];
CAAnimationGroup *animGroup = [CAAnimationGroup animation];
animGroup.animations = [NSArray arrayWithObjects:moveAnim,scaleAnim,opacityAnim, nil];
animGroup.duration = 1;
[view.layer addAnimation:animGroup forKey:nil];
隐式动画:
/假设layer当前position为(100.0,100.0)
theLayer.position=CGPointMake(500.0,500.0);
显式动画:
CABasicAnimation *theAnimation;

theAnimation=[CABasicAnimation animationWithKeyPath:@"opacity"];
theAnimation.duration=3.0;
theAnimation.repeatCount=2;
theAnimation.autoreverses=YES;
theAnimation.fromValue=[NSNumber numberWithFloat:1.0];
theAnimation.toValue=[NSNumber numberWithFloat:0.0];
[theLayer addAnimation:theAnimation forKey:@"animateOpacity"];
CALayer:
CALayer是个简单的类,它是用来在屏幕上显示内容展示的矩形区域。每个UIView都有一个根CALayer,UIView在这个layer上描绘东西。
CALayer *myLayer = myView.layer; //先添加QuartzCore库,才能使用CALayer。

myLayer.backgroundColor = [UIColor orangeColor].CGColor;
myLayer.cornerRadius = 20.0;

CALayer *sublayer = [CALayer layer];
    sublayer.backgroundColor = [UIColor purpleColor].CGColor;
    sublayer.shadowOffset = CGSizeMake(0, 3);
    sublayer.shadowRadius = 5.0;
    sublayer.shadowColor = [UIColor blackColor].CGColor;
    sublayer.shadowOpacity = 0.8;
    sublayer.frame = CGRectMake(30, 30, 128, 192);
    [self.view.layer addSublayer:sublayer];
CALayer *sublayer = [CALayer layer];

CALayer *imageLayer = [CALayer layer];
imageLayer.frame = sublayer.bounds;
imageLayer.cornerRadius = 10.0;
imageLayer.contents = (id)[UIImage imageNamed:@"snaguosha.png"].CGImage;
imageLayer.masksToBounds = YES;
[sublayer addSublayer:imageLayer];
CABasicAnimation animationWithKeyPath 一些规定的值:
废话说的有点多,以下是常用的动画:
1、按路径移动:
 [self.imageView.layer addAnimation:self.pathAnimation forKey:nil];

- (CAAnimation*)pathAnimation;
{
    CGMutablePathRef path = CGPathCreateMutable();
    CGPathMoveToPoint(path,NULL,50.0,120.0);
    CGPathAddLineToPoint(path, NULL, 300, 488);
//    CGPathAddCurveToPoint(path,NULL,50.0,275.0,150.0,275.0,150.0,120.0);
//    CGPathAddCurveToPoint(path,NULL,150.0,275.0,250.0,275.0,250.0,120.0);
//    CGPathAddCurveToPoint(path,NULL,250.0,275.0,350.0,275.0,350.0,120.0);
//    CGPathAddCurveToPoint(path,NULL,350.0,275.0,450.0,275.0,450.0,120.0);
    CAKeyframeAnimation * animation = [CAKeyframeAnimation animationWithKeyPath:@"position"];
    [animation setPath:path];
    [animation setDuration:3.0];
//    [animation setAutoreverses:YES];
    CFRelease(path);
    return animation;
}
- (CAAnimation*)valuesAnimation;
{
    CGPoint pt0 = CGPointMake(50.0, 120.0);
    CGPoint pt1 = CGPointMake(50.0, 275.0);
    CGPoint pt2 = CGPointMake(150.0, 275.0);
    CGPoint pt3 = CGPointMake(150.0, 120.0);
    CGPoint pt4 = CGPointMake(150.0, 275.0);
    CGPoint pt5 = CGPointMake(250.0, 275.0);
    CGPoint pt6 = CGPointMake(250.0, 120.0);
    CGPoint pt7 = CGPointMake(250.0, 275.0);
    CGPoint pt8 = CGPointMake(350.0, 275.0);
    CGPoint pt9 = CGPointMake(350.0, 120.0);
    CGPoint pt10 = CGPointMake(350.0, 275.0);
    CGPoint pt11 = CGPointMake(450.0, 275.0);
    CGPoint pt12 = CGPointMake(450.0, 120.0);

    NSArray *values = [NSArray arrayWithObjects:
                       [NSValue valueWithCGPoint:pt0],
                       [NSValue valueWithCGPoint:pt1],
                       [NSValue valueWithCGPoint:pt2],
                       [NSValue valueWithCGPoint:pt3],
                       [NSValue valueWithCGPoint:pt4],
                       [NSValue valueWithCGPoint:pt5],
                       [NSValue valueWithCGPoint:pt6],
                       [NSValue valueWithCGPoint:pt7],
                       [NSValue valueWithCGPoint:pt8],
                       [NSValue valueWithCGPoint:pt9],
                       nil];
    CAKeyframeAnimation
    *animation = [CAKeyframeAnimation
                  animationWithKeyPath:@"position"];
    [animation setValues:values];
    [animation setDuration:3.0];
    [animation setAutoreverses:YES];
    return animation;
}

 [self.imageView.layer addAnimation:self.valuesAnimation forKey:nil];
2、缩放:
CABasicAnimation *scaleAnim = [CABasicAnimation animationWithKeyPath:@"transform"];
    scaleAnim.fromValue = [NSValue valueWithCATransform3D:CATransform3DIdentity];
    //x,y轴缩小到0.1,Z 轴不变
    scaleAnim.toValue = [NSValue valueWithCATransform3D:CATransform3DMakeScale(0.1, 0.1, 1.0)];
    scaleAnim.removedOnCompletion = YES;

[self.imageView.layer addAnimation:scaleAnim forKey:nil];
3、透明度变化:
    //透明度变化
    CABasicAnimation *opacityAnim = [CABasicAnimation animationWithKeyPath:@"opacity"];
    opacityAnim.fromValue = [NSNumber numberWithFloat:1.0];
    opacityAnim.toValue = [NSNumber numberWithFloat:0.1];
    opacityAnim.removedOnCompletion = YES;
    opacityAnim.duration = 3.0f;

[self.imageView.layer addAnimation:opacityAnim forKey:nil];
4、组合:
    CAAnimationGroup *animGroup = [CAAnimationGroup animation];
    animGroup.animations = [NSArray arrayWithObjects:moveAnim, scaleAnim,opacityAnim, nil];
    animGroup.duration = 1;
    [self.imageView.layer addAnimation:opacityAnim forKey:nil];
5、旋转:
    CABasicAnimation *TransformAnim = [CABasicAnimation animationWithKeyPath:@"transform"];
    TransformAnim.fromValue = [NSValue valueWithCATransform3D:CATransform3DIdentity];

    //沿Z轴旋转
    TransformAnim.toValue = [NSValue valueWithCATransform3D: CATransform3DMakeRotation(M_PI,0,0,1)];
 TransformAnim.cumulative = YES;
    TransformAnim.duration =3;
    //旋转2遍,360度
    TransformAnim.repeatCount =2;
 [self.imageView.layer addAnimation:TransformAnim forKey:nil];