在安装ElasticSearch时遇到了很多坑,所以在这里做个笔记记录一下。
首先我考虑的是使用docker进行部署,结果发现虚拟机直接内存溢出,我也是无解了,也就是说使用docker部署还得注意容器的资源分配调度,于是便放弃了。
ElasticSearch安装
ElasticSearch下载地址:https://www.elastic.co/cn/downloads/elasticsearch
很多人下载的是rpm包安装,这里我下载的linux的已经编译好的包,直接配置启动就行了,因为它自带了JDK等环境:

下载后,使用tar命令解压,然后使用bin/elasticsearch启动即可,比如我这里下载的是7.12.0版本:
    # 解压
    tar -zxf elasticsearch-7.12.0-linux-x86_64.tar.gz
    # 启动
    elasticsearch-7.12.0/bin/elasticsearch
然后启动报错,大致内容如下:
  ERROR: [3] bootstrap checks failed. You must address the points described in the following [3] lines before starting Elasticsearch.
  bootstrap check failure [1] of [3]: max file descriptors [4096] for elasticsearch process is too low, increase to at least [65535]
  bootstrap check failure [2] of [3]: max virtual memory areas vm.max_map_count [65530] is too low, increase to at least [262144]
  bootstrap check failure [3] of [3]: the default discovery settings are unsuitable for production use; at least one of [discovery.seed_hosts, discovery.seed_providers, cluster.initial_master_nodes] must be configured
  ERROR: Elasticsearch did not exit normally - check the logs at /opt/elasticsearch/logs/elasticsearch.log
大致内容是说我们3个配置没有做,也对,刚下载解压后直接运行,肯定会有很多问题:
1、bootstrap check failure [1] of [3]: max file descriptors [4096] for elasticsearch process is too low, increase to at least [65535]
这个是说ElasticSearch进程的最大文件描述大小需要65535,而当前是4096,解决办法是修改 /etc/security/limits.conf 文件,在末尾加上(存在则修改,数值不能比要求的小):
    * soft nofile 65535
    * hard nofile 65535
    * soft nproc 65535
    * hard nproc 65535
2、bootstrap check failure [2] of [3]: max virtual memory areas vm.max_map_count [65530] is too low, increase to at least [262144]
这是说最大虚拟内存太小(vm.max_map_count配置),至少需要262144,当前为65530,解决办法是修改 /etc/sysctl.conf 文件,在末尾加上(存在则修改,数值不能比要求的小):
vm.max_map_count=262144
3、bootstrap check failure [3] of [3]: the default discovery settings are unsuitable for production use; at least one of [discovery.seed_hosts, discovery.seed_providers, cluster.initial_master_nodes] must be configured
这是说我们没有对ElasticSearch发现进行配置,至少需要配置discovery.seed_hosts, discovery.seed_providers, cluster.initial_master_nodes中的一个:
    discovery.seed_hosts:集群节点列表,每个值应采用host:port或host的形式(其中port默认为设置transport.profiles.default.port,如果未设置则返回transport.port)
    discovery.seed_providers:集群节点列表的提供者,作用就是获取discovery.seed_hosts,比如使用文件指定节点列表
    cluster.initial_master_nodes:初始化时master节点的选举列表,一般使用node.name(节点名称)配置指定,配置旨在第一次启动有效,启动之后会保存,下次启动会读取保存的数据
比如这里我全部的配置如下(config/elasticsearch.yml),更多配置参考官网:https://www.elastic.co/guide/en/elasticsearch/reference/current/settings.html:
    # 启动地址,如果不配置,只能本地访问
    network.host: 0.0.0.0
    # 节点名称
    node.name: node-name
    # 节点列表
    discovery.seed_hosts: ["192.168.209.132"]
    # 初始化时master节点的选举列表
    cluster.initial_master_nodes: [ "node-name" ]
    # 集群名称
    cluster.name: cluster-name
    # 对外提供服务的端口
    http.port: 9200
    # 内部服务端口
    transport.port: 9300
    # 跨域支持
    http.cors.enabled: true
    # 跨域访问允许的域名地址(正则)
    http.cors.allow-origin: /.*/
注:如果还报上面1、2的异常,那可能需要重启一下了。
接着启动,结果提示jdk版本不对,原来我自己配置了环境变量JAVA_HOME,而ElasticSearch就是用了这个环境变量对应的java来运行,即通过sdk版本不对,另外还warning,JAVA_HOME环境变量已经弃用了,使用ES_JAVA_HOME代替:
  warning: usage of JAVA_HOME is deprecated, use ES_JAVA_HOME
  Future versions of Elasticsearch will require Java 11; your Java version from [/opt/jdk1.8.0_202/jre] does not meet this requirement. Consider switching to a distribution of Elasticsearch with a bundled JDK. If you are already using a distribution with a bundled JDK, ensure the JAVA_HOME environment variable is not set.
因为ElasticSearch包中包含了JDK,所以我们可以直接使用,有两种使用办法:
1、添加环境变量ES_JAVA_HOME指向ElasticSearch包中包含了JDK目录
2、修改bin/elasticsearch-env中代码,我们注释掉JAVA_HOME部分的判断:

配置完成后,在启动,然后访问 http://192.168.209.132:9200/,如果显示类似下面的json,表示启动成功了

账号密码
如果想要添加账户密码,只需要在config/elasticsearch.yml中添加下面两个配置:
    xpack.security.enabled: true
    xpack.security.transport.ssl.enabled: true
上面两个配置表示启用x-pack验证插件
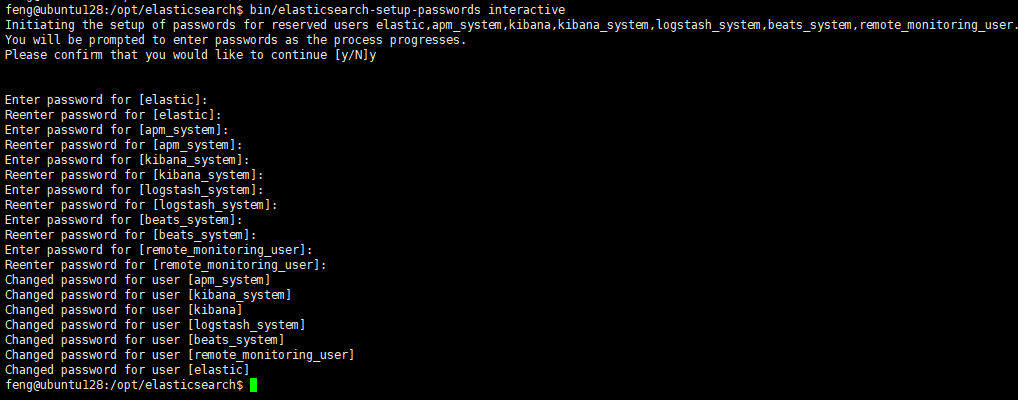
然后重启ElasticSearch,执行下面的命令即可设置与ElasticSearch关联的一些账号的密码:
bin/elasticsearch-setup-passwords interactive

设置完成之后就需要使用账号密码访问了,账号就是上图的第一个设置elastic:
    # 不带认证访问会报认证异常
    curl http://localhost:9200/_cat/indices
    # -u参数指定账号,执行后会提示输入密码
    curl -u elastic http://localhost:9200/_cat/indices
    # -u参数指定账号和密码,格式:user:password
    curl -u elastic:123456 http://localhost:9200/_cat/indices
设置了密码,还可以修改密码:
    # 需要使用api来操作修改密码
    curl -XPOST -u elastic http://localhost:9200/_security/user/elastic/_password -H "Content-Type:application/json" -d "{"password":"abcdefg"}"
如果忘记密码,可以先取消认证,即注释掉上面config/elasticsearch.yml中添加的两个配置,然后重启ElasticSearch,然后找到一个类型.security-X的index,删除掉就可以回到最初无密码认证的状态了:
    # 查看.security-X存在与否
    curl http://localhost:9200/_cat/indices | grep ".security"
    # 删除index,我这里是.security-7
    curl -XDELETE http://localhost:9200/.security-7

中文分词器
ElasticSearch应用时,我们常常会使用到中文,这样ElasticSearch原来的分词器就不够用了,需要安装一个中文分词器,用的多的就是IK分词器,下载地址(下载.zip包):https://github.com/medcl/elasticsearch-analysis-ik/releases

下载好之后,在ElasticSearch主目录下的plugins目录新建一个目录,然后将下载好的ik分词器压缩包放进去,再使用unzip解压:
    # 在ElasticSearch主目录下的plugins目录新建一个目录,我的ElasticSearch主目录是/opt/elasticsearch,所以在/opt/elasticsearch/plugins新建一个目录:analysis-ik
    mkdir /opt/elasticsearch/plugins/analysis-ik
    # 将下载好的ik分词器压缩包放进去
    mv elasticsearch-analysis-ik-7.12.0.zip /opt/elasticsearch/plugins/analysis-ik/
    # 进入新建的analysis-ik目录进行解压
    cd /opt/elasticsearch/plugins/analysis-ik
    # 解压
    unzip elasticsearch-analysis-ik-7.12.0.zip
做完之后重启ElasticSearch就可以了
集群
上面是启动一个节点的ElasticSearch集群,如果我们要启动多个节点的集群,比如我有三台服务器:192.168.209.128,192.168.209.129,192.168.209.132
首先按照上面单个节点的形式保证能运行起来,然后修改配置:
192.168.209.132
    # 启动地址,如果不配置,只能本地访问
    network.host: 0.0.0.0
    # 节点名称
    node.name: node-132
    # 节点列表
    discovery.seed_hosts: ["192.168.209.128", "192.168.209.129", "192.168.209.132"]
    # 初始化时master节点的选举列表
    cluster.initial_master_nodes: [ "node-128", "node-129", "node-132" ]
    # 集群名称
    cluster.name: cluster-name
    # 对外提供服务的端口
    http.port: 9200
    # 内部服务端口
    transport.port: 9300
   # 跨域支持
    http.cors.enabled: true
    # 跨域访问允许的域名地址(正则)
    http.cors.allow-origin: /.*/
192.168.209.129
    # 启动地址,如果不配置,只能本地访问
    network.host: 0.0.0.0
    # 节点名称
    node.name: node-129
    # 节点列表
    discovery.seed_hosts: ["192.168.209.128", "192.168.209.129", "192.168.209.132"]
    # 初始化时master节点的选举列表
    #cluster.initial_master_nodes: [ "node-128", "node-129", "node-132" ]
    # 集群名称
    cluster.name: cluster-name
    # 对外提供服务的端口
    http.port: 9200
    # 内部服务端口
    transport.port: 9300
   # 跨域支持
    http.cors.enabled: true
    # 跨域访问允许的域名地址(正则)
    http.cors.allow-origin: /.*/
192.168.209.128
    # 启动地址,如果不配置,只能本地访问
    network.host: 0.0.0.0
    # 节点名称
    node.name: node-128
    # 节点列表
    discovery.seed_hosts: ["192.168.209.128", "192.168.209.129", "192.168.209.132"]
    # 初始化时master节点的选举列表
    #cluster.initial_master_nodes: [ "node-128", "node-129", "node-132" ]
    # 集群名称
    cluster.name: cluster-name
    # 对外提供服务的端口
    http.port: 9200
    # 内部服务端口
    transport.port: 9300
   # 跨域支持
    http.cors.enabled: true
    # 跨域访问允许的域名地址(正则)
    http.cors.allow-origin: /.*/
这里的配置基本上和单机启动一样,只不过在discovery.seed_hosts中指定了节点列表。然后将每个节点启动即可,然后分别访问各服务的9200端口,查看服务是否正常启动。
同时,也可以访问任意节点的http://host:9200/_cluster/health查看集群状态:green表示正常,yellow表示警告,red表示异常
注:并不是每个节点都需要配置cluster.initial_master_nodes
Kibana安装
Kibana下载地址:https://www.elastic.co/cn/downloads/kibana
同样的,下载编译好的包(7.12.0)

然后解压,然后修改config/kibana.yml,添加ElasticSearch的节点配置:
  # 服务端口,默认5601
  server.port: 5601
  # 启动地址,默认localhost,如果不修改,那么远程无法访问
  server.host: 0.0.0.0
  # elasticsearch集群地址,旧版本是elasticsearch.url
  elasticsearch.hosts: ["http://192.168.209.128:9200","http://192.168.209.129:9200","http://192.168.209.132:9200"]
  # 如果ES有设置账号密码,则添加下面的账号密码设置
  #elasticsearch.username: username
  #elasticsearch.password: passwor
然后就可以启动了:
    # 启动
    kibana-7.12.0-linux-x86_64/bin/kibana
启动之后,访问http://ip:5601就能访问到kibina了,kibina内部功能功能很多,像绘制图表仪表盘等等,还有很多模拟数据,可自行了解,不过我们开发常用的就是它的Dev-Tools了,用来发送Restfull的请求来访问操作ElasticSearch:

进入dev-tools后就可以自行操作了:
