独占式,同一时刻仅有一个线程持有同步状态。
独占式同步状态获取
acquire(int arg)方法为AQS提供的模板方法,该方法为独占式获取同步状态,但是该方法对中断不敏感,也就是说由于线程获取同步状态失败加入到CLH同步队列中,后续对线程进行中断操作时,线程不会从同步队列中移除。代码如下:
public final void acquire(int arg) {
    if (!tryAcquire(arg) &&
        acquireQueued(addWaiter(Node.EXCLUSIVE), arg))
        selfInterrupt();
}
各个方法定义如下:
-
tryAcquire:去尝试获取锁,获取成功则设置锁状态并返回true,否则返回false。该方法自定义同步组件自己实现,该方法必须要保证线程安全的获取同步状态。
-
addWaiter:如果tryAcquire返回FALSE(获取同步状态失败),则调用该方法将当前线程加入到CLH同步队列尾部。
-
acquireQueued:当前线程会根据公平性原则来进行阻塞等待(自旋),直到获取锁为止;并且返回当前线程在等待过程中有没有中断过。
-
selfInterrupt:产生一个中断。
-
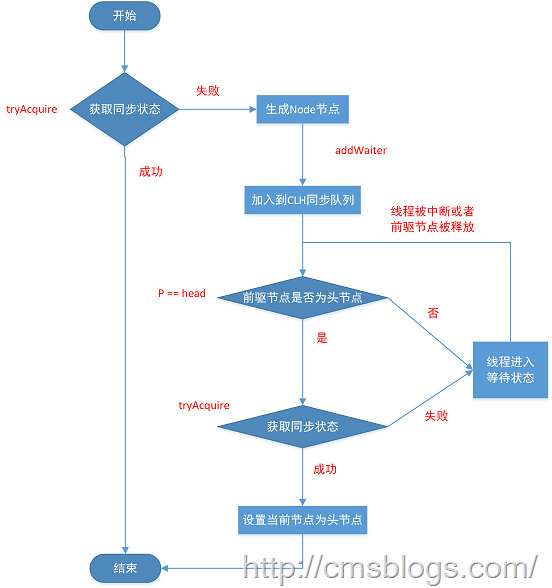
acquireQueued方法为一个自旋的过程,也就是说当前线程(Node)进入同步队列后,就会进入一个自旋的过程,每个节点都会自省地观察,当条件满足,获取到同步状态后,就可以从这个自旋过程中退出,否则会一直执行下去。如下:
 final boolean acquireQueued(final Node node, int arg) {
  boolean failed = true;
  try {
      //中断标志
      boolean interrupted = false;
      /*
       * 自旋过程,其实就是一个死循环而已
       */
      for (;;) {
          //当前线程的前驱节点
          final Node p = node.predecessor();
          //当前线程的前驱节点是头结点,且同步状态成功
          if (p == head && tryAcquire(arg)) {
              setHead(node);
              p.next = null; // help GC
              failed = false;
              return interrupted;
          }
          //获取失败,线程等待--具体后面介绍
          if (shouldParkAfterFailedAcquire(p, node) &&
                  parkAndCheckInterrupt())
              interrupted = true;
      }
  } finally {
      if (failed)
          cancelAcquire(node);
  }
   }
从上面代码中可以看到,当前线程会一直尝试获取同步状态,当然前提是只有其前驱节点为头结点才能够尝试获取同步状态,理由:
保持FIFO同步队列原则。
头节点释放同步状态后,将会唤醒其后继节点,后继节点被唤醒后需要检查自己是否为头节点。
acquire(int arg)方法流程图如下:

独占式获取响应中断
AQS提供了acquire(int arg)方法以供独占式获取同步状态,但是该方法对中断不响应,对线程进行中断操作后,该线程会依然位于CLH同步队列中等待着获取同步状态。为了响应中断,AQS提供了acquireInterruptibly(int arg)方法,该方法在等待获取同步状态时,如果当前线程被中断了,会立刻响应中断抛出异常InterruptedException。
	public final void acquireInterruptibly(int arg)
        throws InterruptedException {
    if (Thread.interrupted())
        throw new InterruptedException();
    if (!tryAcquire(arg))
        doAcquireInterruptibly(arg);
}
首先校验该线程是否已经中断了,如果是则抛出InterruptedException,否则执行tryAcquire(int arg)方法获取同步状态,如果获取成功,则直接返回,否则执行doAcquireInterruptibly(int arg)。doAcquireInterruptibly(int arg)定义如下:
	private void doAcquireInterruptibly(int arg)
    throws InterruptedException {
    final Node node = addWaiter(Node.EXCLUSIVE);
    boolean failed = true;
    try {
        for (;;) {
            final Node p = node.predecessor();
            if (p == head && tryAcquire(arg)) {
                setHead(node);
                p.next = null; // help GC
                failed = false;
                return;
            }
            if (shouldParkAfterFailedAcquire(p, node) &&
                parkAndCheckInterrupt())
                throw new InterruptedException();
        }
    } finally {
        if (failed)
            cancelAcquire(node);
    }
}
doAcquireInterruptibly(int arg)方法与acquire(int arg)方法仅有两个差别。1.方法声明抛出InterruptedException异常,2.在中断方法处不再是使用interrupted标志,而是直接抛出InterruptedException异常。
独占式超时获取
AQS除了提供上面两个方法外,还提供了一个增强版的方法:tryAcquireNanos(int arg,long nanos)。该方法为acquireInterruptibly方法的进一步增强,它除了响应中断外,还有超时控制。即如果当前线程没有在指定时间内获取同步状态,则会返回false,否则返回true。如下:
    public final boolean tryAcquireNanos(int arg, long nanosTimeout)
    throws InterruptedException {
    if (Thread.interrupted())
        throw new InterruptedException();
    return tryAcquire(arg) ||
        doAcquireNanos(arg, nanosTimeout);
}
tryAcquireNanos(int arg, long nanosTimeout)方法超时获取最终是在doAcquireNanos(int arg, long nanosTimeout)中实现的,如下:
       private boolean doAcquireNanos(int arg, long nanosTimeout)
     throws InterruptedException {
    //nanosTimeout <= 0
    if (nanosTimeout <= 0L)
        return false;
    //超时时间
    final long deadline = System.nanoTime() + nanosTimeout;
    //新增Node节点
    final Node node = addWaiter(Node.EXCLUSIVE);
    boolean failed = true;
    try {
        //自旋
        for (;;) {
            final Node p = node.predecessor();
            //获取同步状态成功
            if (p == head && tryAcquire(arg)) {
                setHead(node);
                p.next = null; // help GC
                failed = false;
                return true;
            }
            /*
             * 获取失败,做超时、中断判断
             */
            //重新计算需要休眠的时间
            nanosTimeout = deadline - System.nanoTime();
            //已经超时,返回false
            if (nanosTimeout <= 0L)
                return false;
            //如果没有超时,则等待nanosTimeout纳秒
            //注:该线程会直接从LockSupport.parkNanos中返回,
            //LockSupport为JUC提供的一个阻塞和唤醒的工具类,后面做详细介绍
            if (shouldParkAfterFailedAcquire(p, node) &&
                    nanosTimeout > spinForTimeoutThreshold)
                LockSupport.parkNanos(this, nanosTimeout);
            //线程是否已经中断了
            if (Thread.interrupted())
                throw new InterruptedException();
        }
    } finally {
        if (failed)
            cancelAcquire(node);
    }
}
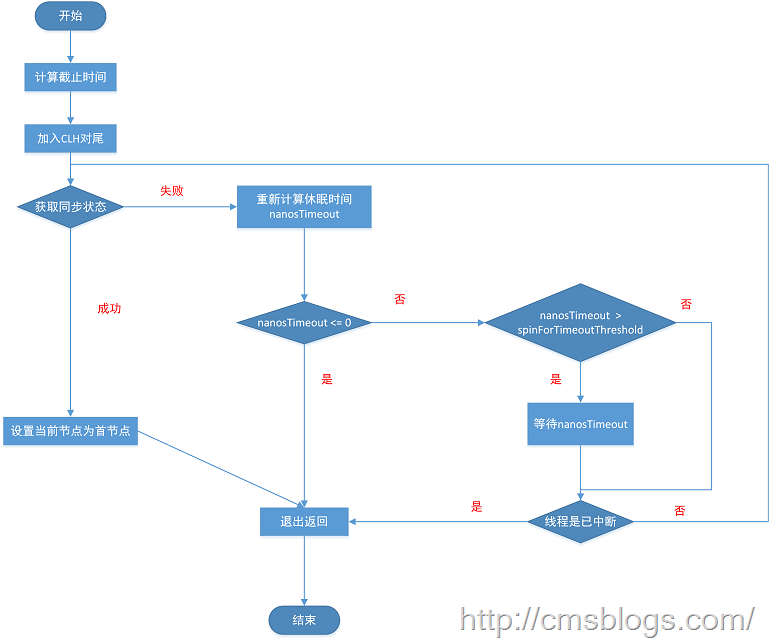
针对超时控制,程序首先记录唤醒时间deadline ,deadline = System.nanoTime() + nanosTimeout(时间间隔)。如果获取同步状态失败,则需要计算出需要休眠的时间间隔nanosTimeout(= deadline – System.nanoTime()),如果nanosTimeout <= 0 表示已经超时了,返回false,如果大于spinForTimeoutThreshold(1000L)则需要休眠nanosTimeout ,如果nanosTimeout <= spinForTimeoutThreshold ,就不需要休眠了,直接进入快速自旋的过程。原因在于 spinForTimeoutThreshold 已经非常小了,非常短的时间等待无法做到十分精确,如果这时再次进行超时等待,相反会让nanosTimeout 的超时从整体上面表现得不是那么精确,所以在超时非常短的场景中,AQS会进行无条件的快速自旋。
整个流程如下:

独占式同步状态释放
当线程获取同步状态后,执行完相应逻辑后就需要释放同步状态。AQS提供了release(int arg)方法释放同步状态:
public final boolean release(int arg) {
if (tryRelease(arg)) {
Node h = head;
if (h != null && h.waitStatus != 0)
unparkSuccessor(h);
return true;
}
return false;
}
该方法同样是先调用自定义同步器自定义的tryRelease(int arg)方法来释放同步状态,释放成功后,会调用unparkSuccessor(Node node)方法唤醒后继节点(如何唤醒LZ后面介绍)。
这里稍微总结下:
在AQS中维护着一个FIFO的同步队列,当线程获取同步状态失败后,则会加入到这个CLH同步队列的对尾并一直保持着自旋。在CLH同步队列中的线程在自旋时会判断其前驱节点是否为首节点,如果为首节点则不断尝试获取同步状态,获取成功则退出CLH同步队列。当线程执行完逻辑后,会释放同步状态,释放后会唤醒其后继节点。
共享式
共享式与独占式的最主要区别在于同一时刻独占式只能有一个线程获取同步状态,而共享式在同一时刻可以有多个线程获取同步状态。例如读操作可以有多个线程同时进行,而写操作同一时刻只能有一个线程进行写操作,其他操作都会被阻塞。
共享式同步状态获取
AQS提供acquireShared(int arg)方法共享式获取同步状态:
	public final void acquireShared(int arg) {
    if (tryAcquireShared(arg) < 0)
		//获取失败,自旋获取同步状态
        doAcquireShared(arg);
	}
从上面程序可以看出,方法首先是调用tryAcquireShared(int arg)方法尝试获取同步状态,如果获取失败则调用doAcquireShared(int arg)自旋方式获取同步状态,共享式获取同步状态的标志是返回 >= 0 的值表示获取成功。自选式获取同步状态如下:
	private void doAcquireShared(int arg) {
    /共享式节点
    final Node node = addWaiter(Node.SHARED);
    boolean failed = true;
    try {
        boolean interrupted = false;
        for (;;) {
            //前驱节点
            final Node p = node.predecessor();
            //如果其前驱节点,获取同步状态
            if (p == head) {
                //尝试获取同步
                int r = tryAcquireShared(arg);
                if (r >= 0) {
                    setHeadAndPropagate(node, r);
                    p.next = null; // help GC
                    if (interrupted)
                        selfInterrupt();
                    failed = false;
                    return;
                }
            }
            if (shouldParkAfterFailedAcquire(p, node) &&
                    parkAndCheckInterrupt())
                interrupted = true;
        }
    } finally {
        if (failed)
            cancelAcquire(node);
    }
	}
tryAcquireShared(int arg)方法尝试获取同步状态,返回值为int,当其 >= 0 时,表示能够获取到同步状态,这个时候就可以从自旋过程中退出。
acquireShared(int arg)方法不响应中断,与独占式相似,AQS也提供了响应中断、超时的方法,分别是:acquireSharedInterruptibly(int arg)、tryAcquireSharedNanos(int arg,long nanos),这里就不做解释了。
共享式同步状态释放
获取同步状态后,需要调用release(int arg)方法释放同步状态,方法如下:
	public final boolean releaseShared(int arg) {
    if (tryReleaseShared(arg)) {
        doReleaseShared();
        return true;
    }
    return false;
	}
因为可能会存在多个线程同时进行释放同步状态资源,所以需要确保同步状态安全地成功释放,一般都是通过CAS和循环来完成的。
自定义同步组件(基于共享式访问)
package com.ljq;

import java.util.concurrent.TimeUnit;
import java.util.concurrent.locks.AbstractQueuedSynchronizer;
import java.util.concurrent.locks.Condition;
import java.util.concurrent.locks.Lock;

public class TwinsLock implements Lock{
    private final Sync sync = new Sync(3);
    //静态内部类
    private final static class Sync extends AbstractQueuedSynchronizer{
        private static final long serialVersionUID = 1L;
        public Sync(int count){
            //判断实例化时设定的资源数
            if(count <=0){
                throw new IllegalArgumentException("访问的资源数需大于0");
            }
            setState(count);
        }
        //重写AbstractQueuedSynchronizer中的共享获取同步状态的方法
        @Override
        protected int tryAcquireShared(int reduceCount) {
            for(;;){
                int current  = getState();
                int newCount = current-reduceCount;
                //判断当前资源数是否还有剩余和并当前状态更新的是否正确
                if(newCount < 0 || compareAndSetState(current , newCount)){
                    return newCount;
                }
            }
        }
        //重写AbstractQueuedSynchronizer中的共享释放同步状态的方法
        @Override
        protected boolean tryReleaseShared(int returnCount ) {
            for(;;){
                int current = getState();
                int newCount = current + returnCount;
                if(compareAndSetState(current , newCount)){
                    return true;
                }
            }
        }
    }

    @Override
    public void lock() {
        this.sync.acquireShared(1);
    }
    @Override
    public void unlock() {
        this.sync.releaseShared(1);
    }
}
package com.ljq;

import java.util.concurrent.locks.Lock;

import org.junit.Test;

public class TwinsLockTest {
    @Test
    @SuppressWarnings("static-access" )
    public void test( ) throws InterruptedException {
        final Lock lock = new TwinsLock();
        class Worker extends Thread{
            @Override
            public void run() {
                lock.lock();
                try{
                    Thread.currentThread().sleep(1000);
                    System.out.println(Thread.currentThread().getName());
                    Thread.currentThread().sleep(1000);
                }catch(InterruptedException e){
                    e.printStackTrace();
                }finally {
                    lock.unlock();
                }
            }
        }
        for(int i = 0 ; i < 10 ; i++){
            Worker worker =new Worker();
            worker.setDaemon(true);
            worker.start();
        }
        for(int i = 0 ; i < 10 ; i++){
            Thread.currentThread().sleep(1000);
            System.out.println();
        }
    }
}
//结果
Thread-0
Thread-1
Thread-2

Thread-4
Thread-5
Thread-3

Thread-7
Thread-6
Thread-8

Thread-9