链接:https://zhuanlan.zhihu.com/p/21463650
来源:知乎
著作权归作者所有。商业转载请联系作者获得授权,非商业转载请注明出处。
2016.7.5 更新:长文多图代码预警,电脑食用效果更佳。
完整版代码已上传 GitHub,后续一些有的没的的代码更新也都在GitHub上(https://github.com/LaytonW/qrcode)
给结尾的几个被自动识别的QR码做了防自动识别。。顺便也检测一下我们这不怎么高的容错率(7%)。要是再被知乎自动识别了。。。_(:з」∠)_
======================================================================
作为一只程序猿,第一篇文章自然要写hello world,但是呐,我看你们今天这样热情,只写一句hello world就闷声你们又不高兴。刚好最近实习工作在处理QR码,就来薛习一下QR码版本的hello world吧。
-
前期准备
-
背景信息
要想实现一个QR码生成器,我们首先需要了解什么是QR码,QR码有哪些类型,以及QR码是如何工作的。
QR码(Quick Response Code) 是二维码的一种,在正方形二位矩阵内通过黑白标识编码二进制位从而编码数据,最早发明用于日本汽车制造业追踪零部件。QR码现有40个标准版本,4个微型版本。QR码的数据编码方式有四种:
- 数字(Numeric):0-9
- 大写字母和数字(alphanumeric):0-9,A-Z,空格,$,%,*,+,-,.,/,:
- 二进制/字节:通过 ISO/IEC 8859-1 标准编码
- 日本汉字/假名:通过 Shift JISJIS X 0208 标准编码
QR码还有四种容错级别可以选择:
- L(Low):7%的字码可被修正
- M(Medium):15%的字码可被修正
- Q(Quartile):25%的字码可被修正
- H(High):30%的字码可被修正
(Wikipedia: QR code, https://en.wikipedia.org/wiki/QR_code)
(40+4)×4×4=...... ∑(っ °Д °;)っ 咳。。好,那我们为了读者着想 (←_←),只实现 Version 1-Byte mode-Low error control 的QR码生成就好了嗯。。
好我们继续。
如今QR码随处可见,大家阅码无数可能也发现了一些规律:这些QR码有大有小、有红有绿,有些还有各种装饰,但是它们总有一些部分看起来十分相似,比如三个角落里总有“回”字形的图样。这就要谈到QR码的结构了。
- 结构
除了存储编码的数据,QR码里还含有一些基本标准里钦定的图样来帮助扫描软件快速识别和解码。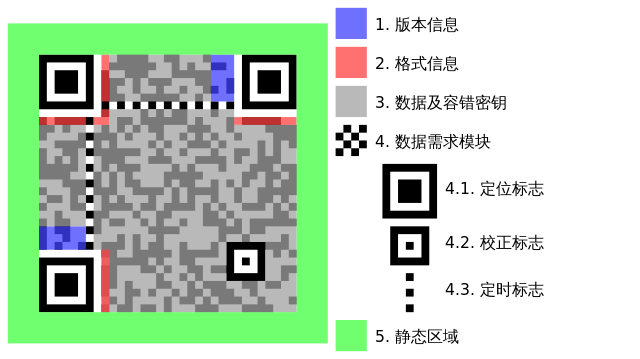 (图片来源:Wikipedia:QR码,https://zh.wikipedia.org/wiki/QR%E7%A2%BC)
标准(ISO/IEC 18004)里是这样说的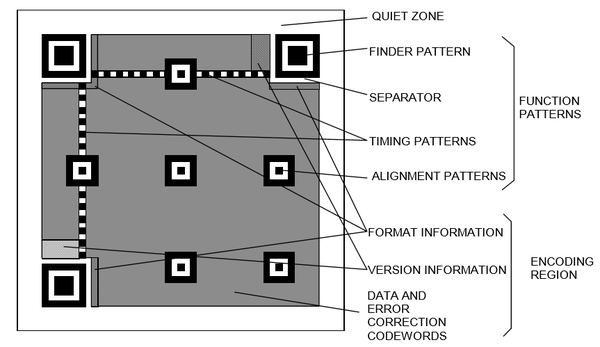 (图片来源:ISO/IEC 18004: Information – Automatic identification and data capture techniques – QR Code barcode symbology specification)
所以说我们做QR码啊,还是要按照QR标准,按照基本标准来。我没有任何硬点这些图样的意思,它们都是有自己的作用的,我们一个一个说。
- 功能性图样(function patterns):不参与编码数据的区域。
- 闷声区(quite zone):标准中规定标准QR码(Ver1-40)四周应有宽4个单位、微型QR码四周应有宽2个单位的区域颜色等效于QR码中白色点(light module),其中不能有图样或标记,以保证QR码清晰可识别。
- 定位标识(finder pattern):之前提到的“回”字形标识,位于QR码的左上,右上和左下角,用于协助扫描软件定位QR码并变换坐标系。定位标识可以让QR码在任意角度被扫描,这是一维条形码做不到的。
 (图片来源:ISO/IEC 18004: Information – Automatic identification and data capture techniques – QR Code barcode symbology specification)
 - 分隔符(separator):一单位宽的白色点带,位于每个定位标识和编码区域之间用于区分。
- 定时标识(timing pattern):一单位宽的黑白交替点带,由黑色起始和结束,用于指示标识密度和确定坐标系。
- 校正标识(alignment pattern):只有 Version 2 及以上的QR码有校正标识。校正标识用于进一步校正坐标系。校正标识的数量取决于版本。
- 编码区域(encoding region):编码数据的区域。
- 格式信息(format information):存储容错级别和数据掩码,和额外的自身BCH容错码,讲到再展开。
- 版本信息(version information):存储版本信息。
- 数据及容错字码(data and error correction codewords):存储编码方式,实际编码的数据和数据的RS容错码。
以上就是QR码的通用结构标准了,再来看一看我们要实现的 Version 1 QR码的结构: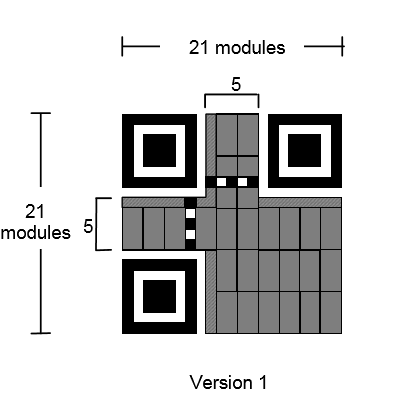
(图片来源:ISO/IEC 18004: Information – Automatic identification and data capture techniques – QR Code barcode symbology specification)
分析完了QR码的结构,豁然开朗,这东西也不就这么回事嘛,简单!开始做!(多年以后,当程序猿面对电脑屏幕的时候,将会回想起不懂事的自己立起flag的那个下午)
- 流程
方便的是,标准也规定了将数据编码成QR码的流程:
- 数据分析(data analysis):分析输入数据,根据数据决定要使用的QR码版本、容错级别和编码模式。低版本的QR码无法编码过长的数据,含有非数字字母字符的数据要使用扩展字符编码模式。因为我们只实现 V1-L byte mode QR码,此步略去。
- 编码数据(data encoding):根据选择的编码模式,将输入的字符串转换成比特流,插入模式标识码(mode indicator)和终止标识符(terminator),把比特流切分成八比特的字节,加入填充字节来满足标准的数据字码数要求。
- 计算容错码(error correction coding):对步骤二产生的比特流计算容错码,附在比特流之后。高版本的编码方式可能需要将数据流切分成块(block)再分别进行容错码计算。
- 组织数据(structure final message):根据结构图把步骤三得到的有容错的数据流切分,准备填充。
- 填充(module placement in matrix):把数据和功能性图样根据标准填充到矩阵中。
- 应用数据掩码(data masking):应用标准中的八个数据掩码来变换编码区域的数据,选择最优的掩码应用。讲到再展开。
- 填充格式和版本信息(format and version information):计算格式和版本信息填入矩阵,完成QR码。
简单! ( ̄ε(# ̄)☆╰╮( ̄▽ ̄///) ↓↓↓
-
代码实战
为(yin)了(wei)可(wo)读(lan)和简单,我们用 Python 来实现这个简化版QR码生成器。为了生成和操作图像,我们需要安装第三方图像处理库 Python Imaging Library (PIL) 。限于篇幅,本文不对PIL的使用做过多介绍,入门可参见 PIL - 廖雪峰的官方网站,Python Imaging Library Handbook。
因为程序需要处理矩阵,方便起见在这里先定义坐标系统。以矩阵的左上角为原点,原点坐标定义为(0,0),i 轴向右,坐标 i 对应列;j 轴向下,坐标 j 对应行。于是对于图像中的像素(i,j),有矩阵元素 mat [ j ] [ i ] 与之对应。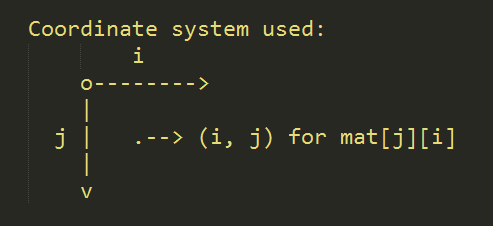
新建Python代码文件 qrcode.py,引入需要的库:
# qrcode.py
from PIL import Image, ImageDraw
为了思维简便,我们自顶向下地构建代码。首先,假设我们已经填充好了一个QR码的矩阵bitmap,我们需要把相应的图像生成出来。这里就有了图像大小的问题:Version 1 的QR码表示为 21×21 的矩阵,直接把这个矩阵当做位图来输出的话,图像只有21像素宽。为了获得大小合适的图像,我们先定义图像大小,再把每一个像素映射到合适的矩阵元素上。
在 qrcode.py 中添加如下代码:
def _genImage(bitmap, width, filename):
    '''
    Generate image corresponding to the input bitmap
    with specified width and filename.
    '''
    # New image in black-white mode initialized with white.
    img = Image.new('1', (width, width), 'white')
    drw = ImageDraw.Draw(img)
    # Normalized pixel width.
    pwidth = width / len(bitmap)
    for j in range(width):
        # Normalized j coordinate in bitmap
        normalj = j / pwidth
        for i in range(width):
            # Normalized i coordinate in bitmap
            normali = i / pwidth
            if normalj < len(bitmap) and normali < len(bitmap):
                # Draw pixel.
                drw.point((i, j), fill=bitmap[normalj][normali])
    img.save(filename)
这个函数接收三个参数:QR码矩阵bitmap,图像宽度width,保存文件名filename。
    img = Image.new('1', (width, width), 'white')
    drw = ImageDraw.Draw(img)
这两行初始化了图像和绘图工具。初始化图像时的参数 '1' 代表生成黑白模式图像,'white' 代表图像初始化填充白色。
pwidth = width / len(bitmap)
用图像宽度除以矩阵维度得到标准化后的像素宽度(QR码中一个单位对应的像素数)。
    normalj = j / pwidth
    normali = i / pwidth
遍历图像时,将像素坐标(i,j)标准化为矩阵坐标 [ i ][ j ]。检查不越界之后,按坐标绘制像素,最后保存图像。
保存代码后,我们测试一下这个函数。在文件目录打开命令行/shell,输入python进入Python REPL。引入qrcode然后进行测试。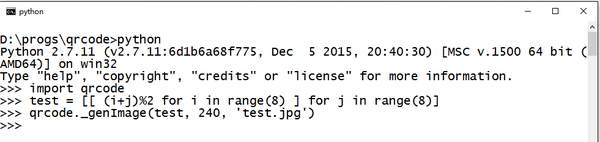
我们定义了一个矩阵 test,然后调用 qrcode._genImage 来生成一个240×240,名为 test.jpg 的图像如下。
我们注意到,原点处对应 (0 + 0) % 2 的像素为黑,因为 0 值对应黑色,1 对应白色。为了明确,在 qrcode.py 中加入如下定义
_LIGHT = 1
_DARK = 0
可见我们的图像生成函数是成功的,现在只需要填充出QR码矩阵就行了。
嗯,玩一会。。_(:з」∠)_

好我们继续。
_genImage 函数接收QR码矩阵作为参数,自顶向下地,我们需要生成这个矩阵。考虑到一个QR码中有很多不变的图样(fixed pattern),我们可以预先填充好一个含有这些不变图样的模板,生成QR码矩阵时直接把编码好的数据填充到这个模板里就行了。
在 qrcode.py 中加入模板的定义,待填充:
_ver1 = [[_LIGHT for i in range(21)] for j in range(21)]
假设 _ver1 是已经填充好的模板,我们生成QR码矩阵需要怎么做呢?根据前期准备,我们需要编码数据,填充数据,应用掩码,再填充格式信息。于是我们定义这些函数:
def _fmtEncode(fmt):
    '''Encode format code.'''
    pass

def _encode(data):
    '''
    Encode the input data stream.
    Add mode prefix, encode data using ISO-8859-1,
    group data, add padding suffix, and call RS encoding method.
    '''
    pass

def _fillData(bitstream):
    '''Fill the encoded data into the template QR code matrix'''
    pass

def _mask(mat):
    '''
    Mask the data QR code matrix with all 8 masks,
    and select the best mask.
    '''
    pass

def _fillInfo(arg):
    '''
    Fill the encoded format code into the masked QR code matrix.
    '''
    pass

def _genBitmap(bitstream):
    '''
    Take in the encoded data stream and generate the
    final QR code bitmap.
    '''
    return _fillInfo(_mask(_fillData(bitstream)))
_encode 编码数据,_fillData 将这些数据填充到模板中,_mask 应用掩码,_fmtEncode 编码格式信息,_fillInfo 填充格式信息,最后 _genBitmap 把这些函数按标准串联起来,返回准备好的QR码矩阵给 _genImage 来生成QR码。
接下来我们按照流程顺序实现这些函数。
- 编码数据
首先我们要检测输入的数据是否超过V1-L byte mode的最大编码长度17,如果超过就抛出异常。在 qrcode.py 开始定义异常:
class CapacityOverflowException(Exception):
    '''Exception for data larger than 17 characters in V1-L byte mode.'''
    def __init__(self, arg):
        self.arg = arg

    def __str__(self):
        return repr(self.arg)
在 _encode 中加入检测
def _encode(data):
    '''
    Encode the input data stream.
    Add mode prefix, encode data using ISO-8859-1,
    group data, add padding suffix, and call RS encoding method.
    '''
    if len(data) > 17:
        raise CapacityOverflowException(
            'Error: Version 1 QR code encodes no more than 17 characters.')
在编码数据之前,还要按照标准的规定加入编码模式前缀和数据字符计数,byte mode的前缀是 0100,接上八位二进制数代表的数据长度,构成数据前缀。再把数据用 ISO/IEC 8859-1 标准编码,按八个二进制位分组,接上终止符和11101100和00010001交替的填充字节,按标准修剪到19字节,完成数据编码。实现 _encode 如下:
def _encode(data):
    '''
    Encode the input data stream.
    Add mode prefix, encode data using ISO-8859-1,
    group data, add padding suffix, and call RS encoding method.
    '''
    if len(data) > 17:
        raise CapacityOverflowException(
            'Error: Version 1 QR code encodes no more than 17 characters.')
    # Byte mode prefix 0100.
    bitstring = '0100'
    # Character count in 8 binary bits.
    bitstring += '{:08b}'.format(len(data))
    # Encode every character in ISO-8859-1 in 8 binary bits.
    for c in data:
        bitstring += '{:08b}'.format(ord(c.encode('iso-8859-1')))
    # Terminator 0000.
    bitstring += '0000'
    res = list()
    # Convert string to byte numbers.
    while bitstring:
        res.append(int(bitstring[:8], 2))
        bitstring = bitstring[8:]
    # Add padding pattern.
    while len(res) < 19:
        res.append(int('11101100', 2))
        res.append(int('00010001', 2))
    # Slice to 19 bytes for V1-L.
    res = res[:19]
在L容错等级下,编码了数据我们还需要计算出七位的里德-所罗门码(可简单了,看我和善的眼神 )
里德-所罗门码是定长码。这意味着一个固定长度输入的数据将被处理成一个固定长度的输出数据。在最常用的(255,223)里所码中,223个里德-所罗门输入符号(每个符号有8个位元)被编码成255个输出符号。
大多数里所错误校正编码流程是成体系的。这意味着输出的码字中有一部分包含着输入数据的原始形式。
符号大小为8位元的里所码迫使码长(编码长度)最长为255个符号。
标准的(255,223)里所码可以在每个码字中校正最多16个里所符号的错误。由于每个符号事实上是8个位元,这意味着这个码可以校正最多16个短爆发性错误。
里德-所罗门码,如同卷积码一样,是一种透明码。这代表如果信道符号在队列的某些地方被反转,解码器一样可以工作。解码结果将是原始数据的补充。但是,里所码在缩短后会失去透明性。在缩短了的码中,“丢失”的比特需要被0或者1替代,这由数据是否需要补足而决定。(如果符号这时候反转,替代的0需要变成1)。于是乎,需要在里所解码前对数据进行强制性的侦测决定(“是”或者“补足”)。
(Wikipedia: 里德-所罗门码,https://zh.wikipedia.org/wiki/%E9%87%8C%E5%BE%B7-%E6%89%80%E7%BD%97%E9%97%A8%E7%A0%81)
......................................(⊙v⊙).....................................
这。。还是留给有兴趣的读者吧(微笑)
参考:Reed–Solomon codes for coders
在 _encode 之前加入如下RS容错码计算工具:
def _gfpMul(x, y, prim=0x11d, field_charac_full=256, carryless=True):
    '''Galois field GF(2^8) multiplication.'''
    r = 0
    while y:
        if y & 1:
            r = r ^ x if carryless else r + x
        y = y >> 1
        x = x << 1
        if prim > 0 and x & field_charac_full:
            x = x ^ prim
    return r

# Calculate alphas to simplify GF calculations.
_gfExp = [0] * 512
_gfLog = [0] * 256
_gfPrim = 0x11d

_x = 1

for i in range(255):
    _gfExp[i] = _x
    _gfLog[_x] = i
    _x = _gfpMul(_x, 2)

for i in range(255, 512):
    _gfExp[i] = _gfExp[i-255]

def _gfPow(x, pow):
    '''GF power.'''
    return _gfExp[(_gfLog[x] * pow) % 255]

def _gfMul(x, y):
    '''Simplified GF multiplication.'''
    if x == 0 or y == 0:
        return 0
    return _gfExp[_gfLog[x] + _gfLog[y]]

def _gfPolyMul(p, q):
    '''GF polynomial multiplication.'''
    r = [0] * (len(p) + len(q) - 1)
    for j in range(len(q)):
        for i in range(len(p)):
            r[i+j] ^= _gfMul(p[i], q[j])
    return r

def _gfPolyDiv(dividend, divisor):
    '''GF polynomial division.'''
    res = list(dividend)
    for i in range(len(dividend) - len(divisor) + 1):
        coef = res[i]
        if coef != 0:
            for j in range(1, len(divisor)):
                if divisor[j] != 0:
                    res[i+j] ^= _gfMul(divisor[j], coef)
    sep = -(len(divisor) - 1)
    return res[:sep], res[sep:]

def _rsGenPoly(nsym):
    '''Generate generator polynomial for RS algorithm.'''
    g = [1]
    for i in range(nsym):
        g = _gfPolyMul(g, [1, _gfPow(2, i)])
    return g

def _rsEncode(bitstring, nsym):
    '''Encode bitstring with nsym EC bits using RS algorithm.'''
    gen = _rsGenPoly(nsym)
    res = [0] * (len(bitstring) + len(gen) - 1)
    res[:len(bitstring)] = bitstring
    for i in range(len(bitstring)):
        coef = res[i]
        if coef != 0:
            for j in range(1, len(gen)):
                res[i+j] ^= _gfMul(gen[j], coef)
    res[:len(bitstring)] = bitstring
    return res
(Source: Wikiversity:Reed–Solomon codes for coders)
在 _encode 结尾直接调用 _rsEncode 添加容错码,完成数据编码部分。
def _encode(data):
    '''
    Encode the input data stream.
    Add mode prefix, encode data using ISO-8859-1,
    group data, add padding suffix, and call RS encoding method.
    '''
    if len(data) > 17:
        raise CapacityOverflowException(
            'Error: Version 1 QR code encodes no more than 17 characters.')
    # Byte mode prefix 0100.
    bitstring = '0100'
    # Character count in 8 binary bits.
    bitstring += '{:08b}'.format(len(data))
    # Encode every character in ISO-8859-1 in 8 binary bits.
    for c in data:
        bitstring += '{:08b}'.format(ord(c.encode('iso-8859-1')))
    # Terminator 0000.
    bitstring += '0000'
    res = list()
    # Convert string to byte numbers.
    while bitstring:
        res.append(int(bitstring[:8], 2))
        bitstring = bitstring[8:]
    # Add padding pattern.
    while len(res) < 19:
        res.append(int('11101100', 2))
        res.append(int('00010001', 2))
    # Slice to 19 bytes for V1-L.
    res = res[:19]
    # Call _rsEncode to add 7 EC bits.
    return _rsEncode(res, 7)
- 数据切分和填充
(在我完成这个项目之后,想了想数据填充有更优雅的方式,还可以通用在其他版本的QR码上。感兴趣或者是想到的读者可以自行实现优化的 _fillData)
QR码标准将八个二进制位(一字节)规定为一个数据元组,先将编码后数据的每一个字节填充到 2×4 的矩阵(高版本QR码中会出现不规则形状的字节元组,本文中不考虑。)中,再将这些小的矩阵填入QR码矩阵。标准也规定了字节填入小矩阵的方式: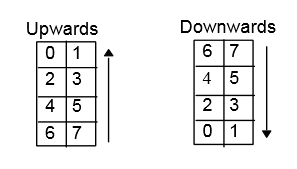
(图片来源:ISO/IEC 18004: Information – Automatic identification and data capture techniques – QR Code barcode symbology specification)
其中,7代表字节最高位(most significant bit),0代表最低位(least significant bit)。
在 _fillData 前添加 _fillByte 来实现单个字节的填充:
def _fillByte(byte, downwards=False):
    '''
    Fill a byte into a 2 by 4 matrix upwards,
    unless specified downwards.
    '''
    bytestr = '{:08b}'.format(byte)
    res = [[0, 0], [0, 0], [0, 0], [0, 0]]
    for i in range(8):
        res[i/2][i%2] = not int(bytestr[7-i])
    if downwards:
        res = res[::-1]
    return res
有了填充好的小矩阵,接下来就把它们填入大矩阵中。标准规定的填充方式为:由大矩阵的右下开始向上填充,遇到编码区域的边界后向左,改为向下填充,如此蛇行将数据填入数据区域。
(图片来源:Wikipedia:QR code,https://en.wikipedia.org/wiki/QR_code)
(图片来源:ISO/IEC 18004: Information – Automatic identification and data capture techniques – QR Code barcode symbology specification)
考虑到将小矩阵填入大矩阵的操作会非常频繁,我们把它写成函数来实现复用。在 qrcode.py 开始添加函数
def _matCp(src, dst, top, left):
    '''
    Copy the content of matrix src into matrix dst.
    The top-left corner of src is positioned at (left, top)
    in dst.
    '''
    res = copy.deepcopy(dst)
    for j in range(len(src)):
        for i in range(len(src[0])):
            res[top+j][left+i] = src[j][i]
    return res
要实现 _fillData,我们就会用到之前说的模板矩阵,那我们先把模板矩阵填充出来吧。
我们的想法是在模板矩阵中填入在所有V1-L QR码中都固定不变的标识来简化生成过程,那么首先我们得找出所有这样固定不变的标识。之前提到的功能性标识包含了大部分固定的图样,那么我们先填充出这些功能性标识。定位标识和校正标识可以定义为变量,但是定时标识会随版本变化有长度变化,为了代码的可扩展性,我们把定时标识定义为生成函数。
在 qrcode.py 开始添加定义:
def _transpose(mat):
    '''Transpose a matrix'''
    res = [[mat[j][i] for j in range(len(mat))] for i in range(len(mat[0]))]
    return res

def _timSeq(len, vertical=False):
    '''
    Generate a horizontal, unless specified vertical
    timing sequence with alternating dark and light
    pixels with length len.
    '''
    res = [[i % 2 for i in range(len)]]
    if vertical:
        res = _transpose(res)
    return res

# Finder pattern.
_finder = _matCp(_matCp([[_DARK for i in range(3)] for j in range(3)],
    [[_LIGHT for i in range(5)] for j in range(5)], 1, 1),
    [[_DARK for i in range(7)] for j in range(7)], 1, 1)

# Alignment pattern. Not used in version 1.
_align = _matCp(_matCp([[_DARK]],
    [[_LIGHT for i in range(3)] for j in range(3)], 1, 1),
    [[_DARK for i in range(5)] for j in range(5)], 1, 1)
有了这些功能性标识,先别急着往模板里填。仔细读标准我们会发现,在格式信息区域也有一个固定不变的黑点。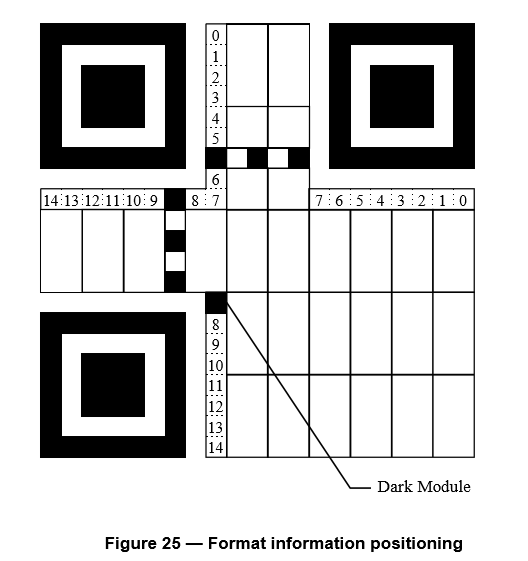
(图片来源:ISO/IEC 18004: Information – Automatic identification and data capture techniques – QR Code barcode symbology specification)
实际上这张图里就是 Version 1 QR码里全部的不变样式了。继续在 qrcode.py 中填充模板:
# Version 1 QR code template with fixed patterns.
_ver1 = [[_LIGHT for i in range(21)] for j in range(21)]
_ver1 = _matCp(_finder, _ver1, 0, 0)
_ver1 = _matCp(_finder, _ver1, 14, 0)
_ver1 = _matCp(_finder, _ver1, 0, 14)
_ver1 = _matCp(_timSeq(5), _ver1, 6, 8)
_ver1 = _matCp(_timSeq(5, vertical=True), _ver1, 8, 6)
_ver1 = _matCp([[_DARK]], _ver1, 13, 8)
我们的模板矩阵就完成了,效果如图: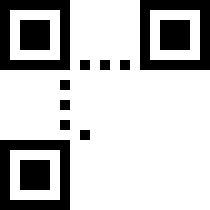
为了避免填充过程修改模板而导致后续QR码生成出错,保险起见我们只通过deepcopy使用这个模板,在 qrcode.py 头部加入模块引入:
import copy
然后实现 _fillData 如下:
def _fillData(bitstream):
    '''Fill the encoded data into the template QR code matrix'''
    res = copy.deepcopy(_ver1)
    for i in range(15):
        res = _matCp(_fillByte(bitstream[i], (i/3)%2!=0),
            res,
            21-4*((i%3-1)*(-1)**((i/3)%2)+2),
            21-2*(i/3+1))
    tmp = _fillByte(bitstream[15])
    res = _matCp(tmp[2:], res, 7, 11)
    res = _matCp(tmp[:2], res, 4, 11)
    tmp = _fillByte(bitstream[16])
    res = _matCp(tmp, res, 0, 11)
    tmp = _fillByte(bitstream[17], True)
    res = _matCp(tmp, res, 0, 9)
    tmp = _fillByte(bitstream[18], True)
    res = _matCp(tmp[:2], res, 4, 9)
    res = _matCp(tmp[2:], res, 7, 9)
    for i in range(3):
        res = _matCp(_fillByte(bitstream[19+i], True),
            res, 9+4*i, 9)
    tmp = _fillByte(bitstream[22])
    res = _matCp(tmp, res, 9, 7)
    for i in range(3):
        res = _matCp(_fillByte(bitstream[23+i], i%2==0),
            res, 9, 4-2*i)
    return res
这是一个非常ad hoc的实现,代码长但是没有什么技术含量。
测试一下填入数据的效果: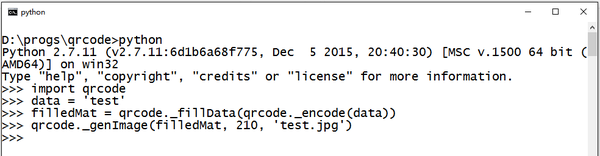

已经有一些QR码的样子了! <( ̄︶ ̄)> (没有完成,这是无法扫描的)
- 掩码和惩♂罚
得到了填入数据的矩阵,下一步就是应用掩码来变换数据图样。那有人要问了,既然我们已经把数据编入了QR码,想编码的信息就已经在里面了,为什么不直接填入格式信息得到QR码,而要多进行这么一步操作呢?
掩码真的是多此一举吗?你们呐还是要提高自身的姿势水平。QR码是要拿来扫描的,而扫描怕的就是无法清晰地分辨出编码信息的每一位。要是QR码中黑白点数量不均,或是空间分布不均都会导致大色块区域的出现,而大色块区域的出现会增加扫描时定位的难度,从而降低扫描的效率。更严重的情况下,如果数据填入后碰巧出现了功能性标识,比如定位标识的图样,还会干扰正常功能性标识的作用,导致QR码无法扫描。
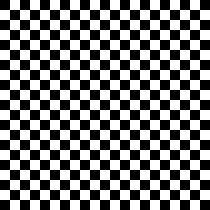
举个栗子: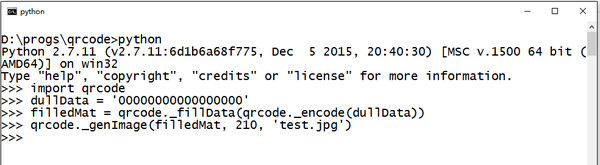

这样的数据产生的原始QR码明显含有大量大面积色块,扫描难度很高。
所以,掩码和之前提到的在数据后添加11101100和00010001交替的填充字节,都是为了避免这种情况发生,让图像更“均匀”。
知道了掩码的重要性,我们来看看掩码到底是什么。在计算机科学中,掩码就是一个二进制串,通过和数据进行异或运算来变换数据。在QR码中,掩码也是通过异或运算来变换数据矩阵。所以你可能已经猜到了,QR码的掩码就是预先定义好的矩阵。QR标准通过生成规则定义了八个数据掩码:
- dark if (row + column) mod 2 == 0
- dark if (row) mod 2 == 0
- dark if (column) mod 3 == 0
- dark if (row + column) mod 3 == 0
- dark if ( floor(row / 2) + floor(column / 3) ) mod 2 == 0
- dark if ((row * column) mod 2) + ((row * column) mod 3) == 0
- dark if ( ((row * column) mod 2) + ((row * column) mod 3) ) mod 2 == 0
- dark if ( ((row + column) mod 2) + ((row * column) mod 3) ) mod 2 == 0
给定了规则我们很容易写出代码来生成这些掩码:
但是且慢,你看出现在出现了什么问题吗?
对,掩码的范围也覆盖了功能性区域,要是用这样的掩码的话,功能性标识也难以幸免。所以我们需要一个代表数据区域的“蒙版”来过滤掉功能性区域中的掩图案。这个“过滤”的过程可以通过矩阵间“与”运算来实现。
在 qrcode.py 开始添加矩阵间“与”运算函数和数据区域蒙版的填充:
def _matAnd(mat1, mat2):
    '''
    Matrix-wise and.
    Dark and dark -> dark
    Light and light -> light
    Dark and light -> light
    Light and dark -> light
    '''
    res = [[_LIGHT for i in range(len(mat1[0]))] for j in range(len(mat1))]
    for j in range(len(mat1)):
        for i in range(len(mat1[0])):
            res[j][i] = int(mat1[j][i] == _LIGHT or mat2[j][i] == _LIGHT)
    return res

# Data area mask to avoid applying masks to functional area.
_dataAreaMask = [[_DARK for i in range(21)] for j in range(21)]
_dataAreaMask = _matCp([[_LIGHT for i in range(9)] for j in range(9)],
    _dataAreaMask, 0, 0)
_dataAreaMask = _matCp([[_LIGHT for i in range(9)] for j in range(8)],
    _dataAreaMask, 13, 0)
_dataAreaMask = _matCp([[_LIGHT for i in range(8)] for j in range(9)],
    _dataAreaMask, 0, 13)
_dataAreaMask = _matCp([[_LIGHT for i in range(4)]], _dataAreaMask, 6, 9)
_dataAreaMask = _matCp([[_LIGHT] for i in range(4)], _dataAreaMask, 9, 6)
填充出的数据区域蒙版效果如图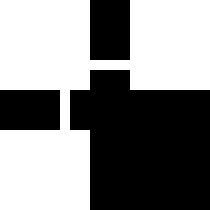
我们在定义掩码时和蒙版进行“与”运算,就可以得到范围正确的掩码了。继续添加掩码定义
# Data masks defined in QR standard.
_dataMasks = []
_dataMasks.append(_matAnd(_dataAreaMask,
    [[_DARK if (i+j)%2==0 else _LIGHT for i in range(21)] for j in range(21)]))
_dataMasks.append(_matAnd(_dataAreaMask,
    [[_DARK if j%2==0 else _LIGHT for i in range(21)] for j in range(21)]))
_dataMasks.append(_matAnd(_dataAreaMask,
    [[_DARK if i%3==0 else _LIGHT for i in range(21)] for j in range(21)]))
_dataMasks.append(_matAnd(_dataAreaMask,
    [[_DARK if (i+j)%3==0 else _LIGHT for i in range(21)] for j in range(21)]))
_dataMasks.append(_matAnd(_dataAreaMask,
    [[_DARK if (j/2 + i/3)%2==0 else _LIGHT for i in range(21)] for j in range(21)]))
_dataMasks.append(_matAnd(_dataAreaMask,
    [[_DARK if (i*j)%2+(i*j)%3==0 else _LIGHT for i in range(21)] for j in range(21)]))
_dataMasks.append(_matAnd(_dataAreaMask,
    [[_DARK if ((i*j)%2+(i*j)%3)%2==0 else _LIGHT for i in range(21)] for j in range(21)]))
_dataMasks.append(_matAnd(_dataAreaMask,
    [[_DARK if ((i+j)%2+(i*j)%3)%2==0 else _LIGHT for i in range(21)] for j in range(21)]))
效果如图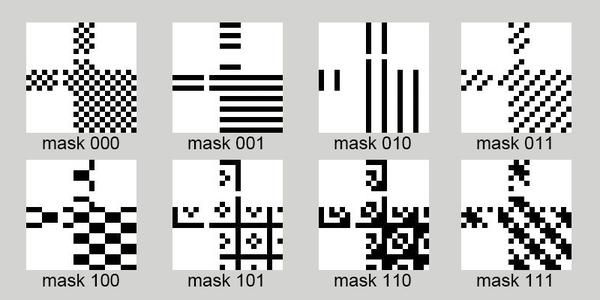
现在我们就可以安心地使用这些掩码啦!
在 qrcode.py 开始添加矩阵间异或函数
def _matXor(mat1, mat2):
    '''
    Matrix-wise xor.
    Dark xor dark -> light
    Light xor light -> light
    Dark xor light -> dark
    Light xor dark -> dark
    '''
    res = [[_LIGHT for i in range(len(mat1[0]))] for j in range(len(mat1))]
    for j in range(len(mat1)):
        for i in range(len(mat1[0])):
            res[j][i] = int(mat1[j][i] == mat2[j][i])
    return res
因为我们用1来表示白色,0来表示黑色,所以异或和与的逻辑都是和正常逻辑相反的。
该实现 _mask 来给填了数据的QR码应用掩码了。可是不对啊,为什么要八个掩码啊?这是因为考虑到数据的多样性,一种掩码难以达到预期的效果,所以QR标准定义了八个掩码,要求在应用掩码时先分别应用所有的掩码产生八个结果,然后根据惩罚规则计算出每个结果矩阵的惩罚分,再选出惩罚分最小,效果最好的掩码当做最终结果。这一过程产生的掩码ID也是格式信息的一部分,来告诉扫描软件应该用哪个掩码来还原数据。
QR标准把惩罚分分成了四项,分别对应行/列中的连续色条、大面积的色块、行/列中类似定位标识的部分、整个矩阵中颜色的不平衡做出加权惩罚。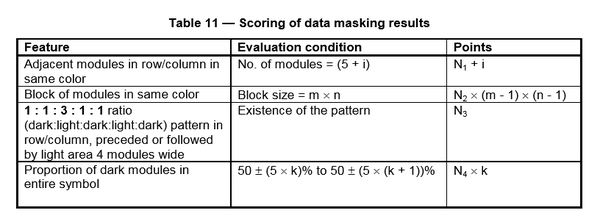
(图片来源:ISO/IEC 18004: Information – Automatic identification and data capture techniques – QR Code barcode symbology specification)
其中,N1=3,N2=3,N3=40,N4=10,i 是色条超出5的部分的长度。
在 _mask 之前添加 _penalty 的实现:
def _penalty(mat):
    '''
    Calculate penalty score for a masked matrix.
    N1: penalty for more than 5 consecutive pixels in row/column,
        3 points for each occurrence of such pattern,
        and extra 1 point for each pixel exceeding 5
        consecutive pixels.
    N2: penalty for blocks of pixels larger than 2x2.
        3*(m-1)*(n-1) points for each block of mxn
        (larger than 2x2).
    N3: penalty for patterns similar to the finder pattern.
        40 points for each occurrence of 1:1:3:1:1 ratio
        (dark:light:dark:light:dark) pattern in row/column,
        preceded of followed by 4 consecutive light pixels.
    N4: penalty for unbalanced dark/light ratio.
        10*k points where k is the rating of the deviation of
        the proportion of dark pixels from 50% in steps of 5%.
    '''
    # Initialize.
    n1 = n2 = n3 = n4 = 0
    # Calculate N1.
    for j in range(len(mat)):
        count = 1
        adj = False
        for i in range(1, len(mat)):
            if mat[j][i] == mat[j][i-1]:
                count += 1
            else:
                count = 1
                adj = False
            if count >= 5:
                if not adj:
                    adj = True
                    n1 += 3
                else:
                    n1 += 1
    for i in range(len(mat)):
        count = 1
        adj = False
        for j in range(1, len(mat)):
            if mat[j][i] == mat[j-1][i]:
                count += 1
            else:
                count = 1
                adj = False
            if count >= 5:
                if not adj:
                    adj = True
                    n1 += 3
                else:
                    n1 += 1
    # Calculate N2.
    m = n = 1
    for j in range(1, len(mat)):
        for i in range(1, len(mat)):
            if mat[j][i] == mat[j-1][i] and mat[j][i] == mat[j][i-1] and mat[j][i] == mat[j-1][i-1]:
                if mat[j][i] == mat[j-1][i]:
                    m += 1
                if mat[j][i] == mat[j][i-1]:
                    n += 1
            else:
                n2 += 3 * (m-1) * (n-1)
                m = n = 1
    # Calculate N3.
    count = 0
    for row in mat:
        rowstr = ''.join(str(e) for e in row)
        occurrences = []
        begin = 0
        while rowstr.find('0100010', begin) != -1:
            begin = rowstr.find('0100010', begin) + 7
            occurrences.append(begin)
        for begin in occurrences:
            if rowstr.count('00000100010', begin-4) != 0 or rowstr.count('01000100000', begin) != 0:
                count += 1
    transposedMat = _transpose(mat)
    for row in transposedMat:
        rowstr = ''.join(str(e) for e in row)
        occurrences = []
        begin = 0
        while rowstr.find('0100010', begin) != -1:
            begin = rowstr.find('0100010', begin) + 7
            occurrences.append(begin)
        for begin in occurrences:
            if rowstr.count('00000100010', begin-4) != 0 or rowstr.count('01000100000', begin) != 0:
                count += 1
    n3 += 40 * count
    # Calculate N4.
    dark = sum(row.count(_DARK) for row in mat)
    percent = int((float(dark) / float(len(mat)**2)) * 100)
    pre = percent - percent % 5
    nex = percent + 5 - percent % 5
    n4 = min(abs(pre-50)/5, abs(nex-50)/5) * 10
    return n1 + n2 + n3 + n4
(插一句,我实现的这个 _penalty 还没有测试正确性。。)
(大概仔细看完了辣么一大段代码然后看到上一句的人会想来打我吧。。)
实现 _mask :
def _mask(mat):
    '''
    Mask the data QR code matrix with all 8 masks,
    call _penalty to calculate penalty scores for each
    and select the best mask.
    Return tuple(selected masked matrix, number of selected mask).
    '''
    maskeds = [_matXor(mat, dataMask) for dataMask in _dataMasks]
    penalty = [0] * 8
    for i, masked in enumerate(maskeds):
        penalty[i] = _penalty(masked)
    # Find the id of the best mask.
    index = penalty.index(min(penalty))
    return maskeds[index], index
这里考虑到 _mask 是由 _fillInfo 调用,而填写格式信息需要选择的掩码的ID,我们让 _mask 返回了结果矩阵和掩码ID构成的tuple。
用我们之前的栗子测试一下掩码效果:
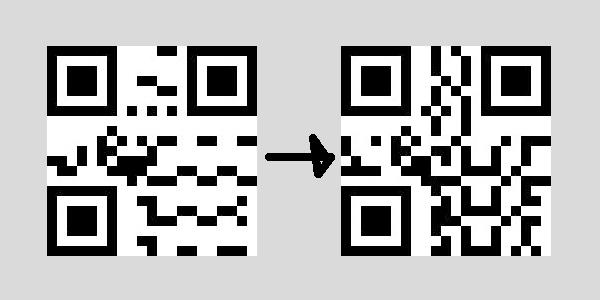
效果不错!
- 填充格式信息
只剩最后一步了!格式信息很简单,由两位容错等级代码和三位QR掩码代码构成。
容错等级代码: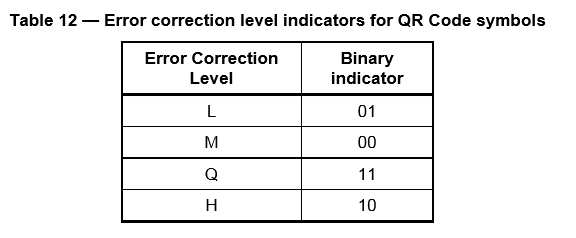
(图片来源:ISO/IEC 18004: Information – Automatic identification and data capture techniques – QR Code barcode symbology specification)
QR掩码代码:
当然格式信息也是要加容错码的。格式信息的容错算法采用(15,5)BCH码。
编码构建码字为
(c14, c13, ..., c8)
这样多项式为
c14+c13+...+c8
我们将它称为 CI。
然后就要找出 CR 满足 CR=CI (mod m1,3(x))=c7+c6+...+c0
这样就得到待发的码字 C(x) = CI+CR (mod m1,3(x)) = 0
例如,如果我们要对 (1,1,0,0,1,1,0) 进行编码
CI=x14+x13+x10+x9
然后用 m1,3(x) 除以(这里的除法是多项式除法)CI ,得到结果为 CR(x),在Z2域中,我们可以算出 CR为
x3+1
这样,待发的码字为
(1,1,0,0,1,1,0, 0,0,0,0,1,0,0,1)
(Wikipedia: BCH码,https://zh.wikipedia.org/wiki/BCH%E7%A0%81)
.......................................................
咳咳。。去看Reed–Solomon codes for coders,都讲得很清楚嘛,很容易就看懂了对不对?(和善的微笑)
计算得出十位BCH容错码接在格式信息之后,还要与掩码101010000010010进行异或,作用同QR掩码。
在 _fillInfo 之前添加 _fmtEncode 实现容错码计算和应用掩码:
def _fmtEncode(fmt):
    '''Encode the 15-bit format code using BCH code.'''
    g = 0x537
    code = fmt << 10
    for i in range(4,-1,-1):
        if code & (1 << (i+10)):
            code ^= g << i
    return ((fmt << 10) ^ code) ^ 0b101010000010010
(Source: Wikiversity: Reed–Solomon codes for coders)
有了编码好的格式信息,就可以把它按照标准填入矩阵了。
(图片来源:ISO/IEC 18004: Information – Automatic identification and data capture techniques – QR Code barcode symbology specification)
其中14代表最高位(most significant bit),0代表最低位(least significant bit)。
继续实现 _fillInfo:
def _fillInfo(arg):
    '''
    Fill the encoded format code into the masked QR code matrix.
    arg: (masked QR code matrix, mask number).
    '''
    mat, mask = arg
    # 01 is the format code for L error control level,
    # concatenated with mask id and passed into _fmtEncode
    # to get the 15 bits format code with EC bits.
    fmt = _fmtEncode(int('01'+'{:03b}'.format(mask), 2))
    fmtarr = [[not int(c)] for c in '{:015b}'.format(fmt)]
    mat = _matCp(_transpose(fmtarr[7:]), mat, 8, 13)
    mat = _matCp(fmtarr[9:][::-1], mat, 0, 8)
    mat = _matCp(fmtarr[7:9][::-1], mat, 7, 8)
    mat = _matCp(fmtarr[:7][::-1], mat, 14, 8)
    mat = _matCp(_transpose(fmtarr[:6]), mat, 8, 0)
    mat = _matCp([fmtarr[6]], mat, 8, 7)
    return mat
至此QR码全部完成(撒花花 ︿( ̄︶ ̄)︿)。
- 接口
最后一步,为我们的QR码生成器提供调用接口:
def qrcode(data, width=210, filename='qrcode.jpg'):
    '''Module public interface'''
    try:
        _genImage(_genBitmap(_encode(data)), width, filename)
    except Exception, e:
        print e
        raise e
哒哒哒哒!完成!(完整版代码已上传 GitHub: https://github.com/LaytonW/qrcode)
别忘了我们最初的目的:hello world!来试验一下吧!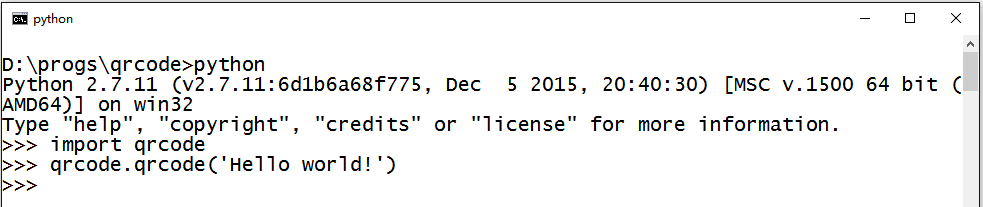
Hello world! (二维码自动识别)
能!扫!描!了!
满满的成就感有没有!!!
可是突然想到!!!
我只是想说一句 hello world啊!!!!!
那何不多说几句啊!!


-
写在后面
凌晨2点14,终于完稿。我只有几点想说的
- 学习真有趣
- Python真好用
- 制定标准真是凝结了工程师的无限智慧
- 熬夜伤身
- 熬夜会饿
- 半夜饿真难受
- 第一次写东西,啰啰嗦嗦拖了这么长的篇幅
- 看到这里的都是真爱

(END)
Reference:
Wikipedia: QR code, https://en.wikipedia.org/wiki/QR_code
Wikipedia: QR码, https://zh.wikipedia.org/wiki/QR%E7%A2%BC
Wikipedia: Reed–Solomon error correction, https://en.wikipedia.org/wiki/Reed%E2%80%93Solomon_error_correction
Wikipedia: 里德-所罗门码, https://zh.wikipedia.org/wiki/%E9%87%8C%E5%BE%B7-%E6%89%80%E7%BD%97%E9%97%A8%E7%A0%81
Wikipedia: BCH code, https://en.wikipedia.org/wiki/BCH_code
Wikipedia: BCH码, https://zh.wikipedia.org/wiki/BCH%E7%A0%81
Wikiversity: Reed–Solomon codes for coders, https://en.wikiversity.org/wiki/Reed%E2%80%93Solomon_codes_for_coders#BCH_codes
Thonky: QR Code Tutorial, http://www.thonky.com/qr-code-tutorial/
Python Imaging Library Handbook, http://effbot.org/imagingbook/pil-index.htm
ISO/IEC 18004: Information – Automatic identification and data capture techniques – QR Code barcode symbology specification