BGP的更新源(BGP Neighbor Update Source Address):
原则1:
在默认情况下,
BGP路由器以自己路由表中,到达对方BGP邻居的地址的那条路由所指示的出接口(物理接口)的地址,作为自己的BGP更新源(源地址)
原则2:
当BGP路由器,收到邻居发来的BGP信息时,会检查其源地址,
然后和自己宣告的Neighbor的目标地址进行比较,
如果一致,这个BGP Session才可建立起来.
BGP路由黑洞的解决方案:
1:选择性重分布(Redistribute Selected BGP Route into IGP);
2:冗余的IBGP(Full-mesh IBGP);
3:路由反射器(Part-mesh IBGP+Refilector);
4:联邦(Confederation);
5:(MPLS)。
LAB2:验证通过物理接口,构建IBGP邻居的不稳定性:

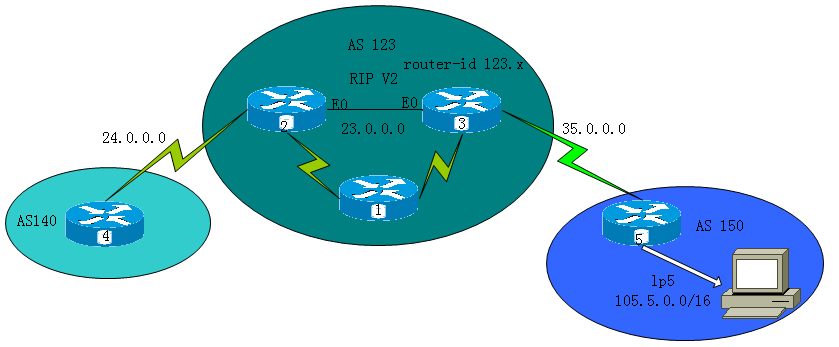
Step1:确认L1/L2通达
Step2:确认L3的IGP通达(RIP),在AS123内R1/2/3
Step3:通过物理接口,在R2/R3之间构建IBGP邻居
show run | begin router bgp
R2#neighbor 23.0.0.3 remote-as 123
R3#neighbor 23.0.0.2 remote-as 123
结论:
在IBGP中,如果使用物理接口构建邻居,是很不稳定的.
很可能因为某条物理链路的抖动,导致IBGP邻居的Flapping/抖动:
建议:
使用环回口/Loopback接口,构建IBGP邻居.
LAB3:以Loopback接口作为BGP更新源,构建稳定的IBGP Session

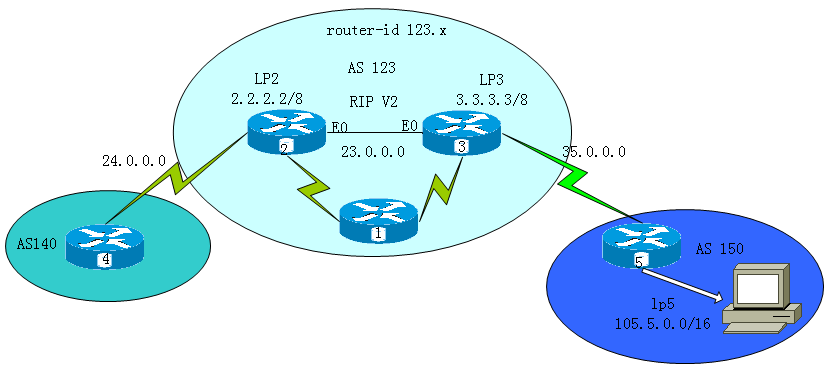
Step1:为每个IBGP路由器,构建一个环回口:
Step2:把此Loopback接口,宣告到IGP(RIP)中.
R2/R3#
router rip
network 2.0.0.0
or
network 3.0.0.0
step3:在R2/R3上,删除原来的,通过物理接口构建的邻居.记得建立router-id
R2#router bgp 123
no nei 23.0.0.3
r3#no nei 23.0.0.2
Step4:通过环回口构建IBGP邻居:
4-1:
以对方的环回口,作为IBGP的目标地址:
R2#neighbor 3.3.3.3 remote-as 123
R3#neighbor 2.2.2.2 remote-as 123
4-2:
更改了IBGP邻居后需要把下一跳也做相应更改
R2(config-router)#nei 3.3.3.3 next-hop-self
R3(config-router)#nei 2.2.2.2 next-hop-self
注意:删除原物理接口所做的IBGP邻居时,相应的下一跳将自动删除.
4-3:
以自己的环回口,作为IBGP连接的源地址:
R2#neighbor 3.3.3.3 update-source loopback 2
R3#neighbor 2.2.2.2 update-source loopback 3
step5:
任意切断本AS123 中的物理链路,
只要两个IBGP路由器R2/R3之间,还有最后一条能够到达,对方的环回口的路由,IBGP邻居都不会中断.
建议:
凡是构建IBGP,默认都使用环回口做更新新源,以构建稳定的IBGP.
LAB4:在两AS间,存在多条冗余链路的网络环境中:
以LoopBack接口作为EBGP更新源,构建稳定的EBGP Session.

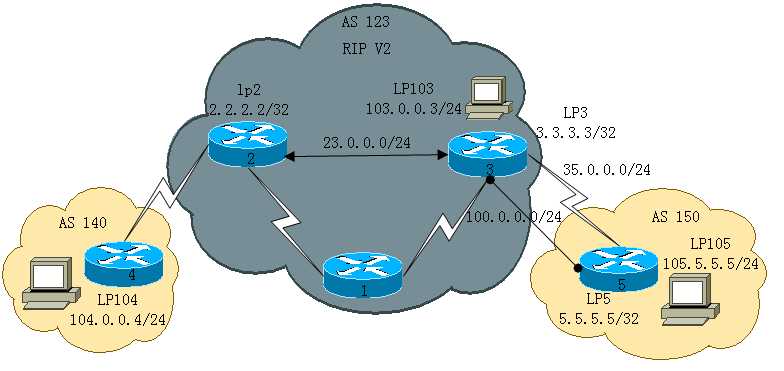
Step1:在两AS之间回口,构建多条冗余链路.
如果两AS间,没有多条冗余链路,就使用物理接口构建EBGPP即可.
Step2:为两AS间的EBGP路由器,构建环回口
Step3:在各自路由器上,指定到达对方环回口静态路由:
∵有两条冗余链路,
∴要有两条到达对方环口的静态路由
R5:(config)#
ip route 3.3.3.3 255.255.255.255 35.0.0.3
ip route 3.3.3.3 255.255.255.255 100.0.0.1
r3#:(config)#
ip route 5.5.5.5 255.255.255.255 35.0.0.5
ip route 5.5.5.5 255.255.255.255 100.0.0.2
测试:
R3#ping 5.5.5.5 source 3.3.3.3 !!!!!!!!!!!!!
Step4:建立邻居EBGP邻居:
R3#
router bgp 123
bgp router-id 123.0.0.3
neighbor 5.5.5.5 remote-as 150
R5#
router bgp 150
bgp router-id 150.0.0.5
neighbor 3.3.3.3 remote-as 123
step5:告知对方,自己的更新源:
r3(config-router)#neighbor 5.5.5.5 update-source loopback 3
r5(config-router)#neighbor 3.3.3.3 update-source loopback 5
Step6:更改EBGP的TTL值(Time to Live)
∵EBGP TTL值默认是1,
∴EBGP的TTL值最少要设为2
而实际上EBGP多跳这个命令,在不指定其取值时,会自动默认指定为255
r3(config-router)#neighbor 5.5.5.5 EBGP-multihop(255)
r5(config-router)#neighbor 3.3.3.3 EBGP-multihop 2
TTL:time to live是L3的IP包头中的一个特定字段,IP包每经过一个路由设备,其TTL会自动减1.
如果TTL减到为0,即使路由器有去往目标的路由,也不会继续转发这个IP包.
Step7:测试
在R3上添加103.0.0.3/24
在R5上添加105.5.5.5/24
r3(config)#router bgp 123
r3(config-router)#net 103.0.0.0 mask 255.255.255.0
r5(config)#router bgp 123
r5(config-router)#net 105.5.5.0 mask 255.255.255.0
R3#ping 105.5.5.5 source 103.0.0.3 repeat 1000000 size 15000
结论:
在一般情况下,EBGP的邻居关系,是不需要使用环回口构建邻居的.
默认都直接使用物理接口,
在只有单链路的时候,都是使用物理接口构建邻居.
只有在两AS之间,存在多条冗余链路的时候,才需要考虑使用环回口构建EBGP邻居,以确保其EBGP的稳定性.
LAB5:观察BGP黑洞的形成

Step1:按图配置BGP网络
注意:R1不运行BGP.
R2#
router rip
ver 2
network 2.0.0.0
net 23.0.0.0
net 12.0.0.0
R3#
router rip
ver 2
network 3.0.0.0
net 23.0.0.0
net 13.0.0.0
r2/3#
router bgp 123
bgp router-id 123.0.0.2/3
R2#neighbor 3.3.3.3 remote-as 123
R3#neighbor 2.2.2.2 remote-as 123
R2(config-router)#nei 3.3.3.3 next-hop-self
R3(config-router)#nei 2.2.2.2 next-hop-self
R2#neighbor 3.3.3.3 update-source loopback 2
R3#neighbor 2.2.2.2 update-source loopback 3
Step2:将AS140/AS150中的BGP路由,宣告到BGP网络中:
R4#(config-if)#
router bgp 140
network 104.0.0.0 mask 255.255.255.0
记得R4与R2建邻居
R5(config-if)#
router bgp 150
network 105.5.5.0 mask 255.255.255.0
Step3:过程AS123中的BGP路由用户问题:
3-1:同步
R2#
router bgp 123
no synchronization
Step4:这时候全网络互通
R4#ping 105.5.5.5 source 104.0.0.4 repeat 1000000 size 15000
!!!!!!!!!!!!!!!!!!!!!!!!!!!!!!!
Step5:这时候切断23.0.0.0.
R4#ping 105.5.5.5 source 104.0.0.4 repeat 1000000 size 15000
..............................
R1因为没有运行BGP,
∴不会有导致BGP的路由,成为BGP路由的黑洞.
BGP路由黑洞的解决方案:
解决BGP路由黑洞,可供选择的解决方案/Solution:
1:Redistribute Selected BGP Route into IGP
2:Full-mesh IBGP
3:Part-mesh IBGP+Refilector
4:Confederation
5:MPLS
LAB6:part-mesh IBGP,Redistribute Selected BGP Route into IGP,with sync(同步/synchronization)

Step1:定义需要重分布到IGP中的,BGP的路由:
R3(config)#ip prefix-list B-105 permit 105.1.0.0/16
R2(config)#ip prefix-list B-104 permit 104.1.0.0/24
Step2:通过Route-map,控制重分布到IGP的范围,
route-map R3-BGP-RP permit 10
match ip address prefix-list B-105
set metric 1
R2#
route-map R2-BGP-PR permit 10
match ip address prefix-list B-104
set metric 1
小提醒:
不要配置:"route-map R3-BGP_RP permit 20"
一旦配置,意味着所有一切BGP路由都进入IGP!
Step3:按照route-map所定义的条件,将BGP路由注入RIP:
R3#
router rip
redistribute bgp 123 route-map R3-BGP-RP
Step4:在R2上观察,105.5.0.0/16,
R2:同时从RIP和BGP,都能学到路由,但因为AD竞争原因,
从RIP所获得的路由,成功进入路由表,
而从BGP所获得的路由,不能进入路由表.
R2#show ip route
R 105.5.0.0[120/2]
R2#show ip bgp
r>i105.5.0.0/16 3.3.3.3
Step5:在R2观察,如果R2,此时启动了BGP的"同步",
是否还能优化?
结果:可以优化~~~!!!
因为:R2此时通过RIP,学到105.5.0.0/16,
结果:可以优化!!!!
Step6:在R1观察两条路由:
R 104.4.4.0[120/1] via 12.0.0.2
R 105.5.0.0[120/1] via 13.0.0.3
R1不再是黑洞!!
Step7:在R2上观察路由的递归查询:
R 105.5.0.0[120/2] via 12.0.0.1
C 12.0.0.0 is directly connected, serial0
Step8:测试:
R4#ping 105.5.5.5 source 104.4.4.4 !!!!!!!!!!!
LAB7:Full-mesh IBGP,No-Sync/(Peer Groups):

Step0:启动BGP进程
R1(config)#
router bgp 123
bgp router-id 123.0.0.1
Step1:在R1上,使用Peer-Group(一个模版),对R2/R3建IGBP邻居:
1-1:定义peer-group:(模块R1-PG)
R1#
router bgp 123
neighbor R1-PG peer-group
neighbor R1-PG remote-as 123
neighbor R1-PG update-source loopback 1
1-2:对不同的IBGP邻居,调用peer-group:
neighbor 2.2.2.2 peer-group R1-PG
neighbor 3.3.3.3 peer-group R1-PG
peer-group 只是一种模版,只影响本路由器的,邻居建立的方法.
在R2/R3上,与R1的邻居建立,仍然可以使用普通方法建立.
Step2:确保整个AS123中的所有BGP路由器的,下一跳,同步问题能够解决:
2-1:
R1/R2/R3#关闭同步
2-2:
R2上,对R1/R3 Say next-hop-self
R3上,对R1/R2 Say next-hop-self
r2/r3#nei 1.1.1.1 next-hop-self
Step3:在R1上,观察所有BGP路由:
*>i103.3.3.0/24 3.3.3.3
*>i104.4.4.4.0/24 2.2.2.2
*>i105.5.5.5.0/16 3.3.3.3
Step4:观察在R2上的BGP路由的递归查询:
R2#
B 105.5.0.0[/0]via 3.3.3.3
R 3.3.3.3[120200/2]via 12.0.0.1
C 12.0.0.0 is directly connected, serial0
Step5:测试:
R4#ping 105.5.5.5 source 104.0.0.4
!!!!!!!!!!!!!!!!!!!!!!!!!!!!!!!!!!