环境变量配置 .zshrc
export GOROOT=/usr/local/go
export GOPATH=$HOME/gocode
export PATH=$PATH:$GOROOT/bin:$GOPATH/bin
设置代理 //https://goproxy.io/zh/
go env -w GO111MODULE=on
go env -w GOPROXY=https://goproxy.io,direct
golang编译源码(树莓派3b armV7l)
cd go/src
GOOS=linux GOARM=7 GOARCH=arm CGO_ENABLED=0 ./bootstrap.bash
golang编译openwrt 程序
GOARCH 可以为 mips/mipsle 分别对应处理器的大小端
GOOS=linux GOARCH=mipsle GOMIPS=softfloat CGO_ENABLED=0 go build
golang编译小米路由器R3G
GOOS=linux GOARCH=mipsle GOMIPS=softfloat go build -o xxx xxx.go
golang编译小米路由器R2D
GOOS=linux GOARM=5 GOARCH=arm CGO_ENABLED=0 go build
golang编译Android
GOOS=linux GOARCH=arm CGO_ENABLED=0 go build
golang编译Linux
GOOS=linux GOARCH=amd64 go build
golang编译Windows
GOOS=windows GOARCH=amd64 CGO_ENABLED=0 go build
golang编译Mac
GOOS=darwin GOARCH=amd64 CGO_ENABLED=0 go build
查看生成的汇编代码
go tool compile -S xx.go //编译器对汇编代码进行优化
go tool compile -S -N -l xx.go //不优化
注:如果编译时不使用 -N -l 参数,编译器会对汇编代码进行优化,编译结果会有较大差别
各平台的GOOS和GOARCH参考
OS ARCH OS version
linux 386/amd64/arm >= Linux 2.6
darwin 386/amd64 OS X (Snow Leopard + Lion)
freebsd 386/amd64 >= FreeBSD 7
windows 386/amd64 >= Windows 2000
android 可执行文件路径
/data/local/tmp/
nps 配置
git clone https://github.com/ehang-io/nps.git
服务器配置
cd nps
vi conf/nps.conf
//修改配置文件 注释掉
====================
#HTTP(S) proxy port, no startup if empty
#http_proxy_ip=0.0.0.0
#http_proxy_port=80
#https_proxy_port=443
#https_just_proxy=true
#default https certificate setting
#ttps_default_cert_file=conf/server.pem
#https_default_key_file=conf/server.key
=====================
public_vkey=
#web
web_host=www.xxx.com
web_username=
web_password=
web_port =
======================
sudo nps install
sudo nps start
/etc/nps/conf/nps.conf //配置文件位置
/var/log/nps.log //log位置
客户端配置
vi start_npc.sh
sudo nohup ~/work/npc -server=ip:8024 -vkey=xxxx > ~/work/npc.log 2>&1 &
开机自启动
1.树莓派3b开机自启动
crontab -e //添加
@reboot /home/user/work/start_npc.sh
crontab -l //查看
2.小米路由器R2D开机自启动
vi /etc/init.d/mystart
==========================
#!/bin/sh /etc/rc.common
START=99
start(){
/mnt/sda1/myapp
}
stop(){
/mnt/sda1/myapp -s
}
restart(){
/mnt/sda1/myapp
}
==========================
chmod -R 777 init.d/mystart #设置权限,否则无法激活开机启动,提示权限不足
/etc/init.d/mystart enable #激活开机启动
/etc/init.d/mystart start #运行start函数启动程序
第三方连接配置
ssh -p 端口号 root@www.xxx.com
scp -P 端口号 -r xxx root@www.xxx.com:/root/ 传文件
文档地址:https://github.com/51qiuzhu/nps
doh-client 配置
vi ~/work/start-dohc.sh
sudo nohup ~/work/doh-client -conf=~/work/doh-client.conf > ~/work/dohc.log 2>&1 &
加入开机启动 /etc/init.d/mystart
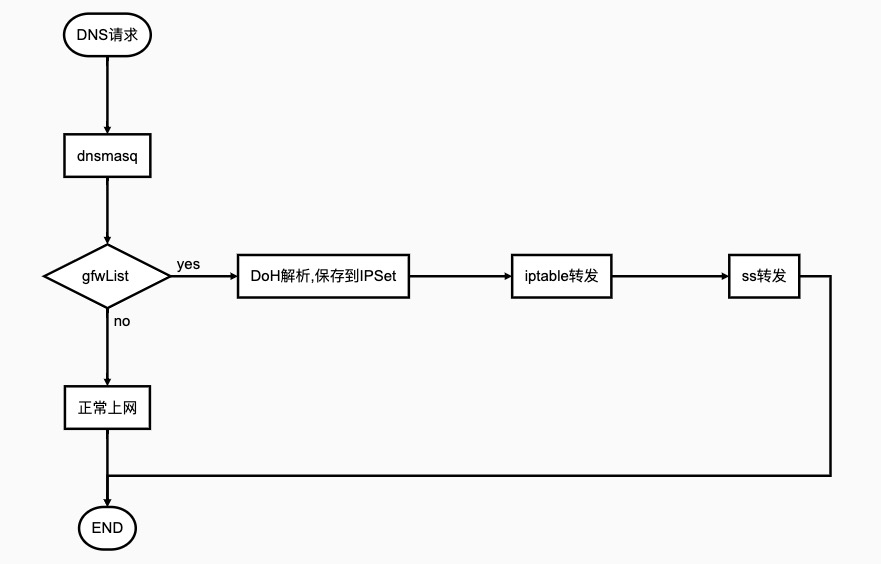
dnsmasq 配置doh
sudo vi /etc/dnsmasq.conf
no-hosts
no-resolv
server=127.0.0.1#5380
conf-dir=/etc/dnsmasq.d/
log-queries
log-facility=/var/log/dnsmasq.log
配置国内的dns走国内查询,国外的ip走doh
wget https://raw.githubusercontent.com/zwpaper/dotfile/master/archlinux/config/dnsmasq/install.sh
chmod 755 install.sh
sudo ./install.sh
进入目录 /etc/dnsmasq.d
从 https://cokebar.github.io/gfwlist2dnsmasq/dnsmasq_gfwlist_ipset.conf 下载 dnsmasq_gfwlist_ipset.conf 后放入该目录
里面的域名指定了使用127.0.0.1#5353 需要替换为5380(doh客户端监听的端口)
:%s/5353/5380/g //vi替换命令
gost 客户端配置透明代理 监听1080端口
vi start_gostc.sh
#sudo nohup ~/work/gost -L=:1080 -F=ss2://AES-256-GCM:Password@Serverip:Serverport >> ~/work/gostc.log 2>&1 &
sudo nohup ~/work/gost -L redirect://:1080 -F ss2://AES-256-GCM:Password@Serverip:Serverport >> ~/work/gostc.log 2>&1 &
iptables ipset 配置gfwlist的流量转发到代理端口
# 新建ipset叫gfwlist
sudo ipset -N gfwlist iphash
#匹配gfwlist的流量转到1080端口(你ss客户端监听的端口)
sudo iptables -t nat -A PREROUTING -p tcp -m set --match-set gfwlist dst -j REDIRECT --to-port 1080
sudo iptables -t nat -A OUTPUT -p tcp -m set --match-set gfwlist dst -j REDIRECT --to-port 1080
上述命令加入开机自启动,每次重启都生效
总结:客户端dns请求通过路由dnsmasq把特殊域名通过DoH解析,结果存入ipset,iptables匹配ipset走ss
https://golang.org/doc/install/source#go14
http://www.lstop.pub/2019/04/11/OpenWrt-DNS-over-Https%E7%BA%AF%E5%87%80%E4%B8%8A%E7%BD%91/
https://github.com/ginuerzh/gost