参考资料如下:
https://www.cnblogs.com/staryea/p/8514144.html
https://www.centos.bz/2018/02/mariadb-mysql%E9%85%8D%E7%BD%AE%E6%96%87%E4%BB%B6my-cnf%E8%A7%A3%E8%AF%BB/ ---- 解读mariadb 各个配置属性
https://blog.csdn.net/cgb278653219/article/details/84917381
https://www.cnblogs.com/ivictor/p/5727395.html
https://blog.csdn.net/jinpengncu/article/details/77879844
https://blog.csdn.net/I_jump/article/details/99691829
https://blog.csdn.net/shaochenshuo/article/details/80162005
https://www.cnblogs.com/LvLoveYuForever/p/5585197.html 安装完mariadb初始化密码
https://www.cnblogs.com/ysuwangqiang/p/11766470.html
https://blog.csdn.net/seesun2012/article/details/83088661
https://blog.csdn.net/weixin_30383279/article/details/97524581 --- 提供了卸载方式
一、准备工作
(1) 在官网上下载 gz格式的安装包;
(2) 将该安装包上传到需安装的Linxu服务器上;
(3) 检查环境;
- 通过命令 lsof -i:3306 查看端口是否被占用;
- 通过 ps -aux|grep mysql或mariadb 查看系统中是否安装 数据库;
二、安装
1、解压软件包
- cd xxxxx(软件所在目录)
- tar -zxvf mariadb-10.1.43-linux-x86_64.tar.gz
该gz包将会解压到同级目录
2、赋权
- chmod -R 777 *
给解压出来的 mariadb-10.1.43-linux-x86_64 文件夹进行赋权
3、配置my.cnf文件
- cd support-files
- cp my-small.cnf /etc/my.cnf
拷贝 my.cnf 文件到 /etc目录下
- vim /etc/my.cnf
进行文件编辑,示例如下:# Example MySQL config file for small systems.
#
# This is for a system with little memory (<= 64M) where MySQL is only used
# from time to time and it's important that the mysqld daemon
# doesn't use much resources.
#
# MySQL programs look for option files in a set of
# locations which depend on the deployment platform.
# You can copy this option file to one of those
# locations. For information about these locations, see:
# http://dev.mysql.com/doc/mysql/en/option-files.html
#
# In this file, you can use all long options that a program supports.
# If you want to know which options a program supports, run the program
# with the "--help" option.

# The following options will be passed to all MySQL clients
[client]
#password    = your_password
port        = 3306
socket        = /opt/mariadb-10.1.43-linux-x86_64/mysql.sock

# Here follows entries for some specific programs

# The MySQL server
[mysqld]

port = 3306
user = mysql
socket = /opt/mariadb-10.1.43-linux-x86_64/mysql.sock
datadir = /opt/mariadb-10.1.43-linux-x86_64/data/mariadb
basedir = /opt/mariadb-10.1.43-linux-x86_64
log_error = /opt/mariadb-10.1.43-linux-x86_64/mariadb.err
pid-file = /opt/mariadb-10.1.43-linux-x86_64/mariadb.pid
skip-external-locking
key_buffer_size = 64M
max_allowed_packet = 64M
table_open_cache = 256
sort_buffer_size = 1M
read_buffer_size = 1M
read_rnd_buffer_size = 4M
net_buffer_length = 64M
thread_stack = 240K
explicit_defaults_for_timestamp=true
default_storage_engine = InnoDB

# Don't listen on a TCP/IP port at all. This can be a security enhancement,
# if all processes that need to connect to mysqld run on the same host.
# All interaction with mysqld must be made via Unix sockets or named pipes.
# Note that using this option without enabling named pipes on Windows
# (using the "enable-named-pipe" option) will render mysqld useless!
#
#skip-networking
server-id    = 1

# Uncomment the following if you want to log updates
log-bin=mysql-bin

# binary logging format - mixed recommended
#binlog_format=mixed

# Causes updates to non-transactional engines using statement format to be
# written directly to binary log. Before using this option make sure that
# there are no dependencies between transactional and non-transactional
# tables such as in the statement INSERT INTO t_myisam SELECT * FROM
# t_innodb; otherwise, slaves may diverge from the master.
#binlog_direct_non_transactional_updates=TRUE

# Uncomment the following if you are using InnoDB tables
innodb_data_home_dir = /opt/mariadb-10.1.43-linux-x86_64/data/mariadb
innodb_data_file_path = ibdata1:10M:autoextend
innodb_log_group_home_dir = /opt/mariadb-10.1.43-linux-x86_64/data/mariadb
# You can set .._buffer_pool_size up to 50 - 80 %
# of RAM but beware of setting memory usage too high
innodb_buffer_pool_size = 64M
innodb_additional_mem_pool_size = 2M
# Set .._log_file_size to 25 % of buffer pool size
innodb_log_file_size = 32M
innodb_log_buffer_size = 20M
innodb_flush_log_at_trx_commit = 1
innodb_lock_wait_timeout = 50

[mysqldump]
quick
max_allowed_packet = 16M

[mysql]
no-auto-rehash
# Remove the next comment character if you are not familiar with SQL
#safe-updates

[myisamchk]
key_buffer_size = 8M
sort_buffer_size = 8M

[mysqlhotcopy]
interactive-timeout
3、安装
(1) 添加mysql用户
- grep mysql /etc/passwd --- 查看是否有mysql用户,没有则添加
- useradd mysql --- 添加mysql用户
- chown mysql.mysql /opt/mariadb-10.1.43-linux-x86_64/data/mariadb -R --- 给mysql 赋权,对 数据库存储目录

问题:
在执行useradd 命令时,可能会出现以下提示,但出现以下问题并不影响用户的添加。

但是想解决该问题的话,可以通过以下方式:
删除用户不用userdel mysql 而是用 userdel -rf mysql
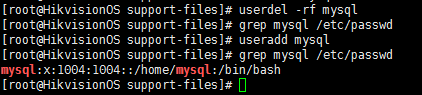
通过上图可以看到此时就没有那个错误提醒了。
在网上还看到其它创建用户的方式:
[root@node1 ~]# useradd -M -r -s  /bin/nologin mysql
[root@node1 ~]# id mysql
uid=987(mysql) gid=981(mysql) 组=981(mysql)
更改数据库的属主属组为root
[root@node1 local]# chown root.root -R mysql(2) 初始化数据库
- cd /opt/mariadb-10.1.43-linux-x86_64/scripts
-
./mysql_install_db --datadir=/opt/mariadb-10.1.43-linux-x86_64/data/mariadb --basedir=/opt/mariadb-10.1.43-linux-x86_64 --defaults-file=/etc/my.cnf --user=mysql
注意:这里mysql_install_db 是一个可执行脚本,需要在前面加上./ 执行。
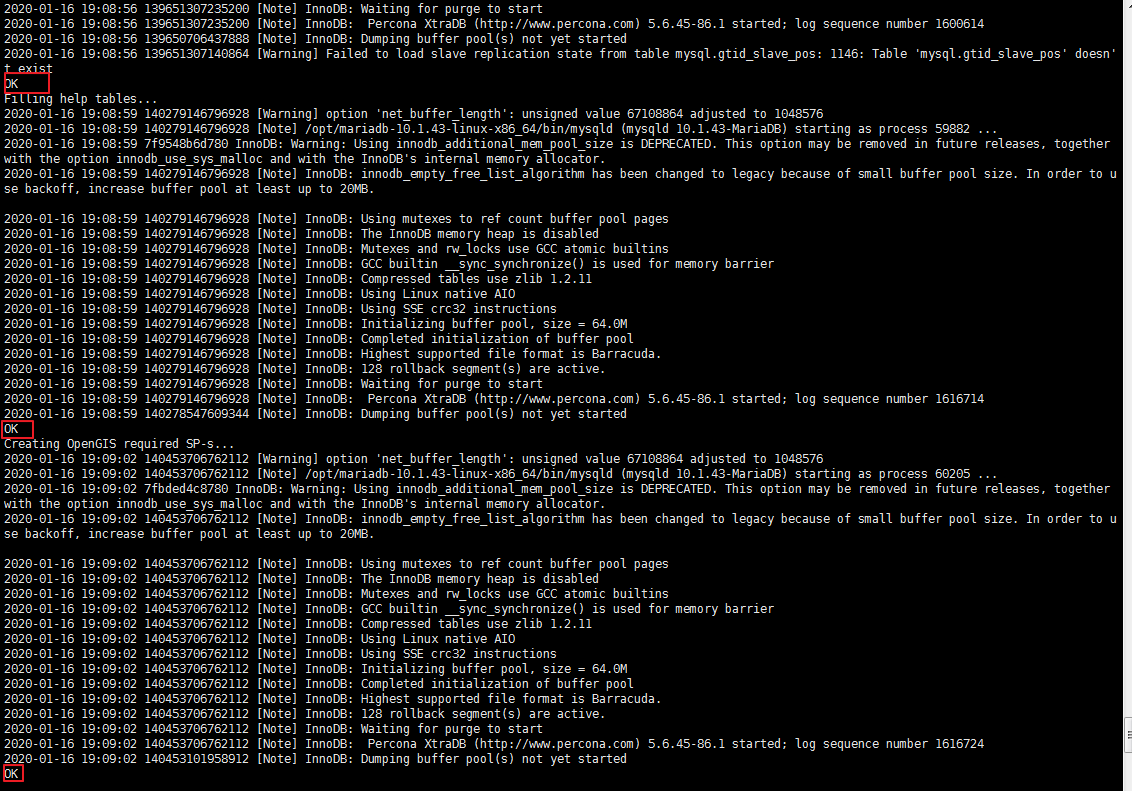
出现以上表示执行成功。
检查是否真实安装成功:
- ll /opt/mariadb-10.1.43-linux-x86_64/data/mariadb/

出现以上3个红框表示安装成功。
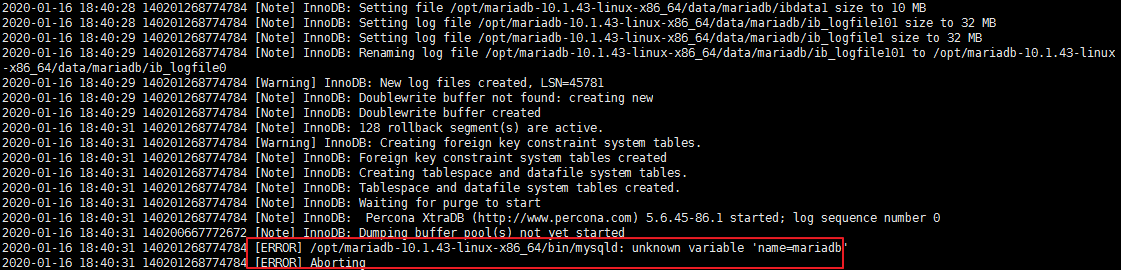
问题:
- 在执行初始化脚本过程中,可能会因为别的原因,导致初始化失败,此时可以查看mariadb的日志(在/etc/my.cnf 中设置 log_error 来指定错误日志路径)
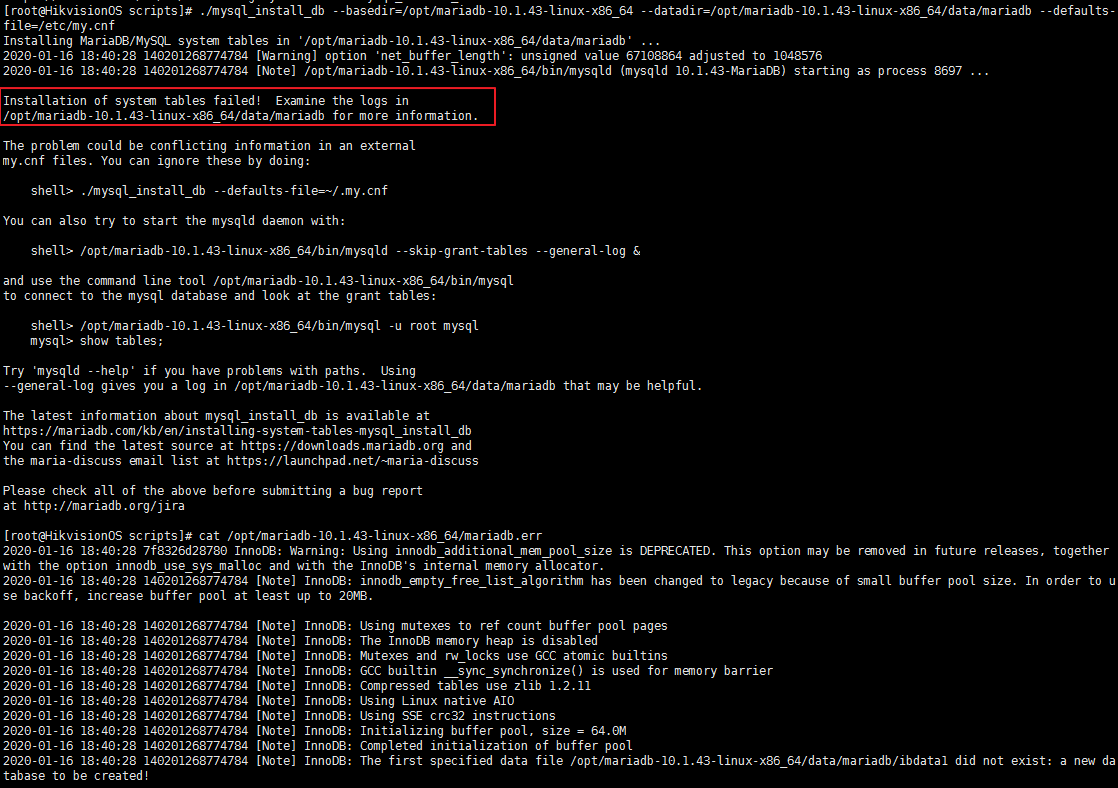
- 还可能出现如下权限问题

所以需要给mysql 用户赋读取数据库目录的权限,可以使用命令 chown mysql.mysql /opt/mariadb-10.1.43-linux-x86_64/data/mariadb -R
(3) 注册成系统服务
- cp support-files/mysql.server /etc/init.d/mysqld
- chkconfig --add mysqld # 添加至系统服务
- chkconfig mysqld on # 设置开机自启动
- chkconfig --list |more --- 查看启动项
(4) 设置指向安装目录的软链接
- ln -s 安装目录 /usr/local/mysql
这样是把数据库安装别的目录了。mariadb 编译的时候默认为是安装在 /usr/loca/mysql下的
(5) 以后台服务先试运行
出现问题:
- ./mysqld_safe --defaults-file=/etc/my.cnf
[root@CI-Fsdmdept-DB-72-73 bin]# ./mysqld_safe --defaults-file=/etc/my.cnf
Warning: World-writable config file '/etc/my.cnf' is ignored
Warning: World-writable config file '/etc/my.cnf' is ignored
200114 17:15:54 mysqld_safe Logging to '/usr/local/mysql/data/CI-Fsdmdept-DB-72-73.err'.
200114 17:15:54 mysqld_safe Starting mysqld daemon with databases from /usr/local/mysql/data
/opt/mariadb-10.1.43-linux-x86_64/bin/mysqld_safe_helper: Can't create/write to file '/usr/local/mysql/data/CI-Fsdmdept-DB-72-73.err' (Errcode: 2 "No such file or directory")
Warning: World-writable config file '/etc/my.cnf' is ignored
这个原因是之前 在etc目录下生成my.cnf 执行了命令 chmod -R 777 的权限,导致 其变成全局用户可写了。提示Warning: World-writable config file ‘/etc/my.cnf’ is ignored ,大概意思是权限全局可写,任何一个用户都可以写。mysql担心这种文件被其他用户恶意修改,所以忽略掉这个配置文件。
解决办法,重新给该文件赋权限。执行以下命令:
- chmod 644 /etc/my.cnf
my.cnf设置为用户可读写,其他用户不可写.
PS:所以在执行文件操作的时候,最好还是使用 cp 命令进行 拷贝,使用 vim 进行在线编辑。
若不解决以上问题,想继续往下走,此时可以执行:
- ./mysqld_safe --datadir='/opt/mariadb-10.1.43-linux-x86_64/data/mariadb' --basedir=/opt/mariadb-10.1.43-linux-x86_64

此时又出现红色区域问题,解决办法:
红色区域表示 写文件没有权限,此时需要给文件夹
mariadb-10.1.43-linux-x86_64 赋权限,可以进行使用如下命令:
- cd /opt/mariadb-10.1.43-linux-x86_64
- chmod -R 777 *
接着再次执行命令启动服务
- /mysqld_safe --datadir='/opt/mariadb-10.1.43-linux-x86_64/data/mariadb' --basedir=/opt/mariadb-10.1.43-linux-x86_64 或 ./mysqld_safe --defaults-file = /etc/my.cnf
- ps -aux|grep mysql ---- 查看服务是否启动

出现上图表示服务已经启动。
(5) 修改用户密码
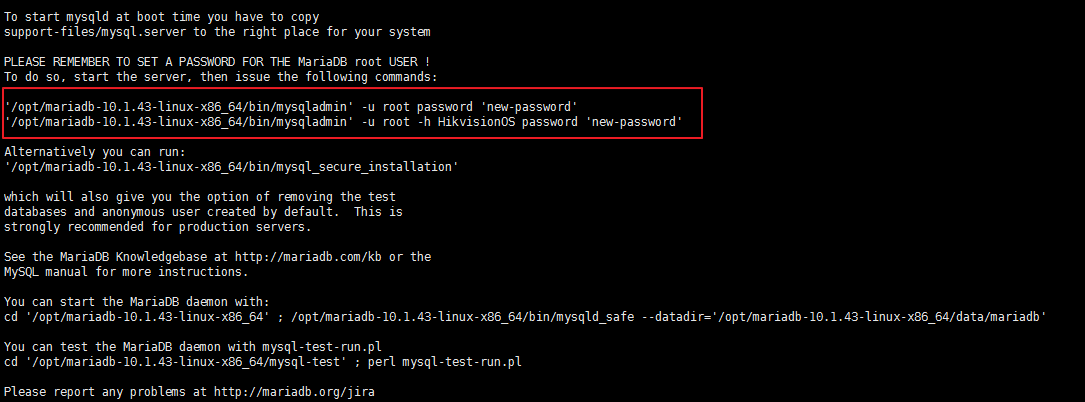
可以按照之前初始化数据库成功时,提示的指导来执行。
-
ln -s /opt/mariadb-10.1.43-linux-x86_64/mysql.sock /tmp/ 方便登录mysql 对mysql.sock文件做个软连接;(因为mysql.sock文件我们在配置文件里已经修改了默认路径,需要软连接到/tmp/下)
- ./mysqladmin -u root password '123456' ---- 设置初始密码
(6) 可选操作(MySQL 安全配置)
可以参考:https://www.cnblogs.com/54db/p/7586577.html PS:后续试验补充
(7) 设置允许远程访问
- ./mysql -uroot -p --- 登录数据库
-
GRANT ALL PRIVILEGES ON *.* TO 'root'@'%'IDENTIFIED BY 'xxxx' WITH GRANT OPTION; xxx为密码
- flush privileges;
问题:
(1) 在登录的时候,会提示找不到文件

解决办法:
- ldd mysql ---- 查找依赖
发现依赖库均在lib64上,所以通过 ll /lib64/libtinfo.so.* 查找是否存在 libtinfo.so.xx的文件,执行完,发现如下:

lib64 目录下存在libtinfo.so文件,进行软链接。

上图表示已补全依赖库,此时再次登录数据库

(2) 通过以上命令设置远程,发现使用工具还是使用不上,需进行以下方式进行排查。
- show grants;

以上显示仅有 root 通过localhost才能连接,其他无法连接,此时要插入 root@% 权限。
三、卸载
1、关闭 mysql 服务
- 关闭mysql服务
service mysql stop 或 /etc/init.d/mysql stop 或 mysqladmin shutdown -uroot -p- 删除数据文件和目录
-
whereis mysql
-
find / -name mysql
-
rm -rf xxx
- 删除软链接,二进文件(如有必要)
-
cd /usr/local/
-
unlink mysql
- 删除自启动配置,配置文件
-
chkconfig --del mysql
-
rm -f /etc/init.d/mysql /etc/my.cnf
- 删除mysql用户和用户组(如有必要)
-
userdel mysql
-