前期回顾
本节摘要
一、多线程
基本使用生产者消费者模型(队列)自定义线程池
二、多进程
基本使用进程池
三、协程
greenletgevent
四、缓存
memcacheredis
五、rabbitMQ六、下节预告:
MySQLORM框架-sqlchemy堡垒机
一、线程
创建线程的两种基本使用方法:
- #!/usr/bin/env python
# -.- coding: utf-8 -.-# By sandlerimport threading# def f1(arg):# print(arg)## t = threading.Thread(target=f1,args=(123,))# t.start()class MyThread(threading.Thread):def __init__(self,func,args):self.func = funcself.args = argssuper(MyThread,self).__init__()def run(self):self.func(self.args)def f2(arg):print(arg)obj = MyThread(f2,123)obj.start()
先进先出队列Queue:
put放数据,是否阻塞,阻塞时的超时时间
get取数据(默认阻塞),是否阻塞,阻塞时的超时时间
队列最大长度
qsize()真实个数
maxsize最大支持的个数
join,task_done,阻塞进程,当队列中任务执行完毕后,释放阻塞,不再阻塞
#!/usr/bin/env python# -.- coding: utf-8 -.-# By sandlerimport queueq = queue.Queue(3)print(q.empty())q.put(11)q.put(22)q.put(33)print(q.empty())print(q.qsize())q.put(44)q.put(55,block=False)q.put(55,block=False,timeout=2)print(q.get())print(q.get())print(q.get())print(q.get(timeout=2))q = queue.Queue(5)q.put(123)q.put(456)q.get()q.task_done()q.get()q.task_done()q.join()
后进先出队列LifoQueue:
#!/usr/bin/env python# -.- coding: utf-8 -.-# By sandlerimport queueq = queue.LifoQueue()q.put(123)q.put(456)print(q.get())
优先级队列PriorityQueue:
#!/usr/bin/env python# -.- coding: utf-8 -.-# By sandlerimport queue# 优先级队列q = queue.PriorityQueue()q.put((1,123))q.put((2,456))q.put((3,789))print(q.get())
双向队列deque:
#!/usr/bin/env python# -.- coding: utf-8 -.-# By sandlerimport queue# 双向队列q = queue.deque()q.append(123)q.append(456)q.appendleft(789)q.pop()q.popleft()
生产者消费者模型:
#!/usr/bin/env python# -.- coding: utf-8 -.-# By sandler# 生产者消费者模型import queueimport threadingimport timeq = queue.Queue(20)def productor(arg):'''买票:param arg::return:'''q.put(str(arg) + ' 火车票 ')for i in range(300):t = threading.Thread(target=productor,args=(i,))t.start()def consumer(arg):'''服务器后台:param arg::return:'''while True:print(arg,q.get())time.sleep(2)for j in range(3):t = threading.Thread(target=consumer,args=(j,))t.start()
线程锁
#!/usr/bin/env python# -.- coding: utf-8 -.-# By sandlerimport threadingimport timeNUM = 10def func(l):global NUM# 上锁l.acquire()NUM -= 1time.sleep(2)print(NUM)# 开锁l.release()lock = threading.RLock() # 支持多层所,嵌套锁# lock = threading.Lock() # 只支持单层所for i in range(10):t = threading.Thread(target=func , args=(lock,))t.start()
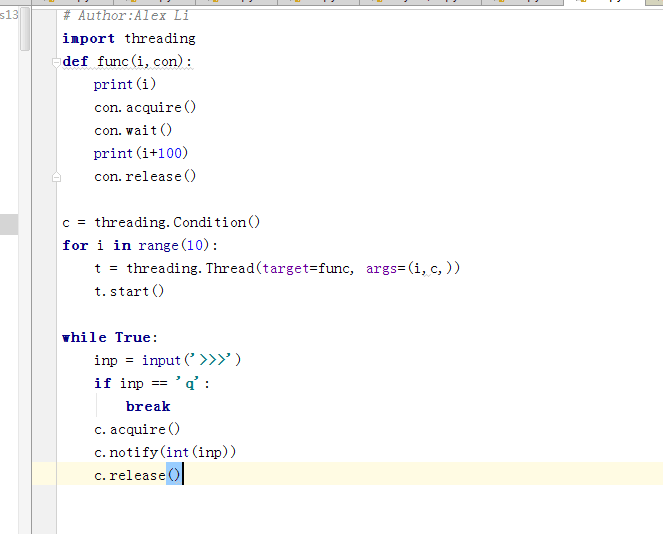
#!/usr/bin/env python# -.- coding: utf-8 -.-# By sandlerimport threadingdef func(i,e):print(i)e.wait() # 检测时什么灯,如果是红灯,停,绿灯,行;print(i+100)event = threading.Event()for i in range(10):t = threading.Thread(target=func,args=(i,event,))t.start()event.clear() # 设置成红灯inp = input('>>>')if inp == '1':event.set() # 设置成绿灯
线程池
#!/usr/bin/env python# -.- coding: utf-8 -.-# By sandlerimport queueimport threadingimport timeclass ThreadPool:def __init__(self,maxsize=5):self.maxsize = maxsizeself._q = queue.Queue(maxsize)for i in range(maxsize):self._q.put(threading.Thread)def get_thread(self):return self._q.get()def add_thread(self):self._q.put(threading.Thread)pool = ThreadPool(5)def task(arg, p):print(arg)time.sleep(1)p.add_thread()for i in range(100):t = pool.get_thread()obj = t(target=task,args=(i,pool,))obj.start()
二、进程
基本使用
默认数据不共享queues
#!/usr/bin/env python# -.- coding: utf-8 -.-# By sandler# 进程基本使用,from multiprocessing import Processfrom multiprocessing import queuesimport multiprocessingdef foo(i,arg):arg.put(i)print('say hi',i ,arg.qsize())if __name__ == "__main__":li = queues.Queue(20,ctx=multiprocessing)for i in range(10):p = Process(target=foo,args=(i,li,))p.start()array
#!/usr/bin/env python# -.- coding: utf-8 -.-# By sandler# 进程基本使用2from multiprocessing import Processfrom multiprocessing import queuesimport multiprocessingfrom multiprocessing import Arraydef foo(i,arg):arg[i] = i + 100for item in arg:print(item)print('============')if __name__ == "__main__":li = Array('i',10)for i in range(10):p = Process(target=foo,args=(i,li,))p.start()Manager.dict
#!/usr/bin/env python# -.- coding: utf-8 -.-# By sandler# 进程基本使用3from multiprocessing import Processfrom multiprocessing import queuesimport multiprocessingfrom multiprocessing import Managerdef foo(i,arg):arg[i] = i + 100print(arg.values())if __name__ == "__main__":obj = Manager()li = obj.dict()for i in range(10):p = Process(target=foo,args=(i,li,))p.start()import timetime.sleep(1)
进程池
#!/usr/bin/env python# -.- coding: utf-8 -.-# By sandler# 进程池from multiprocessing import Poolimport timedef f1(arg):time.sleep(1)print(arg)if __name__ == "__main__":pool = Pool(5)for i in range(30):# pool.apply(func=f1,args=(i,))pool.apply_async(func=f1,args=(i,))# pool.close() # 所有的任务执行完毕# time.sleep(1)# pool.terminate() # 立即终止# pool.join()
PS:
IO密集型使用多线程计算密集型使用多进程
三、协程
原理:利用一个线程,分解一个线程成为多个“微线程” ===>程序级别
greenlet
gevent
#!/usr/bin/env python# -.- coding: utf-8 -.-# By sandlerfrom gevent import monkey ; monkey.patch_all()import geventimport requestsdef f(url):print('GET: %s ' % url)resp = requests.get(url)data = resp.textprint('%d bytes received from %s.' % (len(data),url ))gevent.joinall([gevent.spawn(f,'http://www.python.org'),gevent.spawn(f,'http://www.yahoo.com'),gevent.spawn(f,'http://www.github.com')])
四、缓存
1、安装软件
2、程序:安装其对应的模块
Socket连接,
Memcache
1、天生的集群2、基本操作3、gets和cas
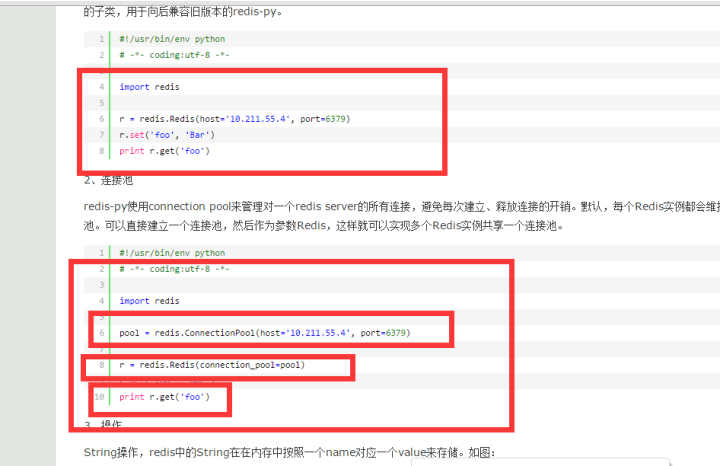
Redis
http://www.cnblogs.com/wupeiqi/articles/5132791.html
http://www.cnblogs.com/wupeiqi/articles/4839959.html
http://www.cnblogs.com/wupeiqi/articles/5040827.html


![6H2`WT%X2ZK$[5]UHM$EU`C.png](https://images2015.cnblogs.com/blog/902492/201607/902492-20160730000929966-1309186087.png)

![AKYO@1Z@KI]BF@O{NE$2L)P.png](https://images2015.cnblogs.com/blog/902492/201607/902492-20160730000931044-174287744.png)