方法一:
1、写插件:
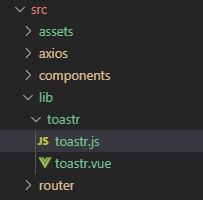
在 src 文件夹下面建 lib 文件夹用于存放插件,lib 文件夹下再建toastr文件夹,在toastr文件夹下新建 toastr.js 和 toastr.vue两个文件。整个项目目录如下所示:
![]()
toastr.vue 的内容如下:
<template>
    <div class="vue-toastr-wraper" v-show="isShow">
        {{message}}
    </div>
</template>

<script>
export default {
    name:'toastr',
    props:{
        message:{
            default:"",
            type:String
        },
        isShow:{
            default:false,
            type:Boolean
        }
    },
    mounted(){
        if(this.isShow){
            setTimeout(() => {
                this.isShow = false
            },2500);
        }
    }
}
</script>

<style scoped>
.vue-toastr-wraper{
    background: rgba(0, 0, 0, 0.6);
    color: #fff;
    font-size: 17px;
    padding: 10px;
    border-radius:12px;
    display: -webkit-box;
    -webkit-box-pack: center;
    -webkit-box-align: center;
    position: fixed;
    top: 50%;
    left: 50%;
    z-index: 2000;
    -webkit-transform: translateY(-50%);
    transform: translateY(-50%);
    -webkit-transform: translateX(-50%);
    transform: translateX(-50%);
}
</style>
toastr.vue 是做一个弹出提示,其中传入的参数有两个:message和 isShow,分别表示提示消息以及是否显示提示。
toastr.js中写install方法,内容如下:
import VueToastrPlugin from './toastr.vue'

const toastrPlugin = {
    install: function(Vue) {
        Vue.component(VueToastrPlugin.name, VueToastrPlugin)
    }
}

// global 情况下 自动安装
if (typeof window !== 'undefined' && window.Vue) {
    window.Vue.use(toastrPlugin)
}

// 导出模块
export default toastrPlugin
2. 本地测试
本插件的功能就这么多,因为我们尚未发布,所以先进行本地测试。
2.1 将 App.vue 多余代码删除。
2.2 在 main.js 中引入
import Vue from 'vue'
import App from './App.vue'

import Toastr from './lib/toastr/toastr.js'
Vue.use(Toastr)

new Vue({
  el: '#app',
  render: h => h(App)
})
2.3 在 App.vue 中使用 toastr (别忘记需要传递的参数)
<template>
  <div id="app">
    <toastr :msg = "'测试'" :isShow = "true"/>
  </div>
</template>

<script>
export default {
  name: 'app'
}
</script>

<style lang="scss">
</style>
方法二:
1、写插件:
在 src 文件夹下面建 lib 文件夹用于存放插件,lib 文件夹下再建toastr文件夹,在toastr文件夹下新建 toastr.js 和 toastr.vue两个文件。整个项目目录如下所示:
![]()
toastr.vue 的内容如下:
<template>
    <transition name="fade">
        <div class="toast" v-show="show">
            {{message}}
        </div>
    </transition>
</template>

<script>
export default {
  data() {
    return {
      show: false,
      message: ""
    };
  }
};
</script>

<style lang="scss" scoped>
.toast {
  position: fixed;
  top: 50%;
  left: 50%;
  margin-left: -100px;
  margin-top: -30px;
  padding: 2vw;
   200px;
  height: 60px;
  overflow-y: auto;
  font-size: 14px;
  color: #fff;
  text-align: left;
  background-color: rgba(0, 0, 0, 0.8);
  border-radius: 3px;
  z-index: 999;
}

.fade-enter-active,
.fade-leave-active {
  transition: 0.3s ease-out;
}
.fade-enter {
  opacity: 0;
  transform: scale(1.2);
}
.fade-leave-to {
  opacity: 0;
  transform: scale(0.8);
}
</style>
toastr.js中写install方法,内容如下:
import ToastComponent from './toastr.vue'

const Toast = {};

// 注册Toast
Toast.install = function (Vue) {
    // 生成一个Vue的子类
    // 同时这个子类也就是组件
    const ToastConstructor = Vue.extend(ToastComponent)
    // 生成一个该子类的实例
    const instance = new ToastConstructor();

    // 将这个实例挂载在我创建的div上
    // 并将此div加入全局挂载点内部
    instance.$mount(document.createElement('div'))
    document.body.appendChild(instance.$el)

    // 通过Vue的原型注册一个方法
    // 让所有实例共享这个方法
    Vue.prototype.$toast = (msg, duration = 2000) => {
        instance.message = msg;
        instance.show = true;

        setTimeout(() => {

            instance.show = false;
        }, duration);
    }
}

export default Toast
2. 本地测试
2.1 在 main.js 中引入:
// The Vue build version to load with the `import` command
// (runtime-only or standalone) has been set in webpack.base.conf with an alias.
import Vue from 'vue'
import Toast from './lib/toastr/toastr.js'

Vue.use(Toast)

/* eslint-disable no-new */
new Vue({
  el: '#app',
  router,
  store,
  components: { App },
  template: '<App/>'
})
2.2 在 App.vue 中使用 toastr:
// app.vue
<template>
  <div id="app">
    <button @click="toast">显示taost弹出框</button>
  </div>
</template>

<script>
export default {
  name: "app",
  methods: {
    toast() {
      this.$toast("你好");
    }
  }
};
</script>

<style>
#app {
  font-family: "Avenir", Helvetica, Arial, sans-serif;
  -webkit-font-smoothing: antialiased;
  -moz-osx-font-smoothing: grayscale;
  text-align: center;
  color: #2c3e50;
  margin-top: 60px;
}
</style>
比较:
以上介绍了这两种不同的插件编写方法,貌似没有什么不一样啊,真的是这样么?
来看一下以上完整的main.js和app.vue两个文件发现,第一个toastr是显示的写在app.vue模板里的,而第二个toastr并没有作为一个组件写入,仅仅是通过一个方法控制显示。