FastDFS 安装包
FastDFS安装包
密码 aj4f
下载后把安装包移动到服务器里面
这里我把安装包放在opt/FastDFS
FastDFS安装
安装环境
在本地安装就需要安装gcc环境
yum -y install cmake make gcc-c++
在阿里服务器因为帮你配置好了的
解压libfastcommon到指定目录
解压
-C 指定解压的目录
# 解压
[root@rzk FastdfsTar]# tar zxvf  libfastcommon-1.0.53.tar.gz -C /usr/local/fastDFS/
编译
编译
# 进入指定解压的目录下
[root@rzk FastdfsTar]# cd /usr/local/fastDFS/
[root@rzk fastDFS]# ls
libfastcommon-1.0.53
[root@rzk fastDFS]# cd libfastcommon-1.0.53/
[root@rzk libfastcommon-1.0.53]# ls
debian  doc  HISTORY  INSTALL  libfastcommon.spec  LICENSE  make.sh  php-fastcommon  README  src
[root@rzk libfastcommon-1.0.53]# ./make.sh
安装
[root@rzk libfastcommon-1.0.53]# ./make.sh install
进入到usr/lib64目录下
查看 libfastcommon.so
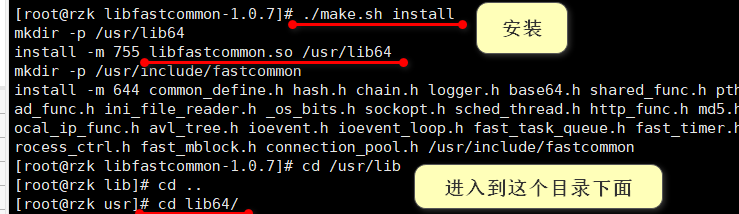
拷贝一份到 /usr/lib
[root@rzk lib64]# cp libfastcommon.so /usr/lib
[root@rzk lib64]# cd /usr/lib
解压fastDFS6
解压指定路径
tar zxvf fastdfs-6.07.tar.gz -C /usr/local/fastDFS/
[root@rzk FastdfsTar]# cd /usr/local/fastDFS/
[root@rzk fastdfs-6.07]# ./make.sh
[root@rzk fastdfs-6.07]# ./make.sh install
安装
进入usr/bin目录
cd /usr/bin
过滤查看文件
进入配置文件下
这里会有相关的配置信息
也就是上面流程图扮演的角色
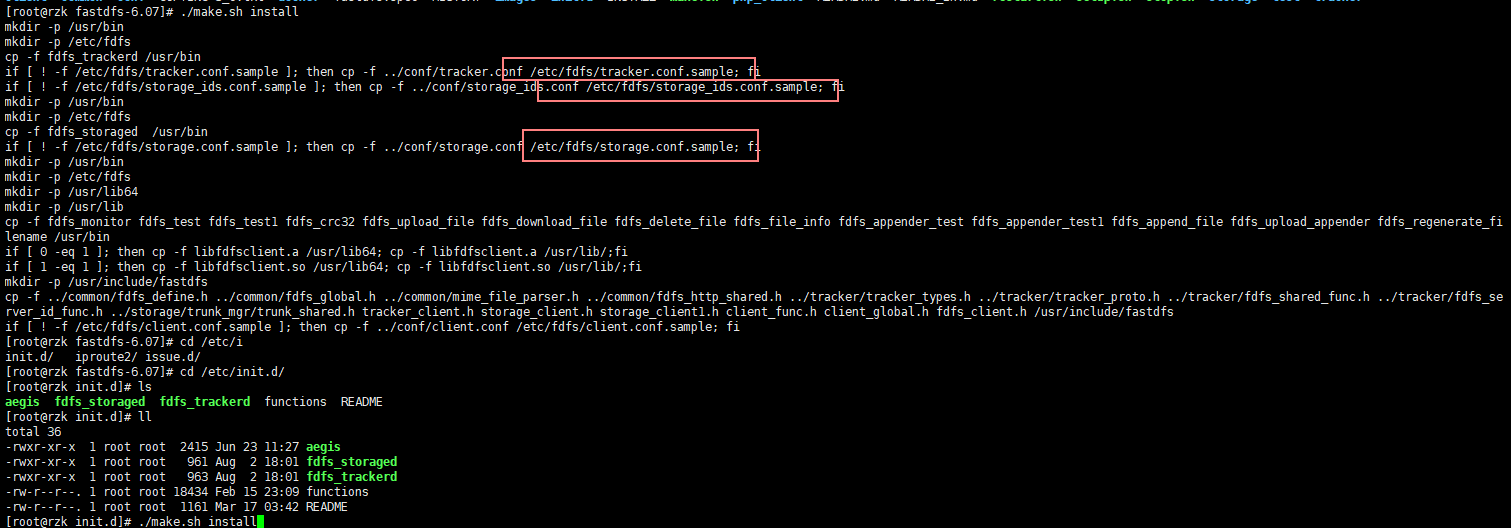
[root@rzk fastdfs-6.07]# cd /etc/init.d/
[root@rzk init.d]# ls
aegis  fdfs_storaged  fdfs_trackerd  functions  README
[root@rzk init.d]# ll
total 36
-rwxr-xr-x  1 root root  2415 Jun 23 11:27 aegis
-rwxr-xr-x  1 root root   961 Aug  2 18:01 fdfs_storaged
-rwxr-xr-x  1 root root   963 Aug  2 18:01 fdfs_trackerd
-rw-r--r--. 1 root root 18434 Feb 15 23:09 functions
-rw-r--r--. 1 root root  1161 Mar 17 03:42 README
[root@rzk init.d]#
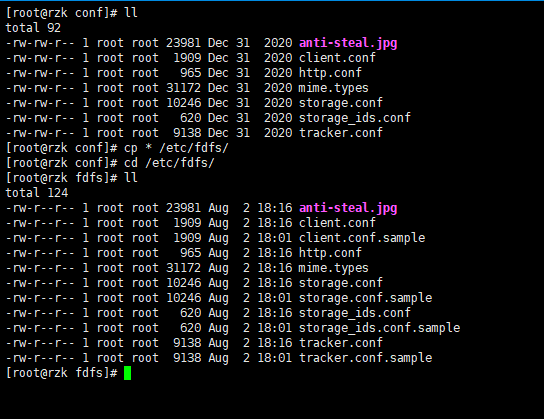
返回FastDFS 6 文件 把文件copy到etc/fdfs

需要把conf文件下所有的文件copy到etc/fdfs
[root@rzk conf]# ll
total 92
-rw-rw-r-- 1 root root 23981 Dec 31  2020 anti-steal.jpg
-rw-rw-r-- 1 root root  1909 Dec 31  2020 client.conf
-rw-rw-r-- 1 root root   965 Dec 31  2020 http.conf
-rw-rw-r-- 1 root root 31172 Dec 31  2020 mime.types
-rw-rw-r-- 1 root root 10246 Dec 31  2020 storage.conf
-rw-rw-r-- 1 root root   620 Dec 31  2020 storage_ids.conf
-rw-rw-r-- 1 root root  9138 Dec 31  2020 tracker.conf
[root@rzk conf]# cp * /etc/fdfs/
[root@rzk conf]# cd /etc/fdfs/
[root@rzk fdfs]# ll
total 124
-rw-r--r-- 1 root root 23981 Aug  2 18:16 anti-steal.jpg
-rw-r--r-- 1 root root  1909 Aug  2 18:16 client.conf
-rw-r--r-- 1 root root  1909 Aug  2 18:01 client.conf.sample
-rw-r--r-- 1 root root   965 Aug  2 18:16 http.conf
-rw-r--r-- 1 root root 31172 Aug  2 18:16 mime.types
-rw-r--r-- 1 root root 10246 Aug  2 18:16 storage.conf
-rw-r--r-- 1 root root 10246 Aug  2 18:01 storage.conf.sample
-rw-r--r-- 1 root root   620 Aug  2 18:16 storage_ids.conf
-rw-r--r-- 1 root root   620 Aug  2 18:01 storage_ids.conf.sample
-rw-r--r-- 1 root root  9138 Aug  2 18:16 tracker.conf
-rw-r--r-- 1 root root  9138 Aug  2 18:01 tracker.conf.sample
进入etc/fdfs修改tracker.conf
根据你命名的文件,在etc/fdfs/目录下创建该文件
[root@rzk fdfs]# mkdir /fastdfs/tracker -p
[root@rzk fdfs]# mkdir /fastdfs/storage -p
[root@rzk fdfs]# mkdir /fastdfs/storage/store -p
[root@rzk fdfs]# mkdir /fastdfs/client -p
[root@rzk fdfs]# mkdir /fastdfs/tmp -p
[root@rzk fdfs]# cd /fastdfs/
[root@rzk fastdfs]# ls
client  storage  tmp  tracker
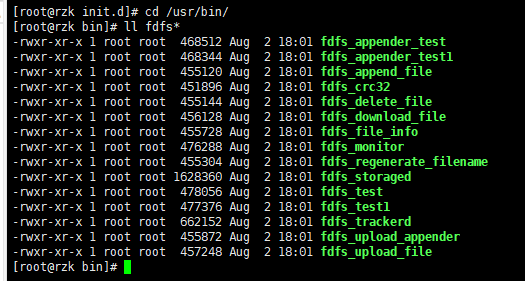
启动tracker
这以下的两个目录的trackerd都可以启动
[root@rzk bin]# ll fdfs*
-rwxr-xr-x 1 root root  468512 Aug  2 18:01 fdfs_appender_test
-rwxr-xr-x 1 root root  468344 Aug  2 18:01 fdfs_appender_test1
-rwxr-xr-x 1 root root  455120 Aug  2 18:01 fdfs_append_file
-rwxr-xr-x 1 root root  451896 Aug  2 18:01 fdfs_crc32
-rwxr-xr-x 1 root root  455144 Aug  2 18:01 fdfs_delete_file
-rwxr-xr-x 1 root root  456128 Aug  2 18:01 fdfs_download_file
-rwxr-xr-x 1 root root  455728 Aug  2 18:01 fdfs_file_info
-rwxr-xr-x 1 root root  476288 Aug  2 18:01 fdfs_monitor
-rwxr-xr-x 1 root root  455304 Aug  2 18:01 fdfs_regenerate_filename
-rwxr-xr-x 1 root root 1628360 Aug  2 18:01 fdfs_storaged
-rwxr-xr-x 1 root root  478056 Aug  2 18:01 fdfs_test
-rwxr-xr-x 1 root root  477376 Aug  2 18:01 fdfs_test1
-rwxr-xr-x 1 root root  662152 Aug  2 18:01 fdfs_trackerd
-rwxr-xr-x 1 root root  455872 Aug  2 18:01 fdfs_upload_appender
-rwxr-xr-x 1 root root  457248 Aug  2 18:01 fdfs_upload_file
[root@rzk bin]# cd /etc/init.d/
[root@rzk init.d]# ll
total 36
-rwxr-xr-x  1 root root  2415 Jun 23 11:27 aegis
-rwxr-xr-x  1 root root   961 Aug  2 18:01 fdfs_storaged
-rwxr-xr-x  1 root root   963 Aug  2 18:01 fdfs_trackerd
-rw-r--r--. 1 root root 18434 Feb 15 23:09 functions
-rw-r--r--. 1 root root  1161 Mar 17 03:42 README
启动 fdfs_trackerd 指向刚刚编辑的conf配置文件
[root@rzk bin]# cd /usr/bin/
[root@rzk bin]# fdfs_trackerd /etc/fdfs/tracker.conf
[root@rzk bin]#
重新启动 fdfs_trackerd /etc/fdfs/tracker.conf restart
查看是否有启动
[root@rzk bin]# ps -ef | grep tracker
root       41759       1  0 18:30 ?        00:00:00 fdfs_trackerd /etc/fdfs/tracker.conf
root       41774   40961  0 18:31 pts/0    00:00:00 grep --color=auto tracker
[root@rzk bin]#
修改storage
进入etc/fdfs修改storage.conf配置文件
group_name=rzk   //根据你的命名改
base_path=/fastdfs/storage      //存放storage基础数据和日志内容
store_path0=/fastdfs/storage/store    //存放文件的目录
tracker_server=192.168.1.103:22122   **端口号需要开启**
启动storage.conf
两种启动方法
[root@rzk bin]# fdfs_storaged  /etc/fdfs/storage.conf
[root@rzk bin]#
重新启动 fdfs_storaged /etc/fdfs/storage.conf restart
[root@rzk fdfs]# /etc/init.d/fdfs_storaged start
Reloading systemd:                                         [  OK  ]
Starting fdfs_storaged (via systemctl):                    [  OK  ]
[root@rzk fdfs]# ps -ef | grep storage
root       43402       1  0 18:51 ?        00:00:00 /usr/bin/fdfs_storaged /etc/fdfs/storage.conf
root       43405   43119  0 18:51 pts/1    00:00:00 grep --color=auto storage

查看是否有启动
[root@rzk fdfs]# ps -ef | grep storage
root       43338       1  0 18:47 ?        00:00:00 fdfs_storaged /etc/fdfs/storage.conf
root       43342   43119  0 18:48 pts/1    00:00:00 grep --color=auto storage
使用fastdfs-nginx做一个桥梁
解压该文件,并进去到解压好的文件里面的src
[root@rzk fastDFS]# tar -zxvf fastdfs-nginx-module_v1.16.tar.gz
fastdfs-nginx-module/
fastdfs-nginx-module/src/
fastdfs-nginx-module/src/ngx_http_fastdfs_module.c
fastdfs-nginx-module/src/mod_fastdfs.conf
fastdfs-nginx-module/src/config
fastdfs-nginx-module/src/common.h
fastdfs-nginx-module/src/common.c
fastdfs-nginx-module/INSTALL
fastdfs-nginx-module/HISTORY
[root@rzk fastDFS]# ls
fastdfs-5.05         fastdfs-nginx-module               libfastcommon-1.0.7
fastdfs-5.05.tar.gz  fastdfs-nginx-module_v1.16.tar.gz  libfastcommon-1.0.7.tar.gz
[root@rzk fastDFS]# cd fastdfs-nginx-module
[root@rzk fastdfs-nginx-module]# ls
HISTORY  INSTALL  src
[root@rzk fastdfs-nginx-module]# cd src/
[root@rzk src]# ls
common.c  common.h  config  mod_fastdfs.conf  ngx_http_fastdfs_module.c
[root@rzk src]#

[root@rzk src]# pwd
/usr/local/fastDFS/fastdfs-nginx-module-1.22/src
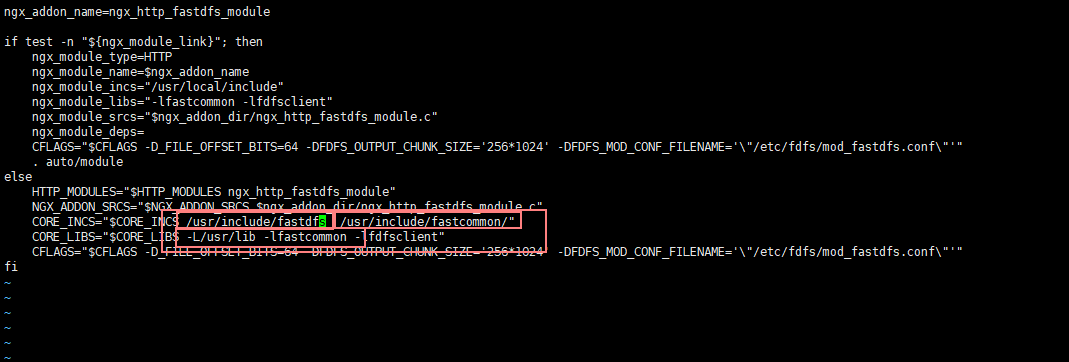
编辑config文件
解压安装Nginx
[root@rzk nginx-1.12.0]# tar zxvf nginx-1.12.0.tar.gz -C /usr/local/fastDFS/
进入解压的文件
安装依赖
[root@rzk nginx-1.12.0]# yum install -y gcc pcre pcre-devel openssl openssl-devel gd gd-devel
需要执行一下代码
最后一行是寻找中间桥梁
最后一行/usr/local/fastDFS/fastdfs-nginx-module-1.22/src这个是fastdfs-nginx-module的src目录
[root@rzk var]# mkdir -p /var/temp/nginx

./configure
--prefix=/usr/local/nginx
--pid-path=/var/run/nginx/nginx.pid
--lock-path=/var/lock/nginx.lock
--error-log-path=/var/log/nginx/error.log
--http-log-path=/var/log/nginx/access.log
--with-http_gzip_static_module
--http-client-body-temp-path=/var/temp/nginx/client
--http-proxy-temp-path=/var/temp/nginx/proxy
--http-fastcgi-temp-path=/var/temp/nginx/fastcgi
--http-uwsgi-temp-path=/var/temp/nginx/uwsgi
--http-scgi-temp-path=/var/temp/nginx/scgi
--add-module=**/usr/local/fastDFS/fastdfs-nginx-module-1.22/src**
编译 和 安装
make
make install
如果编译出现问题请查看是否 是以下问题
解决方法
进入fastds-nginx-module 拷贝文件到 /etc/fdfs/
[root@rzk fdfs]# cd /usr/local/fastDFS/fastdfs-nginx-module-1.22/src/
[root@rzk src]# ll
total 84
-rw-rw-r-- 1 root root 43507 Nov 19  2019 common.c
-rw-rw-r-- 1 root root  3995 Nov 19  2019 common.h
-rw-rw-r-- 1 root root   887 Aug  6 02:35 config
-rw-rw-r-- 1 root root  3725 Nov 19  2019 mod_fastdfs.conf
-rw-rw-r-- 1 root root 28668 Nov 19  2019 ngx_http_fastdfs_module.c
[root@rzk src]# cp mod_fastdfs.conf /etc/fdfs/
[root@rzk src]# cd /etc/fdfs/
修改拷贝好的配置文件
[root@rzk fdfs]# vim mod_fastdfs.conf
base_path=/fastdfs/tmp 日志文件位置
tracker_server=IP地址:22122 IP地址
group_name=rzk 需要一致
url_have_group_name = true 是否需要添加组织的名字(group_name) 默认是false关闭的
store_path0=/fastdfs/storage/store 文件存放的位置
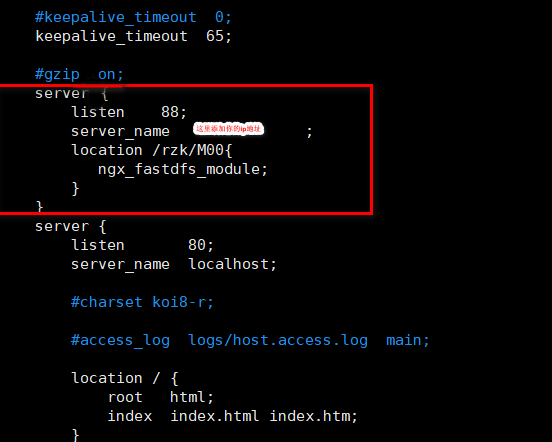
现在需要进入到/usr/local/nginx目录下 编辑nginx.conf配置文件
编辑nginx.conf
[root@rzk fdfs]# cd /usr/local/nginx/
[root@rzk nginx]# ks
-bash: ks: command not found
[root@rzk nginx]# ll
total 0
drwxr-xr-x 2 root root 333 Aug  6 03:02 conf
drwxr-xr-x 2 root root  40 Aug  6 03:02 html
drwxr-xr-x 2 root root  19 Aug  6 03:02 sbin
[root@rzk nginx]# cd conf/
[root@rzk conf]# ll
total 60
-rw-r--r-- 1 root root 1077 Aug  6 03:02 fastcgi.conf
-rw-r--r-- 1 root root 1077 Aug  6 03:02 fastcgi.conf.default
-rw-r--r-- 1 root root 1007 Aug  6 03:02 fastcgi_params
-rw-r--r-- 1 root root 1007 Aug  6 03:02 fastcgi_params.default
-rw-r--r-- 1 root root 2837 Aug  6 03:02 koi-utf
-rw-r--r-- 1 root root 2223 Aug  6 03:02 koi-win
-rw-r--r-- 1 root root 3957 Aug  6 03:02 mime.types
-rw-r--r-- 1 root root 3957 Aug  6 03:02 mime.types.default
-rw-r--r-- 1 root root 2656 Aug  6 03:02 nginx.conf
-rw-r--r-- 1 root root 2656 Aug  6 03:02 nginx.conf.default
-rw-r--r-- 1 root root  636 Aug  6 03:02 scgi_params
-rw-r--r-- 1 root root  636 Aug  6 03:02 scgi_params.default
-rw-r--r-- 1 root root  664 Aug  6 03:02 uwsgi_params
-rw-r--r-- 1 root root  664 Aug  6 03:02 uwsgi_params.default
-rw-r--r-- 1 root root 3610 Aug  6 03:02 win-utf
[root@rzk conf]# vim nginx.conf
注意:这里88端口需要开启
[root@rzk conf]# vim nginx.conf
启动nginx
进入nginx/sbin
进入nginx安装目录,在/usr/local/nginx 然后进到sbin文件,检查nginx
[root@rzk nginx]# cd /usr/local/nginx/
[root@rzk nginx]# cd sbin/
[root@rzk sbin]# ll
total 4948
-rwxr-xr-x 1 root root 5063800 Aug  6 03:02 nginx
[root@rzk sbin]# ./nginx -t
ngx_http_fastdfs_set pid=78881
nginx: the configuration file /usr/local/nginx/conf/nginx.conf syntax is ok
nginx: configuration file /usr/local/nginx/conf/nginx.conf test is successful

[root@rzk sbin]#
启动nginx
[root@rzk sbin]# ./nginx
ngx_http_fastdfs_set pid=78887
[root@rzk sbin]# ps -ef | grep nginx
root       78888       1  0 03:40 ?        00:00:00 nginx: master process ./nginx
nobody     78889   78888  0 03:40 ?        00:00:00 nginx: worker process
root       78899   47016  0 03:41 pts/2    00:00:00 grep --color=auto nginx
测试 随便上传个图片