1.首先要引入jar包

  1  <!--引入beans节点-->
  2     <dependency>
  3       <groupId>org.springframework</groupId>
  4       <artifactId>spring-beans</artifactId>
  5       <version>4.2.3.RELEASE</version>
  6     </dependency>
  7
  8
  9     <dependency>
 10       <groupId>org.springframework</groupId>
 11       <artifactId>spring-context</artifactId>
 12       <version>4.2.0.RELEASE</version>
 13     </dependency>
 14
 15     <dependency>
 16       <groupId> org.aspectj</groupId >
 17       <artifactId> aspectjweaver</artifactId >
 18       <version> 1.8.7</version >
 19     </dependency>
 20
 21     <!--SpringWebMVC-->
 22     <!-- https://mvnrepository.com/artifact/org.springframework/spring-webmvc -->
 23     <dependency>
 24       <groupId>org.springframework</groupId>
 25       <artifactId>spring-webmvc</artifactId>
 26       <version>3.1.2.RELEASE</version>
 27     </dependency>
 28
 29
 30
 31     <!--ServletAPI-->
 32     <dependency>
 33       <groupId>javaee</groupId>
 34       <artifactId>javaee-api</artifactId>
 35       <version>5</version>
 36     </dependency>
 37
 38     <dependency>
 39       <groupId>javax.servlet</groupId>
 40       <artifactId>jstl</artifactId>
 41       <version>1.2</version>
 42       <scope>runtime</scope>
 43     </dependency>
 44
 45
 46     <!--SpringWeb-->
 47     <dependency>
 48       <groupId>org.springframework</groupId>
 49       <artifactId>spring-web</artifactId>
 50       <version>4.1.8.RELEASE</version>
 51     </dependency>
 52
 53
 54     <!--alibaba的 fastjson-->
 55     <dependency>
 56       <groupId>com.alibaba</groupId>
 57       <artifactId>fastjson</artifactId>
 58       <version>1.2.31</version>
 59     </dependency>
 60
 61     <!-- https://mvnrepository.com/artifact/com.fasterxml.jackson.core/jackson-core -->
 62     <dependency>
 63       <groupId>com.fasterxml.jackson.core</groupId>
 64       <artifactId>jackson-core</artifactId>
 65       <version>2.8.1</version>
 66     </dependency>
 67
 68     <dependency>
 69       <groupId>com.fasterxml.jackson.core</groupId>
 70       <artifactId>jackson-databind</artifactId>
 71       <version>2.5.1</version>
 72     </dependency>
 73
 74     <!--数据验证-->
 75     <dependency>
 76       <groupId>org.hibernate</groupId>
 77       <artifactId>hibernate-validator</artifactId>
 78       <version>4.0.1.GA</version>
 79     </dependency>
 80
 81     <!--jboss logging-->
 82     <dependency>
 83       <groupId>org.jboss.logging</groupId>
 84       <artifactId>jboss-logging</artifactId>
 85       <version>3.3.0.Final</version>
 86     </dependency>
 87
 88     <!--validation api-->
 89     <dependency>
 90       <groupId>javax.validation</groupId>
 91       <artifactId>validation-api</artifactId>
 92       <version>1.0.0.GA</version>
 93     </dependency>
 94
 95     <!--slf4j api-->
 96     <dependency>
 97       <groupId>org.slf4j</groupId>
 98       <artifactId>slf4j-api</artifactId>
 99       <version>1.7.21</version>
100     </dependency>
101
102     <!--文件上传的jar包-->
103     <dependency>
104       <groupId>commons-fileupload</groupId>
105       <artifactId>commons-fileupload</artifactId>
106       <version>1.3.1</version>
107     </dependency>
108
109     <dependency>
110       <groupId>commons-io</groupId>
111       <artifactId>commons-io</artifactId>
112       <version>1.4</version>
113     </dependency>
114     <dependency>
115       <groupId>org.apache.poi</groupId>
116       <artifactId>poi</artifactId>
117       <version>3.17-beta1</version>
118     </dependency>
119
120   </dependencies>
2.填写web.xml

 1 <web-app>
 2   <display-name>Archetype Created Web Application</display-name>
 3   <!--配置前端控制器-->
 4   <servlet>
 5     <servlet-name>stringmvc</servlet-name>
 6     <servlet-class>org.springframework.web.servlet.DispatcherServlet</servlet-class>
 7     <!--初始化参数-->
 8  <init-param>
 9    <param-name>contextConfigLocation</param-name>
10    <param-value>classpath:springmvc.xml</param-value>
11  </init-param>
12
13     <!--只要Tomcat一启动,就将servlet对象创建好放入内存了-->
14     <load-on-startup>1</load-on-startup>
15
16   </servlet>
17
18   <servlet-mapping>
19     <servlet-name>stringmvc</servlet-name>
20     <url-pattern>/</url-pattern>
21   </servlet-mapping>
22 </web-app>
3.写springmvc.xml


 1 <?xml version="1.0" encoding="UTF-8"?>
 2 <beans xmlns="http://www.springframework.org/schema/beans"
 3        xmlns:aop="http://www.springframework.org/schema/aop"
 4        xmlns:context="http://www.springframework.org/schema/context"
 5        xmlns:tx="http://www.springframework.org/schema/tx"
 6        xmlns:mvc="http://www.springframework.org/schema/mvc"
 7        xmlns:p="http://www.springframework.org/schema/p"
 8        xmlns:xsi="http://www.w3.org/2001/XMLSchema-instance"
 9        xsi:schemaLocation="
10         http://www.springframework.org/schema/beans http://www.springframework.org/schema/beans/spring-beans.xsd
11         http://www.springframework.org/schema/aop http://www.springframework.org/schema/aop/spring-aop.xsd
12         http://www.springframework.org/schema/context  http://www.springframework.org/schema/context/spring-context.xsd
13         http://www.springframework.org/schema/tx  http://www.springframework.org/schema/tx/spring-tx.xsd
14         http://www.springframework.org/schema/mvc   http://www.springframework.org/schema/mvc/spring-mvc.xsd
15 ">
16     <!--注册处理器-->
17     <bean id="/hello.do" class="cn.happy.controller.FirstController"></bean>
18 </beans>
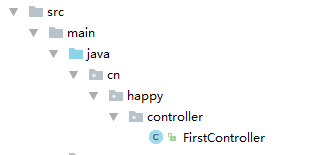
4.创建类编写代码


 1 /*控制器
 2 * ModelAndView
 3 * handleRequest
 4 * */
 5 public class FirstController implements Controller{
 6     public ModelAndView handleRequest(HttpServletRequest httpServletRequest, HttpServletResponse httpServletResponse) throws Exception {
 7         ModelAndView mv=new ModelAndView();
 8         mv.setViewName("/WEB-INF/index.jsp");
 9         return mv;
10     }
11 }
5.在WEB-INF下写一个jsp


1 <%@ page contentType="text/html;charset=UTF-8" language="java" %>
2 <html>
3 <head>
4     <title>Title</title>
5 </head>
6 <body>
7 <h2>StringMVC  One</h2>
8 </body>
9 </html>
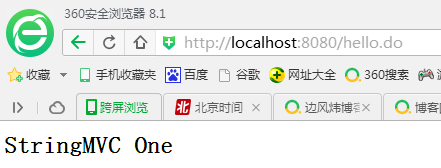
最后运行结果为:

