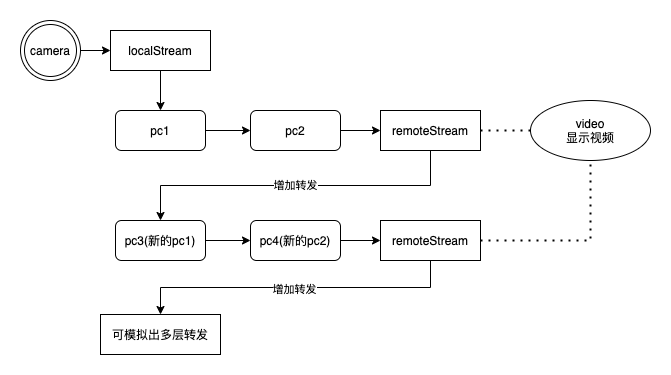
网络延迟是一种比较常见的情况。在本地网页上,我们可以建立多个RTCPeerConnection,增加转发次数,来模拟出网络延迟的效果。
建立通话后,再往后面增加本地转发节点。
准备
页面准备,方便我们后面调试
<div id="container">
    <h1><a href="https://an.rustfisher.com/webrtc/peerconnection/upgrade-to-video" title="">WebRTC插入多个转发节点</a></h1>

    <div id="videos">
        <video id="video1" playsinline autoplay muted></video>
        <video id="video2" playsinline autoplay></video>
    </div>

    <section><input type="checkbox" id="audio"><label for="audio">包含音频(>= Chrome 49)</label></section>

    <div id="buttons">
        <button id="start">开始</button>
        <button id="call" disabled>呼叫</button>
        <button id="insertRelay" disabled>插入转发</button>
        <button id="hangup" disabled>挂断</button>
    </div>
    <div id="status"></div>
</div>

<script src="../../src/js/adapter-2021.js"></script>
<script src="js/connection2.js"></script>
<script src="js/main.js"></script>
放上2个video和几个button。引入WebRTC adapter和控制脚本。
如果要使用官方的适配器adapter,按下边的地址来引入
<!-- <script src="../../src/js/adapter-2021.js"></script> -->
<script src="https://webrtc.github.io/adapter/adapter-latest.js"></script>
控制
分为connection2.js和main.js。
connection2.js包含新建节点的逻辑。main.js控制主流程。
connection2.js
这里能新建2个RTCPeerConnection,建立新的连接。
function doNothing() { }

function errFunc(context) {
    return function (error) {
        trace('报错 ' + context + ': ' + error.toString);
    };
}

// 新建2个节点并建立连接
function Connection2(stream, handler) {
    let servers = null;
    let pc1 = new RTCPeerConnection(servers);
    let pc2 = new RTCPeerConnection(servers);

    pc1.addStream(stream);
    pc1.onicecandidate = function (event) {
        if (event.candidate) {
            pc2.addIceCandidate(new RTCIceCandidate(event.candidate),
                doNothing, errFunc('AddIceCandidate'));
        }
    };
    pc2.onicecandidate = function (event) {
        if (event.candidate) {
            pc1.addIceCandidate(new RTCIceCandidate(event.candidate),
                doNothing, errFunc('AddIceCandidate'));
        }
    };
    pc2.onaddstream = function (e) {
        handler(e.stream);
    };
    pc1.createOffer(function (desc) {
        pc1.setLocalDescription(desc);
        pc2.setRemoteDescription(desc);
        pc2.createAnswer(function (desc2) {
            pc2.setLocalDescription(desc2);
            pc1.setRemoteDescription(desc2);
        }, errFunc('pc2.createAnswer'));
    }, errFunc('pc1.createOffer'));
    this.pc1 = pc1;
    this.pc2 = pc2;
}

Connection2.prototype.close = function () {
    this.pc1.close();
    this.pc2.close();
};
Connection2(stream, handler)新建pc1和pc2,将传入的stream作为数据源交给pc1。
随后在pc1和pc2之间建立连接。pc2接到数据流后再交回给handler。
main.js
先拿到ui
'use strict';

// 获取ui
const video1 = document.querySelector('video#video1');
const video2 = document.querySelector('video#video2');
const statusDiv = document.querySelector('div#status');
const audioCheckbox = document.querySelector('input#audio');
const startBtn = document.querySelector('button#start');
const callBtn = document.querySelector('button#call');
const insertRelayBtn = document.querySelector('button#insertRelay');
const hangupBtn = document.querySelector('button#hangup');
记录一些变量
const connectionList = []; // 连接点
let localStream;
let remoteStream;
启动,获取数据流。可以选择是否带音频流。拿到数据流后,交给video1显示,并且记录为localStream
function gotStream(stream) {
    video1.srcObject = stream;
    localStream = stream;
    callBtn.disabled = false;
}

function start() {
    startBtn.disabled = true;
    const options = audioCheckbox.checked ? { audio: true, video: true } : { audio: false, video: true };
    navigator.mediaDevices.getUserMedia(options)
        .then(gotStream)
        .catch(function (e) {
            alert(`获取媒体失败 ${e}`);
        });
}
发起呼叫
function gotremoteStream(stream) {
    remoteStream = stream;
    video2.srcObject = stream;
    console.log('接收到了传输后的数据流');
    statusDiv.textContent = `当前节点数: ${connectionList.length * 2}`;
    insertRelayBtn.disabled = false;
}

function call() {
    callBtn.disabled = true;
    insertRelayBtn.disabled = false;
    hangupBtn.disabled = false;
    console.log('呼叫!');
    connectionList.push(new Connection2(localStream, gotremoteStream));
}
呼叫的方法是call(),使用Connection2来建立第一级连接。
连接的记录存放在connectionList。
插入转发和call有点类似,都使用了Connection2。但是输入的是remoteStream。
function insertRelay() {
    connectionList.push(new Connection2(remoteStream, gotremoteStream));
    insertRelayBtn.disabled = true;
}
多次调用insertRelay(),可以模拟出多层转发的情况。转发次数多了,视频延迟得也就越明显。

挂断/结束方法hangup()
function hangup() {
    console.log('挂断');
    while (connectionList.length > 0) {
        const pipe = connectionList.pop();
        pipe.close();
    }
    insertRelayBtn.disabled = true;
    hangupBtn.disabled = true;
    callBtn.disabled = false;
}
将connectionList里面的连接全部拿出来结束掉。
如果数量比较多,结束耗时也会比较长。
效果预览
效果预览请参考WebRTC插入多个转发节点
可以尝试多点击几次插入转发按钮。观察视频的延迟情况。
小结
本地网页可以通过增加节点的办法,模拟出视频传输延迟的效果。
Connection2(stream, handler)里的代码写的非常简洁,也利于了解WebRTC传输建立的过程。
从这个例子我们也可以看出,实际工程中要尽量减少中间节点。并且要优先选择质量高的节点。