1,ARC的本质
ARC本质是NSAutoreleasePool的直接应用,
@autorelease{
return UIApplicationMain(argc, argv, nil, NSStringFromClass([AppDelegate class]));
}
其实是:
NSAutoreleasePool* pool = [[NSAutoreleasePool alloc] init];
int iRet = UIApplicationMain(argc, argv, nil, NSStringFromClass([AppDelegate class]));
[pool release];
然后,各种allocrelease后,对应refcount都设置成0,在出自己的引用范围后,就背nsautoreleasepool自动的释放掉,如下:
NSString* str = [[[NSString alloc] init] autorelease];
.......
其中str已经进行了autorelease,当结束生命周期后,str直接释放掉。
2,NSAutoreleasePool的原理
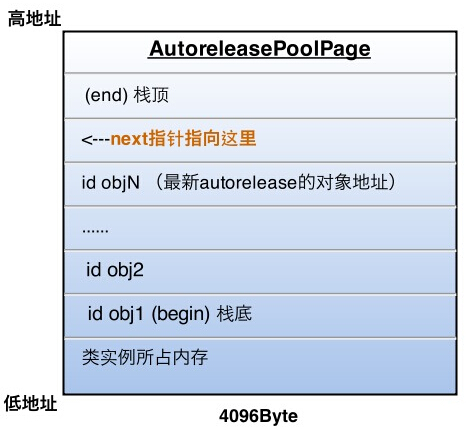
AutoreleasePoolPage是一个C++实现的类。

图中的情况,这一页再加入一个autorelease对象就要满了(也就是next指针马上指向栈顶),这时就要执行上面说的操作,建立下一页page对象,与这一页链表连接完成后,新page的next指针被初始化在栈底(begin的位置),然后继续向栈顶添加新对象。
所以,向一个对象发送- autorelease消息,就是将这个对象加入到当前AutoreleasePoolPage的栈顶next指针指向的位置

objc_autoreleasePoolPush的返回值正是这个哨兵对象的地址,被objc_autoreleasePoolPop(哨兵对象)作为入参,于是:
1.根据传入的哨兵对象地址找到哨兵对象所处的page
2.在当前page中,将晚于哨兵对象插入的所有autorelease对象都发送一次- release消息,并向回移动next指针到正确位置
3.补充2:从最新加入的对象一直向前清理,可以向前跨越若干个page,直到哨兵所在的page
刚才的objc_autoreleasePoolPop执行后,最终变成了下面的样子:

嵌套的AutoreleasePool
知道了上面的原理,嵌套的AutoreleasePool就非常简单了,pop的时候总会释放到上次push的位置为止,多层的pool就是多个哨兵对象而已,就像剥洋葱一样,每次一层,互不影响。