本文中将使用 mvc5与webapi2进行对Autofac整合
准备工作:
1、vs2013 or vs2013+
2、网络良好,nuget正常访问
好了需要的准备工作就这么多。
-----------------------------分割线---------------------------------------
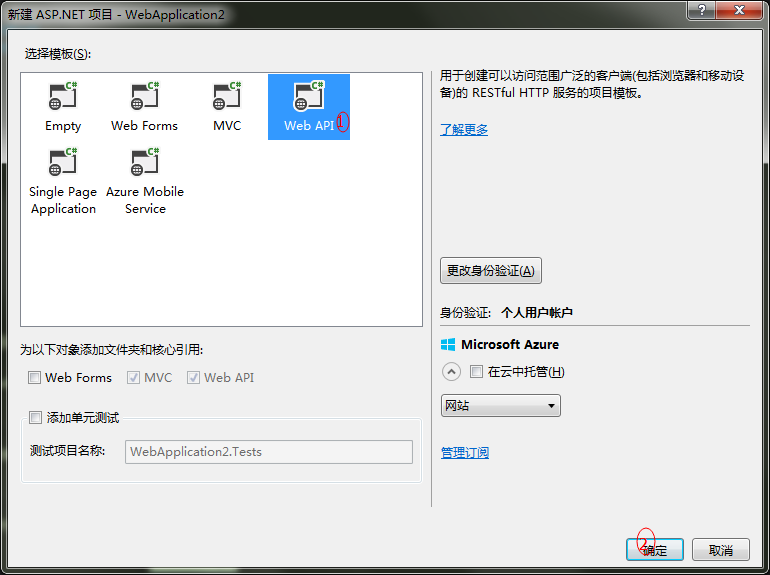
1、首先新建一个mvc5 与 webapi2 的项目如下图


2、安装相应的插件:
1   <package id="Autofac" version="3.5.0" targetFramework="net46" />
2   <package id="Autofac.Configuration" version="3.3.0" targetFramework="net46" />
3   <package id="Autofac.Mvc5" version="3.3.4" targetFramework="net46" />
4   <package id="Autofac.Mvc5.Owin" version="3.1.0" targetFramework="net46" />
5   <package id="Autofac.Owin" version="3.1.0" targetFramework="net46" />
6   <package id="Autofac.WebApi2" version="3.4.0" targetFramework="net46" />
7   <package id="Autofac.WebApi2.Owin" version="3.3.0" targetFramework="net46" />
ps:请参考id进行进行安装
3、在Startup文件中配置 Autofac(ps:看下面代码 有很多可选配置 应为我没有用到就注释了。例如builder.RegisterModelBinders(Assembly.GetExecutingAssembly()) 因为我没有自定义ModelBinders 就启用)
 1 public partial class Startup
 2     {
 3         public void Configuration(IAppBuilder app)
 4         {
 5             //ConfigureAuth(app);
 6             var builder = new ContainerBuilder();
 7             // Register dependencies, then...
 8             IOCRegister.Init(builder);
 9
10             // Register your MVC controllers.
11             builder.RegisterControllers(typeof(MvcApplication).Assembly);
12             // OPTIONAL: Register model binders that require DI.
13             //builder.RegisterModelBinders(Assembly.GetExecutingAssembly());
14             //builder.RegisterModelBinderProvider();
15
16             // OPTIONAL: Register web abstractions like HttpContextBase.
17             //builder.RegisterModule<AutofacWebTypesModule>();
18
19             // OPTIONAL: Enable property injection in view pages.
20             //builder.RegisterSource(new ViewRegistrationSource());
21
22             // OPTIONAL: Enable property injection into action filters.
23             builder.RegisterFilterProvider();
24             builder.RegisterApiControllers(Assembly.GetExecutingAssembly());
25             var config = GlobalConfiguration.Configuration;
26             // Set the dependency resolver to be Autofac.
27             var container = builder.Build();
28             DependencyResolver.SetResolver(new AutofacDependencyResolver(container));
29             config.DependencyResolver = new AutofacWebApiDependencyResolver(container);
30             app.UseAutofacMiddleware(container);
31             app.UseAutofacMvc();
32             app.UseAutofacWebApi(config);
33         }
34     }
 1 public class IOCRegister
 2     {
 3         public static void Init(ContainerBuilder builder)
 4         {
 5             XmlConfigurator.Configure(new FileInfo(Path.Combine(HttpContext.Current.Server.MapPath("/"), "log4net.config")));
 6             var logger = LogManager.GetLogger("");
 7             builder.RegisterInstance(logger).As<ILog>().SingleInstance();
 8
 9
10             var configPath = Path.Combine(HttpContext.Current.Server.MapPath("/"), @"App_Data/Config");
11
12             builder.RegisterModule(new ConfigurationSettingsReader("components", Path.Combine(configPath, "components.xml")));
13             //更多配置文件.....
14
15         }
16     }
ps:以上代码使用配置文件的方法配置 注入实例
4、配置文件components.xml
1 <?xml version="1.0" encoding="utf-8" ?>
2 <components defaultAssembly="BA.Framework.Util">
3   <files>
4     <file name="App_Data/Config/services.xml" section="services" />
5   </files>
6 </components>
5、配置文件 services.xml
 1 <?xml version="1.0" encoding="utf-8" ?>
 2 <service defaultAssembly="WebApplication1Service">
 3   <components>
 4     <component
 5            type="WebApplication1Service.TestService"
 6            service="WebApplication1Service.ITestService"
 7            instance-scope="per-lifetime-scope">
 8       <parameters>
 9         <parameter name="name" value="adfasdfasdfasdfasdf" />
10         <parameter name="age" value="121"/>
11       </parameters>
12     </component>
13
14   </components>
15 </service>
ps: 注意 defaultAssembly 需要配置注入类的命名空间
最后:关于TestService.cs
 1  public interface ITestService
 2     {
 3         string Test();
 4
 5         TestModel GetInfo();
 6
 7     }
 8
 9     public class TestService : ITestService
10     {
11
12         private readonly string name;
13         private readonly int age;
14
15         public TestService(string name, int age)
16         {
17             this.name = name;
18             this.age = age;
19         }
20         public int Count { set; get; }
21
22         public string Test()
23         {
24             return "afdafdasdf";
25         }
26
27         public TestModel GetInfo()
28         {
29             return new TestModel()
30             {
31                 Age = age,
32                 Name = name
33             };
34         }
35     }
36
37     public class TestModel
38     {
39         public string Name { get; set; }
40         public int Age { set; get; }
41     }
Controller里使用Service:
 public class Home2Controller : ApiController
    {
        private readonly ITestService _testService;
        public Home2Controller(ITestService testService)
        {
            _testService = testService;
        }
        public TestModel Get()
        {
            return _testService.GetInfo();
        }
    }