waylau/netty-4-user-guide: Chinese translation of Netty 4.x User Guide. 中文翻译《Netty 4.x 用户指南》 https://github.com/waylau/netty-4-user-guide
Rich Buffer Data Structure 丰富的缓冲实现 · GitBook https://waylau.com/netty-4-user-guide/Architectural%20Overview/Rich%20Buffer%20Data%20Structure.html
Rich Buffer Data Structure 丰富的缓冲实现
Netty 使用自建的 buffer API,而不是使用 NIO 的 ByteBuffer 来表示一个连续的字节序列。与 ByteBuffer 相比这种方式拥有明显的优势。Netty 使用新的 buffer 类型 ByteBuf,被设计为一个可从底层解决 ByteBuffer 问题,并可满足日常网络应用开发需要的缓冲类型。这些很酷的特性包括:
- 如果需要,允许使用自定义的缓冲类型。
- 复合缓冲类型中内置的透明的零拷贝实现。
- 开箱即用的动态缓冲类型,具有像 StringBuffer 一样的动态缓冲能力。
- 不再需要调用的flip()方法。
- 正常情况下具有比 ByteBuffer 更快的响应速度。
更多信息请参考:io.netty.buffer 包描述
Extensibility 可扩展性
ByteBuf 具有丰富的操作集,可以快速的实现协议的优化。例如,ByteBuf 提供各种操作用于访问无符号值和字符串,以及在缓冲区搜索一定的字节序列。你也可以扩展或包装现有的缓冲类型用来提供方便的访问。自定义缓冲仍然实现自 ByteBuf 接口,而不是引入一个不兼容的类型
Transparent Zero Copy 透明的零拷贝
举一个网络应用到极致的表现,你需要减少内存拷贝操作次数。你可能有一组缓冲区可以被组合以形成一个完整的消息。网络提供了一种复合缓冲,允许你从现有的任意数的缓冲区创建一个新的缓冲区而无需内存拷贝。例如,一个信息可以由两部分组成;header 和 body。在一个模块化的应用,当消息发送出去时,这两部分可以由不同的模块生产和装配。
 +--------+----------+
 | header |   body   |
 +--------+----------+
如果你使用的是 ByteBuffer ,你必须要创建一个新的大缓存区用来拷贝这两部分到这个新缓存区中。或者,你可以在 NiO做一个收集写操作,但限制你将复合缓冲类型作为 ByteBuffer 的数组而不是一个单一的缓冲区,打破了抽象,并且引入了复杂的状态管理。此外,如果你不从 NIO channel 读或写,它是没有用的。
// 复合类型与组件类型不兼容。
ByteBuffer[] message = new ByteBuffer[] { header, body };
通过对比, ByteBuf 不会有警告,因为它是完全可扩展并有一个内置的复合缓冲区。
// 复合类型与组件类型是兼容的。
ByteBuf message = Unpooled.wrappedBuffer(header, body);

// 因此,你甚至可以通过混合复合类型与普通缓冲区来创建一个复合类型。
ByteBuf messageWithFooter = Unpooled.wrappedBuffer(message, footer);

// 由于复合类型仍是 ByteBuf,访问其内容很容易,
//并且访问方法的行为就像是访问一个单独的缓冲区,
//即使你想访问的区域是跨多个组件。
//这里的无符号整数读取位于 body 和 footer
messageWithFooter.getUnsignedInt(
     messageWithFooter.readableBytes() - footer.readableBytes() - 1);
Automatic Capacity Extension 自动容量扩展
许多协议定义可变长度的消息,这意味着没有办法确定消息的长度,直到你构建的消息。或者,在计算长度的精确值时,带来了困难和不便。这就像当你建立一个字符串。你经常估计得到的字符串的长度,让 StringBuffer 扩大了其本身的需求。
// 一种新的动态缓冲区被创建。在内部,实际缓冲区是被“懒”创建,从而避免潜在的浪费内存空间。
ByteBuf b = Unpooled.buffer(4);

// 当第一个执行写尝试,内部指定初始容量 4 的缓冲区被创建
b.writeByte('1');

b.writeByte('2');
b.writeByte('3');
b.writeByte('4');

// 当写入的字节数超过初始容量 4 时,
//内部缓冲区自动分配具有较大的容量
b.writeByte('5');
Better Performance 更好的性能
最频繁使用的缓冲区 ByteBuf 的实现是一个非常薄的字节数组包装器(比如,一个字节)。与 ByteBuffer 不同,它没有复杂的边界和索引检查补偿,因此对于 JVM 优化缓冲区的访问更加简单。更多复杂的缓冲区实现是用于拆分或者组合缓存,并且比 ByteBuffer 拥有更好的性能。
io.netty.buffer (Netty API Reference (4.0.56.Final)) https://netty.io/4.0/api/io/netty/buffer/package-summary.html#package_description
Package io.netty.buffer Description
ByteBuffer to represent a sequence of bytes. This approach has significant advantage over using ByteBuffer. Netty's new buffer type, ByteBuf, has been designed from ground up to address the problems of ByteBuffer and to meet the daily needs of network application developers. To list a few cool features:
- You can define your buffer type if necessary.
- Transparent zero copy is achieved by built-in composite buffer type.
- A dynamic buffer type is provided out-of-the-box, whose capacity is expanded on demand, just like
StringBuffer. - There's no need to call the
flip()method anymore. - It is often faster than
ByteBuffer.
Extensibility
ByteBuf has rich set of operations optimized for rapid protocol implementation. For example, ByteBuf provides various operations for accessing unsigned values and strings and searching for certain byte sequence in a buffer. You can also extend or wrap existing buffer type to add convenient accessors. The custom buffer type still implements ByteBuf interface rather than introducing an incompatible type.
Transparent Zero Copy
To lift up the performance of a network application to the extreme, you need to reduce the number of memory copy operation. You might have a set of buffers that could be sliced and combined to compose a whole message. Netty provides a composite buffer which allows you to create a new buffer from the arbitrary number of existing buffers with no memory copy. For example, a message could be composed of two parts; header and body. In a modularized application, the two parts could be produced by different modules and assembled later when the message is sent out.+--------+----------+ | header | body | +--------+----------+If
ByteBuffer were used, you would have to create a new big buffer and copy the two parts into the new buffer. Alternatively, you can perform a gathering write operation in NIO, but it restricts you to represent the composite of buffers as an array of ByteBuffers rather than a single buffer, breaking the abstraction and introducing complicated state management. Moreover, it's of no use if you are not going to read or write from an NIO channel.
 // The composite type is incompatible with the component type.
 ByteBuffer[] message = new ByteBuffer[] { header, body };
By contrast, ByteBuf does not have such caveats because it is fully extensible and has a built-in composite buffer type.
// The composite type is compatible with the component type.ByteBufmessage =Unpooled.wrappedBuffer(header, body); // Therefore, you can even create a composite by mixing a composite and an // ordinary buffer.ByteBufmessageWithFooter =Unpooled.wrappedBuffer(message, footer); // Because the composite is still aByteBuf, you can access its content // easily, and the accessor method will behave just like it's a single buffer // even if the region you want to access spans over multiple components. The // unsigned integer being read here is located across body and footer. messageWithFooter.getUnsignedInt( messageWithFooter.readableBytes() - footer.readableBytes() - 1);
Automatic Capacity Extension
Many protocols define variable length messages, which means there's no way to determine the length of a message until you construct the message or it is difficult and inconvenient to calculate the length precisely. It is just like when you build aString. You often estimate the length of the resulting string and let StringBuffer expand itself on demand.
// A new dynamic buffer is created. Internally, the actual buffer is created // lazily to avoid potentially wasted memory space.ByteBufb =Unpooled.buffer(4); // When the first write attempt is made, the internal buffer is created with // the specified initial capacity (4). b.writeByte('1'); b.writeByte('2'); b.writeByte('3'); b.writeByte('4'); // When the number of written bytes exceeds the initial capacity (4), the // internal buffer is reallocated automatically with a larger capacity. b.writeByte('5');
Better Performance
Most frequently used buffer implementation ofByteBuf is a very thin wrapper of a byte array (i.e. byte[]). Unlike ByteBuffer, it has no complicated boundary check and index compensation, and therefore it is easier for a JVM to optimize the buffer access. More complicated buffer implementation is used only for sliced or composite buffers, and it performs as well as ByteBuffer.直接IO 零拷贝 RDAM 自缓存应用程序
https://en.wikipedia.org/wiki/Zero-copy
"Zero-copy" describes computer operations in which the CPU does not perform the task of copying data from one memory area to another. This is frequently used to save CPU cycles and memory bandwidth when transmitting a file over a network.[1]
Principle
Zero-copy versions of operating system elements, such as device drivers, file systems, and network protocol stacks, greatly increase the performance of certain application programs and more efficiently utilize system resources. Performance is enhanced by allowing the CPU to move on to other tasks while data copies proceed in parallel in another part of the machine. Also, zero-copy operations reduce the number of time-consuming mode switches between user space and kernel space. System resources are utilized more efficiently since using a sophisticated CPU to perform extensive copy operations, which is a relatively simple task, is wasteful if other simpler system components can do the copying.
As an example, reading a file and then sending it over a network the traditional way requires two data copies and two context switches per read/write cycle. One of those data copies uses the CPU. Sending the same file via zero copy reduces the context switches to two and eliminates all CPU data copies.[1]
Zero-copy protocols are especially important for high-speed networks in which the capacity of a network link approaches or exceeds the CPU's processing capacity. In such a case the CPU spends nearly all of its time copying transferred data, and thus becomes a bottleneck which limits the communication rate to below the link's capacity. A rule of thumb used in the industry is that roughly one CPU clock cycle is needed to process one bit of incoming data.
Hardware implementations
An early implementation was IBM OS/360 where a program could instruct the channel subsystem to copy blocks of data from one file or device to another without the nucleus having to copy the data to an intermediate buffer.
Techniques for creating zero-copy software include the use of direct memory access (DMA)-based copying and memory-mapping through an memory management unit (MMU). These features require specific hardware support and usually involve particular memory alignment requirements.
A newer approach used by the Heterogeneous System Architecture (HSA) facilitates the passing of pointers between the CPU and the GPU and also other processors. This requires a unified address space for the CPU and the GPU.[2][3]
Programmatic access
Several operating systems support zero-copying of files through specific APIs.
The Linux kernel supports zero-copy through various system calls, such as
- sys/socket.h's sendfile, sendfile64
- splice, tee, vmsplice
- process_vm_readv, process_vm_writev
- copy_file_range
- raw sockets with packet mmap[4] or AF_XDP
Some of them are specified in POSIX and thus also present in the BSD kernels or IBM AIX, some are unique to the Linux kernel API.
Microsoft Windows supports zero-copy through the TransmitFile API.
macOS supports zero-copy through the FreeBSD portion of the kernel[citation needed].
Java input streams can support zero-copy through the java.nio.channels.FileChannel's transferTo() method if the underlying operating system also supports zero copy.[5]
RDMA (Remote Direct Memory Access) protocols deeply rely on zero-copy techniques.
零复制(英语:Zero-copy;也译零拷贝)技术是指计算机执行操作时,CPU不需要先将数据从某处内存复制到另一个特定区域。这种技术通常用于通过网络传输文件时节省CPU周期和内存带宽。[1]
原理
操作系统某些组件(例如驱动程序、文件系统和网络协议栈)若采用零复制技术,则能极大地增强了特定应用程序的性能,并更有效地利用系统资源。通过使CPU得以完成其他而非将机器中的数据复制到另一处的任务,性能也得到了增强。另外,零复制操作减少了在用户空间与内核空间之间切换模式的次数。
举例来说,如果要读取一个文件并通过网络发送它,传统方式下每个读/写周期都需要复制两次数据和切换两次上下文,而数据的复制都需要依靠CPU。通过零复制技术完成相同的操作,上下文切换减少到两次,并且不需要CPU复制数据。
零复制协议对于网络链路容量接近或超过CPU处理能力的高速网络尤为重要。在这种网络下,CPU几乎将所有时间都花在复制要传送的数据上,因此将成为使通信速率低于链路容量的瓶颈。
硬件实现
最早的实现为IBM OS/360,其中一个程序可以指示通道子系统从一个文件或设备复制数据块到另一处,无需先转移数据。
实现零复制的软件通常依靠基于直接存储器访问(DMA)的复制,以及通过内存管理单元(MMU)的内存映射。这些功能需要特定硬件的支持,并通常涉及到特定存储器的对齐。
一种较新的方式为使用异构系统架构(HSA),便于CPU和GPU以及其他处理器传递指针。这需要CPU和GPU使用统一地址空间。[2][3]
程序访问
数种操作系统都通过特定API支持文件的零复制。
Linux内核通过各个系统调用支持零复制,例如sys/socket.h的sendfile、sendfile64以及splice。它们部分在POSIX中指定,因此也存在于BSD内核或IBM AIX中,部分则是Linux内核API中独有。
Microsoft Windows通过TransmitFile API支持零复制。
Java输入流可以通过java.nio.channels支持零复制。FileChannel的transferTo()方法也可以支持零复制(如果底层操作系统支持)。[4]
远程直接内存访问(RDMA)协议深度依赖零复制技术。
https://www.cnblogs.com/f-ck-need-u/p/7615914.html
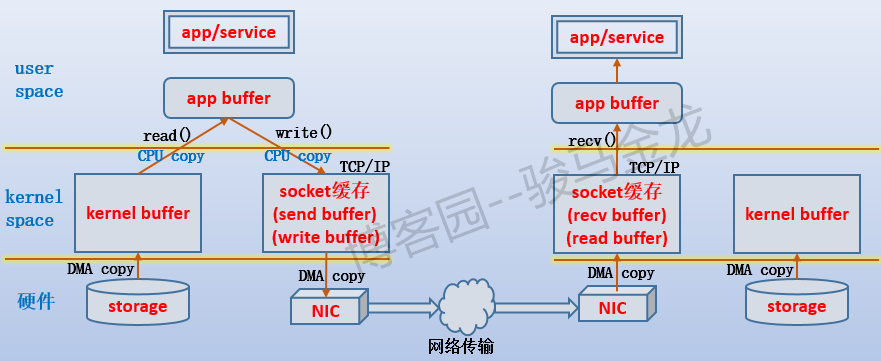
以右侧为浏览器,左侧为httpd服务器为例。
- 当httpd服务收到浏览器发送的index.html文件的请求时,负责处理请求的httpd子进程/线程总是会先发起系统调用,让内核将index.html从存储设备中加载出来。但是加载到的位置是内核空间的缓冲区kernel buffer,而不是直接给进程/线程的内存区。由于是内存设备和存储设备之间的数据传输,没有CPU的参与,所以这次是DMA操作。
- 当数据准备好后,内核唤醒httpd子进程/线程,让它使用read()函数把数据复制到它自己的缓冲区,也就是图中的app buffer。到了app buffer中的数据,已经独属于进程/线程,也就可以对它做读取、修改等等操作。由于这次是使用CPU来复制的,所以会消耗CPU资源。由于这个阶段从内核空间切换到用户空间,所以进行了上下文切换。
- 当数据修改完成(也可能没做任何操作)后,按我们所想的,需要把它响应给浏览器,也就是说要通过TCP连接传输出去。但TCP协议栈有自己的缓冲区,要通过它发送数据,必须将数据写到它的buffer中,对于发送者就是send buffer,对于接受者就是recv buffer。于是,通过write()函数将数据再次从app buffer复制到send buffer。这次也是CPU参与进行的复制,所以会消耗CPU。同样也会进行上下文切换。
- 非本机数据最终还是会通过网卡传输出去的,所以再使用send()函数就可以将send buffer中的数据交给网卡并通过网卡传输出去。由于这次是内存和设备之间的数据传输,没有CPU的参与,所以这次也是DMA操作。
- 当浏览器所在主机的网卡收到响应数据后(当然,数据是源源不断传输的),将它传输到TCP的recv buffer。这次是DMA操作。
- 数据源源不断地填充到recv buffer中,但是浏览器却不一定会去读取,而是需要通知浏览器进程使用recv()函数将数据从read buffer中取走。这次是CPU操作(图中忘记标注了)。
需要注意,对于httpd端来说,如果网速很慢,而httpd子进程/线程需要响应出去的数据又足够大(比send buffer还大),很可能会导致socket buffer填满的情况,这时write()函数会返回EWOULDBLOCK或EAGAIN,子进程/线程会进入等待状态。
对于浏览器一端来说,如果浏览器进程迟迟不将数据从socket buffer(recv buffer)中取走,很可能会导致socket buffer被填满。
再来说httpd端网络数据的"经历"。如下图:
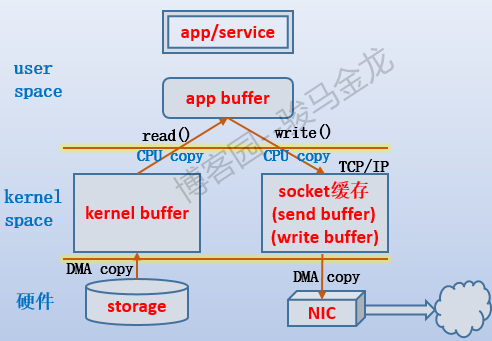
每次进程/线程需要一段数据时,总是先拷贝到kernel buffer,再拷贝到app buffer,再拷贝到socket buffer,最后再拷贝到网卡上。也就是说,总是会经过4段拷贝经历。
但想想,正常情况下,数据从存储设备到kernel buffer是必须的,从socket buffer到NIC也是必须的,但是从kernel buffer到app buffer是必须的吗?进程一定需要访问、修改这些数据吗?不一定,甚至对于web服务来说,如果不是要修改http响应报文,数据完全可以不用经过用户空间。也就是不用再从kernel buffer拷贝到app buffer,这就是零复制的概念。
零复制的概念是避免将数据在内核空间和用户空间进行拷贝。主要目的是减少不必要的拷贝,避免让CPU做大量的数据拷贝任务。
注:上面只是说正常情况下,例如某些硬件可以完成TCP/IP协议栈的工作,数据可以不经过socket buffer,直接在app buffer和硬件之间传输数据,RDMA技术就是在此基础上实现的。
https://zh.wikipedia.org/wiki/远程直接内存访问
在数据中心领域,远程直接内存访问(英语:remote direct memory access,RDMA)是一种绕过远程主机操作系统内核访问其内存中数据的技术,由于不经过操作系统,不仅节省了大量CPU资源,同样也提高了系统吞吐量、降低了系统的网络通信延迟,尤其适合在大规模并行计算机集群中有广泛应用。在基于NVMe over Fabric的数据中心中,RDMA可以配合高性能的NVMe SSD构建高性能、低延迟的存储网络。
RDMA支持零复制网络传输,通过使网络适配器直接在应用程序内存间传输数据,不再需要在应用程序内存与操作系统缓冲区之间复制数据。这种传输不需要中央处理器、CPU缓存或上下文交换参与,并且传输可与其他系统操作并行。当应用程序执行RDMA读取或写入请求时,应用程序数据直接传输到网络,从而减少延迟并实现快速的消息传输。
但是,这种策略也表现出目标节点不会收到请求完成的通知(单向通信)等相关的若干问题。
https://www.linuxjournal.com/article/6345?page=0,0
Zero Copy I: User-Mode Perspective
By now almost everyone has heard of so-called zero-copy functionality under Linux, but I often run into people who don't have a full understanding of the subject. Because of this, I decided to write a few articles that dig into the matter a bit deeper, in the hope of unraveling this useful feature. In this article, we take a look at zero copy from a user-mode application point of view, so gory kernel-level details are omitted intentionally.
To better understand the solution to a problem, we first need to understand the problem itself. Let's look at what is involved in the simple procedure of a network server dæmon serving data stored in a file to a client over the network. Here's some sample code:
read(file, tmp_buf, len);
write(socket, tmp_buf, len);
Looks simple enough; you would think there is not much overhead with only those two system calls. In reality, this couldn't be further from the truth. Behind those two calls, the data has been copied at least four times, and almost as many user/kernel context switches have been performed. (Actually this process is much more complicated, but I wanted to keep it simple). To get a better idea of the process involved, take a look at Figure 1. The top side shows context switches, and the bottom side shows copy operations.
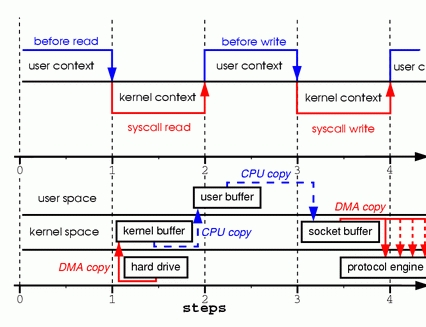
Figure 1. Copying in Two Sample System Calls
Step one: the read system call causes a context switch from user mode to kernel mode. The first copy is performed by the DMA engine, which reads file contents from the disk and stores them into a kernel address space buffer.
Step two: data is copied from the kernel buffer into the user buffer, and the read system call returns. The return from the call caused a context switch from kernel back to user mode. Now the data is stored in the user address space buffer, and it can begin its way down again.
Step three: the write system call causes a context switch from user mode to kernel mode. A third copy is performed to put the data into a kernel address space buffer again. This time, though, the data is put into a different buffer, a buffer that is associated with sockets specifically.
Step four: the write system call returns, creating our fourth context switch. Independently and asynchronously, a fourth copy happens as the DMA engine passes the data from the kernel buffer to the protocol engine. You are probably asking yourself, “What do you mean independently and asynchronously? Wasn't the data transmitted before the call returned?” Call return, in fact, doesn't guarantee transmission; it doesn't even guarantee the start of the transmission. It simply means the Ethernet driver had free descriptors in its queue and has accepted our data for transmission. There could be numerous packets queued before ours. Unless the driver/hardware implements priority rings or queues, data is transmitted on a first-in-first-out basis. (The forked DMA copy in Figure 1 illustrates the fact that the last copy can be delayed).
As you can see, a lot of data duplication is not really necessary to hold things up. Some of the duplication could be eliminated to decrease overhead and increase performance. As a driver developer, I work with hardware that has some pretty advanced features. Some hardware can bypass the main memory altogether and transmit data directly to another device. This feature eliminates a copy in the system memory and is a nice thing to have, but not all hardware supports it. There is also the issue of the data from the disk having to be repackaged for the network, which introduces some complications. To eliminate overhead, we could start by eliminating some of the copying between the kernel and user buffers.
One way to eliminate a copy is to skip calling read and instead call mmap. For example:
tmp_buf = mmap(file, len);
write(socket, tmp_buf, len);
To get a better idea of the process involved, take a look at Figure 2. Context switches remain the same.
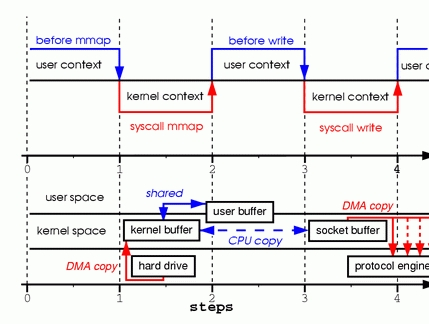
Figure 2. Calling mmap
Step one: the mmap system call causes the file contents to be copied into a kernel buffer by the DMA engine. The buffer is shared then with the user process, without any copy being performed between the kernel and user memory spaces.
Step two: the write system call causes the kernel to copy the data from the original kernel buffers into the kernel buffers associated with sockets.
Step three: the third copy happens as the DMA engine passes the data from the kernel socket buffers to the protocol engine.
By using mmap instead of read, we've cut in half the amount of data the kernel has to copy. This yields reasonably good results when a lot of data is being transmitted. However, this improvement doesn't come without a price; there are hidden pitfalls when using the mmap+write method. You will fall into one of them when you memory map a file and then call write while another process truncates the same file. Your write system call will be interrupted by the bus error signal SIGBUS, because you performed a bad memory access. The default behavior for that signal is to kill the process and dump core—not the most desirable operation for a network server. There are two ways to get around this problem.
The first way is to install a signal handler for the SIGBUS signal, and then simply call return in the handler. By doing this the write system call returns with the number of bytes it wrote before it got interrupted and the errno set to success. Let me point out that this would be a bad solution, one that treats the symptoms and not the cause of the problem. Because SIGBUS signals that something has gone seriously wrong with the process, I would discourage using this as a solution.
The second solution involves file leasing (which is called “opportunistic locking” in Microsoft Windows) from the kernel. This is the correct way to fix this problem. By using leasing on the file descriptor, you take a lease with the kernel on a particular file. You then can request a read/write lease from the kernel. When another process tries to truncate the file you are transmitting, the kernel sends you a real-time signal, the RT_SIGNAL_LEASE signal. It tells you the kernel is breaking your write or read lease on that file. Your write call is interrupted before your program accesses an invalid address and gets killed by the SIGBUS signal. The return value of the write call is the number of bytes written before the interruption, and the errno will be set to success. Here is some sample code that shows how to get a lease from the kernel:
if(fcntl(fd, F_SETSIG, RT_SIGNAL_LEASE) == -1) {
    perror("kernel lease set signal");
    return -1;
}
/* l_type can be F_RDLCK F_WRLCK */
if(fcntl(fd, F_SETLEASE, l_type)){
    perror("kernel lease set type");
    return -1;
}
You should get your lease before mmaping the file, and break your lease after you are done. This is achieved by calling fcntl F_SETLEASE with the lease type of F_UNLCK.
In kernel version 2.1, the sendfile system call was introduced to simplify the transmission of data over the network and between two local files. Introduction of sendfile not only reduces data copying, it also reduces context switches. Use it like this:
sendfile(socket, file, len);
To get a better idea of the process involved, take a look at Figure 3.

Figure 3. Replacing Read and Write with Sendfile
Step one: the sendfile system call causes the file contents to be copied into a kernel buffer by the DMA engine. Then the data is copied by the kernel into the kernel buffer associated with sockets.
Step two: the third copy happens as the DMA engine passes the data from the kernel socket buffers to the protocol engine.
You are probably wondering what happens if another process truncates the file we are transmitting with the sendfile system call. If we don't register any signal handlers, the sendfile call simply returns with the number of bytes it transferred before it got interrupted, and the errno will be set to success.
If we get a lease from the kernel on the file before we call sendfile, however, the behavior and the return status are exactly the same. We also get the RT_SIGNAL_LEASE signal before the sendfile call returns.
So far, we have been able to avoid having the kernel make several copies, but we are still left with one copy. Can that be avoided too? Absolutely, with a little help from the hardware. To eliminate all the data duplication done by the kernel, we need a network interface that supports gather operations. This simply means that data awaiting transmission doesn't need to be in consecutive memory; it can be scattered through various memory locations. In kernel version 2.4, the socket buffer descriptor was modified to accommodate those requirements—what is known as zero copy under Linux. This approach not only reduces multiple context switches, it also eliminates data duplication done by the processor. For user-level applications nothing has changed, so the code still looks like this:
sendfile(socket, file, len);
To get a better idea of the process involved, take a look at Figure 4.

Figure 4. Hardware that supports gather can assemble data from multiple memory locations, eliminating another copy.
Step one: the sendfile system call causes the file contents to be copied into a kernel buffer by the DMA engine.
Step two: no data is copied into the socket buffer. Instead, only descriptors with information about the whereabouts and length of the data are appended to the socket buffer. The DMA engine passes data directly from the kernel buffer to the protocol engine, thus eliminating the remaining final copy.
Because data still is actually copied from the disk to the memory and from the memory to the wire, some might argue this is not a true zero copy. This is zero copy from the operating system standpoint, though, because the data is not duplicated between kernel buffers. When using zero copy, other performance benefits can be had besides copy avoidance, such as fewer context switches, less CPU data cache pollution and no CPU checksum calculations.
Now that we know what zero copy is, let's put theory into practice and write some code. You can download the full source code from www.xalien.org/articles/source/sfl-src.tgz. To unpack the source code, type tar -zxvf sfl-src.tgz at the prompt. To compile the code and create the random data file data.bin, run make.
Looking at the code starting with header files:
/* sfl.c sendfile example program
Dragan Stancevic <
header name                 function / variable
-------------------------------------------------*/
#include <stdio.h>          /* printf, perror */
#include <fcntl.h>          /* open */
#include <unistd.h>         /* close */
#include <errno.h>          /* errno */
#include <string.h>         /* memset */
#include <sys/socket.h>     /* socket */
#include <netinet/in.h>     /* sockaddr_in */
#include <sys/sendfile.h>   /* sendfile */
#include <arpa/inet.h>      /* inet_addr */
#define BUFF_SIZE (10*1024) /* size of the tmp
                               buffer */
Besides the regular <sys/socket.h> and <netinet/in.h> required for basic socket operation, we need a prototype definition of the sendfile system call. This can be found in the <sys/sendfile.h> server flag:
/* are we sending or receiving */
if(argv[1][0] == 's') is_server++;
/* open descriptors */
sd = socket(PF_INET, SOCK_STREAM, 0);
if(is_server) fd = open("data.bin", O_RDONLY);
The same program can act as either a server/sender or a client/receiver. We have to check one of the command-prompt parameters, and then set the flag is_server to run in sender mode. We also open a stream socket of the INET protocol family. As part of running in server mode we need some type of data to transmit to a client, so we open our data file. We are using the system call sendfile to transmit data, so we don't have to read the actual contents of the file and store it in our program memory buffer. Here's the server address:
/* clear the memory */
memset(&sa, 0, sizeof(struct sockaddr_in));
/* initialize structure */
sa.sin_family = PF_INET;
sa.sin_port = htons(1033);
sa.sin_addr.s_addr = inet_addr(argv[2]);
We clear the server address structure and assign the protocol family, port and IP address of the server. The address of the server is passed as a command-line parameter. The port number is hard coded to unassigned port 1033. This port number was chosen because it is above the port range requiring root access to the system.
Here is the server execution branch:
if(is_server){
    int client; /* new client socket */
    printf("Server binding to [%s]
", argv[2]);
    if(bind(sd, (struct sockaddr *)&sa,
                      sizeof(sa)) < 0){
        perror("bind");
        exit(errno);
    }
As a server, we need to assign an address to our socket descriptor. This is achieved by the system call bind, which assigns the socket descriptor (sd) a server address (sa):
if(listen(sd,1) < 0){
    perror("listen");
    exit(errno);
}
Because we are using a stream socket, we have to advertise our willingness to accept incoming connections and set the connection queue size. I've set the backlog queue to 1, but it is common to set the backlog a bit higher for established connections waiting to be accepted. In older versions of the kernel, the backlog queue was used to prevent syn flood attacks. Because the system call listen changed to set parameters for only established connections, the backlog queue feature has been deprecated for this call. The kernel parameter tcp_max_syn_backlog has taken over the role of protecting the system from syn flood attacks:
if((client = accept(sd, NULL, NULL)) < 0){
    perror("accept");
    exit(errno);
}
The system call accept creates a new connected socket from the first connection request on the pending connections queue. The return value from the call is a descriptor for a newly created connection; the socket is now ready for read, write or poll/select system calls:
if((cnt = sendfile(client,fd,&off,
                          BUFF_SIZE)) < 0){
    perror("sendfile");
    exit(errno);
}
printf("Server sent %d bytes.
", cnt);
close(client);
A connection is established on the client socket descriptor, so we can start transmitting data to the remote system. We do this by calling the sendfile system call, which is prototyped under Linux in the following manner:
extern ssize_t
sendfile (int __out_fd, int __in_fd, off_t *offset,
          size_t __count) __THROW;
The first two parameters are file descriptors. The third parameter points to an offset from which sendfile should start sending data. The fourth parameter is the number of bytes we want to transmit. In order for the sendfile transmit to use zero-copy functionality, you need memory gather operation support from your networking card. You also need checksum capabilities for protocols that implement checksums, such as TCP or UDP. If your NIC is outdated and doesn't support those features, you still can use sendfile to transmit files. The difference is the kernel will merge the buffers before transmitting them.One of the problems with the sendfile system call, in general, is the lack of a standard implementation, as there is for the open system call. Sendfile implementations in Linux, Solaris or HP-UX are quite different. This poses a problem for developers who wish to use zero copy in their network data transmission code.
One of the implementation differences is Linux provides a sendfile that defines an interface for transmitting data between two file descriptors (file-to-file) and (file-to-socket). HP-UX and Solaris, on the other hand, can be used only for file-to-socket submissions.
The second difference is Linux doesn't implement vectored transfers. Solaris sendfile and HP-UX sendfile have extra parameters that eliminate overhead associated with prepending headers to the data being transmitted.
The implementation of zero copy under Linux is far from finished and is likely to change in the near future. More functionality should be added. For example, the sendfile call doesn't support vectored transfers, and servers such as Samba and Apache have to use multiple sendfile calls with the TCP_CORK flag set. This flag tells the system more data is coming through in the next sendfile calls. TCP_CORK also is incompatible with TCP_NODELAY and is used when we want to prepend or append headers to the data. This is a perfect example of where a vectored call would eliminate the need for multiple sendfile calls and delays mandated by the current implementation.
One rather unpleasant limitation in the current sendfile is it cannot be used when transferring files greater than 2GB. Files of such size are not all that uncommon today, and it's rather disappointing having to duplicate all that data on its way out. Because both sendfile and mmap methods are unusable in this case, a sendfile64 would be really handy in a future kernel version.
Despite some drawbacks, zero-copy sendfile is a useful feature, and I hope you have found this article informative enough to start using it in your programs. If you have a more in-depth interest in the subject, keep an eye out for my second article, titled “Zero Copy II: Kernel Perspective”, where I will dig a bit more into the kernel internals of zero copy.