0.前言
这是我看完书,敲完demo,做的一篇笔记.
如果有朋友恰巧看到这篇文章,请先跟着资料敲一遍再看会比较好理解.
1.事务管理相关接口
Spring-tx 是Spring提供事务管理功能的依赖包.在它的org.Springframework.transaction包下有三个接口文件:PlatformTransactionManager,TransactionDefinition和TransactionStatus.
PlatformTransactionManager
这是 Spring 声明式事务基础结构中的中心接口。功能和名字一样,是平台事务管理器,提供了三个方法:
- commit(TransactionStatus status):Commit the given transaction, with regard to its status. 提交事务
- TransactionStatus getTransaction(TransactionDefinition definition):Return a currently active transaction or create a new one, according to the specified propagation behavior. 获取事务状态
- rollback(TransactionStatus status):Perform a rollback of the given transaction. 事务回滚
然后,这个接口有三个实现类
- org.springframework.jdbc.datasource.DataSourceTransactionManager 配置JDBC数据源的事务管理器
- org.springframework.orm.Hibernate4.HibernateTransationManager Hibernate的事务管理器
- org.springframework.transaction.jta.JtaTransactionManager 全局事务管理器
TransactionDefinition
TransactionDefinition 接口是事务定义的对象,该对象中定义了事务规则,并提供了获取事务相关信息的方法.
它声明了以下方法:
- string getName():获取事务对象名称
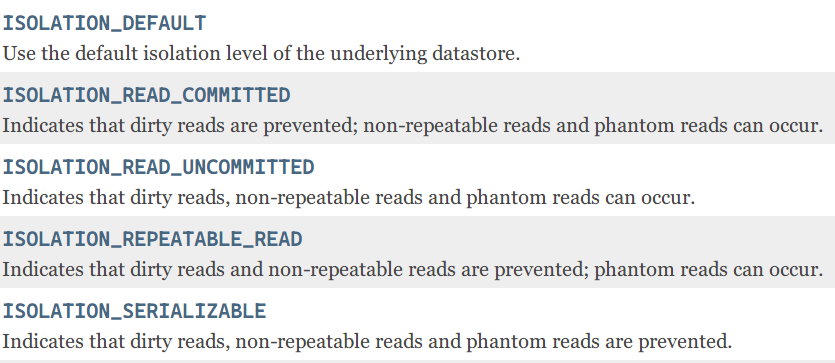
- int getlsolationLevel():获取事务的隔离级别
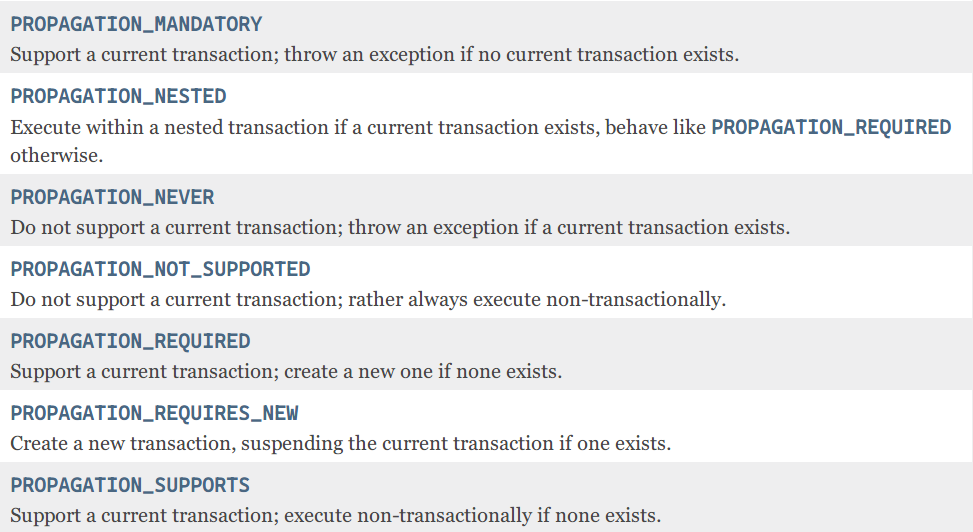
- int getPropagationBehavior():获取事务的传播行为
- int setTimeout:设置事务的超时时间
- boolean isReadOnly():获取事务是否只读
其中最重要的是它的传播行为还有隔离级别,有下列常量可选
TransactionStatus
TransactionStatus 接口是事务的状态,描述了某一时间点上事务的状态信息.
包含以下方法:
- void flush0:刷新事务
- boolean isNewTransaction():获取是否是新事务
- boolean isCompleted():获取事务是否完成
- boolean isRollbackOnly():获取是否回滚
- void setRollbackOnly():设置事务回滚
2.事务管理方式
事务管理可以通过编程实现,也可以通过声明事务(通过AOP技术)来管理.
同样的,通过编程实现的事务管理,牵一发而动全身,所以现在大都采用声明式事务管理.
然后,声明式事务管理同样可以再细分为xml和annotation两种实现方式.
二者主要在于事务的声明和配置文件有所区别,所以以下内容主要就此展开.
如果要看完整demo,可以访问这个链接SSM-bootstrap/MyTransaction at master · rpishgithub/SSM-bootstrap
基于xml的声明式事务管理
- applicationContext.xml
<?xml version="1.0" encoding="UTF-8"?>
<beans xmlns="http://www.springframework.org/schema/beans"
 xmlns:xsi="http://www.w3.org/2001/XMLSchema-instance"
 xmlns:tx="http://www.springframework.org/schema/tx"
 xmlns:aop="http://www.springframework.org/schema/aop"
 xsi:schemaLocation="http://www.springframework.org/schema/beans
 http://www.springframework.org/schema/beans/spring-beans.xsd http://www.springframework.org/schema/cache http://www.springframework.org/schema/cache/spring-cache.xsd http://www.springframework.org/schema/aop https://www.springframework.org/schema/aop/spring-aop.xsd http://www.springframework.org/schema/tx http://www.springframework.org/schema/tx/spring-tx.xsd">
<!--    1.配置数据源-->
 <bean id="dataSource" class="org.springframework.jdbc.datasource.DriverManagerDataSource">
        <property name="driverClassName" value="com.mysql.jdbc.Driver"/>
        <property name="url" value="jdbc:mysql://localhost:3306/spring_db"/>
        <property name="username" value="root"/>
        <property name="password" value="pass"/>

    </bean>

<!--    2.配置JDBC Templat-->
 <bean id="jdbcTemplate" class="org.springframework.jdbc.core.JdbcTemplate">
<!-- 使用默认数据源-->
 <property name="dataSource" ref="dataSource"/>
    </bean>
<!--    3.定义Bean UserDaoImpl-->
 <bean id="userDao" class="tech.rpish.dao.UserDaoImpl">
<!-- 将jdbcTemplate注入到userDao实例中(预留了一个setter)-->
 <property name="jdbcTemplate" ref="jdbcTemplate"/>
    </bean>

<!--    4.事务管理器,依赖数据源-->
 <bean id="transactionManager" class="org.springframework.jdbc.datasource.DataSourceTransactionManager">
        <property name="dataSource" ref="dataSource"/>
    </bean>

<!--    XML-based Transaction-->
<!--    5.编写通知,对事务进行增强/通知,编写切入点及具体执行细节-->
 <tx:advice id="txAdvice" transaction-manager="transactionManager">
        <tx:attributes>
            <tx:method name="*" propagation="REQUIRED" isolation="DEFAULT" read-only="false"/>
        </tx:attributes>
    </tx:advice>
<!--    6.编写aop-->
 <aop:config>
        <aop:pointcut id="txPointcut" expression="execution(* tech.rpish.dao.*.*(..))"/>
        <aop:advisor advice-ref="txAdvice" pointcut-ref="txPointcut"/>
    </aop:config>
</beans>
基于annotation的声明式事务管理
- applicationContext.xml
<?xml version="1.0" encoding="UTF-8"?>
<beans xmlns="http://www.springframework.org/schema/beans"
 xmlns:xsi="http://www.w3.org/2001/XMLSchema-instance"
 xmlns:tx="http://www.springframework.org/schema/tx"
 xmlns:aop="http://www.springframework.org/schema/aop"
 xsi:schemaLocation="http://www.springframework.org/schema/beans
 http://www.springframework.org/schema/beans/spring-beans.xsd http://www.springframework.org/schema/cache http://www.springframework.org/schema/cache/spring-cache.xsd http://www.springframework.org/schema/aop https://www.springframework.org/schema/aop/spring-aop.xsd http://www.springframework.org/schema/tx http://www.springframework.org/schema/tx/spring-tx.xsd">
<!--    1.配置数据源-->
 <bean id="dataSource" class="org.springframework.jdbc.datasource.DriverManagerDataSource">
        <property name="driverClassName" value="com.mysql.jdbc.Driver"/>
        <property name="url" value="jdbc:mysql://localhost:3306/spring_db"/>
        <property name="username" value="root"/>
        <property name="password" value="pass"/>

    </bean>

<!--    2.配置JDBC Templat-->
 <bean id="jdbcTemplate" class="org.springframework.jdbc.core.JdbcTemplate">
<!-- 使用默认数据源-->
 <property name="dataSource" ref="dataSource"/>
    </bean>
<!--    3.定义Bean UserDaoImpl-->
 <bean id="userDao" class="tech.rpish.dao.UserDaoImpl">
<!-- 将jdbcTemplate注入到userDao实例中(预留了一个setter)-->
 <property name="jdbcTemplate" ref="jdbcTemplate"/>
    </bean>

<!--    4.事务管理器,依赖数据源-->
 <bean id="transactionManager" class="org.springframework.jdbc.datasource.DataSourceTransactionManager">
        <property name="dataSource" ref="dataSource"/>
    </bean>
	    <tx:annotation-driven transaction-manager="transactionManager"/>
</beans>
这样看可能不是很明显,丢进IDEA 的 Diff里对比一下就清楚了

开头都是老四样
- 配置数据源(数据库)
- 配置JDBC Template,然后把数据源通过参数传给它
- 创建个bean,把UserDaoImpl类注册进来,通过参数把JDBC Template传给它(为什么要传给它呢?看代码就知道啦,我们的sql操作可都是通过JDBC Template来执行的,所以预留了一个Setter方法来注入)
- 新建个bean,注册事务管理器,配置数据源
接着就不一样啦.
xml先用<tx:advice>编写通知,然后再通过aop对切入点进行事务增强/通知.
说着轻松,具体用到的各个标签,它们的关系还挺麻烦的.
基于annotation就简单多了,一句话,annotation驱动,再赋个事务管理器.
<tx:annotation-driven transaction-manager="transactionManager"/>
然后到DaoImpl的类或者方法上加上@Transactional注解,然后和<tx:attributes>一样附上TransactionDefinition该有的参数就好了.
遇到的问题
然后我在写这个demo的时候也遇到了几个问题,如果有人遇到可以参考一下.