周末继续写博客,算起来,关于rabbitMQ这个中间件的研究已经持续至两个星期了,上一篇文章使用sring amqp实现了同步和异步的消息接收功能。这一节继续实用spring amqp实现一个股票交易系统的主要逻辑。这个例子更为复杂也更具代表意义,因为它是现实世界中的例子。
stock trading这个例子包含一个服务端(server),它用于向指定的Topic Exchange发送股票数据。还要很多客户端(clients),它们从特定的Queue(绑定了routing patten的Queue)订阅消息。这个例子的另外一个特性是它实现了一个“请求--响应”的股票交易交互动作,即由客户端发起请求,而由服务端进行处理。
也就是说,这个demo包含了两条线索,第一:服务端发送股票行情数据,客户端根据自己的喜好接收特定的行情数据;第二:客户端看到喜欢的股票,申请交易,服务端处理,然后将结果返回客户端。
一.领域对象
在正式开始讲解程序的主要逻辑之前,先看看该demo所涉及的领域对象。为节省篇幅,只列出主要的成员,get,set方法就不列出了。
--Quote:股票报价信息
public class Quote {

    private Stock stock;
    private String price;
    private long timestamp;
}
--Stock:股票信息
public class Stock {

    private String ticker;

    private StockExchange stockExchange;
}
其中的StockExchange为一个枚举类型,代表的是股票交易所,它的定义如下。
--StockExchange:证券交易所
/**
 * Enumeration for Stock Exchanges.
 *
 * @author Mark Fisher
 */
public enum StockExchange {

    nyse, nasdaq;

}
--TradeRequest:交易请求实体
public class TradeRequest {

    private String ticker;

    private long quantity;

    private BigDecimal price;

    private String orderType;

    private String accountName;

    private boolean buyRequest;

    private String userName;

    private String requestId;

    private String id = UUID.randomUUID().toString();
}
--TradeResponse:交易响应实体
/**
 * Simple trade request 'data' object. No functionality in this 'domain' class.
 * @author Mark Pollack
 *
 */
public class TradeResponse {

    private String ticker;

    private long quantity;

    private BigDecimal price;

    private String orderType;

    private String confirmationNumber;

    private boolean error;

    private String errorMessage;

    private String accountName;

    private long timestamp = new Date().getTime();

    private String requestId;
}
二.服务端发送股票报价信息,客户端接收特定信息
这部分的逻辑可以用以下图示来表示。

服务端向名为app.stock.marketdata的TopicExchange里面发布股票行情报价消息,并且每次发布消息以app.stock.quotes.[stockExchange].[ticker]作为routekey,其中后面两个为可变参数,即不同的股票,因为他们stockExchange和ticker不一样,所以发送该股票行情信息的RouteKey也不一样。这为消费者按指定类别接收股票提供了基础。
客户端的消费者可以按照需要订阅自己感兴趣的股票,只需要指定与Queue绑定的key,如app.stock.uotes.nasdaq.*表示接收所有纳斯达克交易所的股票行情。这一部分的原理在讲述topic的Exchange的时候就有解释,此处不再赘述。感兴趣的读者可以点这里。五.RabbitMQ之路由(Routing)和主题(topics)
首先来看主要的配置文件,该配置文件为服务端和客户端共享。需要注意的是,在获取RabbitTemplate的bean中,调用了抽象方法configureRabbitTemplate,该方法会在其子类中实现。
package org.springframework.amqp.rabbit.stocks.config;

import org.springframework.amqp.core.AmqpAdmin;
import org.springframework.amqp.core.TopicExchange;
import org.springframework.amqp.rabbit.connection.CachingConnectionFactory;
import org.springframework.amqp.rabbit.connection.ConnectionFactory;
import org.springframework.amqp.rabbit.core.RabbitAdmin;
import org.springframework.amqp.rabbit.core.RabbitTemplate;
import org.springframework.amqp.support.converter.JsonMessageConverter;
import org.springframework.amqp.support.converter.MessageConverter;
import org.springframework.beans.factory.annotation.Value;
import org.springframework.context.annotation.Bean;
import org.springframework.context.annotation.Configuration;

/**
 * Provides shared configuration between Client and Server. (客户端和服务端共用的)
 * <p>The abstract method configureRabbitTemplate lets the Client and Server further customize
 * the rabbit template to their specific needs.
 *
 * @author Mark Pollack
 * @author Mark Fisher
 */
@Configuration
public abstract class AbstractStockAppRabbitConfiguration {

    /**
     * Shared topic exchange used for publishing any market data (e.g. stock quotes)
     */
    protected static String MARKET_DATA_EXCHANGE_NAME = "app.stock.marketdata";//topic exchange的名称

    /**
     * The server-side consumer's queue that provides point-to-point semantics for stock requests.
     */
    protected static String STOCK_REQUEST_QUEUE_NAME = "app.stock.request";

    /**
     * Key that clients will use to send to the stock request queue via the default direct exchange.
     */
    protected static String STOCK_REQUEST_ROUTING_KEY = STOCK_REQUEST_QUEUE_NAME;

    @Value("${amqp.port:5672}")
    private int port = 5672;


    protected abstract void configureRabbitTemplate(RabbitTemplate template);

    @Bean
    public ConnectionFactory connectionFactory() {
        //TODO make it possible to customize in subclasses.
        CachingConnectionFactory connectionFactory = new CachingConnectionFactory("192.168.1.195");
        connectionFactory.setUsername("xdx");
        connectionFactory.setPassword("xxxx");
        connectionFactory.setPort(port);
        return connectionFactory;
    }

    @Bean
    public RabbitTemplate rabbitTemplate() {
        RabbitTemplate template = new RabbitTemplate(connectionFactory());
        template.setMessageConverter(jsonMessageConverter());
        configureRabbitTemplate(template);
        return template;
    }

    @Bean
    public MessageConverter jsonMessageConverter() {
        return new JsonMessageConverter();
    }

    @Bean
    public TopicExchange marketDataExchange() {
        return new TopicExchange(MARKET_DATA_EXCHANGE_NAME);
    }

    /**
     * @return the admin bean that can declare queues etc.
     */
    @Bean
    public AmqpAdmin amqpAdmin() {
        RabbitAdmin rabbitAdmin = new RabbitAdmin(connectionFactory());
        return rabbitAdmin ;
    }

}
接下来就是服务端的配置文件,它继承自AbstractStockAppRabbitConfiguration并且实现了configureRabbitTemplate方法。指定server端的TopicExchange的名称。同时建立一个Queue,Exchange为匿名,Queue名称为app.stock.request,默认绑定的routekey为app.stock.request,该Queue用于接收来自客户端的交易请求消息。(现在我们暂且不管接收消息部分,专注于发送消息部分)
package org.springframework.amqp.rabbit.stocks.config.server;

import org.springframework.amqp.core.Queue;
import org.springframework.amqp.rabbit.core.RabbitTemplate;
import org.springframework.amqp.rabbit.stocks.config.AbstractStockAppRabbitConfiguration;
import org.springframework.context.annotation.Bean;
import org.springframework.context.annotation.Configuration;

/**
 * Configures RabbitTemplate for the server.
 *
 * @author Mark Pollack
 * @author Mark Fisher
 */
@Configuration
public class RabbitServerConfiguration extends
        AbstractStockAppRabbitConfiguration {

    /**
     * The server's template will by default send to the topic exchange named
     * {@link AbstractStockAppRabbitConfiguration#MARKET_DATA_EXCHANGE_NAME}.
     * 服务端继承自AbstractStockAppRabbitConfiguration
     * ,重写了父类方法configureRabbitTemplate,将topic
     * Exchange的名称定为MARKET_DATA_EXCHANGE_NAME,这样发送消息的时候就不必每次指定Exchange这个参数
     */
    public void configureRabbitTemplate(RabbitTemplate rabbitTemplate) {
        rabbitTemplate.setExchange(MARKET_DATA_EXCHANGE_NAME);
    }

    /**
     * We don't need to define any binding for the stock request queue, since
     * it's relying on the default (no-name) direct exchange to which every
     * queue is implicitly bound.
     * 生成一个绑定了默认(无名称)的DirectExchange的Queue实例,名称为该app.stock.request,这个队列是服务为股票交易开设的(股票请求队列)。
     * 服务端监听这个队列里面的消息(即交易请求,来自客户端),并做处理
     * 名称为:app.stock.request
     */
    @Bean
    public Queue stockRequestQueue() {
        return new Queue(STOCK_REQUEST_QUEUE_NAME);
    }

}
接下来就是编写发送消息的代码。如RabbitMarketDataGateway类所示,该类模拟发送股票行情数据(随机生成一个行情价)的功能。可以看到它将消息发送到了topic Exchange名为app.stock.marketdata,而routekey为app.stock.quotes.nyse.AAPL或者app.stock.quotes.nasdaq.IBM这样的通道中。
package org.springframework.amqp.rabbit.stocks.gateway;

import java.text.DecimalFormat;
import java.util.ArrayList;
import java.util.List;
import java.util.Random;

import org.apache.commons.logging.Log;
import org.apache.commons.logging.LogFactory;

import org.springframework.amqp.rabbit.core.RabbitGatewaySupport;
import org.springframework.amqp.rabbit.stocks.domain.Quote;
import org.springframework.amqp.rabbit.stocks.domain.Stock;
import org.springframework.amqp.rabbit.stocks.domain.StockExchange;

/**
 * Rabbit implementation of the {@link MarketDataGateway} for sending Market
 * data.
 *
 * @author Mark Pollack
 * @author Mark Fisher
 */
public class RabbitMarketDataGateway extends RabbitGatewaySupport implements
        MarketDataGateway {

    private static Log logger = LogFactory
            .getLog(RabbitMarketDataGateway.class);

    private static final Random random = new Random();

    private final List<MockStock> stocks = new ArrayList<MockStock>();

    public RabbitMarketDataGateway() {
        this.stocks.add(new MockStock("AAPL", StockExchange.nasdaq, 255));
        this.stocks.add(new MockStock("CSCO", StockExchange.nasdaq, 22));
        this.stocks.add(new MockStock("DELL", StockExchange.nasdaq, 15));
        this.stocks.add(new MockStock("GOOG", StockExchange.nasdaq, 500));
        this.stocks.add(new MockStock("INTC", StockExchange.nasdaq, 22));
        this.stocks.add(new MockStock("MSFT", StockExchange.nasdaq, 29));
        this.stocks.add(new MockStock("ORCL", StockExchange.nasdaq, 24));
        this.stocks.add(new MockStock("CAJ", StockExchange.nyse, 43));
        this.stocks.add(new MockStock("F", StockExchange.nyse, 12));
        this.stocks.add(new MockStock("GE", StockExchange.nyse, 18));
        this.stocks.add(new MockStock("HMC", StockExchange.nyse, 32));
        this.stocks.add(new MockStock("HPQ", StockExchange.nyse, 48));
        this.stocks.add(new MockStock("IBM", StockExchange.nyse, 130));
        this.stocks.add(new MockStock("TM", StockExchange.nyse, 76));
    }

    /**
     * 服务端发送消息,发送到的Exchange为app.stock.marketdata,routekey为app.stock.quotes.+
     * stock.getStockExchange()+.stock.getTicker()
     * 比如app.stock.quotes.nyse.AAPL或者app.stock.quotes.nasdaq.IBM
     */
    public void sendMarketData() {
        Quote quote = generateFakeQuote();// 将股票按照原来的basePrice进行包装后得到一个新的报价信息
        Stock stock = quote.getStock();
        logger.info("Sending Market Data for " + stock.getTicker());
        String routingKey = "app.stock.quotes." + stock.getStockExchange()
                + "." + stock.getTicker();
        getRabbitTemplate().convertAndSend(routingKey, quote);
    }

    /**
     * 生成一条行情数据
     *
     * @return
     */
    private Quote generateFakeQuote() {
        MockStock stock = this.stocks.get(random.nextInt(this.stocks.size()));
        String price = stock.randomPrice();
        return new Quote(stock, price);
    }

    /**
     * 对股票stock类进行封装,给它一个基本当价格basePrice
     *
     * @author xdx
     *
     */
    private static class MockStock extends Stock {

        private final int basePrice;
        private final DecimalFormat twoPlacesFormat = new DecimalFormat("0.00");

        private MockStock(String ticker, StockExchange stockExchange,
                int basePrice) {
            super(stockExchange, ticker);
            this.basePrice = basePrice;
        }

        private String randomPrice() {
            return this.twoPlacesFormat.format(this.basePrice
                    + Math.abs(random.nextGaussian()));
        }
    }

}
接下来配置一下上述的bean,使其可以被spring调用。
    <!-- 发送消息,注入了服务端的rabbitTemplate-->
    <bean id="marketDataGateway"
        class="org.springframework.amqp.rabbit.stocks.gateway.RabbitMarketDataGateway">
        <property name="rabbitTemplate" ref="rabbitTemplate" />
    </bean>
然后配置任务管理,让服务端每隔一段时间调用marketDataGateway来发送股票行情。如下所示。
<task:scheduled-tasks>
        <task:scheduled ref="marketDataGateway" method="sendMarketData" fixed-delay="5000"/>
    </task:scheduled-tasks>
到此为止,我们就完成了发送一端的功能。接下来我们来完成接收消息这一端的功能。
同样的,客户端也有一个主配置文件,也是继承自AbstractStockAppRabbitConfiguration,在该配置文件中定义了关于客户端发送和接收消息的一些bean,我们还是先专注于接收消息这一端。
package org.springframework.amqp.rabbit.stocks.config.client;

import org.springframework.amqp.core.AcknowledgeMode;
import org.springframework.amqp.core.AmqpAdmin;
import org.springframework.amqp.core.AnonymousQueue;
import org.springframework.amqp.core.Binding;
import org.springframework.amqp.core.BindingBuilder;
import org.springframework.amqp.core.Queue;
import org.springframework.amqp.rabbit.core.RabbitAdmin;
import org.springframework.amqp.rabbit.core.RabbitTemplate;
import org.springframework.amqp.rabbit.listener.SimpleMessageListenerContainer;
import org.springframework.amqp.rabbit.listener.adapter.MessageListenerAdapter;
import org.springframework.amqp.rabbit.stocks.config.AbstractStockAppRabbitConfiguration;
import org.springframework.amqp.rabbit.stocks.gateway.RabbitStockServiceGateway;
import org.springframework.amqp.rabbit.stocks.gateway.StockServiceGateway;
import org.springframework.amqp.rabbit.stocks.handler.ClientHandler;
import org.springframework.beans.factory.annotation.Autowired;
import org.springframework.beans.factory.annotation.Value;
import org.springframework.context.annotation.Bean;
import org.springframework.context.annotation.Configuration;

/**
 * Configures RabbitTemplate and creates the Trader queue and binding for the
 * client. 与服务端共用一个RabbitTemplate,但是配置略有不同
 *
 * @author Mark Pollack
 * @author Mark Fisher
 */
@Configuration
public class RabbitClientConfiguration extends
        AbstractStockAppRabbitConfiguration {

    @Value("${stocks.quote.pattern}")
    // app.stock.quotes.nasdaq.* 接收消息的pattern
    private String marketDataRoutingKey;

    @Autowired
    private ClientHandler clientHandler;

    /**
     * The client's template will by default send to the exchange defined in
     * {@link org.springframework.amqp.rabbit.config.AbstractRabbitConfiguration#rabbitTemplate()}
     * with the routing key
     * {@link AbstractStockAppRabbitConfiguration#STOCK_REQUEST_QUEUE_NAME}
     * <p>
     * The default exchange will delivery to a queue whose name matches the
     * routing key value.
     * Exchange为default,即无名的Exchange,RoutingKey为app.stock.request,这是客户端发送信息的配置
     * 也就是说客户端的信息将发送至匿名的Exchange,RoutingKey为app.stock.request的通道
     */
    @Override
    public void configureRabbitTemplate(RabbitTemplate rabbitTemplate) {
        rabbitTemplate.setRoutingKey(STOCK_REQUEST_QUEUE_NAME);// 客户端将信息发送到defaultExchange,RouteKey为app.stock.request
    }

    /**
     * 这个bean主要用于从客户端向服务端发送交易请求
     *
     * @return
     */
    @Bean
    public StockServiceGateway stockServiceGateway() {
        RabbitStockServiceGateway gateway = new RabbitStockServiceGateway();
        gateway.setRabbitTemplate(rabbitTemplate());
        // 此处设置DefaultReplyTo为traderJoeQueue().getName(),它将作为一个回调的Queue,接收来自服务端的响应。
        // 隐式的注入RabbitTemplate对象到RabbitStockServiceGateway中
        // 这个bean在client-message.xml中也有配置
        gateway.setDefaultReplyTo(traderJoeQueue().getName());
        return gateway;
    }

    /**
     * 这个bean用于监听服务端发过来的消息,包含两类消息,一类是服务端发送的行情消息,另外一类是 服务端处理完客户端的交易请求以后的响应消息
     *
     * @return
     */
    @Bean
    public SimpleMessageListenerContainer messageListenerContainer() {
        SimpleMessageListenerContainer container = new SimpleMessageListenerContainer(
                connectionFactory());
        // 设置该监听器监听的为marketDataQueue()和traderJoeQueue(),其中marketDataQueue()绑定了app.stock.marketdata这个Exchange和
        // app.stock.quotes.nasdaq.*这个routeKey。所以他可以监听到服务端发过来的nasdaq交易所下的证券信息
        // traderJoeQueue()是一个系统自动命名的Queue,当客户端发送trade
        // request会用它作为确认(replyTo)的Queue,好让服务端在处理完后发送确认信息到这个Queue
        // 所以此处我们也要监听它。这个bean在client-message.xml中也有配置
        container.setConcurrentConsumers(5);
        container.setQueues(marketDataQueue(), traderJoeQueue());
        container.setMessageListener(messageListenerAdapter());
        container.setAcknowledgeMode(AcknowledgeMode.AUTO);
        return container;

        // container(using(connectionFactory()).listenToQueues(marketDataQueue(),
        // traderJoeQueue()).withListener(messageListenerAdapter()).
    }

    /**
     * 这个bean为监听适配器,主要的作用是监听消息
     *
     * @return
     */
    @Bean
    public MessageListenerAdapter messageListenerAdapter() {
        //
        return new MessageListenerAdapter(clientHandler, jsonMessageConverter());
    }

    // Broker Configuration

    // @PostContruct
    // public void declareClientBrokerConfiguration() {
    // declare(marketDataQueue);
    // declare(new Binding(marketDataQueue, MARKET_DATA_EXCHANGE,
    // marketDataRoutingKey));
    // declare(traderJoeQueue);
    // // no need to bind traderJoeQueue as it is automatically bound to the
    // default direct exchanage, which is what we will use
    //
    // //add as many declare statements as needed like a script.
    // }
    /**
     * 这个bean是用于接收股票行情的Queue,这是一个匿名的Queue。
     *
     * @return
     */
    @Bean
    public Queue marketDataQueue() {
        return new AnonymousQueue();
    }

    /**
     * Binds to the market data exchange. Interested in any stock quotes.
     */
    /**
     * 将marketDataQueue与发送股票行情的topic Exchange关联,并且以marketDataRoutingKey作为绑定
     * 的key。这样就可以接收特定的股票行情。
     * @return
     */
    @Bean
    public Binding marketDataBinding() {
        return BindingBuilder.bind(marketDataQueue()).to(marketDataExchange())
                .with(marketDataRoutingKey);
    }

    /**
     * This queue does not need a binding, since it relies on the default
     * exchange.
     * 该bean用于接收服务端发送回来的响应消息。
     */
    @Bean
    public Queue traderJoeQueue() {
        return new AnonymousQueue();
    }

    @Bean
    public AmqpAdmin rabbitAdmin() {
        return new RabbitAdmin(connectionFactory());
    }

}
按照上述配置文件,我们来探究客户端是如何接收消息的。
客户端采用的是异步接收消息的策略,记得我们在上一篇文章(hello world例子中)阐述过,异步接收策略需要用到一个监听器,监听特定的Queue,然后调用一个回调的接口的回调方法(一般是handleMessage方法)。此处我们也是按照这种方式来配置的。
首先,定义一个Queue,用于接收服务端发送的行情数据。
    /**
     * 这个bean是用于接收股票行情的Queue,这是一个匿名的Queue。
     *
     * @return
     */
    @Bean
    public Queue marketDataQueue() {
        return new AnonymousQueue();
    }
接着,给这个Queue绑定特定的TopicExchange和RouteKey。
    /**
     * Binds to the market data exchange. Interested in any stock quotes.
     */
    /**
     * 将marketDataQueue与发送股票行情的topic Exchange关联,并且以marketDataRoutingKey作为绑定
     * 的key。这样就可以接收特定的股票行情。
     * @return
     */
    @Bean
    public Binding marketDataBinding() {
        return BindingBuilder.bind(marketDataQueue()).to(marketDataExchange())
                .with(marketDataRoutingKey);
    }
其中的RouteKey为marketDataRoutingKey,它的定义如下。
@Value("${stocks.quote.pattern}")
    // app.stock.quotes.nasdaq.* 接收消息的pattern
    private String marketDataRoutingKey;
这是从client.properties配置文件中读取的,此处为stocks.quote.pattern=app.stock.quotes.nasdaq.*。这样做的好处是当我们要修改这个筛选模式的时候,不需要重新编译整个项目。
通过上述两个步骤,我们构造了一个可以从topic Exchange为app.stock.marketdata,routekey为app.stock.quotes.nasdaq.*的Queue中去接收消息,也就是接收所有nasdaq交易所下面的股票信息。
编写一个监听器,监听特定的queue。
    /**
     * 这个bean为监听适配器,主要的作用是监听消息
     *
     * @return
     */
    @Bean
    public MessageListenerAdapter messageListenerAdapter() {
        //
        return new MessageListenerAdapter(clientHandler, jsonMessageConverter());
    }
该监听器指定了一个handler作为回调的类,并且指定了消息转换器为Json类型的消息,clientHandler的代码如下。
package org.springframework.amqp.rabbit.stocks.handler;

import org.apache.commons.logging.Log;
import org.apache.commons.logging.LogFactory;

import org.springframework.amqp.rabbit.stocks.domain.Quote;
import org.springframework.amqp.rabbit.stocks.domain.Stock;
import org.springframework.amqp.rabbit.stocks.domain.TradeResponse;
import org.springframework.amqp.rabbit.stocks.ui.StockController;

/**
 * POJO handler that receives market data and trade responses. Calls are
 * delegated to the UI controller.
 *
 * @author Mark Pollack
 * @author Mark Fisher
 */
public class ClientHandler {

    private static Log log = LogFactory.getLog(ClientHandler.class);

    private StockController stockController;

    public StockController getStockController() {
        return stockController;
    }

    public void setStockController(StockController stockController) {
        this.stockController = stockController;
    }

    /**
     * 处理股票行情消息
     *
     * @param quote
     */
    public void handleMessage(Quote quote) {
        Stock stock = quote.getStock();
        log.info("Received market data.  Ticker = " + stock.getTicker()
                + ", Price = " + quote.getPrice());
        stockController.displayQuote(quote);
    }

    /**
     * 处理交易请求的响应消息
     *
     * @param tradeResponse
     */
    public void handleMessage(TradeResponse tradeResponse) {
        log.info("Received trade repsonse. [" + tradeResponse + "]");
        stockController.updateTrade(tradeResponse);
    }

}
上述ClientHandler 处理器有两个handleMessage方法,分别用于处理行情消息以及交易请求的响应消息,我们现在只需关注第一个方法,第一个方法,打印出股票的行情信息,并且调用stockController.displayQuote(quote);将其显示在可视化的容器Panel里。
监听器写好了,接下来就是把它放入一个container里面。
/**
     * 这个bean用于监听服务端发过来的消息,包含两类消息,一类是服务端发送的行情消息,另外一类是 服务端处理完客户端的交易请求以后的响应消息
     *
     * @return
     */
    @Bean
    public SimpleMessageListenerContainer messageListenerContainer() {
        SimpleMessageListenerContainer container = new SimpleMessageListenerContainer(
                connectionFactory());
        // 设置该监听器监听的为marketDataQueue()和traderJoeQueue(),其中marketDataQueue()绑定了app.stock.marketdata这个Exchange和
        // app.stock.quotes.nasdaq.*这个routeKey。所以他可以监听到服务端发过来的nasdaq交易所下的证券信息
        // traderJoeQueue()是一个系统自动命名的Queue,当客户端发送trade
        // request会用它作为确认(replyTo)的Queue,好让服务端在处理完后发送确认信息到这个Queue
        // 所以此处我们也要监听它。这个bean在client-message.xml中也有配置
        container.setConcurrentConsumers(5);
        container.setQueues(marketDataQueue(), traderJoeQueue());
        container.setMessageListener(messageListenerAdapter());
        container.setAcknowledgeMode(AcknowledgeMode.AUTO);
        return container;

        // container(using(connectionFactory()).listenToQueues(marketDataQueue(),
        // traderJoeQueue()).withListener(messageListenerAdapter()).
    }
做完上述步骤,只需要运行服务端的任务管理器,模拟定时发送行情消息,再运行客户端的监听器,就可以实现股票行情监测的功能了。
看看服务端的main入口。
package org.springframework.amqp.rabbit.stocks;

import org.junit.After;
import org.junit.Test;

import org.springframework.context.support.ClassPathXmlApplicationContext;

/**
 * Server application than can be run as an app or unit test.
 *
 * @author Mark Pollack
 */
public class Server {

    private ClassPathXmlApplicationContext context;

    public static void main(String[] args) {
        new Server().run();
    }

    @After
    public void close() {
        if (context != null) {
            context.close();
        }
    }

    @Test
    public void run() {
        context = new ClassPathXmlApplicationContext("server-bootstrap-config.xml");
    }

}
它做的只是载入主xml配置文件server-bootstrap-config.xml,由该配置文件去将所有的bean加载。
<?xml version="1.0" encoding="UTF-8"?>
<beans xmlns="http://www.springframework.org/schema/beans"
    xmlns:xsi="http://www.w3.org/2001/XMLSchema-instance" xmlns:context="http://www.springframework.org/schema/context"
    xmlns:task="http://www.springframework.org/schema/task"
    xsi:schemaLocation="http://www.springframework.org/schema/beans http://www.springframework.org/schema/beans/spring-beans-3.0.xsd
        http://www.springframework.org/schema/task http://www.springframework.org/schema/task/spring-task-3.0.xsd
        http://www.springframework.org/schema/context http://www.springframework.org/schema/context/spring-context-3.0.xsd">

    <context:property-placeholder
        system-properties-mode="OVERRIDE" />

    <!-- pick up rabbit broker configuration -->
    <context:component-scan
        base-package="org.springframework.amqp.rabbit.stocks.config.server" />
    <import resource="classpath:server-handlers.xml" />
    <import resource="classpath:server-messaging.xml" />
    <import resource="classpath:server-services.xml" />
    <!-- <import resource="classpath:server-jmx.xml" /> -->
    <!-- 任务我管理器,定时发送行情消息 -->
    <task:scheduled-tasks>
        <task:scheduled ref="marketDataGateway" method="sendMarketData"
            fixed-delay="5000" />
    </task:scheduled-tasks>
</beans>
看看客户端的main入口。
package org.springframework.amqp.rabbit.stocks;

import javax.swing.JFrame;

import org.junit.After;
import org.junit.Test;

import org.springframework.amqp.rabbit.stocks.ui.StockController;
import org.springframework.amqp.rabbit.stocks.ui.StockPanel;
import org.springframework.context.ConfigurableApplicationContext;
import org.springframework.context.support.ClassPathXmlApplicationContext;

/**
 * Main client application, can run as an application or unit test.
 *
 * @author Mark Pollack
 */
public class Client {

    private ConfigurableApplicationContext context;

    public static void main(String[] args) {
        new Client().run();
    }

    @Test
    public void run() {
        context = new ClassPathXmlApplicationContext("client-bootstrap-config.xml");
        StockController controller = context.getBean(StockController.class);
        JFrame f = new JFrame("Rabbit Stock Demo");
        f.setDefaultCloseOperation(JFrame.EXIT_ON_CLOSE);
        // TODO consider @Configurable
        f.add(new StockPanel(controller));
        f.pack();
        f.setVisible(true);
    }

    @After
    public void close() {
        if (context != null) {
            context.close();
        }
    }

}
它除了加载主配置文件,还调起了一个Panel,我们可以在该Panel上面进行股票交易请求的操作。
客户端的主配置xml文件如下。
<?xml version="1.0" encoding="UTF-8"?>
<beans xmlns="http://www.springframework.org/schema/beans"
    xmlns:xsi="http://www.w3.org/2001/XMLSchema-instance"
    xmlns:context="http://www.springframework.org/schema/context"
    xsi:schemaLocation="http://www.springframework.org/schema/beans http://www.springframework.org/schema/beans/spring-beans-3.0.xsd
        http://www.springframework.org/schema/context http://www.springframework.org/schema/context/spring-context-3.0.xsd">

    <!--  pick up rabbit broker configuration -->
    <context:component-scan base-package="org.springframework.amqp.rabbit.stocks.config.client"/>

    <context:property-placeholder location="classpath:/client.properties"/>

    <import resource="classpath:client-handlers.xml" />

    <!-- XML version of RabbitClientConfiguration -->
    <!-- import resource="classpath:client-messaging.xml" /-->

</beans>
三.客户端发送交易请求,服务端接收请求并响应
这一部分的内容可以用以下的流程图来表示。
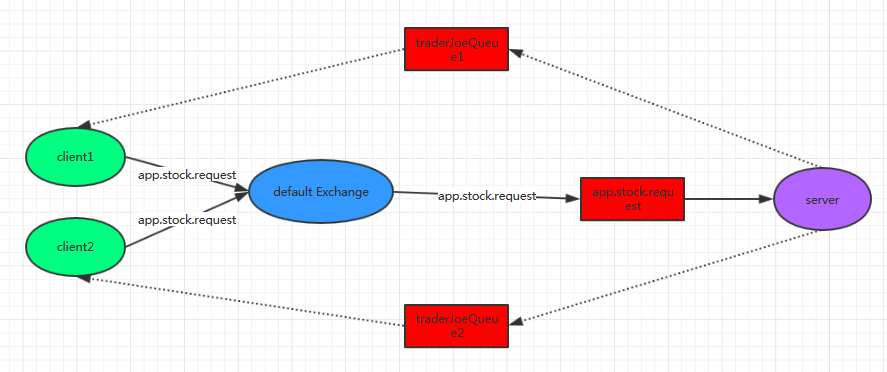
1.客户端发现自己感兴趣的股票,执行交易请求操作,将请求消息发送到一个Default Exchange(就是无名称的Exchange),绑定的RouteKey为app.stock.request.在发送消息的同时,指定了一个匿名的ReplyTo的Queue,即上图中的tradeJoeQueue。
2.服务端生成名为app.stock.request的queue,因为没有绑定特定的Exchange,所以其默认的绑定的routeKey即为自己的名称app.stock.request。
3.服务端监听上述名为app.stock.request的queue,就可以坚挺到客户端发送的交易请求。
4.监听到客户端的交易请求,服务端对其进行处理,然后将响应沿着客户端在第一步指定的tradeJoeQueue发送回去。
5.客户端监听tradeJoeQueue的消息,接收到服务端返回的响应,打印出来。
接下来我们一步一步的讲解上述步骤的具体实现。
首先是客户端指定发送消息的Exchange和RouteKey,如下所示。
/**
     * The client's template will by default send to the exchange defined in
     * {@link org.springframework.amqp.rabbit.config.AbstractRabbitConfiguration#rabbitTemplate()}
     * with the routing key
     * {@link AbstractStockAppRabbitConfiguration#STOCK_REQUEST_QUEUE_NAME}
     * <p>
     * The default exchange will delivery to a queue whose name matches the
     * routing key value.
     * Exchange为default,即无名的Exchange,RoutingKey为app.stock.request,这是客户端发送信息的配置
     * 也就是说客户端的信息将发送至匿名的Exchange,RoutingKey为app.stock.request的通道
     */
    @Override
    public void configureRabbitTemplate(RabbitTemplate rabbitTemplate) {
        rabbitTemplate.setRoutingKey(STOCK_REQUEST_QUEUE_NAME);// 客户端将信息发送到defaultExchange,RouteKey为app.stock.request
    }
接下来是发送消息,发送消息的动作是通过一个可视化的panel来进行的,我们暂且不关心,只看与RabbitMQ相关的发送部分。
package org.springframework.amqp.rabbit.stocks.gateway;

import java.io.UnsupportedEncodingException;
import java.util.UUID;

import org.springframework.amqp.AmqpException;
import org.springframework.amqp.core.Message;
import org.springframework.amqp.core.MessagePostProcessor;
import org.springframework.amqp.rabbit.core.RabbitGatewaySupport;
import org.springframework.amqp.rabbit.stocks.domain.TradeRequest;

/**
 * Rabbit implementation of {@link StockServiceGateway} to send trade requests
 * to an external process.
 *
 * @author Mark Pollack
 * @author Gary Russell
 */
public class RabbitStockServiceGateway extends RabbitGatewaySupport implements
        StockServiceGateway {

    private String defaultReplyTo;

    public void setDefaultReplyTo(String defaultReplyTo) {
        this.defaultReplyTo = defaultReplyTo;
    }

    /**
     * 此处将发送股票交易请求到DefaultExchange,RouteKey为app.stock.request的通道
     * 并且指定了回调的Queue名字为traderJoeQueue().getName()
     */
    public void send(TradeRequest tradeRequest) {
        getRabbitTemplate().convertAndSend(tradeRequest,
                new MessagePostProcessor() {
                    public Message postProcessMessage(Message message)
                            throws AmqpException {
                        message.getMessageProperties().setReplyTo(
                                defaultReplyTo);
                        try {
                            message.getMessageProperties().setCorrelationId(
                                    UUID.randomUUID().toString()
                                            .getBytes("UTF-8"));
                        } catch (UnsupportedEncodingException e) {
                            throw new AmqpException(e);
                        }
                        return message;
                    }
                });
    }

}
这是一个发送消息的类,在主配置文件中,我们有配置defaultReplyTo参数,如下。
/**
     * 这个bean主要用于从客户端向服务端发送交易请求
     *
     * @return
     */
    @Bean
    public StockServiceGateway stockServiceGateway() {
        RabbitStockServiceGateway gateway = new RabbitStockServiceGateway();
        gateway.setRabbitTemplate(rabbitTemplate());
        // 此处设置DefaultReplyTo为traderJoeQueue().getName(),它将作为一个回调的Queue,接收来自服务端的响应。
        // 隐式的注入RabbitTemplate对象到RabbitStockServiceGateway中
        // 这个bean在client-message.xml中也有配置
        gateway.setDefaultReplyTo(traderJoeQueue().getName());
        return gateway;
    }
其中的traderJoeQueue的代码如下。
    /**
     * This queue does not need a binding, since it relies on the default
     * exchange.
     * 该bean用于接收服务端发送回来的响应消息。
     */
    @Bean
    public Queue traderJoeQueue() {
        return new AnonymousQueue();
    }
这个Queue在客户端主配置文件被载入的时候就生成,它是一个匿名的Queue,也就是说由系统自动命名,它默认绑定的是无名称的topicExchange,routeKey为自己的名字。它被指定作为交易响应的回调Queue.
客户端发送完请求消息以后,服务端需要监听这些请求消息,如下所示。
    <!-- 监听消息 -->
    <listener-container concurrency="5"
        connection-factory="connectionFactory" message-converter="jsonMessageConverter"
        xmlns="http://www.springframework.org/schema/rabbit">
        <!-- 从stockRequestQueue.name(app.stock.request)中去监听消息 -->
        <listener ref="serverHandler" method="handleMessage"
            queue-names="#{stockRequestQueue.name}" />
    </listener-container>
对应的serverHandler代码如下所示。
package org.springframework.amqp.rabbit.stocks.handler;

import java.util.ArrayList;
import java.util.List;

import org.springframework.amqp.rabbit.stocks.domain.TradeRequest;
import org.springframework.amqp.rabbit.stocks.domain.TradeResponse;
import org.springframework.amqp.rabbit.stocks.service.CreditCheckService;
import org.springframework.amqp.rabbit.stocks.service.ExecutionVenueService;
import org.springframework.amqp.rabbit.stocks.service.TradingService;
import org.springframework.util.StringUtils;


/**
 * POJO handler that receives trade requests and sends back a trade response.  Main application
 * logic sits here which coordinates between {@link ExecutionVenueService}, {@link CreditCheckService},
 * and {@link TradingService}.
 *
 * @author Mark Pollack
 *
 */
public class ServerHandler {

    private ExecutionVenueService executionVenueService;

    private CreditCheckService creditCheckService;

    private TradingService tradingService;


    public ServerHandler(ExecutionVenueService executionVenueService,
                         CreditCheckService creditCheckService,
                         TradingService tradingService) {
        this.executionVenueService = executionVenueService;
        this.creditCheckService = creditCheckService;
        this.tradingService = tradingService;
    }

    //委托方法,用于处理客户端发来的交易请求tradeRequest并且处理
    public TradeResponse handleMessage(TradeRequest tradeRequest)
    {
        TradeResponse tradeResponse;
        List<?> errors = new ArrayList<Object>();
        if (creditCheckService.canExecute(tradeRequest, errors))
        {
            tradeResponse = executionVenueService.executeTradeRequest(tradeRequest);
        }
        else
        {
            tradeResponse = new TradeResponse();
            tradeResponse.setError(true);
            tradeResponse.setErrorMessage(StringUtils.arrayToCommaDelimitedString(errors.toArray()));

        }
        tradingService.processTrade(tradeRequest, tradeResponse);
        return tradeResponse;
    }

}
我们可以简单的理解该处理方法将股票交易的请求数据做了简单的价格处理(比如随机将价格换成另外一个数字),然后返回一个响应的对象。
接下来就是客户端来监听这些响应消息了,这部分的代码在第二部分介绍服务端发送行情消息,客户端监听消息的时候已经有提及,主要是如下代码。可以看到它不仅监听marketDataQueue(),而且监听了traderJoeQueue(),后者就是用于回传响应的QUeue.
    /**
     * 这个bean用于监听服务端发过来的消息,包含两类消息,一类是服务端发送的行情消息,另外一类是 服务端处理完客户端的交易请求以后的响应消息
     *
     * @return
     */
    @Bean
    public SimpleMessageListenerContainer messageListenerContainer() {
        SimpleMessageListenerContainer container = new SimpleMessageListenerContainer(
                connectionFactory());
        // 设置该监听器监听的为marketDataQueue()和traderJoeQueue(),其中marketDataQueue()绑定了app.stock.marketdata这个Exchange和
        // app.stock.quotes.nasdaq.*这个routeKey。所以他可以监听到服务端发过来的nasdaq交易所下的证券信息
        // traderJoeQueue()是一个系统自动命名的Queue,当客户端发送trade
        // request会用它作为确认(replyTo)的Queue,好让服务端在处理完后发送确认信息到这个Queue
        // 所以此处我们也要监听它。这个bean在client-message.xml中也有配置
        container.setConcurrentConsumers(5);
        container.setQueues(marketDataQueue(), traderJoeQueue());
        container.setMessageListener(messageListenerAdapter());
        container.setAcknowledgeMode(AcknowledgeMode.AUTO);
        return container;

        // container(using(connectionFactory()).listenToQueues(marketDataQueue(),
        // traderJoeQueue()).withListener(messageListenerAdapter()).
    }
我们最后来看看客户端如何处理这些响应消息。如下所示。它只是把它打印出来,并且显示在可视化的panel上。
    /**
     * 处理交易请求的响应消息
     *
     * @param tradeResponse
     */
    public void handleMessage(TradeResponse tradeResponse) {
        log.info("Received trade repsonse. [" + tradeResponse + "]");
        stockController.updateTrade(tradeResponse);
    }
至此,关于这个demo的所有知识点都已介绍完毕,相信掌握了这个demo,我们就可以利用spring amqp在自己的项目中实现异步消息队列。后续有时间我会利用spring amqp实现一个日志管理系统,集成到旧有的系统中去。
PS:demo的下载地址为http://download.csdn.net/download/xxjoy_777/10173957
github下载地址:https://github.com/xdxxdx/stocks