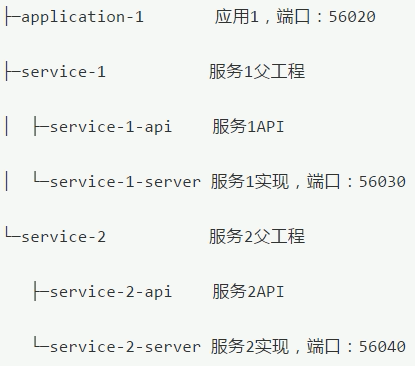
系统架构:

这里只演示以下组件,其他组件的使用和SpringCloud一样
application-1 :应用1,模拟应用,提供http接口服务。
service-1 :微服务1,模拟微服务,提供dubbo接口服务。
service-2 :微服务2,模拟微服务,提供dubbo接口服务。
架构中 application与sevice的区别:
service 提供了基础服务功能;application组装基础服务功能,提供给用户直接可用的业务。
service 服务粒度小、功能基础,不易发生改变;application提供上游业务功能,紧贴业务需求,容易发生改变。
形成 service支撑application的整体架构,增加多变的application甚至不需要变动service。
工程结构:

创建父工程:
    <parent>
        <groupId>org.springframework.boot</groupId>
        <artifactId>spring-boot-starter-parent</artifactId>
        <version>2.1.3.RELEASE</version>
    </parent>

    <properties>
        <java.version>1.8</java.version>
        <project.build.sourceEncoding>UTF-8</project.build.sourceEncoding>
        <spring-cloud.version>Greenwich.RELEASE</spring-cloud.version>
        <spring-cloud-alibaba.version>2.1.0.RELEASE</spring-cloud-alibaba.version>
    </properties>

    <dependencyManagement>
        <dependencies>
            <dependency>
                <groupId>org.springframework.cloud</groupId>
                <artifactId>spring-cloud-dependencies</artifactId>
                <version>${spring-cloud.version}</version>
                <type>pom</type>
                <scope>import</scope>
            </dependency>
            <dependency>
                <groupId>com.alibaba.cloud</groupId>
                <artifactId>spring-cloud-alibaba-dependencies</artifactId>
                <version>${spring-cloud-alibaba.version}</version>
                <type>pom</type>
                <scope>import</scope>
            </dependency>
        </dependencies>
    </dependencyManagement>
创建子模块application1:dubbo服务消费者
    <dependencies>
        <dependency>
            <groupId>com.alibaba.cloud</groupId>
            <artifactId>spring-cloud-starter-alibaba-nacos-discovery</artifactId>
        </dependency>
        <dependency>
            <groupId>com.alibaba.cloud</groupId>
            <artifactId>spring-cloud-starter-alibaba-nacos-config</artifactId>
        </dependency>
        <dependency>
            <groupId>org.springframework.boot</groupId>
            <artifactId>spring-boot-starter-web</artifactId>
        </dependency>
    </dependencies>
1.实现 application1 的功能
@RestController
public class Application1Controller {

    @GetMapping("/service")
    public String service() {
        return "test";
    }
}
2.application1 的配置,定义bootstrap.yml
server:
  port: 56020
  servlet:
    context-path: /application1
spring:
  application:
    name: application1
  main:
    allow-bean-definition-overriding: true #Spring Boot 2.1 需要设定,允许覆盖bean
  cloud:
    nacos:
      discovery:
        server-addr: 127.0.0.1:8848
        namespace: b0818a15-92f4-438b-ab16-1b0d13c1d225 #开发环境
      config:
        server-addr: 127.0.0.1:8848 #配置中心地址,和服务注册地址一样,nacos集服务管理和配置管理于一身
        file-extension: yaml
        namespace: b0818a15-92f4-438b-ab16-1b0d13c1d225 #开发环境
        group: NACOS_MICROSERVICE_GROUP #xx业务组
3.application1 启动类
@SpringBootApplication
@EnableDiscoveryClient
public class Application1Bootstrap {
    public static void main(String[] args) {
        SpringApplication.run(Application1Bootstrap.class, args);
    }
}
4.启动服务,访问 http://localhost:56020/application1/service 进行测试
创建子模块service1:
1.定义service-1-api:方便其它服务调用dubbo服务,专门定义api工程,此工程将作为jar被其它工程依赖。
定义服务接口
public interface ConsumerService {
    String service();
}
2.定义service-1-server:实现 service-1-api 定义的服务接口
    <dependencies>
        <dependency>
            <groupId>pers.fgy.nacos</groupId>
            <artifactId>service‐1‐api</artifactId>
            <version>1.0-SNAPSHOT</version>
        </dependency>
        <dependency>
            <groupId>com.alibaba.cloud</groupId>
            <artifactId>spring-cloud-starter-alibaba-nacos-discovery</artifactId>
        </dependency>
        <dependency>
            <groupId>com.alibaba.cloud</groupId>
            <artifactId>spring-cloud-starter-alibaba-nacos-config</artifactId>
        </dependency>
        <dependency>
            <groupId>com.alibaba.cloud</groupId>
            <artifactId>spring-cloud-starter-dubbo</artifactId>
        </dependency>
    </dependencies>
实现 Dubbo 服务
注意:使用 @org.apache.dubbo.config.annotation.Service 标记 dubbo 服务
@org.apache.dubbo.config.annotation.Service
public class ConsumerServiceImpl implements ConsumerService {
    @Override
    public String service() {
        return "Consumer invoke ";
    }
}
配置 Dubbo 服务
server:
  port: 56030
spring:
  application:
    name: service1
  main:
    allow-bean-definition-overriding: true #Spring Boot 2.1 需要设定,允许覆盖bean
  cloud:
    nacos:
      discovery:
        server-addr: 127.0.0.1:8848
        namespace: b0818a15-92f4-438b-ab16-1b0d13c1d225 #开发环境
      config:
        server-addr: 127.0.0.1:8848 #配置中心地址,和服务注册地址一样,nacos集服务管理和配置管理于一身
        file-extension: yaml
        namespace: b0818a15-92f4-438b-ab16-1b0d13c1d225 #开发环境
        group: NACOS_MICROSERVICE_GROUP #xx业务组
dubbo:
  scan:
    # dubbo 服务扫描基准包
    base-packages: pers.fgy.nacos.service
  protocol:
    # dubbo 协议
    name: dubbo
    # dubbo 协议端口
    port: 20881
  registry:
    address: spring-cloud://localhost #相当于nacos的服务地址127.0.0.1:8848
  application:
    qos-enable: false #dubbo运维服务是否开启
  consumer:
    check: false #启动时是否检查依赖的服务
启动服务消费方应用
@SpringBootApplication
@EnableDiscoveryClient
public class Service1Bootstrap {
    public static void main(String[] args) {
        SpringApplication.run(Service1Bootstrap.class, args);
    }
}
当 Service1Bootstrap 启动后,应用 service1 将出现在 Nacos 控制台界面。
实现 application1调用Service1:
在application1中引用service1
        <dependency>
            <groupId>pers.fgy.nacos</groupId>
            <artifactId>service‐1‐api</artifactId>
            <version>1.0-SNAPSHOT</version>
        </dependency>
引入 spring-cloud-starter-dubbo 依赖,它会根据接口生成代理对象
        <dependency>
            <groupId>com.alibaba.cloud</groupId>
            <artifactId>spring-cloud-starter-dubbo</artifactId>
        </dependency>
实现远程调用
@RestController
public class Application1Controller {

    @org.apache.dubbo.config.annotation.Reference
    private ConsumerService consumerService;

    @GetMapping("/service")
    public String service() {
        return "test" + consumerService.service();
    }
}
注意:这里的 @Reference 注解是 org.apache.dubbo.config.annotation.Reference
请求:http://localhost:56020/application1/service consumerService 正常生成代理对象,service1被调用。
创建子模块service2:
1.定义service-2-api:
定义服务接口
public interface ProviderService {
    String service();
}
2.定义service-2-server
    <dependencies>
        <dependency>
            <groupId>pers.fgy.nacos</groupId>
            <artifactId>service-2-api</artifactId>
            <version>1.0-SNAPSHOT</version>
        </dependency>
        <dependency>
            <groupId>com.alibaba.cloud</groupId>
            <artifactId>spring-cloud-starter-alibaba-nacos-discovery</artifactId>
        </dependency>
        <dependency>
            <groupId>com.alibaba.cloud</groupId>
            <artifactId>spring-cloud-starter-alibaba-nacos-config</artifactId>
        </dependency>
        <dependency>
            <groupId>com.alibaba.cloud</groupId>
            <artifactId>spring-cloud-starter-dubbo</artifactId>
        </dependency>
    </dependencies>
实现 Dubbo 服务
@org.apache.dubbo.config.annotation.Service
public class ProviderServiceImpl implements ProviderService {
    @Override
    public String service() {
        return "Provider invoke";
    }
}
配置 Dubbo 服务
server:
  port: 56040
spring:
  application:
    name: service2
  main:
    allow-bean-definition-overriding: true #Spring Boot 2.1 需要设定,允许覆盖bean
  cloud:
    nacos:
      discovery:
        server-addr: 127.0.0.1:8848
        namespace: b0818a15-92f4-438b-ab16-1b0d13c1d225 #开发环境
      config:
        server-addr: 127.0.0.1:8848 #配置中心地址,和服务注册地址一样,nacos集服务管理和配置管理于一身
        file-extension: yaml
        namespace: b0818a15-92f4-438b-ab16-1b0d13c1d225 #开发环境
        group: NACOS_MICROSERVICE_GROUP #xx业务组
dubbo:
  scan:
    # dubbo 服务扫描基准包
    base-packages: pers.fgy.nacos.service
  protocol:
    # dubbo 协议
    name: dubbo
    # dubbo 协议端口
    port: 20891
  registry:
    address: spring-cloud://localhost #相当于nacos的服务地址127.0.0.1:8848
  application:
    qos-enable: false #dubbo运维服务是否开启
  consumer:
    check: false #启动时是否检查依赖的服务
启动服务提供方应用
@SpringBootApplication
@EnableDiscoveryClient
public class Service2Bootstrap {
    public static void main(String[] args) {
        SpringApplication.run(Service2Bootstrap.class, args);
    }
}
实现service1调用service2:
在service1中添加service2的依赖
        <dependency>
            <groupId>pers.fgy.nacos</groupId>
            <artifactId>service-2-api</artifactId>
            <version>1.0-SNAPSHOT</version>
        </dependency>
实现远程调用
@org.apache.dubbo.config.annotation.Service
public class ConsumerServiceImpl implements ConsumerService {

    @org.apache.dubbo.config.annotation.Reference
    private ProviderService providerService;

    @Override
    public String service() {
        // return "Consumer invoke ";
        return "Consumer invoke | " + providerService.service();
    }
}
服务启动后立即请求:http://localhost:56020/application1/service 可能会出现错误,是因为服务还没有注册成功,过一会再访问即可