一、系统定时器
1. 简介
- SysTick 叫做系统滴答时钟、系统定时器,属于 Cortex-M4 内核中的一个外设(外围设备),被嵌入在 NVIC 中。
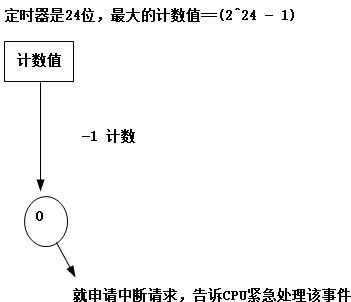
- 它是一个24 位向下递减的定时器,每计数一次所需时间为1/SYSTICK,SYSTICK是系统定时器时钟。
- 它可以直接取自系统时钟,还可以通过系统时钟8分频后获取。
- 当定时器计数到0时,将从LOAD 寄存器中自动重装定时器初值,重新向下递减计数,如此循环往复。
- 如果开启SysTick中断的话,当定时器计数到0,将产生一个中断信号。
因此只要知道计数的次数就可以准确得到它的延时时间
注意:
- 定时器的位数越多,定时时间更长。
- 通过计数值间接计算定时时间,不能像操作系统直接调用函数实现延时或定时功能。
2.工作原理
二、SysTick_Config函数的使用
- core_cm4.h
/** rief  System Tick Configuration

    The function initializes the System Timer and its interrupt, and starts the System Tick Timer.
    Counter is in free running mode to generate periodic interrupts.

    param [in]  ticks  Number of ticks between two interrupts.


eturn          0  Function succeeded.

eturn          1  Function failed.


ote     When the variable <b>__Vendor_SysTickConfig</b> is set to 1, then the
    function <b>SysTick_Config</b> is not included. In this case, the file <b><i>device</i>.h</b>
    must contain a vendor-specific implementation of this function.

 */
__STATIC_INLINE uint32_t SysTick_Config(uint32_t ticks)
{
  if ((ticks - 1) > SysTick_LOAD_RELOAD_Msk)  return (1);      /* Reload value impossible */

  SysTick->LOAD  = ticks - 1;                                  /* set reload register */
  NVIC_SetPriority (SysTick_IRQn, (1<<__NVIC_PRIO_BITS) - 1);  /* set Priority for Systick Interrupt */
  SysTick->VAL   = 0;                                          /* Load the SysTick Counter Value */
  SysTick->CTRL  = SysTick_CTRL_CLKSOURCE_Msk |
                   SysTick_CTRL_TICKINT_Msk   |
                   SysTick_CTRL_ENABLE_Msk;                    /* Enable SysTick IRQ and SysTick Timer */
  return (0);                                                  /* Function successful */
}
- 设置1ms触发一次SysTick中断,设置后一直有效,即SysTick产生中断的频率为1000HZ
SysTick_Config(SystemCoreClock / 1000);
- SystemCoreClock定义在system_stm32f4xx.c
#if defined (STM32F40_41xxx)
  uint32_t SystemCoreClock = 168000000;
#endif /* STM32F40_41xxx */
- 定义SysTick的中断处理函数
static uint32_t i = 0;

/**
  * @brief  This function handles SysTick Handler.
  * @param  None
  * @retval None
  */
void SysTick_Handler(void)
{
    i++;

    //LED0 100ms闪烁1次
    LED0 = (0 == i % 100) ? (~LED0) : LED0;
    //LED1 330ms闪烁1次
    LED1 = (0 == i % 330) ? (~LED1) : LED1;
    //LED2 1500ms闪烁1次
    LED2 = (0 == i % 1500) ? (~LED2) : LED2;
    //LED3 2200ms闪烁1次
    LED3 = (0 == i % 2200) ? (~LED3) : LED3;
}
三、SysTick最大定时时间确定
Tmax = 2^24 *1000ms/168000000 = 99.86ms
四、延时函数
1.系统定时器的用途
- 没有操作系统:只用于延时
- 操作系统(ucos2 ucos3 freertos....):为操作系统提供精准的定时中断(1ms~50ms)
2.官方示例
参考文档:《Cortex M3与M4权威指南.pdf》第314页
    In many cases you might not want to use the SysTick_Confifig function because you might want
to use the reference clock or you might not want to enable the SysTick interrupt. In these cases
you need to program the SysTick registers directly,and the following sequence is recommended:
1. Disable the SysTick timer by writing 0 to SysTick->CTRL. This step is optional.
It is recommended for reusable code because the SysTick could have been enabled previously.
2. Write the new reload value to SysTick->LOAD. The reload value should be the interval value e1.
3. Write to the SysTick Current Value register SysTick->VAL with any value to clear the current value to 0.
4. Write to the SysTick Control and Status register SysTick->CTRL to start the SysTick timer.
参考文档:《Cortex M3与M4权威指南.pdf》第316页
    If you want to use the SysTick timer in polling mode,
you can use the count flag in the SysTick Control and Status Register (SysTick->CTRL) to determine when the timer reaches zero.
For example, you can create a timed delay by setting the SysTick timer to a certain value and waiting until it reaches zero:

SysTick->CTRL = 0; // Disable SysTick
SysTick->LOAD = 0xFF; // Count from 255 to 0 (256 cycles)
SysTick->VAL = 0; // Clear current value as well as count flag
SysTick->CTRL = 5; // Enable SysTick timer with processor clock
while ((SysTick->CTRL & 0x00010000)==0);// Wait until count flag is set
SysTick->CTRL = 0; // Disable SysTick
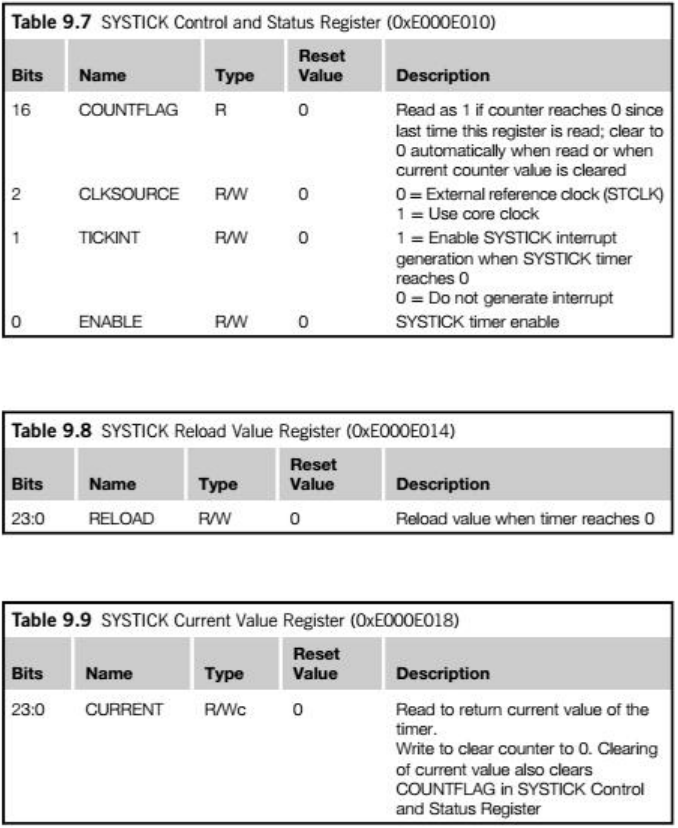
3.寄存器
4.毫秒延时函数
/** @brief  delay value milliseconds
  * @param  value:uint32_t
  * @retval None
  */
void delay_ms(uint32_t value)
{
    while(value--)
    {
        SysTick->CTRL = 0; 			// Disable SysTick
        /*这里直接使用的是系统时钟,频率168000000,也可用系统时钟8分频,21000000*/
        /*这里是计数168000-1到0共168000次,时间是1ms*/
        SysTick->LOAD = 168000 - 1; 	        // Count from 168000 - 1 to 0
        SysTick->VAL = 0; 		        // Clear current value as well as count flag
        SysTick->CTRL = 5; 			// Enable SysTick timer with processor clock
        while ((SysTick->CTRL & 0x00010000)==0);// Wait until count flag is set
        SysTick->CTRL = 0; 			// Disable SysTick
    }
}
5.微妙延时函数
/** @brief 	delay value microseconds
  * @param 	value:uint32_t
  * @retval None
  */
void delay_us(uint32_t value)
{
    while(value--)
    {
        SysTick->CTRL = 0; 						// Disable SysTick
        /*1us*/
        SysTick->LOAD = 168 - 1; 				// Count from 168 - 1 to 0
        SysTick->VAL = 0; 						// Clear current value as well as count flag
        SysTick->CTRL = 5; 						// Enable SysTick timer with processor clock
        while ((SysTick->CTRL & 0x00010000)==0);// Wait until count flag is set
        SysTick->CTRL = 0; 						// Disable SysTick
    }
}