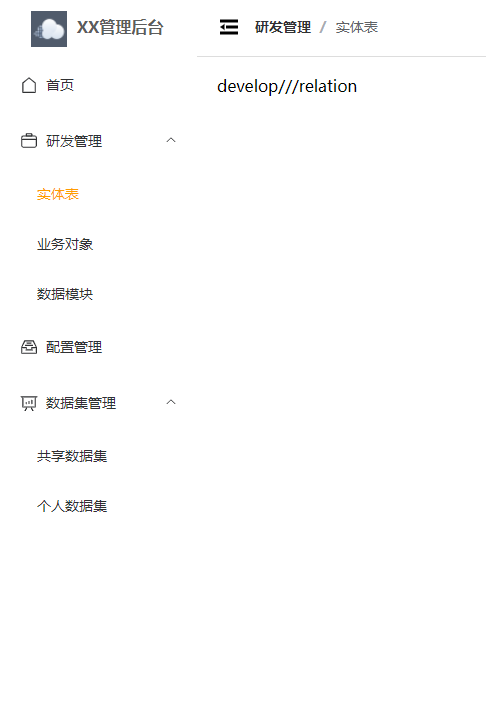
设置menuType来区分菜单类型
  /**
   * @params menuType
   * -1 一般为首页 / -> /home 只显示第一个子项
   * -2 为无子菜单的菜单项 /config -> /config/person 无上下级,使用一级title
   * -3 正常菜单 /system -> /system/1 | /system/2 有上下级
   */
先看看页面效果吧

- type=1
  export default [
    {
  	path: '/',
  	component: Layout,
  	redirect: '/home',
  	meta: { icon: 'House', menuType: 1 },
  	children: [
  	  {
  		path: 'home',
  		component: () => import('@/views/home/index.vue'),
  		meta: { title: '首页' }
  	  },
  	  {
  		path: '401',
  		component: () => import('@/views/home/401.vue'),
  		meta: { title: '401', hideMenu: true }
  	  },
  	  {
  		path: '404',
  		component: () => import('@/views/home/404.vue'),
  		meta: { title: '404', hideMenu: true }
  	  }
  	]
    },
    {
  	path: '/:pathMatch(.*)*',
  	redirect: '/404',
  	meta: { hideMenu: true }
    }
  ]
- type=2
  export default [
    {
  	path: '/configuration',
  	component: Layout,
  	meta: { title: '配置管理', icon: 'MessageBox', menuType: 2 },
  	redirect: '/configuration/form',
  	children: [
  	  {
  		path: 'form',
  		component: () => import('@/views/configuration/form/index.vue'),
  		meta: { title: '表单可视化', cache: false }
  	  }
  	]
    }
  ]
- type=3
  export default [
    {
  	path: '/dataset',
  	component: Layout,
  	meta: { title: '数据集管理', icon: 'DataAnalysis', menuType: 3 },
  	redirect: '/dataset/multi',
  	children: [
  	  {
  		path: 'multi',
  		component: () => import('@/views/dataset/multi/index.vue'),
  		meta: { title: '共享数据集', cache: true }
  	  },
  	  {
  		path: 'person',
  		component: () => import('@/views/dataset/person/index.vue'),
  		meta: { title: '个人数据集', cache: true }
  	  }
  	]
    }
  ]
区别看得出来吧,看得出来吧,出来吧,吧!
最主要看看menu逻辑
menu:
  <template>
    <el-scrollbar>
  	<el-menu
  	  :default-active="activePath"
  	  :collapse="!!collapseMenu"
  	  :collapse-transition="false"
  	>
  	  <menu-item
  		v-for="(menu, key) in allRoutes"
  		:key="key"
  		:menu="menu"
  		:path="menu.path"
  	  />
  	</el-menu>
    </el-scrollbar>
  </template>

  <script lang="ts" setup>
  import { computed } from 'vue'
  import { useRouter, useRoute } from 'vue-router'
  import MenuItem from './MenuItem.vue'
  import { storeToRefs } from 'pinia'
  import { SystemStore } from '@/store'

  const systemStore = SystemStore()
  const { collapseMenu } = storeToRefs(systemStore)

  const route = useRoute()
  const router = useRouter()

  const allRoutes = router.options.routes

  const activePath = computed(() => {
    return route.path
  })
  </script>

  <style lang="scss" scoped>
  .el-menu {
    border: none;
  }
  </style>
menuItem:
  <template>
    <template v-if="!props.menu.meta?.hideMenu">
  	<el-sub-menu v-if="props.menu.meta?.menuType === 3" :index="menuPath">
  	  <template #title>
  		<el-icon>
  		  <component :is="props.menu.meta?.icon"></component>
  		</el-icon>
  		<span>{{ props.menu.meta?.title }}</span>
  	  </template>
  	  <template v-for="children in props.menu.children" :key="children.path">
  		<menu-item
  		  v-if="!children.meta?.hideMenu"
  		  :menu="children"
  		  :path="`${menuPath}/${children.path}`"
  		/>
  	  </template>
  	</el-sub-menu>
  	<router-link v-else :to="menuPath">
  	  <el-menu-item :index="menuPath">
  		<el-icon v-if="props.menu.meta?.icon">
  		  <component :is="props.menu.meta.icon"></component>
  		</el-icon>
  		<template #title>
  		  <span>{{
  			props.menu.meta?.menuType === 1
  			  ? props.menu.children[0].meta?.title
  			  : props.menu.meta?.title
  		  }}</span>
  		</template>
  	  </el-menu-item>
  	</router-link>
    </template>
  </template>

  <script lang="ts" setup>
  import { computed, PropType } from 'vue'
  import { RouteRecordRaw } from 'vue-router'
  const props = defineProps({
    menu: {
  	type: Object as PropType<RouteRecordRaw>,
  	required: true
    },
    path: {
  	type: String,
  	default: ''
    }
  })
  const menuPath = computed(() => {
    if ([1, 2].includes(props.menu.meta?.menuType as number)) {
  	return (
  	  (props.path === '/' ? props.path : props.path + '/') +
  	  props.menu.children![0].path
  	)
    }
    return props.path
  })
  </script>
通过路由meta里面设置hideMenu属性来控制是否在菜单栏展示
menuType
- 为1时(首页),取第一个children的信息
- 为2时取主菜单信息,不展示子菜单
- 为3时全部展示父子菜单
然后就是获取path和取title的逻辑,看看代码就能懂