一、创建方式分类
Kubernetes 支持两种方式创建资源:
(1)用 kubectl 命令直接创建,比如:
kubectl run httpd-app --image=reg.yunwei.com/learn/httpd:latest --replicas=2
在命令行中通过参数指定资源的属性。
(2)通过配置文件和 kubectl apply 创建,要完成前面同样的工作,可执行命令:
kubectl apply -f httpd.yaml
httpd.yaml 的内容为:
apiVersion: extensions/v1beta1
kind: Deployment
metadata:
  name: httpd-deployment
spec:
  replicas: 2
  template:
    metadata:
      labels:
        name: httpd
    spec:
      containers:
      - name: httpd-app
        image: reg.yunwei.com/learn/httpd:latest
资源的属性写在配置文件中,文件格式为YAML。
[root@ren7 yaml]# kubectl get pod
No resources found.
[root@ren7 yaml]# kubectl apply -f httpd.yaml
deployment.extensions/httpd-deployment created
[root@ren7 yaml]# kubectl get pod
NAME                                READY   STATUS    RESTARTS   AGE
httpd-deployment-584d5b54cf-g5rqg   1/1     Running   0          5s
httpd-deployment-584d5b54cf-tpndt   1/1     Running   0          5s
两种方式的比较:
基于命令的方式:
(1)简单直观快捷,上手快。
(2)适合临时测试或实验。
基于配置文件的方式:
(1)配置文件描述了what,即应用最终要达到的状态。
(2)配置文件提供了创建资源的模板,能够重复部署。
(3)可以像管理代码一样管理部署。
(4)适合正式的、跨环境的、规模化部署。
(5)这种方式要求熟悉配置文件的语法,有一定的难度。
kubectl apply 不但能够创建 Kubernetes 资源,也能对资源进行更新,非常方便。不过 Kubernetes 还提供了几个类似的命令,例如 kubectl create、kubectl replace、kubectl edit 和 kubectl patch。
为避免造成不必要的困扰,我们会尽量只使用 kubectl apply,
此命令已经能够应对超过 90% 的场景,事半功倍。
二、Deployment YAML文件
1、deployment 的配置格式
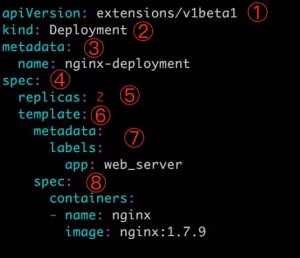
① apiVersion 是当前配置格式的版本。
先执行kubectl api-resources找到所有的资源,再执行命令 kubectl explain deploy 即可获取到版本和类型信息
[root@ren7 yaml]# kubectl explain deploy
KIND:     Deployment
VERSION:  extensions/v1beta1
② kind 是要创建的资源类型,这里是 Deployment。
③ metadata 是该资源的元数据,name 是必需的元数据项。
④ spec 部分是该 Deployment 的规格说明。
⑤ replicas 指明副本数量,默认为 1。
⑥ template 定义 Pod 的模板,这是配置文件的重要部分。
⑦ metadata 定义 Pod 的元数据,至少要定义一个 label。label 的 key 和 value 可以任意指定。
⑧ spec 描述 Pod 的规格,此部分定义 Pod 中每一个容器的属性,name 和 image 是必需的。
注意:最后name前面加个横线是因为container后面是一个列表
[root@ren7 yaml]# kubectl explain deployments.spec.template.spec
KIND:     Deployment
VERSION:  extensions/v1beta1
RESOURCE: spec <Object>
DESCRIPTION:
     Specification of the desired behavior of the pod. More info:
     https://git.k8s.io/community/contributors/devel/api-conventions.md#spec-and-status
     PodSpec is a description of a pod.
FIELDS:
   containers    <[]Object> -required-    #列表,后面有横杠
     List of containers belonging to the pod. Containers cannot currently be
     added or removed. There must be at least one container in a Pod. Cannot be
     updated.

   dnsConfig    <Object>      #仅仅是一个对象
     Specifies the DNS parameters of a pod. Parameters specified here will be
     merged to the generated DNS configuration based on DNSPolicy.

   volumes    <[]Object>
     List of volumes that can be mounted by containers belonging to the pod.
     More info: https://kubernetes.io/docs/concepts/storage/volumes
查看上文通过kubectl apply创建的pod的各种资源:
[root@ren7 yaml]# kubectl get deployment
NAME               READY   UP-TO-DATE   AVAILABLE   AGE
httpd-deployment   2/2     2            2           45m
[root@ren7 yaml]# kubectl get replicaset
NAME                          DESIRED   CURRENT   READY   AGE
httpd-deployment-584d5b54cf   2         2         2       46m
[root@ren7 yaml]# kubectl get pod -o wide
NAME                                READY   STATUS    RESTARTS   AGE   IP              NODE           NOMINATED NODE   READINESS GATES
httpd-deployment-584d5b54cf-g5rqg   1/1     Running   0          46m   172.20.72.140   192.168.11.5   <none>           <none>
httpd-deployment-584d5b54cf-tpndt   1/1     Running   0          46m   172.20.33.74    192.168.11.6   <none>           <none>
Deployment、ReplicaSet、Pod 都已经就绪。如果要删除这些资源,执行 kubectl delete deployment httpd-deployment 或者 kubectl delete -f httpd.yaml (编写的httpd.yaml文件不会被删除)。
[root@ren7 yaml]# kubectl delete -f httpd.yaml
deployment.extensions "httpd-deployment" deleted
[root@ren7 yaml]# kubectl get pod -o wide
No resources found.
2、运行yaml配置文件
执行如下命令:
 kubectl apply -f httpd.yaml      #运行pod
 kubectl delete -f http.yaml      #删除pod
(1)伸缩(Scale Up/Down):是指在线增加或减少 Pod 的副本数。直接改写yaml配置文件的 replicas 参数即可
出于安全考虑,默认配置下 Kubernetes 不会将 Pod 调度到 Master 节点。
(2)节点故障(Failover):若其中一个node故障, Kubernetes 会检查到 k8s-node3 不可用,将 k8s-node1 上的 Pod 标记为 Terminating 状态,并在 k8s-node2 上新创建两个 Pod,维持总副本数为原指定副本数 3。
当 k8s-node2 恢复后,Terminating 的 Pod 会被删除,不过已经运行的 Pod 不会重新调度回 k8s-node2。
(3)用 label 控制 Pod 的位置: 默认配置下,Scheduler 会将 Pod 调度到所有可用的 Node。不过有些情况我们希望将 Pod 部署到指定的 Node,比如将有大量磁盘 I/O 的 Pod 部署到配置了 SSD 的 Node;或者 Pod 需要 GPU,需要运行在配置了 GPU 的节点上。
Kubernetes 是通过 label 来实现这个功能的。label 是 key-value 对,各种资源都可以设置 label,灵活添加各种自定义属性。比如执行如下命令标注 k8s-node3 是配置了 SSD 的节点。
[root@ren8 ~]# kubectl label node 192.168.11.5 disktype=ssd
node/192.168.11.5 labeled
然后通过:kubectl get node --show-labels 查看节点的label。
[root@ren8 ~]# kubectl get node --show-labels
NAME           STATUS                     ROLES    AGE   VERSION   LABELS
192.168.11.5   Ready                      <none>   46h   v1.14.2   beta.kubernetes.io/arch=amd64,beta.kubernetes.io/os=linux,disktype=ssd,kubernetes.io/arch=amd64,kubernetes.io/hostname=192.168.11.5,kubernetes.io/os=linux
192.168.11.6   Ready                      <none>   46h   v1.14.2   beta.kubernetes.io/arch=amd64,beta.kubernetes.io/os=linux,kubernetes.io/arch=amd64,kubernetes.io/hostname=192.168.11.6,kubernetes.io/os=linux
192.168.11.7   Ready,SchedulingDisabled   <none>   46h   v1.14.2   beta.kubernetes.io/arch=amd64,beta.kubernetes.io/os=linux,kubernetes.io/arch=amd64,kubernetes.io/hostname=192.168.11.7,kubernetes.io/os=linux
disktype=ssd 已经成功添加到 k8s-node3,除了 disktype,Node 还有几个 Kubernetes 自己维护的 label。
有了 disktype 这个自定义 label,接下来就可以指定将 Pod 部署到 k8s-node3。编辑 httpd.yaml:
apiVersion: extensions/v1beta1
kind: Deployment
metadata:
  name: httpd-deployment
spec:
  replicas: 2
  template:
    metadata:
      labels:
        name: httpd
    spec:
      containers:
      - name: httpd-app
        image: reg.yunwei.com/learn/httpd:latest
      nodeSelector:
        disktype: ssd
在 Pod 模板的 spec 里通过 nodeSelector 指定将此 Pod 部署到具有:label disktype=ssd 的 Node 上。
部署 Deployment 并查看 Pod 的运行节点:
[root@ren7 yaml]# kubectl apply -f .
deployment.extensions/httpd-deployment created
[root@ren7 yaml]# kubectl get pod -o wide
NAME                                READY   STATUS    RESTARTS   AGE   IP              NODE           NOMINATED NODE   READINESS GATES
httpd-deployment-55d95f5b6f-5pfcw   1/1     Running   0          18s   172.20.72.142   192.168.11.5   <none>           <none>
httpd-deployment-55d95f5b6f-hcpg7   1/1     Running   0          18s   172.20.72.141   192.168.11.5   <none>           <none>
全部2个副本都运行在k8s-node3节点上,符合我们的预期。
要删除 label disktype,执行如下命令:kubectl label node k8s-node3 disktype- 即删除。不过此时已创建的pod并不会重新部署,依然在 k8s-node3上运行。
[root@ren7 yaml]# kubectl label node 192.168.11.5 disktype-
node/192.168.11.5 labeled
[root@ren7 yaml]# kubectl get node --show-labels
NAME           STATUS                     ROLES    AGE   VERSION   LABELS
192.168.11.5   Ready                      <none>   46h   v1.14.2   beta.kubernetes.io/arch=amd64,beta.kubernetes.io/os=linux,kubernetes.io/arch=amd64,kubernetes.io/hostname=192.168.11.5,kubernetes.io/os=linux
192.168.11.6   Ready                      <none>   46h   v1.14.2   beta.kubernetes.io/arch=amd64,beta.kubernetes.io/os=linux,kubernetes.io/arch=amd64,kubernetes.io/hostname=192.168.11.6,kubernetes.io/os=linux
192.168.11.7   Ready,SchedulingDisabled   <none>   46h   v1.14.2   beta.kubernetes.io/arch=amd64,beta.kubernetes.io/os=linux,kubernetes.io/arch=amd64,kubernetes.io/hostname=192.168.11.7,kubernetes.io/os=linux
[root@ren7 yaml]# kubectl get pod -o wide
NAME                                READY   STATUS    RESTARTS   AGE    IP              NODE           NOMINATED NODE   READINESS GATES
httpd-deployment-55d95f5b6f-5pfcw   1/1     Running   0          5m8s   172.20.72.142   192.168.11.5   <none>           <none>
httpd-deployment-55d95f5b6f-hcpg7   1/1     Running   0          5m8s   172.20.72.141   192.168.11.5   <none>           <none>
除非在 httpd.yaml文件中删除nodeSelector设置,然后通过kubectl apply重新部署。kubernetes 会删除之前的pod并调度和运行新的pod。
[root@ren7 yaml]# kubectl get pod -o wide
NAME                                READY   STATUS    RESTARTS   AGE    IP              NODE           NOMINATED NODE   READINESS GATES
httpd-deployment-55d95f5b6f-5pfcw   1/1     Running   0          5m8s   172.20.72.142   192.168.11.5   <none>           <none>
httpd-deployment-55d95f5b6f-hcpg7   1/1     Running   0          5m8s   172.20.72.141   192.168.11.5   <none>           <none>
[root@ren7 yaml]# vim httpd.yaml     #删除(或注释)nodeSelector设置
[root@ren7 yaml]# kubectl apply -f .   #重新部署pod
deployment.extensions/httpd-deployment configured
[root@ren7 yaml]# kubectl get pod -o wide
NAME                                READY   STATUS    RESTARTS   AGE   IP              NODE           NOMINATED NODE   READINESS GATES
httpd-deployment-584d5b54cf-c9d6r   1/1     Running   0          17s   172.20.33.75    192.168.11.6   <none>           <none>
httpd-deployment-584d5b54cf-vltn8   1/1     Running   0          17s   172.20.72.143   192.168.11.5   <none>           <none>
三、DaemonSet应用
Deployment 部署的副本 Pod 会分布在各个 Node 上,每个 Node 都可能运行好几个副本。DaemonSet 的不同之处在于:每个 Node 上最多只能运行一个副本。
(2)在每个节点上运行日志收集 Daemon,比如 flunentd 或 logstash。
(3)在每个节点上运行监控 Daemon,比如 Prometheus Node Exporter 或 collectd。
[root@ren8 ~]# kubectl get daemonset -n kube-system
NAME          DESIRED   CURRENT   READY   UP-TO-DATE   AVAILABLE   NODE SELECTOR   AGE
calico-node   3         3         3       3            3           <none>          46h
DaemonSet calico-node分别负责在每个节点上运行 calico-node 组件。
[root@ren8 ~]# kubectl get pod -n kube-system -o wide
NAME                                       READY   STATUS    RESTARTS   AGE   IP              NODE           NOMINATED NODE   READINESS GATES
calico-kube-controllers-7dd985b95c-s8q64   1/1     Running   1          46h   192.168.11.6    192.168.11.6   <none>           <none>
calico-node-fwrnb                          2/2     Running   6          46h   192.168.11.7    192.168.11.7   <none>           <none>
calico-node-tpbgh                          2/2     Running   2          46h   192.168.11.6    192.168.11.6   <none>           <none>
calico-node-z7wxb                          2/2     Running   2          46h   192.168.11.5    192.168.11.5   <none>           <none>
coredns-64d5b756bc-bcmqd                   1/1     Running   1          46h   172.20.33.69    192.168.11.6   <none>           <none>
coredns-64d5b756bc-bmj2v                   1/1     Running   2          46h   172.20.72.136   192.168.11.5   <none>           <none>
heapster-7f48ff4cd9-6zmqr                  1/1     Running   1          25h   172.20.33.71    192.168.11.6   <none>           <none>
kubernetes-dashboard-6f75588d94-g6vcr      1/1     Running   1          46h   172.20.72.137   192.168.11.5   <none>           <none>
monitoring-grafana-6c76875cb-8zjrv         1/1     Running   1          25h   172.20.33.70    192.168.11.6   <none>           <none>
monitoring-influxdb-66dbc76bf9-9lsqk       1/1     Running   1          25h   172.20.72.135   192.168.11.5   <none>           <none>
因为 calico-node 属于系统组件,需要在命令行中通过 --namespace=kube-system 指定 namespace kube-system。如果不指定则只返回默认 namespace default 中的资源。
[root@ren8 templates]# pwd
/etc/ansible/roles/calico/templates
[root@ren8 templates]# vim calico.yaml.j2
# This manifest installs the calico/node container, as well
# as the Calico CNI plugins and network config on
# each master and worker node in a Kubernetes cluster.
kind: DaemonSet
apiVersion: extensions/v1beta1
metadata:
  name: calico-node
  namespace: kube-system
  labels:
    k8s-app: calico-node
spec:
  selector:
    matchLabels:
      k8s-app: calico-node
  updateStrategy:
    type: RollingUpdate
    rollingUpdate:
      maxUnavailable: 1
  template:
    metadata:
      labels:
        k8s-app: calico-node
      annotations:
        scheduler.alpha.kubernetes.io/critical-pod: ''
    spec:
      hostNetwork: true
      tolerations: