一.系统环境
| 服务器版本 | containerd软件版本 | CPU架构 |
|---|---|---|
| CentOS Linux release 7.4.1708 (Core) | 1.6.8 | x86_64 |
二.前言
在 Kubernetes 的早期,我们只支持一个容器运行时。那个运行时是 Docker 引擎。那时,并没有太多其他的选择,而 Docker 是处理容器的主要工具,所以这不是一个有争议的选择。最终,我们开始添加更多的容器运行时,比如 rkt 和 hypernetes,很明显 Kubernetes 用户希望选择最适合他们的运行时。因此,Kubernetes 需要一种方法来允许集群操作员灵活地使用他们选择的任何运行时。
发布了容器运行时接口(CRI) 以实现这种灵活性。CRI 的引入对项目和用户来说都很棒,但它确实引入了一个问题:Docker Engine 作为容器运行时的使用早于 CRI,并且 Docker Engine 不兼容 CRI。为了解决这个问题,引入了一个小型软件 shim (dockershim) 作为 kubelet 组件的一部分,专门用于填补 Docker Engine 和 CRI 之间的空白,允许集群操作员继续使用 Docker Engine 作为他们的容器运行时基本上不间断。
然而,这个小软件垫片从来没有打算成为一个永久的解决方案。多年来,它的存在给 kubelet 本身带来了许多不必要的复杂性。由于这个 shim,Docker 的一些集成实现不一致,导致维护人员的负担增加,并且维护供应商特定的代码不符合我们的开源理念。为了减少这种维护负担并朝着支持开放标准的更具协作性的社区迈进,引入了 KEP-2221,建议删除 dockershim。随着 Kubernetes v1.20 的发布,正式弃用。
自 Kubernetes v1.24 起,Dockershim 已被删除,这对项目来说是一个积极的举措。
自 Kubernetes v1.24 起,K8S默认使用containerd作为容器运行时!可以理解为containerd是docker的替代品。
好消息是containerd用法和docker类似,转型相当简单!
三.containerd
containerd 是一个行业标准的容器运行时,强调简单性、健壮性和可移植性。它可作为 Linux 和 Windows 的守护进程使用,可以管理其主机系统的完整容器生命周期:图像传输和存储、容器执行和监督、低级存储和网络附件等。containerd 旨在嵌入到更大的系统中,而不是由开发人员或最终用户直接使用。
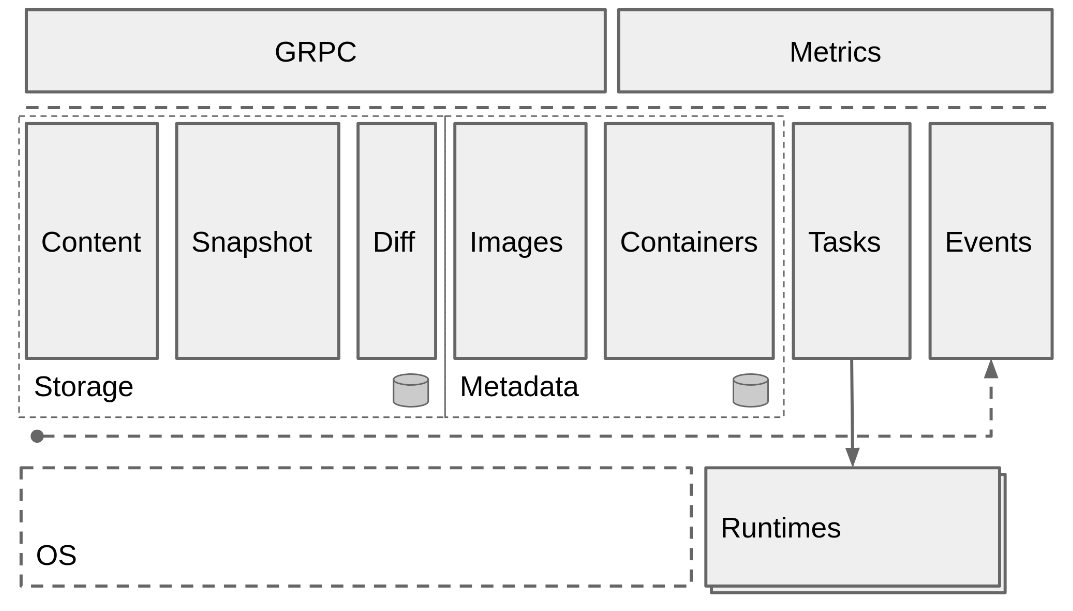
containerd是从Docker中分离出来的一个项目,可以作为一个底层容器运行时,现在它成了Kubernete容器运行时更好的选择。docker 对容器的管理和操作基本都是通过 containerd 完成的
K8S发布CRI(Container Runtime Interface),统一了容器运行时接口,凡是支持CRI的容器运行时,皆可作为K8S的底层容器运行时。
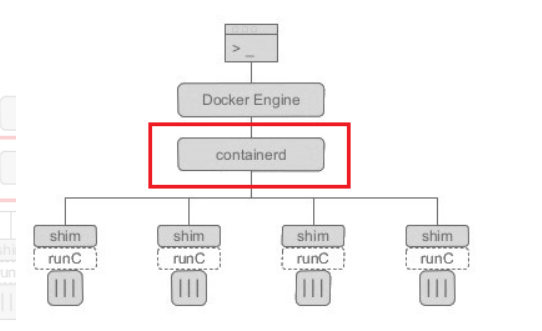
如果你使用Docker作为K8S容器运行时的话,kubelet需要先要通过dockershim去调用Docker,再通过Docker去调用containerd。
如果你使用containerd作为K8S容器运行时的话,由于containerd内置了CRI插件,kubelet可以直接调用containerd。使用containerd不仅性能提高了(调用链变短了),而且资源占用也会变小(Docker不是一个纯粹的容器运行时,具有大量其他功能)。
四.部署containerd
4.1 安装containerd
安装containerd
[root@k8sworker2 ~]# yum -y install containerd.io cri-tools
已加载插件:fastestmirror
base                                                                                                                                                                                      | 3.6 kB  00:00:00
......
  验证中      : containerd.io-1.4.12-3.1.el7.x86_64                                                                                                                                                          4/4

更新完毕:
  containerd.io.x86_64 0:1.6.8-3.1.el7                                                                        cri-tools.x86_64 0:1.24.2-0

完毕!
设置containerd开机自启动并启动containerd
[root@k8sworker2 ~]# systemctl enable containerd --now
Created symlink from /etc/systemd/system/multi-user.target.wants/containerd.service to /usr/lib/systemd/system/containerd.service.

[root@k8sworker2 ~]# systemctl status containerd
● containerd.service - containerd container runtime
   Loaded: loaded (/usr/lib/systemd/system/containerd.service; enabled; vendor preset: disabled)
   Active: active (running) since 四 2022-01-06 00:23:13 CST; 1min 4s ago
     Docs: https://containerd.io
 Main PID: 88228 (containerd)
   CGroup: /system.slice/containerd.service
           └─88228 /usr/bin/containerd
4.2 containerd配置文件
containerd的配置文件为/etc/containerd/config.toml
[root@k8sworker2 ~]# ll -h /etc/containerd/config.toml
-rw-r--r-- 1 root root 886 11月 18 04:15 /etc/containerd/config.toml
containerd的默认配置文件/etc/containerd/config.toml 内容如下
[root@k8sworker2 ~]# cat /etc/containerd/config.toml
#   Copyright 2018-2020 Docker Inc.

#   Licensed under the Apache License, Version 2.0 (the "License");
#   you may not use this file except in compliance with the License.
#   You may obtain a copy of the License at

#       http://www.apache.org/licenses/LICENSE-2.0

#   Unless required by applicable law or agreed to in writing, software
#   distributed under the License is distributed on an "AS IS" BASIS,
#   WITHOUT WARRANTIES OR CONDITIONS OF ANY KIND, either express or implied.
#   See the License for the specific language governing permissions and
#   limitations under the License.

disabled_plugins = ["cri"]

#root = "/var/lib/containerd"
#state = "/run/containerd"
#subreaper = true
#oom_score = 0

#[grpc]
#  address = "/run/containerd/containerd.sock"
#  uid = 0
#  gid = 0

#[debug]
#  address = "/run/containerd/debug.sock"
#  uid = 0
#  gid = 0
#  level = "info"
可以使用containerd config default > /etc/containerd/config.toml生成默认的配置文件,这个命令生成的配置文件内容很多
[root@k8sworker2 ~]# containerd config default
version = 2
root = "/var/lib/containerd"
state = "/run/containerd"
plugin_dir = ""
disabled_plugins = []
required_plugins = []
oom_score = 0

[grpc]
  address = "/run/containerd/containerd.sock"
  tcp_address = ""
  tcp_tls_cert = ""
  tcp_tls_key = ""
  uid = 0
  gid = 0
  max_recv_message_size = 16777216
  max_send_message_size = 16777216

[ttrpc]
  address = ""
  uid = 0
  gid = 0

[debug]
  address = ""
  uid = 0
  gid = 0
  level = ""

[metrics]
  address = ""
  grpc_histogram = false

[cgroup]
  path = ""

[timeouts]
  "io.containerd.timeout.shim.cleanup" = "5s"
  "io.containerd.timeout.shim.load" = "5s"
  "io.containerd.timeout.shim.shutdown" = "3s"
  "io.containerd.timeout.task.state" = "2s"

[plugins]
  [plugins."io.containerd.gc.v1.scheduler"]
    pause_threshold = 0.02
    deletion_threshold = 0
    mutation_threshold = 100
    schedule_delay = "0s"
    startup_delay = "100ms"
  [plugins."io.containerd.grpc.v1.cri"]
    disable_tcp_service = true
    stream_server_address = "127.0.0.1"
    stream_server_port = "0"
    stream_idle_timeout = "4h0m0s"
    enable_selinux = false
    selinux_category_range = 1024
    sandbox_image = "k8s.gcr.io/pause:3.2"
    stats_collect_period = 10
    systemd_cgroup = false
    enable_tls_streaming = false
    max_container_log_line_size = 16384
    disable_cgroup = false
    disable_apparmor = false
    restrict_oom_score_adj = false
    max_concurrent_downloads = 3
    disable_proc_mount = false
    unset_seccomp_profile = ""
    tolerate_missing_hugetlb_controller = true
    disable_hugetlb_controller = true
    ignore_image_defined_volumes = false
    [plugins."io.containerd.grpc.v1.cri".containerd]
      snapshotter = "overlayfs"
      default_runtime_name = "runc"
      no_pivot = false
      disable_snapshot_annotations = true
      discard_unpacked_layers = false
      [plugins."io.containerd.grpc.v1.cri".containerd.default_runtime]
        runtime_type = ""
        runtime_engine = ""
        runtime_root = ""
        privileged_without_host_devices = false
        base_runtime_spec = ""
      [plugins."io.containerd.grpc.v1.cri".containerd.untrusted_workload_runtime]
        runtime_type = ""
        runtime_engine = ""
        runtime_root = ""
        privileged_without_host_devices = false
        base_runtime_spec = ""
      [plugins."io.containerd.grpc.v1.cri".containerd.runtimes]
        [plugins."io.containerd.grpc.v1.cri".containerd.runtimes.runc]
          runtime_type = "io.containerd.runc.v2"
          runtime_engine = ""
          runtime_root = ""
          privileged_without_host_devices = false
          base_runtime_spec = ""
          [plugins."io.containerd.grpc.v1.cri".containerd.runtimes.runc.options]
    [plugins."io.containerd.grpc.v1.cri".cni]
      bin_dir = "/opt/cni/bin"
      conf_dir = "/etc/cni/net.d"
      max_conf_num = 1
      conf_template = ""
    [plugins."io.containerd.grpc.v1.cri".registry]
      [plugins."io.containerd.grpc.v1.cri".registry.mirrors]
        [plugins."io.containerd.grpc.v1.cri".registry.mirrors."docker.io"]
          endpoint = ["https://registry-1.docker.io"]
    [plugins."io.containerd.grpc.v1.cri".image_decryption]
      key_model = ""
    [plugins."io.containerd.grpc.v1.cri".x509_key_pair_streaming]
      tls_cert_file = ""
      tls_key_file = ""
  [plugins."io.containerd.internal.v1.opt"]
    path = "/opt/containerd"
  [plugins."io.containerd.internal.v1.restart"]
    interval = "10s"
  [plugins."io.containerd.metadata.v1.bolt"]
    content_sharing_policy = "shared"
  [plugins."io.containerd.monitor.v1.cgroups"]
    no_prometheus = false
  [plugins."io.containerd.runtime.v1.linux"]
    shim = "containerd-shim"
    runtime = "runc"
    runtime_root = ""
    no_shim = false
    shim_debug = false
  [plugins."io.containerd.runtime.v2.task"]
    platforms = ["linux/amd64"]
  [plugins."io.containerd.service.v1.diff-service"]
    default = ["walking"]
  [plugins."io.containerd.snapshotter.v1.devmapper"]
    root_path = ""
    pool_name = ""
    base_image_size = ""
    async_remove = false
查看默认的配置
[root@k8sworker2 ~]# containerd config dump
version = 2
root = "/var/lib/containerd"
state = "/run/containerd"
plugin_dir = ""
disabled_plugins = ["cri"]
required_plugins = []
oom_score = 0
imports = ["/etc/containerd/config.toml"]

[grpc]
  address = "/run/containerd/containerd.sock"
  tcp_address = ""
  tcp_tls_cert = ""
  tcp_tls_key = ""
  uid = 0
  gid = 0
  max_recv_message_size = 16777216
  max_send_message_size = 16777216

[ttrpc]
  address = ""
  uid = 0
  gid = 0

[debug]
  address = ""
  uid = 0
  gid = 0
  level = ""

[metrics]
  address = ""
  grpc_histogram = false

[cgroup]
  path = ""

[timeouts]
  "io.containerd.timeout.shim.cleanup" = "5s"
  "io.containerd.timeout.shim.load" = "5s"
  "io.containerd.timeout.shim.shutdown" = "3s"
  "io.containerd.timeout.task.state" = "2s"

[plugins]
  [plugins."io.containerd.gc.v1.scheduler"]
    pause_threshold = 0.02
    deletion_threshold = 0
    mutation_threshold = 100
    schedule_delay = "0s"
    startup_delay = "100ms"
  [plugins."io.containerd.internal.v1.opt"]
    path = "/opt/containerd"
  [plugins."io.containerd.internal.v1.restart"]
    interval = "10s"
  [plugins."io.containerd.metadata.v1.bolt"]
    content_sharing_policy = "shared"
  [plugins."io.containerd.monitor.v1.cgroups"]
    no_prometheus = false
  [plugins."io.containerd.runtime.v1.linux"]
    shim = "containerd-shim"
    runtime = "runc"
    runtime_root = ""
    no_shim = false
    shim_debug = false
  [plugins."io.containerd.runtime.v2.task"]
    platforms = ["linux/amd64"]
  [plugins."io.containerd.service.v1.diff-service"]
    default = ["walking"]
  [plugins."io.containerd.snapshotter.v1.devmapper"]
    root_path = ""
    pool_name = ""
    base_image_size = ""
    async_remove = false
4.3 配置containerd阿里云镜像加速器
修改配置文件,添加镜像加速器
[root@k8sworker2 ~]# cat /etc/containerd/config.toml
disabled_plugins = ["restart"]
[plugins]
  [plugins.cri.registry.mirrors."docker.io"]
    endpoint = ["https://frz7i079.mirror.aliyuncs.com"]
重启containerd
[root@k8sworker2 ~]# systemctl restart containerd

[root@k8sworker2 ~]# systemctl status containerd
● containerd.service - containerd container runtime
   Loaded: loaded (/usr/lib/systemd/system/containerd.service; enabled; vendor preset: disabled)
   Active: active (running) since 四 2022-01-06 00:34:18 CST; 6s ago
     Docs: https://containerd.io
  Process: 90199 ExecStartPre=/sbin/modprobe overlay (code=exited, status=0/SUCCESS)
 Main PID: 90201 (containerd)
   Memory: 19.6M
   CGroup: /system.slice/containerd.service
           └─90201 /usr/bin/containerd
五.管理containerd镜像/容器
5.1 使用ctr管理容器
ctr是containerd自带的用于管理容器的命令行工具,虽然该ctr工具与 containerd 捆绑在一起,但应注意该ctr工具仅用于调试 containerd,用户体验并不好,不推荐使用。
查看命名空间
[root@k8sworker2 ~]# ctr ns list
NAME LABELS
moby
查看镜像
[root@k8sworker2 ~]# ctr i list
REF TYPE DIGEST SIZE PLATFORMS LABELS
5.2 使用nerdctl管理容器
5.2.1 安装nerdctl
因为containerd自带的命令行管理工具用户体验不好,所以Containerd 官方推出了一个新的 CLI 叫 nerdctl。nerdctl 的使用体验和 docker 一样顺滑,使用最广,推荐使用。
nerdctl是containerd的cli客户端工具,与docker cli语法大部分兼容,用法类似。需要两个安装包nerdctl-0.15.0-linux-amd64.tar.gz和cni-plugins-linux-amd64-v1.0.1.tgz ,两个安装包下载地址如下:
- nerdctl-0.15.0-linux-amd64.tar.gz下载地址:https://github.com/containerd/nerdctl/releases
- 网络插件cni-plugins-linux-amd64-v1.0.1.tgz 下载地址:https://github.com/containernetworking/plugins/releases
[root@k8sworker2 ~]# ll -h nerdctl-0.15.0-linux-amd64.tar.gz
-rw-r--r-- 1 root root 9.6M 1月   6 00:45 nerdctl-0.15.0-linux-amd64.tar.gz

[root@k8sworker2 ~]# ll -h cni-plugins-linux-amd64-v1.0.1.tgz
-rw-r--r-- 1 root root 36M 1月   6 00:59 cni-plugins-linux-amd64-v1.0.1.tgz
分别进行解压
[root@k8sworker2 ~]# tar xf nerdctl-0.15.0-linux-amd64.tar.gz -C /usr/local/bin/
[root@k8sworker2 ~]# ls /usr/local/bin/
containerd-rootless-setuptool.sh  containerd-rootless.sh  nerdctl

[root@k8sworker2 ~]# mkdir -p /opt/cni/bin
[root@k8sworker2 ~]# tar xf cni-plugins-linux-amd64-v1.0.1.tgz -C /opt/cni/bin/
[root@k8sworker2 ~]# ls /opt/cni/bin/
bandwidth  bridge  dhcp  firewall  host-device  host-local  ipvlan  loopback  macvlan  portmap  ptp  sbr  static  tuning  vlan  vrf
5.2.2 配置nerdctl命令tab键自动补全
先安装必要的依赖包
[root@k8sworker2 ~]# yum install -y epel-release bash-completion

[root@k8sworker2 ~]# source /usr/share/bash-completion/bash_completion
修改配置文件
[root@k8sworker2 ~]# source <(nerdctl completion bash)

#添加source <(nerdctl completion bash)到/etc/profile里
[root@k8sworker2 ~]# cat /etc/profile | head -3
# /etc/profile
source <(nerdctl completion bash)
使/etc/profile文件生效
[root@k8sworker2 buildtest]# source /etc/profile
此时nerdctl r按tab键就可以自动补全了
[root@k8sworker2 ~]# nerdctl r
restart  (Restart one or more running containers)
rmi      (Remove one or more images)
rm       (Remove one or more containers)
run      (Run a command in a new container. Optionally specify "ipfs://" or "ipns://" scheme to pull image from IPFS.)
5.2.3 nerdctl常用命令
nerdctl的命令和docker命令类似
#查看nerdctl版本
nerdctl version

#nerdctl run运行容器
nerdctl run -d -p 80:80 --name=nginx --restart=always nginx

#执行容器
nerdctl exec -it nginx /bin/sh

#列出正在运行的容器
nerdctl ps

#获取容器的详细信息
nerdctl inspect nginx

#获取容器日志
nerdctl logs -f nginx

#停止容器
nerdctl stop nginx

#删除容器
nerdctl rm -f nginx

#镜像列表
nerdctl images

#登录镜像仓库
nerdctl login --username xxx --password xxx  ip/主机名
nerdctl login --username xxx --password xxx  harbor.k8s.local

#注销退出登录
nerdctl logout

#拉取镜像
nerdctl pull busybox

#推送镜像
nerdctl push harbor.k8s.local/course/nginx:alpine

#给镜像起别名
nerdctl tag nginx:alpine harbor.k8s.local/course/nginx:alpine

#导出镜像为tar包
nerdctl save -o busybox.tar busybox:latest
nerdctl save hub.c.163.com/library/nginx:latest >nginx.tar

#删除镜像
nerdctl rmi busybox

#导入镜像
nerdctl load -i busybox.tar.gz

#查看数据卷
[root@k8sworker2 ~]# nerdctl volume list
VOLUME NAME    DIRECTORY

#查看网络
[root@k8sworker2 ~]# nerdctl network list
NETWORK ID    NAME               FILE
0             bridge
              k8s-pod-network    /etc/cni/net.d/10-calico.conflist
              host
              none

#查看命名空间
[root@k8sworker2 ~]# nerdctl namespace list
NAME        CONTAINERS    IMAGES    VOLUMES
buildkit    0             0         0
default     2             2         0
moby        0             0         0
5.2.4 使用nerdctl管理容器
查看镜像
[root@k8sworker2 ~]# nerdctl images
REPOSITORY    TAG    IMAGE ID    CREATED    PLATFORM    SIZE
拉取nginx镜像
[root@k8sworker2 ~]# nerdctl pull nginx
docker.io/library/nginx:latest:                                                   resolved       |++++++++++++++++++++++++++++++++++++++|
docker.io/library/nginx:latest:                                                   resolved
......
|++++++++++++++++++++++++++++++++++++++|
layer-sha256:a9edb18cadd1336142d6567ebee31be2a03c0905eeefe26cb150de7b0fbc520b:    done           |++++++++++++++++++++++++++++++++++++++|
layer-sha256:b4df32aa5a72e2a4316aad3414508ccd907d87b4ad177abd7cbd62fa4dab2a2f:    done           |++++++++++++++++++++++++++++++++++++++|
elapsed: 30.9s                                                                    total:  54.1 M (1.8 MiB/s)

[root@k8sworker2 ~]# nerdctl images
REPOSITORY    TAG       IMAGE ID        CREATED           PLATFORM       SIZE
nginx         latest    0d17b565c37b    40 seconds ago    linux/amd64    146.2 MiB
查看容器
#没有容器运行
[root@k8sworker2 ~]# nerdctl ps
CONTAINER ID    IMAGE    COMMAND    CREATED    STATUS    PORTS    NAMES
使用Nginx镜像创建一个容器,-p 80:80端口映射
[root@k8sworker2 ~]# nerdctl run -d --name=nginx --restart=always -p 80:80 nginx
5d1c3f1ca77f17d77f75895c29b6ce491d1921e61ad4f59f4ace3046436d10d4

[root@k8sworker2 ~]# nerdctl ps
CONTAINER ID    IMAGE                             COMMAND                   CREATED           STATUS    PORTS                 NAMES
5d1c3f1ca77f    docker.io/library/nginx:latest    "/docker-entrypoint.…"    17 seconds ago    Up        0.0.0.0:80->80/tcp    nginx
访问nginx容器:物理机IP:80端口
[root@k8sworker2 ~]# curl http://192.168.110.139:80
<!DOCTYPE html>
<html>
<head>
<title>Welcome to nginx!</title>
<style>
html { color-scheme: light dark; }
body {  35em; margin: 0 auto;
font-family: Tahoma, Verdana, Arial, sans-serif; }
</style>
</head>
<body>
<h1>Welcome to nginx!</h1>
<p>If you see this page, the nginx web server is successfully installed and
working. Further configuration is required.</p>

<p>For online documentation and support please refer to
<a href="http://nginx.org/">nginx.org</a>.<br/>
Commercial support is available at
<a href="http://nginx.com/">nginx.com</a>.</p>

<p><em>Thank you for using nginx.</em></p>
</body>
</html>
查看nerdctl信息
[root@k8sworker2 ~]# nerdctl info
Client:
 Namespace:	default
 Debug Mode:	false

Server:
 Server Version: 1.4.12
 Storage Driver: overlayfs
 Logging Driver: json-file
 Cgroup Driver: cgroupfs
 Cgroup Version: 1
 Plugins:
  Log: json-file
  Storage: native overlayfs
 Security Options:
  seccomp
   Profile: default
 Kernel Version: 3.10.0-693.el7.x86_64
 Operating System: CentOS Linux 7 (Core)
 OSType: linux
 Architecture: x86_64
 CPUs: 2
 Total Memory: 2.371GiB
 Name: k8sworker2
 ID: 160b58af-90bf-420f-99d3-ef2d4b9305ef
六.使用nerdctl构建镜像
nerdctl构建镜像和docker build类似,docker构建自定义镜像可以查看博客《构建自定义镜像并优化dockerfile文件》https://www.cnblogs.com/renshengdezheli/p/16645144.html
注意:使用nerdctl构建镜像需要提前安装buildkit
配置Dockerfile文件,此Dockerfile文件的意思是构建一个可以ssh的centos镜像,Dockerfile文件的具体解释请查看博客《构建自定义镜像并优化dockerfile文件》https://www.cnblogs.com/renshengdezheli/p/16645144.html
[root@k8sworker2 ~]# cat Dockerfile_ssh2
FROM hub.c.163.com/library/centos:latest
MAINTAINER LZ
RUN yum -y install openssh-server openssh-clients && \
    ssh-keygen -t rsa -f /etc/ssh/ssh_host_rsa_key && \
    ssh-keygen -t ecdsa -f /etc/ssh/ssh_host_ecdsa_key && \
    ssh-keygen -t ed25519 -f /etc/ssh/ssh_host_ed25519_key && \
    echo qweasd | passwd --stdin root && \
    sed -i '/UseDNS/cUseDNS no' /etc/ssh/sshd_config && \
    yum -y install net-tools && \
    yum -y install iproute && \
    yum clean all
EXPOSE 22
CMD ["/usr/sbin/sshd","-D"]
构建镜像
#构建镜像失败,报错依赖于buildkit
[root@k8sworker2 ~]# nerdctl build -t centos:ssh . -f Dockerfile_ssh2
FATA[0000] `buildctl` needs to be installed and `buildkitd` needs to be running, see https://github.com/moby/buildkit: exec: "buildctl": executable file not found in $PATH
6.1 安装buildkit
为了能使用nerdctl构建镜像,需要先安装buildkit
buildkit-v0.9.3.linux-amd64.tar.gz下载网址:https://github.com/moby/buildkit/releases/tag/v0.9.3
准备好buildkit安装包并解压
[root@k8sworker2 ~]# ll -h buildkit-v0.9.3.linux-amd64.tar.gz
-rw-r--r-- 1 root root 46M 1月   6 22:11 buildkit-v0.9.3.linux-amd64.tar.gz

#解压
[root@k8sworker2 ~]# tar xf buildkit-v0.9.3.linux-amd64.tar.gz -C /usr/local/bin/
[root@k8sworker2 ~]# ls /usr/local/bin/
bin  containerd-rootless-setuptool.sh  containerd-rootless.sh  nerdctl

[root@k8sworker2 ~]# ls /usr/local/bin/bin/
buildctl   buildkit-qemu-aarch64  buildkit-qemu-i386    buildkit-qemu-mips64el  buildkit-qemu-riscv64  buildkit-runc
buildkitd  buildkit-qemu-arm      buildkit-qemu-mips64  buildkit-qemu-ppc64le   buildkit-qemu-s390x
[root@k8sworker2 ~]# mv /usr/local/bin/bin/* /usr/local/bin/

[root@k8sworker2 ~]# ls /usr/local/bin/
bin       buildkitd              buildkit-qemu-arm   buildkit-qemu-mips64    buildkit-qemu-ppc64le  buildkit-qemu-s390x  containerd-rootless-setuptool.sh  nerdctl
buildctl  buildkit-qemu-aarch64  buildkit-qemu-i386  buildkit-qemu-mips64el  buildkit-qemu-riscv64  buildkit-runc        containerd-rootless.sh
配置buildkit使用systemd启动
[root@k8sworker2 buildtest]# cat /etc/systemd/system/buildkit.service
[Unit]
Description=BuildKit
Documentation=https://github.com/moby/buildkit

[Service]
ExecStart=/usr/local/bin/buildkitd --oci-worker=false --containerd-worker=true

[Install]
WantedBy=multi-user.target
确保/usr/local/bin/buildkitd这个可执行文件存在
[root@k8sworker2 ~]# ls /usr/local/bin/buildkitd
/usr/local/bin/buildkitd
重启加载配置文件
[root@k8sworker2 ~]# systemctl daemon-reload
配置buildkit开机自启动并现在启动buildkit
[root@k8sworker2 ~]# systemctl enable buildkit --now
Created symlink from /etc/systemd/system/multi-user.target.wants/buildkit.service to /etc/systemd/system/buildkit.service.

[root@k8sworker2 ~]# systemctl status buildkit
● buildkit.service - BuildKit
   Loaded: loaded (/etc/systemd/system/buildkit.service; enabled; vendor preset: disabled)
   Active: active (running) since 四 2022-01-06 22:18:45 CST; 9s ago
     Docs: https://github.com/moby/buildkit
 Main PID: 93007 (buildkitd)
   Memory: 10.6M
   CGroup: /system.slice/buildkit.service
           └─93007 /usr/local/bin/buildkitd --oci-worker=false --containerd-worker=true
可以查看buildkit的日志
[root@k8sworker2 ~]# journalctl -u buildkit
-- Logs begin at 三 2022-01-05 10:28:14 CST, end at 四 2022-01-06 22:19:31 CST. --
1月 06 22:18:45 k8sworker2 systemd[1]: Started BuildKit.
1月 06 22:18:45 k8sworker2 systemd[1]: Starting BuildKit...
1月 06 22:18:45 k8sworker2 buildkitd[93007]: time="2022-01-06T22:18:45+08:00" level=warning msg="using host network as the default"
1月 06 22:18:45 k8sworker2 buildkitd[93007]: time="2022-01-06T22:18:45+08:00" level=warning msg="git source cannot be enabled: failed to find git binary: exec: \"git\
1月 06 22:18:45 k8sworker2 buildkitd[93007]: time="2022-01-06T22:18:45+08:00" level=info msg="found worker \"bb19mi8dhi1sk5r4qn6wxic8e\", labels=map[org.mobyproject.b
1月 06 22:18:45 k8sworker2 buildkitd[93007]: time="2022-01-06T22:18:45+08:00" level=info msg="found 1 workers, default=\"bb19mi8dhi1sk5r4qn6wxic8e\""
1月 06 22:18:45 k8sworker2 buildkitd[93007]: time="2022-01-06T22:18:45+08:00" level=warning msg="currently, only the default worker can be used."
1月 06 22:18:45 k8sworker2 buildkitd[93007]: time="2022-01-06T22:18:45+08:00" level=info msg="running server on /run/buildkit/buildkitd.sock"
6.2 构建镜像
配置Dockerfile文件,此Dockerfile文件的意思是构建一个可以ssh的centos镜像
[root@k8sworker2 ~]# cat Dockerfile_ssh2
FROM hub.c.163.com/library/centos:latest
MAINTAINER LZ
RUN yum -y install openssh-server openssh-clients && \
    ssh-keygen -t rsa -f /etc/ssh/ssh_host_rsa_key && \
    ssh-keygen -t ecdsa -f /etc/ssh/ssh_host_ecdsa_key && \
    ssh-keygen -t ed25519 -f /etc/ssh/ssh_host_ed25519_key && \
    echo qweasd | passwd --stdin root && \
    sed -i '/UseDNS/cUseDNS no' /etc/ssh/sshd_config && \
    yum -y install net-tools && \
    yum -y install iproute && \
    yum clean all
EXPOSE 22
CMD ["/usr/sbin/sshd","-D"]
使用nerdctl根据Dockerfile_ssh2文件构建镜像
[root@k8sworker2 ~]# nerdctl build -t centos:ssh . -f Dockerfile_ssh2
[+] Building 35.1s (6/6) FINISHED
 => [internal] load build definition from Dockerfile_ssh2                                                                                                                                                   0.0s
 => => transferring dockerfile: 557B                                                                                                                                                                        0.0s
 => [internal] load .dockerignore                                                                                                                                                                           0.0s
 => => transferring context: 2B                                                                                                                                                                             0.0s
 => [internal] load metadata for hub.c.163.com/library/centos:latest                                                                                                                                        1.0s
 => CACHED [1/2] FROM hub.c.163.com/library/centos:latest@sha256:ab7e9c357fa8e5c822dd22615d3f704090780df1e089ac4ff8c6098f26a71fef                                                                           0.0s
 => => resolve hub.c.163.com/library/centos:latest@sha256:ab7e9c357fa8e5c822dd22615d3f704090780df1e089ac4ff8c6098f26a71fef                                                                                  0.2s
 => [2/2] RUN yum -y install openssh-server openssh-clients &&     ssh-keygen -t rsa -f /etc/ssh/ssh_host_rsa_key &&     ssh-keygen -t ecdsa -f /etc/ssh/ssh_host_ecdsa_key &&     ssh-keygen -t ed25519   27.3s
 => exporting to oci image format                                                                                                                                                                           6.6s
 => => exporting layers                                                                                                                                                                                     2.0s
 => => exporting manifest sha256:d250fe183c437af049cf0c03e616c543574f889d6f7c271c37918104537503ba                                                                                                           0.0s
 => => exporting config sha256:06aa9d95ed27cbb080d669c66131ae9975910efd34de434fc407b08da66e2a59                                                                                                             0.0s
 => => sending tarball                                                                                                                                                                                      4.6s
unpacking docker.io/library/centos:ssh (sha256:d250fe183c437af049cf0c03e616c543574f889d6f7c271c37918104537503ba)...done
可以看到镜像已经构建完毕,centos:ssh就是新构建的镜像
[root@k8sworker2 ~]# nerdctl images
REPOSITORY    TAG       IMAGE ID        CREATED           PLATFORM       SIZE
centos        ssh       d250fe183c43    16 seconds ago    linux/amd64    232.0 MiB
nginx         latest    0d17b565c37b    6 hours ago       linux/amd64    146.2 MiB
使用新构建的镜像centos:ssh创建容器
[root@k8sworker2 ~]# nerdctl run -d --name=centos-ssh --restart=always centos:ssh
baf0b7d8f067a12eb67576dbaf9249d8134f04a46df6d36b7c3d213065cdf44e
查看正在运行的容器
[root@k8sworker2 ~]# nerdctl ps
CONTAINER ID    IMAGE                             COMMAND                   CREATED          STATUS    PORTS                 NAMES
5d1c3f1ca77f    docker.io/library/nginx:latest    "/docker-entrypoint.…"    6 hours ago      Up        0.0.0.0:80->80/tcp    nginx
baf0b7d8f067    docker.io/library/centos:ssh      "/usr/sbin/sshd -D"       5 seconds ago    Up                              centos-ssh
查看容器centos-ssh的IP地址,IP地址为:10.4.0.6
[root@k8sworker2 ~]# nerdctl exec -it centos-ssh ip a
1: lo: <LOOPBACK,UP,LOWER_UP> mtu 65536 qdisc noqueue state UNKNOWN group default qlen 1
    link/loopback 00:00:00:00:00:00 brd 00:00:00:00:00:00
    inet 127.0.0.1/8 scope host lo
       valid_lft forever preferred_lft forever
    inet6 ::1/128 scope host
       valid_lft forever preferred_lft forever
2: eth0@if9: <BROADCAST,MULTICAST,UP,LOWER_UP> mtu 1500 qdisc noqueue state UP group default
    link/ether 66:ff:8f:43:5c:af brd ff:ff:ff:ff:ff:ff link-netnsid 0
    inet 10.4.0.6/24 brd 10.4.0.255 scope global eth0
       valid_lft forever preferred_lft forever
    inet6 fe80::64ff:8fff:fe43:5caf/64 scope link tentative dadfailed
       valid_lft forever preferred_lft forever
使用ssh连接容器centos-ssh,root密码为:qweasd
[root@k8sworker2 ~]# ssh root@10.4.0.6
The authenticity of host '10.4.0.6 (10.4.0.6)' can't be established.
ECDSA key fingerprint is SHA256:gaD8Yb7WsdXxXtAx1Iwz2zkvzhYPb4TqluriL39OzxM.
ECDSA key fingerprint is MD5:e8:32:27:d1:75:58:8f:b3:5b:71:43:e8:fd:cc:7d:ee.
Are you sure you want to continue connecting (yes/no)? yes
Warning: Permanently added '10.4.0.6' (ECDSA) to the list of known hosts.
root@10.4.0.6's password:

#成功ssh进入容器
[root@baf0b7d8f067 ~]# ip a
1: lo: <LOOPBACK,UP,LOWER_UP> mtu 65536 qdisc noqueue state UNKNOWN group default qlen 1
    link/loopback 00:00:00:00:00:00 brd 00:00:00:00:00:00
    inet 127.0.0.1/8 scope host lo
       valid_lft forever preferred_lft forever
    inet6 ::1/128 scope host
       valid_lft forever preferred_lft forever
2: eth0@if9: <BROADCAST,MULTICAST,UP,LOWER_UP> mtu 1500 qdisc noqueue state UP group default
    link/ether 66:ff:8f:43:5c:af brd ff:ff:ff:ff:ff:ff link-netnsid 0
    inet 10.4.0.6/24 brd 10.4.0.255 scope global eth0
       valid_lft forever preferred_lft forever
    inet6 fe80::64ff:8fff:fe43:5caf/64 scope link tentative dadfailed
       valid_lft forever preferred_lft forever

[root@baf0b7d8f067 ~]# exit
logout
Connection to 10.4.0.6 closed.