前面两篇文章,我们介绍了基于JAX-RS的REST服务以及Application的Rest服务。这里将介绍restlet如何整合spring框架进行开发。Spring 是一个开源框架,是为了解决企业应用程序开发复杂性而创建的,广泛的应用于应用项目中。本篇文章将在上篇的基础上面做介绍,将上篇文章的介绍的rest,用spring整合来实现。
一、基于spring配置的Rest简单服务
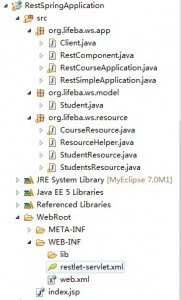
1、新建RestSpringApplication Web工程。
将restlet和spring的jar包复制进来。红色部分为新加入进来的jar包。
将上篇中的RestApplication工程项目中的src的源文件复制过来。
2、将web.xml加入下面代码
<servlet>
<servlet-name>restlet</servlet-name>
<servlet-class>
org.restlet.ext.spring.RestletFrameworkServlet
</servlet-class>
<init-param>
<param-name>org.restlet.component</param-name>
<param-value>restletComponent</param-value>
</init-param>
</servlet><servlet-mapping>
<servlet-name>restlet</servlet-name>
<url-pattern>/*</url-pattern>
</servlet-mapping>
上面代码指定了restlet使用spring的RestletFrameworkServlet。
3、建立restlet-servlet.xml文件,只需要配置org.restlet.ext.spring.SpringRouter,及对应的路径和资源文件。
<bean name="root">
<property name="attachments">
<map>
<entry key="/student/{studentId}">
<bean>
<lookup-method name="create" bean="StudentResource" />
</bean>
</entry>
<entry key="/student">
<bean>
<lookup-method name="create" bean="StudentsResource" />
</bean>
</entry></map>
</property>
</bean><bean id="StudentResource" class="org.lifeba.ws.resource.StudentResource" scope="prototype"/>
<bean id="StudentsResource" class="org.lifeba.ws.resource.StudentsResource" scope="prototype"/>
上面的代码配置了 /student/{studentId}对应StudentResource,以及student对应StudentsResource资源类。通过 SpringRouter可以非常方便的通过attachments配置资源路径。如果你有更多的路径,你可以建立多个entry即可。
4、好了,你现在可以重启tomcat了,输入 http://localhost:8085/RestSpringApplication/student/1 ,访问正常。
二、测试添加、删除、更新方法。
1、student_post方法,添加一个Student,成功后返回新建studentId为2的对象。
public void student_post(){
try {
Form queryForm = new Form();
queryForm.add("name","steven_spring");
queryForm.add("clsId","201002");
queryForm.add("sex","2");
queryForm.add("age","12");
ClientResource client = new ClientResource("http://localhost:8085/RestSpringApplication/student");
Representation representation =client.post(queryForm.getWebRepresentation());
System.out.println(representation.getText());
} catch (Exception e) {e.printStackTrace();
}
}
访问http://localhost:8085/RestSpringApplication/student/2
访问http://localhost:8085/RestSpringApplication/student ,可以看到有2个Student对象。
2、student_delete方法,删除Id为1的Student,成功执行后返回1。
public void student_delete(){
try {
ClientResource client = new ClientResource("http://localhost:8085/RestSpringApplication/student/1");
Representation representation =client.delete();
System.out.println(representation.getText());
} catch (Exception e) {
e.printStackTrace();
}
}
再次访问http://localhost:8085/RestSpringApplication/student,可以看到只有一个Id为2的Student对象。
3、student_put方法,更新Id为2的Student。
public void student_put(){
try {
Form queryForm = new Form();
queryForm.add("name","steven_spring_modify");
queryForm.add("clsId","201012");
queryForm.add("sex","12");
queryForm.add("age","24");ClientResource client = new ClientResource("http://localhost:8085/RestSpringApplication/student/2");
Representation representation =client.put(queryForm);
System.out.println(representation.getText());
} catch (Exception e) {
e.printStackTrace();
}
}
访问http://localhost:8085/RestSpringApplication/student/2
通过上面的代码已经完全实现了Spring中的restlet的配置。上面只对Student对象做了介绍,你也可以实现对Course在spring中配置,基本方法一样。这里不再阐述。
三、资源工程下载


