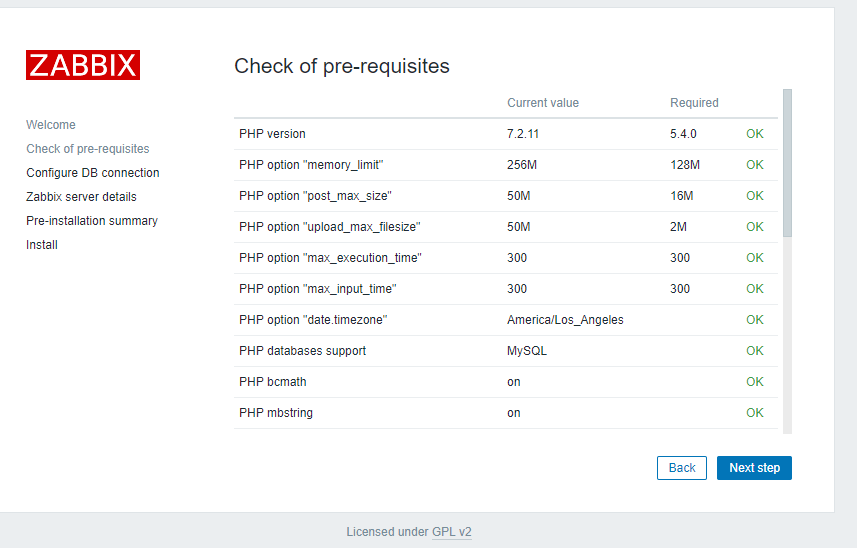
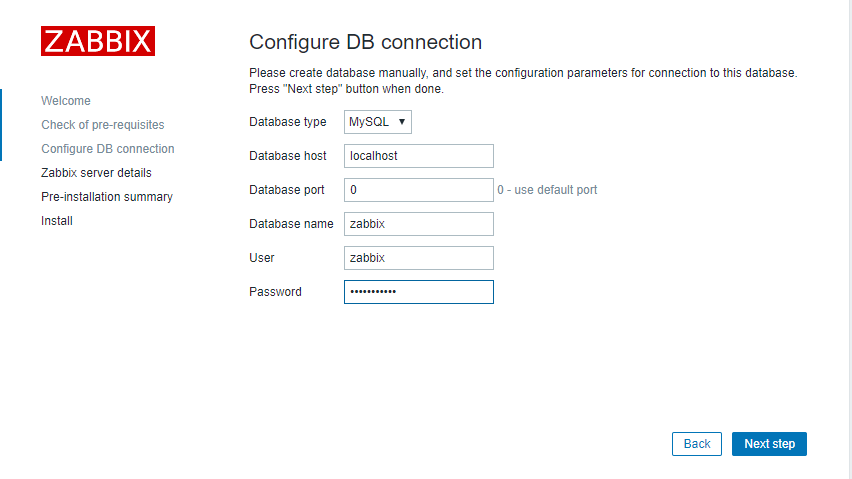
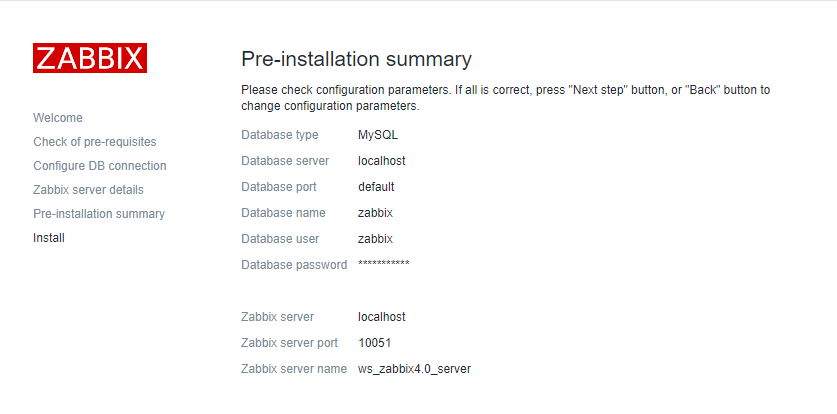
一、安装数据库,这里使用的是percona-server5.7.24版本 配置如下 [root@zabbix4_clone:~]# cat /etc/my.cnf # Example MySQL config file for medium systems. # 8核 16G # This is for a system with little memory (16G) where MySQL plays [client] #password = your_password port = 3306 socket = /tmp/mysql.sock # The MySQL server [mysqld] user = mysql port = 3306 bind-address = 0.0.0.0 socket = /tmp/mysql.sock datadir = /data/mysql_data pid-file = /data/mysql_data/mysql.pid basedir = /usr/local/mysql tmpdir = /tmp #此开关默认为NULL,即不允许导入导出。 #secure-file-priv = /opt/upload #-------------------------------gobal variables------------------------# #默认关闭,涉及到timestamp类型的列自动更新的问题 explicit_defaults_for_timestamp = 1 ###transaction_write_set_extraction = XXHASH64 #以便在server收集写集合的同时将其记录到二进制日志。并且是行更改后的唯一标识此标识将用于检测冲突。 ###loose-group_replication_group_name = 'ce9be252-2b71-11e6-b8f4-00212889f856' #组的名字可以随便起,但不能用主机的GTID ###loose-group_replication_start_on_boot = off #为了避免每次启动自动引导具有相同名称的第二个组,所以设置为OFF。 ###loose-group_replication_bootstrap_group = off #同上 ###loose-group_replication_local_address = '192.168.1.88:33071' #写自己主机所在IP ###loose-group_replication_group_seeds ='192.168.1.88:33071,192.168.1.89:33071,192.168.1.90:33071' ###loose-group_replication_single_primary_mode = off #关闭单主模式的参数 ###loose-group_replication_enforce_update_everywhere_checks = on #开启多主模式的参数 skip-external-locking skip-name-resolve skip-ssl #memory is 16G key_buffer_size = 32M table_open_cache = 2048 table_definition_cache = 1024 sort_buffer_size = 4M net_buffer_length = 32K read_buffer_size = 4M read_rnd_buffer_size = 16M open_files_limit = 10000 thread_cache_size = 400 query_cache_type = 0 query_cache_size = 32M max_write_lock_count = 300 wait_timeout = 120 interactive_timeout = 120 net_read_timeout = 120 net_write_timeout = 120 max_connections = 800 max_user_connections = 750 max_connect_errors = 10000 max_allowed_packet = 256M back_log = 2048 log_timestamps = system performance_schema = OFF character_set_server = utf8mb4 ##当链接数耗尽后,通过设置别用端口,让root可以登录 extra_max_connections = 2 extra_port = 13306 ###让mysql不区分大小写敏感 lower_case_table_names = 1 #explicit_defaults_for_timestamp = 1 #----------------Myisam--------------------------------# myisam_recover_options = DEFAULT bulk_insert_buffer_size = 32M myisam_sort_buffer_size = 64M myisam_max_sort_file_size = 256M myisam_repair_threads = 1 #if the query is exec time great than 2 seconds, the query will log to slow log if slowlog is enabled. long_query_time = 1 slow_query_log = On slow-query-log-file = /data/mysql_data/slow.log show_compatibility_56 = on # Don't listen on a TCP/IP port at all. This can be a security enhancement, # if all processes that need to connect to mysqld run on the same host. # All interaction with mysqld must be made via Unix sockets or named pipes. # Note that using this option without enabling named pipes on Windows # (via the "enable-named-pipe" option) will render mysqld useless! # #skip-networking #----------------------------MySQL Log----------------# # Replication Master Server (default) # binary logging is required for replication log-bin = mysql-bin expire_logs_days = 20 log_error = error.log log_error_verbosity = 1 log_warnings = 1 # binary logging format - mixed recommended binlog_format = row relay-log = mysql-relay-bin relay-log-index = relay.index # required unique id between 1 and 2^32 - 1 server-id = 1 #sql-mode = "NO_AUTO_CREATE_USER,NO_ENGINE_SUBSTITUTION" #sql-mode = "NO_AUTO_CREATE_USER,NO_ENGINE_SUBSTITUTION" sync_binlog = 1 log_slave_updates = 1 #binlog_checksum = NONE #------------------------------replicate--------------# #排除不需要同步的库表 #replicate-ignore-db = mysql #replicate-ignore-db = sys replicate-ignore-db = information_schema replicate-ignore-db = performance_schema replicate-ignore-db = undolog replicate-ignore-db = for_nagios replicate-ignore-db = undolog #replicate_wild_ignore_table = mysql.% #replicate_wild_ignore_table = sys.% replicate_wild_ignore_table = information_schema.% replicate_wild_ignore_table = performance_schema.% replicate_wild_ignore_table = undolog.% replicate_wild_ignore_table = for_nagios.% replicate_wild_ignore_table = undolog.% #主主复制需要开启 #auto_increment_offset= 2 #auto_increment_increment= 2 #GTID模式复制,需要开启如下 gtid_mode = ON enforce_gtid_consistency = ON #并发复制 slave-parallel-type = LOGICAL_CLOCK slave-parallel-workers = 2 master_info_repository = TABLE relay_log_info_repository = TABLE relay_log_recovery = ON #跳过slave进程启动参数 skip-slave-start #如果实例为从库,则需要设置为on #read_only = on #skip-grant-tables #--------------------------------------------------------innoDB------------# innodb_rollback_on_timeout # Uncomment the following if you are using InnoDB tables innodb_data_home_dir = /data/mysql_data innodb_data_file_path = ibdata1:1G;ibdata2:1G:autoextend innodb_log_group_home_dir = /data/mysql_data innodb_undo_directory = /data/mysql_data/undolog/ innodb_undo_logs = 128 innodb_undo_tablespaces = 3 # You can set .._buffer_pool_size up to 50 - 80 % #innodb_use_sys_malloc = 0 #innodb_page_size = 8192 innodb_buffer_pool_size = 2G innodb_buffer_pool_instances = 1 #innodb_additional_mem_pool_size = 8M # Set .._log_file_size to 25 % of buffer pool size innodb_log_file_size = 256M innodb_log_buffer_size = 64M innodb_log_files_in_group = 3 #每次事务提交时MySQL都会把log buffer的数据写入log file,并且flush(刷到磁盘)中去,该模式为系统默认 innodb_flush_log_at_trx_commit = 1 innodb_lock_wait_timeout = 120 #启用独立表空间 innodb_file_per_table = 1 #CPU是1颗8核的,那么可以设置 innodb_read_io_threads = 8 innodb_write_io_threads = 8 #默认是0,则表示没有并发线程数限制,所有请求都会直接请求线程执行,当并发用户线程数量小于64,建议设置innodb_thread_concurrency=0,在大多数情况下,最佳的值是小于并接近虚拟CPU的个数 innodb_thread_concurrency = 12 innodb_max_dirty_pages_pct = 75 innodb_flush_method = O_DIRECT innodb_purge_threads = 10 innodb_large_prefix = 1 #参数待测试 #innodb_io_capacity = 20000 #innodb_io_capacity_max = 40000 #根据CPU核心数来设定 thread_pool_size = 8 #thread_handling = pool-of-threads thread_pool_oversubscribe = 24 #thread_handling = pool-of-threads thread_pool_stall_limit = 100 thread_pool_max_threads = 30 #解释: 在启动时把热数据加载到内存。 innodb_buffer_pool_load_at_startup = 1 #解释: 在关闭时把热数据dump到本地磁盘 innodb_buffer_pool_dump_at_shutdown = 1 ##默认是8M, 如果一次insert数据量比较多的话, 可以适当增加 innodb_autoextend_increment = 32 [mysqldump] quick max_allowed_packet = 256M [mysql] no-auto-rehash # Remove the next comment character if you are not familiar with SQL #safe-updates [myisamchk] #key_buffer_size = 20M #sort_buffer_size = 20M key_buffer_size = 200M sort_buffer_size = 200M read_buffer = 2M write_buffer = 2M [mysqld_safe] #控制文件打开数的show global status like 'open%file%';比较合适的设置:Open_files / open_files_limit * 100% <= 75% open-files-limit = 65535 log-error = /data/mysql_data/error.log [mysqlhotcopy] interactive-timeout # 初始化语句 /usr/local/mysql/bin/mysqld --initialize-insecure --user=mysql --basedir=/usr/local/mysql --datadir=/data/mysql_data 2.启动数据库服务 # /etc/init.d/mysql start [root@zabbix4_clone:~]# ss -tuanlp|grep 3306 tcp LISTEN 0 2048 *:3306 *:* users:(("mysqld",pid=35200,fd=170)) tcp LISTEN 0 2048 *:13306 *:* users:(("mysqld",pid=35200,fd=184)) ####启动脚本 [root@zabbix4_clone:~]# cat /etc/init.d/mysql #!/bin/sh # Copyright Abandoned 1996 TCX DataKonsult AB & Monty Program KB & Detron HB # This file is public domain and comes with NO WARRANTY of any kind # MySQL (Percona Server) daemon start/stop script. # Usually this is put in /etc/init.d (at least on machines SYSV R4 based # systems) and linked to /etc/rc3.d/S99mysql and /etc/rc0.d/K01mysql. # When this is done the mysql server will be started when the machine is # started and shut down when the systems goes down. # Comments to support chkconfig on RedHat Linux # chkconfig: 2345 64 36 # description: A very fast and reliable SQL database engine. # Comments to support LSB init script conventions ### BEGIN INIT INFO # Provides: mysql # Required-Start: $local_fs $network $remote_fs # Should-Start: ypbind nscd ldap ntpd xntpd # Required-Stop: $local_fs $network $remote_fs # Default-Start: 2 3 4 5 # Default-Stop: 0 1 6 # Short-Description: start and stop MySQL (Percona Server) # Description: Percona-Server is a SQL database engine with focus on high performance. ### END INIT INFO # If you install MySQL on some other places than /usr/local/percona-server-5.7.24, then you # have to do one of the following things for this script to work: # # - Run this script from within the MySQL installation directory # - Create a /etc/my.cnf file with the following information: # [mysqld] # basedir=<path-to-mysql-installation-directory> # - Add the above to any other configuration file (for example ~/.my.ini) # and copy my_print_defaults to /usr/bin # - Add the path to the mysql-installation-directory to the basedir variable # below. # # If you want to affect other MySQL variables, you should make your changes # in the /etc/my.cnf, ~/.my.cnf or other MySQL configuration files. # If you change base dir, you must also change datadir. These may get # overwritten by settings in the MySQL configuration files. basedir= datadir= # Default value, in seconds, afterwhich the script should timeout waiting # for server start. # Value here is overriden by value in my.cnf. # 0 means don't wait at all # Negative numbers mean to wait indefinitely service_startup_timeout=900 # Lock directory for RedHat / SuSE. lockdir='/var/lock/subsys' lock_file_path="$lockdir/mysql" # The following variables are only set for letting mysql.server find things. # Set some defaults mysqld_pid_file_path= if test -z "$basedir" then basedir=/usr/local/percona-server-5.7.24 bindir=/usr/local/percona-server-5.7.24/bin if test -z "$datadir" then datadir=/data/mysql_data fi sbindir=/usr/local/percona-server-5.7.24/bin libexecdir=/usr/local/percona-server-5.7.24/bin else bindir="$basedir/bin" if test -z "$datadir" then datadir="$basedir/data" fi sbindir="$basedir/sbin" libexecdir="$basedir/libexec" fi # datadir_set is used to determine if datadir was set (and so should be # *not* set inside of the --basedir= handler.) datadir_set= # # Use LSB init script functions for printing messages, if possible # lsb_functions="/lib/lsb/init-functions" if test -f $lsb_functions ; then . $lsb_functions else log_success_msg() { echo " SUCCESS! $@" } log_failure_msg() { echo " ERROR! $@" } fi PATH="/sbin:/usr/sbin:/bin:/usr/bin:$basedir/bin" export PATH mode=$1 # start or stop [ $# -ge 1 ] && shift other_args="$*" # uncommon, but needed when called from an RPM upgrade action # Expected: "--skip-networking --skip-grant-tables" # They are not checked here, intentionally, as it is the resposibility # of the "spec" file author to give correct arguments only. case `echo "testingc"`,`echo -n testing` in *c*,-n*) echo_n= echo_c= ;; *c*,*) echo_n=-n echo_c= ;; *) echo_n= echo_c='c' ;; esac parse_server_arguments() { for arg do case "$arg" in --basedir=*) basedir=`echo "$arg" | sed -e 's/^[^=]*=//'` bindir="$basedir/bin" if test -z "$datadir_set"; then datadir="$basedir/data" fi sbindir="$basedir/sbin" libexecdir="$basedir/libexec" ;; --datadir=*) datadir=`echo "$arg" | sed -e 's/^[^=]*=//'` datadir_set=1 ;; --pid-file=*) mysqld_pid_file_path=`echo "$arg" | sed -e 's/^[^=]*=//'` ;; --service-startup-timeout=*) service_startup_timeout=`echo "$arg" | sed -e 's/^[^=]*=//'` ;; esac done } wait_for_pid () { verb="$1" # created | removed pid="$2" # process ID of the program operating on the pid-file pid_file_path="$3" # path to the PID file. i=0 avoid_race_condition="by checking again" while test $i -ne $service_startup_timeout ; do case "$verb" in 'created') # wait for a PID-file to pop into existence. test -s "$pid_file_path" && i='' && break ;; 'removed') # wait for this PID-file to disappear test ! -s "$pid_file_path" && i='' && break ;; *) echo "wait_for_pid () usage: wait_for_pid created|removed pid pid_file_path" exit 1 ;; esac # if server isn't running, then pid-file will never be updated if test -n "$pid"; then if kill -0 "$pid" 2>/dev/null; then : # the server still runs else # The server may have exited between the last pid-file check and now. if test -n "$avoid_race_condition"; then avoid_race_condition="" continue # Check again. fi # there's nothing that will affect the file. log_failure_msg "The server quit without updating PID file ($pid_file_path)." return 1 # not waiting any more. fi fi echo $echo_n ".$echo_c" i=`expr $i + 1` sleep 1 done if test -z "$i" ; then log_success_msg return 0 else log_failure_msg return 1 fi } # Get arguments from the my.cnf file, # the only group, which is read from now on is [mysqld] if test -x "$bindir/my_print_defaults"; then print_defaults="$bindir/my_print_defaults" else # Try to find basedir in /etc/my.cnf conf=/etc/my.cnf print_defaults= if test -r $conf then subpat='^[^=]*basedir[^=]*=(.*)$' dirs=`sed -e "/$subpat/!d" -e 's//1/' $conf` for d in $dirs do d=`echo $d | sed -e 's/[ ]//g'` if test -x "$d/bin/my_print_defaults" then print_defaults="$d/bin/my_print_defaults" break fi done fi # Hope it's in the PATH ... but I doubt it test -z "$print_defaults" && print_defaults="my_print_defaults" fi # # Read defaults file from 'basedir'. If there is no defaults file there # check if it's in the old (depricated) place (datadir) and read it from there # extra_args="" if test -r "$basedir/my.cnf" then extra_args="-e $basedir/my.cnf" fi parse_server_arguments `$print_defaults $extra_args mysqld server mysql_server mysql.server` # # Set pid file if not given # if test -z "$mysqld_pid_file_path" then mysqld_pid_file_path=$datadir/`hostname`.pid else case "$mysqld_pid_file_path" in /* ) ;; * ) mysqld_pid_file_path="$datadir/$mysqld_pid_file_path" ;; esac fi case "$mode" in 'start') # Start daemon # Safeguard (relative paths, core dumps..) cd $basedir echo $echo_n "Starting MySQL (Percona Server)" if test -x $bindir/mysqld_safe then # Give extra arguments to mysqld with the my.cnf file. This script # may be overwritten at next upgrade. $bindir/mysqld_safe --datadir="$datadir" --pid-file="$mysqld_pid_file_path" $other_args >/dev/null & wait_for_pid created "$!" "$mysqld_pid_file_path"; return_value=$? # Make lock for RedHat / SuSE if test -w "$lockdir" then touch "$lock_file_path" fi exit $return_value else log_failure_msg "Couldn't find MySQL server ($bindir/mysqld_safe)" fi ;; 'stop') # Stop daemon. We use a signal here to avoid having to know the # root password. if test -s "$mysqld_pid_file_path" then # signal mysqld_safe that it needs to stop touch "$mysqld_pid_file_path.shutdown" mysqld_pid=`cat "$mysqld_pid_file_path"` if (kill -0 $mysqld_pid 2>/dev/null) then echo $echo_n "Shutting down MySQL (Percona Server)" kill $mysqld_pid # mysqld should remove the pid file when it exits, so wait for it. wait_for_pid removed "$mysqld_pid" "$mysqld_pid_file_path"; return_value=$? else log_failure_msg "MySQL (Percona Server) server process #$mysqld_pid is not running!" rm "$mysqld_pid_file_path" fi # Delete lock for RedHat / SuSE if test -f "$lock_file_path" then rm -f "$lock_file_path" fi exit $return_value else log_failure_msg "MySQL (Percona Server) PID file could not be found!" fi ;; 'restart') # Stop the service and regardless of whether it was # running or not, start it again. if $0 stop $other_args; then $0 start $other_args else log_failure_msg "Failed to stop running server, so refusing to try to start." exit 1 fi ;; 'reload'|'force-reload') if test -s "$mysqld_pid_file_path" ; then read mysqld_pid < "$mysqld_pid_file_path" kill -HUP $mysqld_pid && log_success_msg "Reloading service MySQL (Percona Server)" touch "$mysqld_pid_file_path" else log_failure_msg "MySQL (Percona Server) PID file could not be found!" exit 1 fi ;; 'status') # First, check to see if pid file exists if test -s "$mysqld_pid_file_path" ; then read mysqld_pid < "$mysqld_pid_file_path" if kill -0 $mysqld_pid 2>/dev/null ; then log_success_msg "MySQL (Percona Server) running ($mysqld_pid)" exit 0 else log_failure_msg "MySQL (Percona Server) is not running, but PID file exists" exit 1 fi else # Try to find appropriate mysqld process mysqld_pid=`pidof $libexecdir/mysqld` # test if multiple pids exist pid_count=`echo $mysqld_pid | wc -w` if test $pid_count -gt 1 ; then log_failure_msg "Multiple MySQL running but PID file could not be found ($mysqld_pid)" exit 5 elif test -z $mysqld_pid ; then if test -f "$lock_file_path" ; then log_failure_msg "MySQL (Percona Server) is not running, but lock file ($lock_file_path) exists" exit 2 fi log_failure_msg "MySQL (Percona Server) is not running" exit 3 else log_failure_msg "MySQL (Percona Server) is running but PID file could not be found" exit 4 fi fi ;; *) # usage basename=`basename "$0"` echo "Usage: $basename {start|stop|restart|reload|force-reload|status} [ MySQL (Percona Server) options ]" exit 1 ;; esac exit 0 3.创建zabbix库 mysql> create database zabbix character set utf8 collate utf8_bin; 给zabbix库授权并指定用户 mysql> grant all privileges on zabbix.* to zabbix@'localhost' identified by 'zabbix'; 4.在zabbix server主机上导入zabbix自带的三个表,路径在zabbix4.0.10源码目录database/mysql下后缀为.sql的三个文件 [root@zabbix4_clone:~]# ll /usr/local/src/zabbix-4.0.10/database/mysql/ total 7260 -rw-r--r-- 1 1001 mysql 3957065 Jun 26 04:20 data.sql -rw-r--r-- 1 1001 mysql 1978341 Jun 26 04:20 images.sql -rw-r--r-- 1 root root 15585 Jun 26 23:24 Makefile -rw-r--r-- 1 1001 mysql 392 Jun 26 04:20 Makefile.am -rw-r--r-- 1 1001 mysql 15711 Jun 26 04:20 Makefile.in -rw-r--r-- 1 1001 mysql 140265 Jun 26 04:20 schema.sql 5.导入sql文件是有先后顺序的,先导schema.sql、images.sql、data.sql. [root@ws_zabbix4:/usr/local/src]# cd zabbix-4.0.10/database/mysql/ [root@ws_zabbix4:/usr/local/src/zabbix-4.0.10/database/mysql]# ls data.sql images.sql Makefile.am Makefile.in schema.sql [root@ws_zabbix4:/usr/local/src/zabbix-4.0.10/database/mysql]# mysql -uzabbix -p'zabbix' zabbix < schema.sql [root@ws_zabbix4:/usr/local/src/zabbix-4.0.10/database/mysql]# mysql -uzabbix -p'zabbix' zabbix < images.sql [root@ws_zabbix4:/usr/local/src/zabbix-4.0.10/database/mysql]# mysql -uzabbix -p'zabbix' zabbix < data.sql 二、zabbix服务端的编译安装 1.安装编译环境所需要的依赖包组 #yum install gcc libxml2-devel libevent-devel net-snmp net-snmp-devel curl curl-devel php php-bcmath php-mbstring php-gettext php-session php-ctype php-xmlreader php-xmlwrer php-xml php-net-socket php-gd php-mysql -y 2.创建zabbix用户useradd zabbix -s /sbin/nologin 3.下载源码包,解压,编译 # wget https://sourceforge.net/projects/zabbix/files/ZABBIX%20Latest%20Stable/4.0.10/zabbix-4.0.10.tar.gz/download # tar xf zabbix-4.0.10.tar.gz 4.编译安装zabbix4.0.10 ./configure --prefix=/usr/local/zabbix4.0.10 --enable-server --enable-agent --with-mysql --enable-ipv6 --with-net-snmp --with-libcurl --with-libxml2 --enable-java # 编译报错 ... checking for libperfstat 5.2.0.40 fileset... no checking for libperfstat 5.3.0.60 fileset... no checking for architecture... linux (linux-gnu) checking for the linux kernel version... unknown family (3.10.0-957.el7.x86_64) checking size of void *... 8 checking for mysql_config... /usr/local/mysql/bin/mysql_config checking for main in -lperconaserverclient... no configure: error: Not found perconaserverclient library # 查找perconaserverclient.so 文件 # [root@ws_zabbix4:/usr/local/src/zabbix-4.0.10]# locate perconaserverclient /usr/local/Percona-Server-5.7.24_解压版/lib/libperconaserverclient.a /usr/local/Percona-Server-5.7.24_解压版/lib/libperconaserverclient.so /usr/local/Percona-Server-5.7.24_解压版/lib/libperconaserverclient.so.20 /usr/local/Percona-Server-5.7.24_解压版/lib/libperconaserverclient.so.20.3.11 /usr/local/Percona-Server-5.7.24_解压版/lib/pkgconfig/perconaserverclient.pc /usr/local/bak_percona-server-5.7.24/lib/libperconaserverclient.a /usr/local/bak_percona-server-5.7.24/lib/libperconaserverclient.so /usr/local/bak_percona-server-5.7.24/lib/libperconaserverclient.so.20 /usr/local/bak_percona-server-5.7.24/lib/libperconaserverclient.so.20.3.11 /usr/local/bak_percona-server-5.7.24/lib/pkgconfig/perconaserverclient.pc /usr/local/percona-server-5.7.14/lib/libperconaserverclient.a /usr/local/percona-server-5.7.14/lib/libperconaserverclient.so /usr/local/percona-server-5.7.14/lib/libperconaserverclient.so.20 /usr/local/percona-server-5.7.14/lib/libperconaserverclient.so.20.3.1 /usr/local/percona-server-5.7.14/lib/pkgconfig/perconaserverclient.pc /usr/local/percona-server-5.7.24/lib/libperconaserverclient.a /usr/local/percona-server-5.7.24/lib/libperconaserverclient.so /usr/local/percona-server-5.7.24/lib/libperconaserverclient.so.20 /usr/local/percona-server-5.7.24/lib/libperconaserverclient.so.20.3.11 /usr/local/percona-server-5.7.24/lib/pkgconfig/perconaserverclient.pc # 生成软连接,问题解决 [root@ws_zabbix4:/usr/local/src/zabbix-4.0.10]# ln -s /usr/local/mysql/lib/libperconaserverclient.so /usr/lib64/mysql/libperconaserverclient.so [root@ws_zabbix4:/usr/local/src/zabbix-4.0.10]# ln -s /usr/local/mysql/lib/libperconaserverclient.so /usr/lib/libperconaserverclient.so 5.执行make && make install #make -j 4 && make install 6.拷贝启动脚本文件到/etc/init.d目录下 #cp misc/init.d/fedora/core/* /etc/init.d/ 7.拷贝过去的脚本需要修改下目录路径,server和agent都需要改 # cd /usr/local # ln -s zabbix4.0.10 zabbix #vim /etc/init.d/zabbix_server 22 BASEDIR=/usr/local 改成: 22 BASEDIR=/usr/local/zabbix 8.创建zabbix的日志存放路径和修改/usr/local/zabbix的所属主为zabbix useradd zabbix -s /sbin/nologin # mkdir /var/log/zabbix # chown -R zabbix.zabbix /var/log/zabbix # chown -R zabbix.zabbix /usr/local/zabbix/ 9.修改配置文件 [root@ws_zabbix4:/usr/local/src/zabbix-4.0.10]# egrep -v '^#|^$' /usr/local/zabbix/etc/zabbix_server.conf LogFileSize=10 开启日志滚动,单位为MB、达到指定值之后就生成新的日志文件。 ListenPort=10051 LogFile=/var/log/zabbix/zabbix_server.log 修改日志存放路径 DBName=zabbix DBUser=zabbix DBSocket=/tmp/mysql.sock DBPort=3306 StartPollers=30 StartTrappers=30 StartVMwareCollectors=20 VMwareFrequency=20 VMwarePerfFrequency=20 VMwareCacheSize=64M VMwareTimeout=30 ListenIP=0.0.0.0 HousekeepingFrequency=12 CacheSize=256M Timeout=15 AlertScriptsPath=/usr/local/zabbix/share/zabbix/alertscripts ExternalScripts=/usr/local/zabbix/share/zabbix/externalscripts LogSlowQueries=3000 StartProxyPollers=20 10.启动zabbix、并查看端口是否正常监听 # 通过启动脚本启动,看不到端口 # /etc/init.d/zabbix_server start # 直接使用sbin下的可执行程序启动,定位错误 [root@ws_zabbix4:/usr/local]# /usr/local/zabbix/sbin/zabbix_server [root@ws_zabbix4:/usr/local]# zabbix_server [40848]: cannot open "/var/log/zabbix/zabbix_server.log": [13] Permission denied chown -R zabbix.zabbix /var/log/zabbix/ # 再次启动成功 [root@ws_zabbix4:/usr/local]# netstat -tnlp | grep 10051 tcp 0 0 0.0.0.0:10051 0.0.0.0:* LISTEN 41018/zabbix_server 安装nginx yum install -y nginx # 修改php.ini参数 max_input_time=300 11.创建一个zabbix前端页面存放目录 # mkdir /data/www/vhosts/zabbix.chinasoft.com 12从zabbix解压包里面把php的所有文件拷贝到/var/www/html/zabbix目录下 # cp -ar frontends/php/* /data/www/vhosts/zabbix.chinasoft.com 13.通过网页来安装zabbix默认账号Admin 密码 zabbix
nginx配置文件
[root@zabbix4_clone:~]# cat /usr/local/nginx/conf/vhost.d/zabbix.chinasoft.com.conf
server
{
    listen      80;
    server_name  zabbix.chinasoft.com;
    index index.php index.html index.htm;
    root   /data/www/vhosts/zabbix.chinasoft.com/httpdocs;
    access_log /data/www/logs/zabbix/access_zabbix.log  combined;
    error_log  /data/www/logs/zabbix/error_zabbix.log;

    #expires
    location ~ .*.(gif|jpg|jpeg|png|bmp|swf)$
    {
        expires 30d;
    }

    location ~ .*.(js|css)?$
    {
        expires      24h;
    }

    location /webstatus {
        stub_status on;
        access_log off;
    }

    # location ~* ^/(attachments|images)/.*.(php|php5)$
    # {
    #    deny all;
    # }

    location ~ .*.php?$
    {
        fastcgi_pass 127.0.0.1:9000;
        #fastcgi_pass unix:/tmp/php-fcgi.sock;
        #fastcgi_pass php;
        fastcgi_index index.php;
        fastcgi_param  SCRIPT_FILENAME    $document_root$fastcgi_script_name;
        include fastcgi_params;
    }

}
客户端启动脚本
[root@:~]# cat /etc/init.d/zabbix_agentd
#!/bin/bash
#
# chkconfig: - 90 10
# description:  Starts and stops Zabbix Agent using chkconfig
#                Tested on Fedora Core 2 - 5
#                Should work on all Fedora Core versions
#
# @name:    zabbix_agentd
# @author:    Alexander Hagenah <hagenah@topconcepts.com>
# @created:    18.04.2006
#
# Modified for Zabbix 2.0.0
# May 2012, Zabbix SIA
#
# Source function library.
. /etc/init.d/functions

# Variables
# Edit these to match your system settings

    # Zabbix-Directory
    BASEDIR=/usr/local/zabbix_agents_3.2.0

    # Binary File
    BINARY_NAME=zabbix_agentd

    # Full Binary File Call
    FULLPATH=$BASEDIR/sbin/$BINARY_NAME

    # PID file
    PIDFILE=/tmp/$BINARY_NAME.pid

    # Establish args
    ERROR=0
    STOPPING=0

#
# No need to edit the things below
#

# application checking status
if [ -f $PIDFILE  ] && [ -s $PIDFILE ]
    then
    PID=`cat $PIDFILE`

    if [ "x$PID" != "x" ] && kill -0 $PID 2>/dev/null && [ $BINARY_NAME == `ps -e | grep $PID | awk '{print $4}'` ]
    then
        STATUS="$BINARY_NAME (pid `pidof $APP`) running.."
        RUNNING=1
    else
        rm -f $PIDFILE
        STATUS="$BINARY_NAME (pid file existed ($PID) and now removed) not running.."
        RUNNING=0
    fi
else
    if [ `ps -e | grep $BINARY_NAME | head -1 | awk '{ print $1 }'` ]
        then
        STATUS="$BINARY_NAME (pid `pidof $APP`, but no pid file) running.."
    else
        STATUS="$BINARY_NAME (no pid file) not running"
    fi
    RUNNING=0
fi

# functions
start() {
    if [ $RUNNING -eq 1 ]
        then
        echo "$0 $ARG: $BINARY_NAME (pid $PID) already running"
    else
        action $"Starting $BINARY_NAME: " $FULLPATH
        touch /var/lock/subsys/$BINARY_NAME
    fi
}

stop() {
    echo -n $"Shutting down $BINARY_NAME: "
    killproc $BINARY_NAME
    RETVAL=$?
    echo
    [ $RETVAL -eq 0 ] && rm -f /var/lock/subsys/$BINARY_NAME
    RUNNING=0
}


# logic
case "$1" in
    start)
        start
        ;;
    stop)
        stop
        ;;
    status)
        status $BINARY_NAME
        ;;
    restart)
        stop
        sleep 2
        start
        ;;
    help|*)
        echo $"Usage: $0 {start|stop|status|restart|help}"
        cat <<EOF

            start        - start $BINARY_NAME
            stop        - stop $BINARY_NAME
            status        - show current status of $BINARY_NAME
            restart        - restart $BINARY_NAME if running by sending a SIGHUP or start if not running
            help        - this screen

EOF
    exit 1
    ;;
esac

exit 0