1. OS模块与shutil模块
os :新建/删除
shutil: 复制/移动
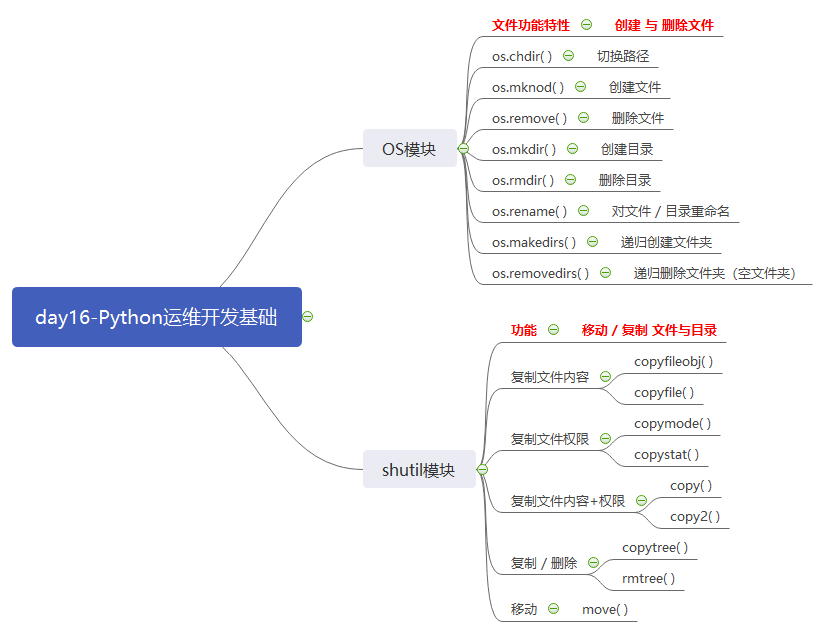


# ### os模块 与 shutil模块
"""
os     新建/删除
shutil 复制/移动
"""
import os
os.chdir("/home/wangwen/mywork")

#os.mknod   创建文件
# os.mknod("ceshi111.txt")

#os.remove  删除文件
# os.remove("ceshi111.txt")

#os.mkdir   创建目录(文件夹)
# os.mkdir("ceshi200")

#os.rmdir   删除目录(文件夹)
# os.rmdir("ceshi200")

#os.rename  对文件,目录重命名
# os.rename("ceshi100","ceshi1001")

#os.makedirs   递归创建文件夹
# os.makedirs("a/b/c/d/e/f")

#os.removedirs 递归删除文件夹(空文件夹)
# os.removedirs("a/b/c/d/e/f")

# ### shutil
import shutil

# 1. 单纯仅仅复制文件内容
#copyfileobj(fsrc, fdst[, length=16*1024])  复制文件 (length的单位是字符(在r模式下,read单位是字符个数,在rb模式read单位是字节个数))
# fp1 = open("ceshi100.py",mode="r",encoding="utf-8")
# fp2 = open("ceshi101.py",mode="w",encoding="utf-8")
# shutil.copyfileobj(fp1,fp2)

#copyfile(src,dst)   #单纯的仅复制文件内容 , 底层调用了 copyfileobj
# shutil.copyfile("ceshi101.py","ceshi102.py")

# 2. 单纯仅仅复制文件权限
#copymode(src,dst)   #单纯的仅复制文件权限 , 不包括内容  (虚拟机共享目录都是默认777)
# shutil.copymode("ceshi102.py","103.py")

#copystat(src,dst)   #复制所有状态信息,包括权限,修改时间等,不包括内容
# shutil.copystat("ceshi102.py","104.py")


# 3. 文件内容 + 文件权限
#copy(src,dst)       #复制文件权限和内容
# shutil.copy("ceshi102.py","105.py")
#copy2(src,dst)      #复制文件权限和内容,还包括权限,时间等
# shutil.copy2("ceshi102.py","106.py")

# 4.复制 / 删除
#copytree(src,dst)   #拷贝文件夹里所有内容(递归拷贝)
# shutil.copytree("ceshi1001","ceshi1002")

#rmtree(path)        #删除当前文件夹及其中所有内容(递归删除)
# shutil.rmtree("ceshi1002")

# 5.移动 move(path1,paht2)   #移动文件或者文件夹
# 移动文件夹
# shutil.move("ceshi1001","../ceshi1003")
# 移动文件
shutil.move("104.py","../111.py")
2. os.path 模块
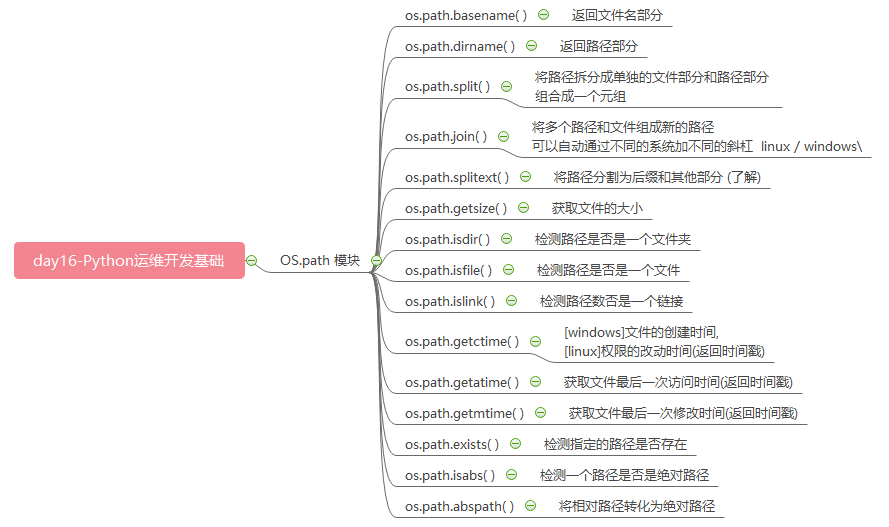
# ### os.path
import os
strvar = "/home/wangwen/mywork/ceshi1.py"
#basename() 返回文件名部分
res = os.path.basename(strvar)
print(res)

#dirname()  返回路径部分
res = os.path.dirname(strvar)
print(res)

#split() 将路径拆分成单独的文件部分和路径部分 组合成一个元组
res = os.path.split(strvar)
print(res)

#join()  将多个路径和文件组成新的路径 可以自动通过不同的系统加不同的斜杠  linux / windows
path1 = "home"
path2 = "wangwen"
path3 = "mywork"
# 方法一
pathvar = path1 + os.sep + path2 + os.sep + path3
print(pathvar)
# 方法二
pathvar = os.path.join(path1,path2,path3)
print(pathvar)
# d:homewangwenmywork
# D:gongxiang8day16
# /home/wangwen/mywork/

#splitext() 将路径分割为后缀和其他部分 (了解)
strvar = "/home/wangwen/mywork/ceshi1.py"
res = os.path.splitext(strvar)
print(res)
# 用字符串中的split也可以分割出后缀部分
a,b = strvar.split(".")
print(a,b)

#getsize()  获取文件的大小
res = os.path.getsize("1.py")
print(res)

# ### isdir / isfile / islink
#isdir()    检测路径是否是一个文件夹
res = os.path.isdir("ceshi100")
print(res)

#isfile()   检测路径是否是一个文件
res = os.path.isfile("1.py")
print(res)

#islink()   检测路径数否是一个链接
res = os.path.islink("/home/wangwen/ceshi200/ceshi100")
print(res)

# ### getctime / getmtime / getatime
#getctime() [windows]文件的创建时间,[linux]权限的改动时间(返回时间戳)
pathvar = "/home/wangwen/mywork/103.py"
res = os.path.getctime(pathvar)
print(res)

import time
str_time = time.ctime(res)
print(str_time)

#getmtime() 获取文件最后一次修改时间(返回时间戳)
res = os.path.getmtime(pathvar)
print(res)

import time
str_time = time.ctime(res)
print(str_time)

#getatime() 获取文件最后一次访问时间(返回时间戳)
res = os.path.getatime(pathvar)
print(res)

import time
str_time = time.ctime(res)
print(str_time)

#exists()   检测指定的路径是否存在
pathvar = "/home/wangwen/mywork/10323223.py"
res = os.path.exists(pathvar)
print(res)

#isabs()    检测一个路径是否是绝对路径
pathvar = "."
res = os.path.isabs(pathvar)
print(res)

#abspath()  将相对路径转化为绝对路径
res = os.path.abspath(pathvar)
print(res)

# 结合使用
if not os.path.isabs(pathvar):
    pathnew = os.path.abspath(pathvar)
    print(pathnew)
# ### 如何计算一个文件夹中所有文件的大小
import os
pathvar = "/mnt/hgfs/gongxiang8/day16/ceshi100"
# (1)获取文件夹中所有的文件名称
lst = os.listdir(pathvar)
print(lst)
"""
拼接路径,计算文件大小
res = os.path.join(pathvar,"1.txt")
print(res) # "/mnt/hgfs/gongxiang8/day16/ceshi100/1.txt"
res2 = os.path.getsize(res)
print(res2)
"""

# (2)计算所有文件的大小 [缺陷:不能计算文件夹中的内容]
size = 0
for i in lst:
    pathnew = os.path.join(pathvar,i)
    # 判断是否是文件
    if os.path.isfile(pathnew):
        print(i,"[是文件]")
        size += os.path.getsize(pathnew)
    # 判断是否是文件夹
    elif os.path.isdir(pathnew):
        print(i,"[是文件夹]")


# (3)使用递归计算文件夹中所有文件大小
def getallsize(pathvar):
    size = 0
    lst = os.listdir(pathvar)
    for i in lst:
        # 路径 + 文件名 => 绝对路径
        pathnew = os.path.join(pathvar,i)
        if os.path.isfile(pathnew):
            # 计算文件大小
            size += os.path.getsize(pathnew)
        elif os.path.isdir(pathnew):
            size += getallsize(pathnew)

    return size
res = getallsize(pathvar)
print(res)
3. tarfile 压缩模块

# ### tarfile 压缩模块 后缀为.tar  |  .tar.gz  |   .tar.bz2
import tarfile

# ### 1.创建tar压缩包 [官方: 理论上可以压缩到最小的模式是bz2]
# (1) 创建压缩包
""".tar的压缩包,只打包不压缩 276480"""
tf = tarfile.open("ceshi1029.tar","w",encoding="utf-8")
# (2) 写入文件到压缩包中
tf.add("/bin/ntfscmp","ntfscmp")
tf.add("/bin/openvt","openvt")
tf.add("/bin/grep","tmp/grep")
# (3) 关闭压缩包
tf.close()

# 2.创建.tar.gz压缩包 120462
tf = tarfile.open("ceshi1030.tar.gz","w:gz",encoding="utf-8")
tf.add("/bin/ntfscmp","ntfscmp")
tf.add("/bin/openvt","openvt")
tf.add("/bin/grep","tmp/grep")
tf.close()

# 3.创建.tar.bz2压缩包 115728
tf = tarfile.open("ceshi1031.tar.bz2","w:bz2",encoding="utf-8")
tf.add("/bin/ntfscmp","ntfscmp")
tf.add("/bin/openvt","openvt")
tf.add("/bin/grep","tmp/grep")
tf.close()

# ### 2.解压压缩包
tf = tarfile.open("ceshi1030.tar.gz","r",encoding="utf-8")
# extract(文件,路径)
# tf.extract("ntfscmp","ceshi1030")
# extractall(路径)
tf.extractall("ceshi1030")
tf.close()

# ### 3.追加文件 支持with语法
with  tarfile.open("ceshi1029.tar","a",encoding="utf-8") as tf :
    tf.add("/bin/gzip","gzip")

# error tarfile中的追加,只能是对只打包不压缩的包进行追加,其他的模式不可以;
"""
with tarfile.open("ceshi1031.tar.bz2","a",encoding="utf-8") as tf:
    tf.add("/bin/gzip","gzip")
"""

# ### 4.查看压缩包中的内容
with  tarfile.open("ceshi1029.tar","r",encoding="utf-8") as tf :
    lst = tf.getnames()
    print(lst)


# ### 如何解决tarfile中存在的缺陷?(不能追加文件到已经压缩的包)
"""
(1) 先解压所有文件到文件夹
(2) 把想要追加的内容复制到文件夹中
(3) 经过过滤筛选,重新打包压缩
"""
import os
# 获取当前脚本所在的路径
pathvar = os.getcwd()
# print(res) # /mnt/hgfs/gongxiang8/day16

# 压缩包路径
path1 = os.path.join(pathvar,"ceshi1031.tar.bz2")
print(path1)
# 解压的路径
path2 = os.path.join(pathvar,"ceshi1031")

# (1) 先解压所有文件到文件夹
with tarfile.open( path1 , "r",encoding="utf-8") as tf:
    tf.extractall(path2)

# (2) 把想要追加的内容复制到文件夹中
mybin = "cp -a /bin/ip " + path2 # cp -a /bin/ip /mnt/hgfs/gongxiang8/day16/ceshi1031
os.system(mybin)

# (3) 经过过滤筛选,重新打包压缩
lst = os.listdir(path2)
print(lst)

with tarfile.open(path1,"w:bz2",encoding="utf-8") as tf:
    for i in lst:
        if i != "openvt":
            # 拼接绝对路径
            pathnew = os.path.join(path2,i)
            # add(路径,别名)
            tf.add(pathnew,i)
day16