SpringCloudConfig
是什么
Spring Cloud Config为微服务架构中的微服务提供集中化的外部配置支持,配置服务器为各个不同微服务应用的所有环境提供了一个中心化的外部配置;
解决了众多微服务,N多个配置文件的情况。
作用
-
集中管理配置文件
-
不同环境不同配置,动态化的配置更新,分环境比如dev/test/prod/beta/release
-
运行期间动态调整配置,不再需要在每个服务器部署的机器上写配置文件,服务会向配置中心统一拉去配置自己的信息
-
当配置发生改变时,服务不需要重启即可感知到配置的变化并应用新的配置
-
将配置信息以REST接口的形式暴露:
-
post/crul访问刷新即可......
1.创建Git仓库
github&gitee均可
注意:提交的配置文件(ymlproperties等等)编码格式必须是utf-8

2.创建配置中心服务端
创建项目
导入pom
        <dependency>
            <groupId>org.springframework.cloud</groupId>
            <artifactId>spring-cloud-config-server</artifactId>
            <version>2.2.5.RELEASE</version>
        </dependency>
开启@EnableConfigServer
@EnableConfigServer
@SpringBootApplication
public class ConfigApplication {
    public static void main(String[] args) {
        SpringApplication.run(ConfigApplication.class, args);
    }
}
YML
server:
  port: 5555

spring:
  application:
    name: cloud-config-center
  cloud:
    config:
      server:
        git:
          ####搜索目录,当配置文件在git仓库的多级目录中时,需指定,否则SpringCloudConfig默认只会在Git仓库根目录寻找
          search-paths:
            - /** #git仓库下所有目录
            - /myconfig1 #指定目录 有多个路径使用逗号隔开
          uri: git@gitee.com:RollBack2010/spring-cloud-configs.git #git仓库地址
          passphrase: 123456 #GIT公钥生成时如果设置了密码,则需输入,否则无需配置
          #uri: git@github.com:RollBack2010/SpringCloudConfig.git #GitHub上面的git仓库名字
          #username: username #git帐号
          #password: password #git密码
      ####读取分支(可不配置)
      #1.不配置默认读取master分支下的文件
      #2.配置了
        #通过http://127.0.0.1:5555/配置文件名 请求资源文件时,默认走配置的分支
        #也可通过http://127.0.0.1:5555/分支名/配置文件名 获得其他分支的文件
        #更多请求方式见下方
      #label: master

eureka: #注册中心配置
  instance:
    instance-id: config
    prefer-ip-address: true
  client:
    fetch-registry: true
    register-with-eureka: true
    service-url:
      defaultZone: http://192.168.1.2:8761/eureka/

测试
浏览器访问 http://127.0.0.1:5555/master/application-my.yml 可获得相关的文件

全部资源请求方式
官方提供五种方式

常用方式
-
- /{application}/{profile}[/{label}]
-
-
- {application}-{profile}.yml 文件名称 + "-" + 开发环境 + 后缀
- {label}:远程仓库分支名称
-
-
- /{application}-{profile}.yml
-
-
- yml中不配置label 默认的master分支,配置则指定的分支
- {application}-{profile}.yml 文件名称 + "-" + 开发环境 + 后缀
-
-
- /{label}/{application}-{profile}.yml
-
-
- {label}:远程仓库分支名称
- {application}-{profile}.yml 文件名称 + "-" + 开发环境 + 后缀
-
3.创建客户端
创建项目
导入pom
        <dependency>
            <groupId>org.springframework.cloud</groupId>
            <artifactId>spring-cloud-starter-config</artifactId>
            <version>2.2.5.RELEASE</version>
        </dependency>
YML
注意:修改application.yml为bootstrap.yml
application.yml是用户级的资源配置项
bootstrap.yml是系统级的,优先级更加高
Spring Cloud会创建一个"Bootstrap Context",作为 Spring应用的 Application Context的父上下文。初始化的时候, Bootstrap Context负责从外部源加载配置属性并解析配置。这两个上下文共享个从外部获取的Environment。
Bootstrap属性有高优先级,默认情況下,它们不会被本地配置覆盖。 Bootstrap context和 Application Context有着不同的约定,所以新增了一个 bootstrap.yml文件,保证 Bootstrap Context和 Application Context配置的分离。
因为 bootstrap.yml是比 application.yml先加载的。 bootstrap.yml优先级高于 application.yml
server:
  port: 2222 #如git仓库中的配置文件有port属性,该属性被重写
spring:
  application:
    name: config-client
  cloud:
    #Config客户端配置
    config:
      label: master #分支名称
      name: application #配置文件名称
      profile: dev #读取后缀名称
      uri: http://192.168.1.2:5555 #上面配置中心地址
eureka: #注册中心配置
  instance:
    instance-id: config-client
    prefer-ip-address: true
  client:
    fetch-registry: true
    register-with-eureka: true
    service-url:
      defaultZone: http://192.168.1.2:8761/eureka/
配置中心高可用
用discovery替换uri即可
  cloud:
    #Config客户端配置
    config:
      label: master #分支名称
      name: application #配置文件名称
      profile: dev #读取后缀名称
      discovery: #config配置中心高可用
        # 开启 Config 服务发现与注册
        enabled: true
        # 指定 server
        service-id: CLOUD-CONFIG-CENTER #注册到Eureka的配置中心微服务名称
多环境切换
通过上述方式实现后,项目启动会默认去拉取profile配置的文件,那生产、测试、开发等环境如何切换?
- 删除yml中profile配置
- 启动服务的时候通过 --spring.profiles.active=xxx指定即可
其他:Git更新
完成上述操作后,git库内容更新,客户端无法获得更新后的内容,需如下配置
-
添加Pom
<dependency> <groupId>org.springframework.boot</groupId> <artifactId>spring-boot-starter-actuator</artifactId> </dependency> -
将需要调用配置的类添加注解
@RefreshScope #这个 @RestController public class Demo {} -
Git更新后执行Post请求http://客户端ip:端口/actuator/refresh
-
最新的内容拉取完毕
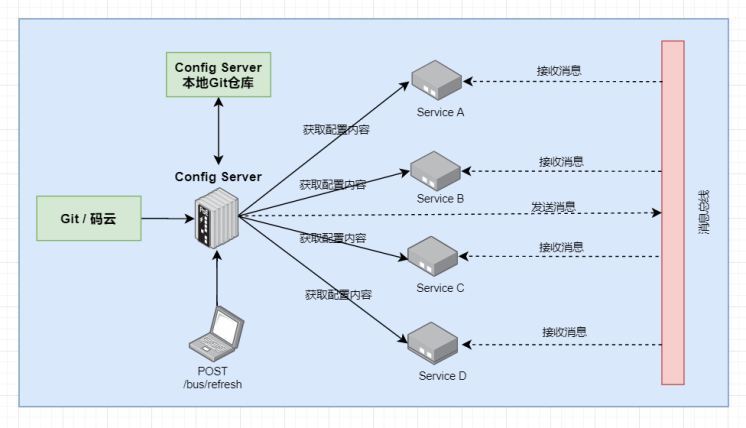
SpringCloudBus
上面配置后,发现每次GIT仓库更新都需要手动在每个服务执行/actuator/refresh来获取最新的版本,当服务数量多了,很麻烦,BUS来解决这个。
是什么
用来将分布式系统的节点与轻量级消息系统链接起来的框架,它整合了Java的事件处理机制和消息中间件的功能
目前支持消息框架:RabbitMQ 、Kafka
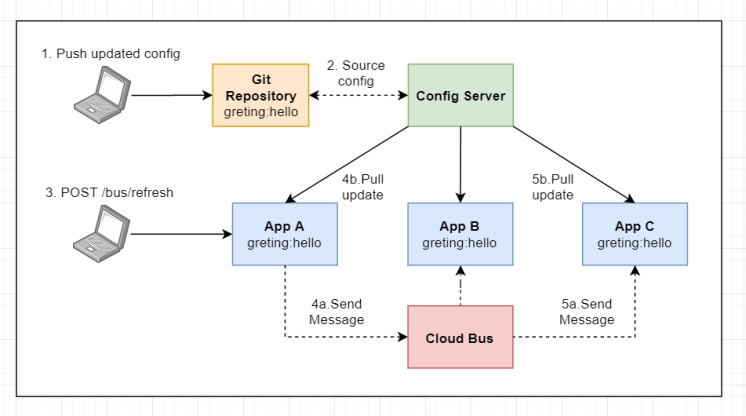
工作流程
所有客户端监听MQ中同个 topic,当一个服务刷新数据的时候,它会把这个信息放入到 topic中,这样其它监听同一Topic的服务就能得到通知,然后去更新自身的配置
什么是总线
在微服务架构的系统中,通常会使用轻量级的消息代理来构建一个共用的消息主题,并让系统中所有微服务实例都连接上来。由于该主题中产生的消息会被所有实例监听和消费,所以称它为消息总线。在总线上的各个实例,都可以方便地广播一些需要让其他连接在该主题上的实例都知道的消息。
1.安装RabbitMQ
- 安装Elang,下载地址:https://www.erlang.org/downloads
- 安装RabbitMQ,下载地址:https://github.com/rabbitmq/rabbitmq-server/releases
- 进入RabbitMQ安装目录下的sbin目录
- 输入以下命令启动管理功能:rabbitmq-plugins enable rabbitmq_management
- 启动RibbitMQ,在浏览器输入:http://127.0.0.1:15672
- 输入账号并登陆:guest guest
- 可以打开证明安装成功
2.修改配置中心服务
添加pom
        <dependency>
            <groupId>org.springframework.cloud</groupId>
            <artifactId>spring-cloud-starter-bus-amqp</artifactId>
            <version>2.2.3.RELEASE</version>
        </dependency>
修改yml
新增如下配置
#rabbitmq相关配置
rabbitmq:
  host: http://192.168.1.2
  port: 5672
  username: guest
  password: guest
##rabbitmq相关配置,暴露bus刷新配置的端点
management:
  endpoints: #暴露bus刷新配置的端点
    web:
      exposure:
        include: 'bus-refresh'
3.修改客户端服务
添加pom
        <dependency>
            <groupId>org.springframework.cloud</groupId>
            <artifactId>spring-cloud-starter-bus-amqp</artifactId>
            <version>2.2.3.RELEASE</version>
        </dependency>
修改yml
新增如下配置
rabbitmq:
  host: http://192.168.1.2
  port: 5672
  username: guest
  password: guest
测试
-
分别启动Eureakconfig配置中心服务客户端服务
-
修改git仓库上的文件
-
请求config配置中心服务 (http://配置中心地址/分支名/资源名)可得到最新的文件
-
访问客户端
-
依旧是上一个版本的文件;
-
再次访问客户端地址,发现资源已经刷新
-
更新部分服务
上面actuator/bus-refresh这个请求会更新所有连接BUS的服务,如想更新部分,执行连接后追加参数即可
-
actuator/bus-refresh/注册服务名:端口号
执行后,与对应服务及端口匹配的服务就全部更新了,之外的没有更新
-
actuator/bus-refresh/注册服务名
执行后,与对应服务匹配的服务就全部更新了,之外的没有更新