先进行后台环境的配置。新建项目,基于.Net Core,这个没什么好说的。
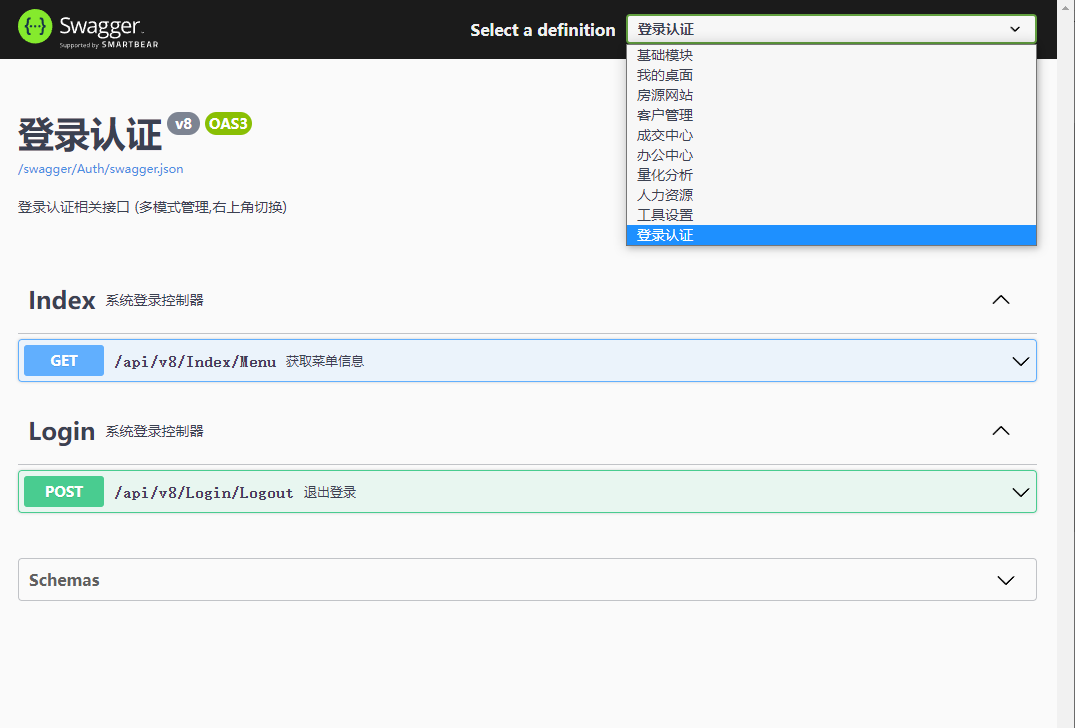
为了防止接口过多,在配置swagger之前,对接口做了分类,分别是:基础模块、我的桌面、房源网站、客户管理、成交中心、办公中心、量化分析、人力资源、工具设置、登录认证。
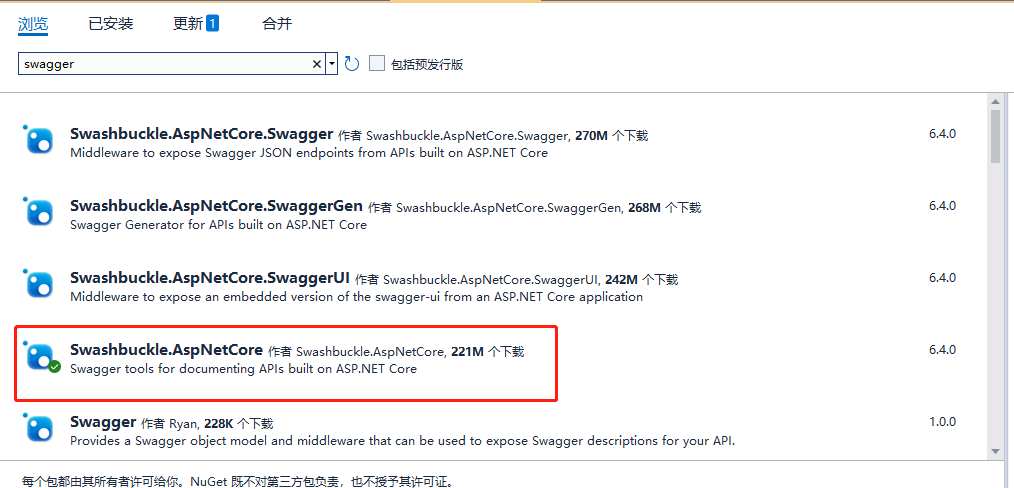
1、安装引用
使用Nuget搜索 Swagger,选择Swashbuckle.AspNetCore安装即可。
2、在Startup.cs类ConfigureServices方法中注册Swagger:
// 注册 Swagger
var assembly = typeof(Startup).Assembly;
var xmlPath = Path.Combine(AppDomain.CurrentDomain.BaseDirectory, assembly.GetName().Name + ".xml");
services.AddSwaggerGen(c =>
{
    // 通过枚举值生成接口文档
    typeof(ApiGroup).GetFields().Skip(1).ToList().ForEach(f =>
    {
        var info = f.GetCustomAttributes(typeof(ApiGroupInfo), false).OfType<ApiGroupInfo>().FirstOrDefault();
        c.SwaggerDoc(f.Name, new OpenApiInfo
        {
            Version = info?.Version,
            Title = info?.Title,
            Description = info?.Description
        });
    });

    // 判断接口归于哪个分组
    c.DocInclusionPredicate((name, apiDescription) =>
    {
        if (name == ApiGroup.Base.ToString())
            return string.IsNullOrEmpty(apiDescription.GroupName);
        else
            return apiDescription.GroupName == name;
    });

    // 为接口方法添加注释
    c.IncludeXmlComments(xmlPath, true);   // true : 显示控制器层注释
    c.OrderActionsBy(o => o.RelativePath); // 对action的名称进行排序
});
这里面用到的ApiGroup和ApiGroupInfo是用来标识接口分组的,后面会有代码。
3、在Startup.cs类Configure方法中启用Swagger:
//  是否开发环境
if (env.IsDevelopment())
{
    app.UseDeveloperExceptionPage();
    app.UseSwagger();
    app.UseSwaggerUI(c =>
    {
        // 通过枚举值生成接口文档
        typeof(ApiGroup).GetFields().Skip(1).ToList().ForEach(f =>
        {
            var info = f.GetCustomAttributes(typeof(ApiGroupInfo), false).OfType<ApiGroupInfo>().FirstOrDefault();
            c.SwaggerEndpoint($"/swagger/{f.Name}/swagger.json", info != null ? info.Title : f.Name);
        });

        // 默认打开自动折叠
        c.DocExpansion(DocExpansion.None);
    });
}
4、分组文件代码
ApiGroup.cs
namespace Randy.Fang.Model
{
    /// <summary>
    /// 接口分组枚举值
    /// </summary>
    public enum ApiGroup
    {
        /// <summary>
        ///
        /// </summary>
        [ApiGroupInfo(Version = "v8", Title = "基础模块", Description = "基础模块相关接口 (多模式管理,右上角切换)")]
        Base,

        /// <summary>
        ///
        /// </summary>
        [ApiGroupInfo(Version = "v8", Title = "我的桌面", Description = "我的桌面相关接口 (多模式管理,右上角切换)")]
        Index,

        /// <summary>
        ///
        /// </summary>
        [ApiGroupInfo(Version = "v8", Title = "房源网站", Description = "房源网站相关接口 (多模式管理,右上角切换)")]
        House,

        /// <summary>
        ///
        /// </summary>
        [ApiGroupInfo(Version = "v8", Title = "客户管理", Description = "客户管理相关接口 (多模式管理,右上角切换)")]
        Customer,

        /// <summary>
        ///
        /// </summary>
        [ApiGroupInfo(Version = "v8", Title = "成交中心", Description = "成交中心相关接口(多模式管理,右上角切换)")]
        Deal,

        /// <summary>
        ///
        /// </summary>
        [ApiGroupInfo(Version = "v9", Title = "办公中心", Description = "办公中心相关接口 (多模式管理,右上角切换)")]
        Office,

        /// <summary>
        ///
        /// </summary>
        [ApiGroupInfo(Version = "v8", Title = "量化分析", Description = "量化分析相关接口 (多模式管理,右上角切换)")]
        Effective,

        /// <summary>
        ///
        /// </summary>
        [ApiGroupInfo(Version = "v8", Title = "人力资源", Description = "人力资源相关接口 (多模式管理,右上角切换)")]
        HR,

        /// <summary>
        ///
        /// </summary>
        [ApiGroupInfo(Version = "v8", Title = "工具设置", Description = "工具设置相关接口 (多模式管理,右上角切换)")]
        Setup,

        /// <summary>
        ///
        /// </summary>
        [ApiGroupInfo(Version = "v8", Title = "登录认证", Description = "登录认证相关接口 (多模式管理,右上角切换)")]
        Auth,
    }
}
ApiGroupAttribute.cs
using Microsoft.AspNetCore.Mvc.ApiExplorer;
using System;

namespace Randy.Fang.Model
{
    /// <summary>
    /// 接口分组特性
    /// </summary>
    public class ApiGroupAttribute : Attribute, IApiDescriptionGroupNameProvider
    {
        /// <summary>
        /// 分类的名称
        /// </summary>
        /// <param name="name"></param>
        public ApiGroupAttribute(ApiGroup name)
        {
            GroupName = name.ToString();
        }

        /// <summary>
        ///
        /// </summary>
        public string GroupName { get; set; }
    }
}
ApIGroupInfo.cs
namespace Randy.Fang.Model
{
    /// <summary>
    /// 接口分组枚举注释
    /// </summary>
    public class ApiGroupInfo : Attribute
    {
        /// <summary>
        /// 标题
        /// </summary>
        public string Title { get; set; }

        /// <summary>
        /// 版本
        /// </summary>
        public string Version { get; set; }

        /// <summary>
        /// 描述
        /// </summary>
        public string Description { get; set; }
    }
}
后期就可以在接口上添加如下代码来标识此接口属于哪个分类了。
    /// <summary>
    /// 系统登录控制器
    /// </summary>
    [Route("api/v8/[controller]")]
    [ApiController]
    [ApiGroup(ApiGroup.Auth)]
最终效果:
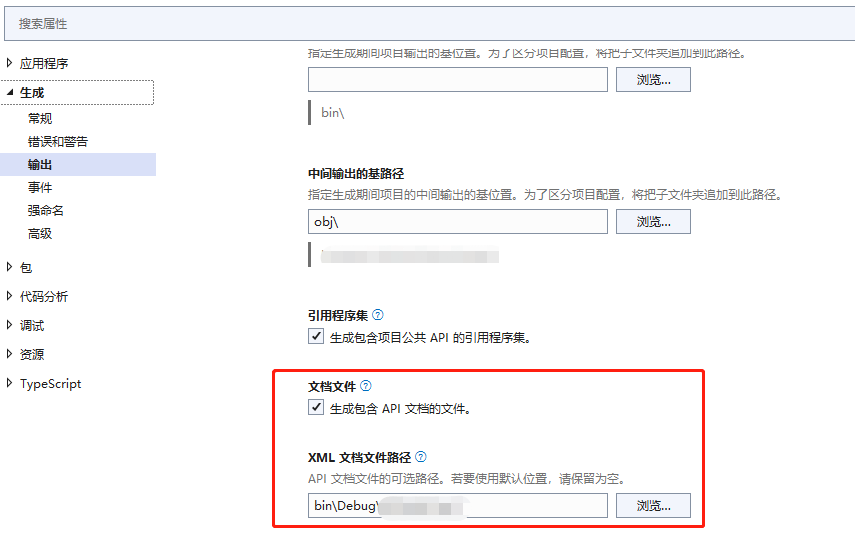
注1:如果报错找不到xml文件,需要进行如下配置,让工程生成相关的xml文件功swagger调用。
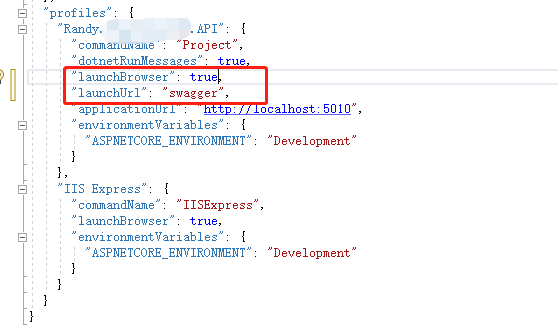
注2:默认运行工程不会自动打开swagger网址,需要手工输入,可以进入launchSettings.json文件做如下配置,每次运行工程可以自动打开swagger页面。
(本文完)