准备:
MySQL8.0 Windows zip包下载地址:https://cdn.mysql.com//Downloads/MySQL-8.0/mysql-8.0.11-winx64.zip
环境:Windows 10
一、安装
1. 解压zip包到安装目录
我的安装目录是D:Program Filesmysql-8.0.11-winx64
2.配置文件
windows系统中配置文件默认是安装目录下的 my.ini 文件,部分配置需要在初始安装时配置,大部分也可以在安装完成后进行更改,不知道别人是什么情况,我的是该文件目录下不存在my.ini文件,所以我新建了该文件,如下

写入基本配置如下:
 1 [mysqld]
 2 default_authentication_plugin=mysql_native_password
 3 # Remove leading # and set to the amount of RAM for the most important data
 4 # cache in MySQL. Start at 70% of total RAM for dedicated server, else 10%.
 5 # innodb_buffer_pool_size = 128M
 6
 7 # Remove leading # to turn on a very important data integrity option: logging
 8 # changes to the binary log between backups.
 9 # log_bin
10
11 # These are commonly set, remove the # and set as required.
12 basedir=D:Program Filesmysql-8.0.11-winx64
13 datadir=D:Program Filesmysql-8.0.11-winx64data(这两行是主要修改的内容,会自动生成data文件夹,其他直接粘贴即可)
14 port = 3306
15 # server_id = .....
16
17
18 # Remove leading # to set options mainly useful for reporting servers.
19 # The server defaults are faster for transactions and fast SELECTs.
20 # Adjust sizes as needed, experiment to find the optimal values.
21 # join_buffer_size = 128M
22 # sort_buffer_size = 2M
23 # read_rnd_buffer_size = 2M
24
25 sql_mode=NO_ENGINE_SUBSTITUTION,STRICT_TRANS_TABLES
26
27 character-set-server = utf8mb4
28
29 performance_schema_max_table_instances = 600
30 table_definition_cache = 400
31 table_open_cache = 256
32
33 [mysql]
34 default-character-set = utf8mb4
35
36 [client]
37 default-character-set = utf8mb4
注意,里面的 basedir 是我本地的安装目录,datadir 是我数据库数据文件要存放的位置,各项配置需要根据自己的环境进行配置。
3.初始化数据库
在MySQL安装目录的 bin 目录下执行命令:
.mysqld --initialize --console执行完成后,会打印 root 用户的初始默认密码,比如:
2018-05-01T14:35:01.507037Z 0 [Warning] [MY-010915] [Server] 'NO_ZERO_DATE', 'NO_ZERO_IN_DATE' and 'ERROR_FOR_DIVISION_BY_ZERO' sql modes should be used with strict mode. They will be merged with strict mode in a future release.
2018-05-01T14:35:01.507640Z 0 [System] [MY-013169] [Server] D:ProgramMySQL8binmysqld.exe (mysqld 8.0.11) initializing of server in progress as process 11064
2018-05-01T14:35:01.508173Z 0 [ERROR] [MY-010340] [Server] Error message file 'D:Program Filesmysql-8.0.11-winx64shareenglisherrmsg.sys' had only 1090 error messages, but it should contain at least 4512 error messages. Check that the above file is the right version for this program!
2018-05-01T14:35:05.464644Z 5 [Note] [MY-010454] [Server] A temporary password is generated for root@localhost: APWCY5ws&hjQ
2018-05-01T14:35:07.017280Z 0 [System] [MY-013170] [Server] D:ProgramMySQL8binmysqld.exe (mysqld 8.0.11) initializing of server has completed
其中,第4行的“APWCY5ws&hjQ”就是初始密码,在没有更改密码前,需要记住这个密码,后续登录需要用到。
要是你手贱,关快了,或者没记住,那也没事,删掉初始化的 datadir 目录,再执行一遍初始化命令,又会重新生成的。当然,也可以使用安全工具,强制改密码,用什么方法,自己随意。
4.安装服务
在MySQL安装目录的 bin 目录下执行命令:
.mysqld --install [服务名]后面的服务名可以不写,默认的名字为 mysql。当然,如果你的电脑上需要安装多个MySQL服务,就可以用不同的名字区分了,比如 mysql5 和 mysql8。
安装完成之后,就可以通过命令net start mysql启动MySQL的服务了。
二.更改密码和密码认证插件
在MySQL安装目录的 bin 目录下执行命令:
net start mysql
.mysql -uroot -p这时候会提示输入密码,记住了第3步的密码,填入即可登录成功,进入MySQL命令模式
在MySQL8.0.4以前,执行
SET PASSWORD=PASSWORD('[修改的密码]');就可以更改密码,但是MySQL8.0.4开始,这样默认是不行的。因为之前,MySQL的密码认证插件是“mysql_native_password”,而现在使用的是“caching_sha2_password”。
因为当前有很多数据库工具和链接包都不支持“caching_sha2_password”,为了方便,我暂时还是改回了“mysql_native_password”认证插件。
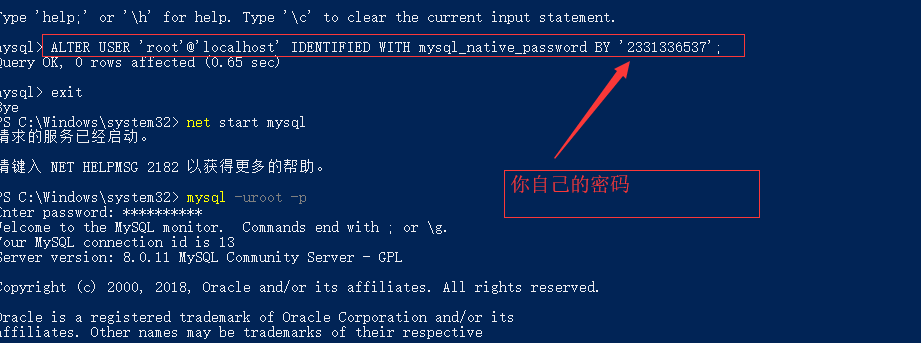
在MySQL中执行命令:
ALTER USER 'root'@'localhost' IDENTIFIED WITH mysql_native_password BY 'password';(注意一定要有分号)(注意一定要有分号)修改密码验证插件,同时修改密码。
如果想默认使用“mysql_native_password”插件认证,可以在配置文件中配置default_authentication_plugin项。
[mysqld]
default_authentication_plugin=mysql_native_password