原文地址:https://blog.csdn.net/xiaouncle/article/details/70229119
C#中的Attribute详解(下)
一、Attribute本质
从上篇里我们可以看到,Attribute似乎总跟public、static这些关键字(Keyword)出现在一起。莫非使用了Attribute就相当于定义了新的修饰符(Modifier)吗?让我们一窥究竟吧!
示例代码如下:
#define Guo
using System;
using System.Collections.Generic;
using System.Diagnostics;
using System.Linq;
using System.Text;

namespace AttributeTest
{
    class Program
    {
        static void Main(string[] args)
        {
            Func();
            Console.ReadKey();
        }

        [Conditional("Guo")]
        static void Func()
        {
            Console.WriteLine("Hello Attribute!");
        }
    }
}
先编译程序,然后使用微软的中间语言反编译器查看MSIL中间语言中static void Func()方法的代码,截图如下:
可以看出:Attribute本质上就是一个类,它附着在目标对象上最终实例化。

仔细观察中间语言(MSIL)的代码之后,那些被C#语言掩盖的事实,在中间语言中就变得赤身裸体了,Attribute也变得毫无秘密!
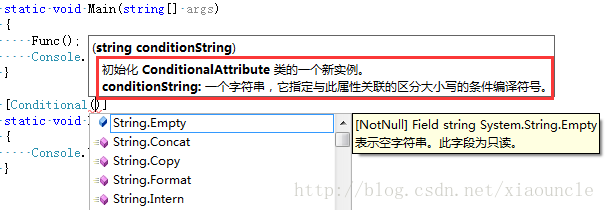
图中红色部分指的是Func方法及其修饰符,但Attribute并没有出现在这里。
图中蓝色部分指的是调用mscorlib.dll程序集中System.Diagnostics命名空间中ConditionalAttribute类的含参构造方法,01 00 03 47 75 6F 00 00 实际上是字符串Guo的十六进制形式。
可见,Attribute并不是修饰符,而是一个有着独特实例化形式的类。
除了分析中间语言之外,给方法添加特性时系统给出的提示信息,也可以帮助大家了解Attribute,系统提示截图如下:
二、Attribute实例化
就像牡蛎天生要吸附在礁石或船底上一样,Attribute的实例一构造出来就必须“粘”在一个什么目标上。
Attribute实例化的语法是相当怪异的,主要体现在以下三点:
- 不通过new操作符来产生实例,而是使用在方括号里调用构造方法来产生实例。
- 方括号必须紧挨着放置在被附着目标的前面。
- 因为方括号里空间有限,所以不能使用对象初始化器给对象的属性(Property)赋值,必须使用含参构造方法对Attribute实例中的属性赋值。
Attribute实例化时尤其要注意的是:
- 构造函数的参数一定要写。有几个就得写几个,否则类无法正常实例化。
- 构造函数参数的顺序不能错。调用任何函数都不能改变参数的顺序,除非他有相应的重载(Overload)。因为这个顺序是固定的,有些书里称其为“定位参数”(意即“个数和位置固定的参数”)。
- 对Attribute实例中的属性的赋值可有可无。它会有一个默认值,并且属性赋值的顺序不受限制。有些书里称属性赋值的参数为“具名参数”。
三、Attribute实例化的独特之处
1、他的实例是用.custom声明的。查看中间语法,你会发现.custom是专门用来声明自定义特性的。
2、声明Attribute的位置是在函数体内的真正代码(IL_0000至IL_0014)之前。
3、这就从“底层”证明了Attribute不是“修饰符”,而是一种实例化方式比较特殊的类。
四、元数据的作用
MSIL中间语言中,程序集的元数据(Metadata)记录了这个程序集里有多少个namespace、多少个类、类里有什么成员、成员的访问级别是什么。元数据是以文本(也就是Unicode字符)形式存在的,使用.NET的反射(Reflection)技术就能把它们读取出来,并形成MSIL中的树状图、VS里的Object Browser视图以及代码自动提示功能,这些都是元数据与反射技术结合的产物。一个程序集(.exe或.dll)能够使用包含在自己体内的元数据来完整地说明自己,而不必像C/C++那样带着一大捆头文件,这就叫作“自包含性”或“自描述性”。
五、自定义Attribute实例
在此我们不使用.Net Framework中的各种Attribute系统特性,而是从头自定义一个全新的Attribute类。
示例代码如下:
namespace AttributeTest
{
    class Program
    {
        static void Main(string[] args)
        {
            System.Reflection.MemberInfo memberInfo = typeof(Student);
            System.Reflection.PropertyInfo propertyInfo = typeof (Student).GetProperty("Name");
            HobbyAttribute hobbyStudent = (HobbyAttribute)Attribute.GetCustomAttribute(memberInfo, typeof(HobbyAttribute));
            HobbyAttribute hobbyName = (HobbyAttribute) Attribute.GetCustomAttribute(propertyInfo, typeof (HobbyAttribute));
            if (hobbyStudent != null)
            {
                Console.WriteLine("类Student的特性");
                Console.WriteLine("类名:{0}", memberInfo.Name);
                Console.WriteLine("兴趣类型:{0}", hobbyStudent.Type);
                Console.WriteLine("兴趣指数:{0}
", hobbyStudent.Level);
            }
            if (hobbyName != null)
            {
                Console.WriteLine("属性Name的特性");
                Console.WriteLine("属性名:{0}", propertyInfo.Name);
                Console.WriteLine("兴趣类型:{0}", hobbyName.Type);
                Console.WriteLine("兴趣指数:{0}", hobbyName.Level);
            }
            Console.ReadKey();
        }
    }

    [Hobby("Sport",Level = 5)]
    class Student
    {
        [Hobby("Tennis",Level = 3)]
        public string Name { get; set; }
        public int Age { get; set; }
    }
}
namespace AttributeTest
{
    class HobbyAttribute:Attribute
    {
        //值为null的string是危险的,所以必需在构造函数中赋值
        public HobbyAttribute(string type)
        {
            this.Type = type;
        }

        public string Type { get; set; }
        public int Level { get; set; }
    }
}
为了不让代码太长,上面示例中Hobby类的构造函数只有一个参数,所以对“定位参数”体现的不够淋漓尽致。大家可以为Hobby类再添加几个属性,并在构造函数里多设置几个参数,体验一下Attribute实例化时对参数个数及参数位置的敏感性。
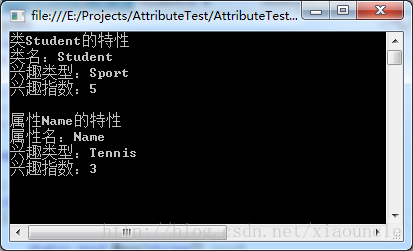
示例运行结果如下:
六、Attribute的附着目标
Attribute可以将自己的实例附着在什么目标上呢?这个问题的答案隐藏在AttributeTargets这个枚举类型里。
这个枚举类型的可取值集合为:
All Assembly Class Constructor
Delegate Enum Event Field
GenericParameter Interface Method Module
Parameter Property ReturnValue Struct
一共是16个可取值。不过,上面这张表是按字母顺序排列的,并不代表它们真实值的排列顺序。使用下面这个小程序可以查看每个枚举值对应的整数值。
static void Main(string[] args)
{
    Console.WriteLine("Assembly		{0}", Convert.ToInt32(AttributeTargets.Assembly));
    Console.WriteLine("Module			{0}", Convert.ToInt32(AttributeTargets.Module));
    Console.WriteLine("Class			{0}", Convert.ToInt32(AttributeTargets.Class));
    Console.WriteLine("Struct			{0}", Convert.ToInt32(AttributeTargets.Struct));
    Console.WriteLine("Enum			{0}", Convert.ToInt32(AttributeTargets.Enum));
    Console.WriteLine("Constructor		{0}", Convert.ToInt32(AttributeTargets.Constructor));
    Console.WriteLine("Method			{0}", Convert.ToInt32(AttributeTargets.Method));
    Console.WriteLine("Property		{0}", Convert.ToInt32(AttributeTargets.Property));
    Console.WriteLine("Field			{0}", Convert.ToInt32(AttributeTargets.Field));
    Console.WriteLine("Event			{0}", Convert.ToInt32(AttributeTargets.Event));
    Console.WriteLine("Interface		{0}", Convert.ToInt32(AttributeTargets.Interface));
    Console.WriteLine("Parameter		{0}", Convert.ToInt32(AttributeTargets.Parameter));
    Console.WriteLine("Delegate		{0}", Convert.ToInt32(AttributeTargets.Delegate));
    Console.WriteLine("ReturnValue		{0}", Convert.ToInt32(AttributeTargets.ReturnValue));
    Console.WriteLine("GenericParameter	{0}", Convert.ToInt32(AttributeTargets.GenericParameter));
    Console.WriteLine("All			{0}", Convert.ToInt32(AttributeTargets.All));
    Console.ReadKey();
}
运行结果如下: 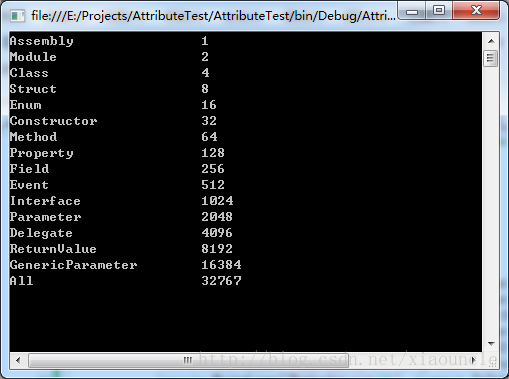
它们的值并不是步长值为1的线性递增,除了All之外,每个值的二进制形式中只有一位是“1”,其余全是“0”。这就是枚举值的另一种用法——标识位。那么标识位有什么好处呢?
如果我们的Attribute要求既能附着在类上,又能附着在方法上,可以使用C#中的操作符”|”(即按位求“或”)。有了它,我们只需要将代码书写如下:AttributeTargets.Class | AttributeTargets.Method,因为这两个枚举值的标识位(也就是那个唯一的1)是错开的,所以只需按位求或就解决问题了。这样,你就能理解为什么AttributeTargets.All的值是32767了。
默认情况下,当我们声明并定义一个新的Attribute类时,它的可附着目标是AttributeTargets.All。大多数情况下,AttributeTargets.All就已经满足要求了。不过,如果你非要对它有所限制,那就要费点儿周折了。
例如,你想把前面的HobbyAttribute类的附着目标限制为只有“类”和“属性”能使用,则示例代码如下:
[AttributeUsage(AttributeTargets.Class | AttributeTargets.Property)]
class HobbyAttribute : Attribute
{
    //HobbyAttribute类的具体实现
}
这里使用Attribute的实例(AttributeUsage)附着在Attribute类(HobbyAttribute)上。Attribute的本质是类,而AttributeUsage又说明HobbyAttribute可以附着在哪些类型上。
七、附加问题
1、如果一个Attribute类附着在了某个类上,那么这个Attribute类会不会随着继承关系也附着到派生类上呢?
2、可不可以像多个牡蛎附着在同一艘船上那样,让一个Attribute类的多个实例附着在同一个目标上呢?
答案:可以。代码如下:
[AttributeUsage(AttributeTargets.Class | AttributeTargets.Property,Inherited = false,AllowMultiple = true)]
class HobbyAttribute : Attribute
{
    //HobbyAttribute类的具体实现
}
AttributeUsage这个专门用来修饰Attribute的Attribute,除了可以控制修饰目标外,还能决定被它修饰的Attribute是否可以随宿主“遗传”,以及是否可以使用多个实例来修饰同一个目标!
那修饰ConditionalAttribute的AttributeUsage又会是什么样子呢?(答案在MSDN中)
参考文章:
深入浅出Attribute (上)——Attribute初体验
深入浅出Attribute (中)——Attribute本质论
我很想知道写这两篇文章的作者,他是在哪里获得这些知识的,或者说他在写这两篇文章时又参考了哪些资料呢?