1、PXE是什么?
pxe是Preboot Excution Environment的缩写,是intel公司研发,基于client/server的网络模式,支持远程主机通过网络从远端服务器下载镜,并由此支持通过网络启动操作系统的预启动执行环境。
2、PXE的工作原理
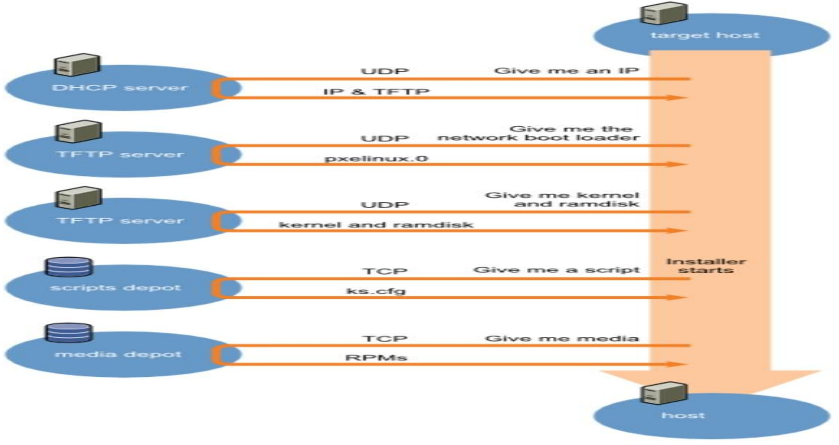
它的工作流程是这样的:
1、客户端向PXE 服务器上的DHCP发送ip地址请求消息,DHCP检测到客户端是否合法(主要是检测客户端的网卡MAC地址)如果合法则返回客户端的ip地址,同时将启动文件pxelinx.0位置信息一并传给客户端;
2、客户端拿到IP地址和存放启动文件服务器(tftp服务器)地址后,它就会用向tftp服务器发送获取pxelinux.0的请求消息,tftp服务器接收到消息后,再向客户端发送pxelinux.0文件的大小,试探客户端是否满意,当tftp接收到客户端发回的同意大小信息后,tftp服务器就正式向客户端发送pxelinux.0文件;
3、客户端收到tftp发送过来的pxelinux.0文件后,客户端会再向tftp服务器发送针对本机的配置信息文件(在TFTP服务器的pxelinux.cfg目录下),TFTP服务器将配置文件发送给客户端后,继而客户端根据配置文件执行后续的操作;
4、客户端向TFTP服务器发送请求Linux内核信息,tftp接收到消息后将内核文件发送给客户端,客户端接收到内核文件后,又向tftp发送获取根文件请求的信息,当tftp服务器收到根文件请求信息后,就把根文件发送给客户端;
5、客户端此时有了Linux内核文件和根文件后,客户端尝试启动Linux内核;
6、客户端下载安装源文件,读取自动化安装脚本(ks.cfg)
从上面的流程我们可以知道,我们首先要配置好DHCP服务器,TFTP服务器,然后准备必要的启动文件,和配置文件,以及自动安装脚本。
DHCP服务器的搭建,以及配置
[root@localhost ~]# yum install dhcp
Loaded plugins: fastestmirror, refresh-packagekit, security
Setting up Install Process
Loading mirror speeds from cached hostfile
 * base: mirrors.aliyun.com
 * extras: mirrors.aliyun.com
 * updates: mirrors.aliyun.com
Resolving Dependencies
--> Running transaction check
---> Package dhcp.x86_64 12:4.1.1-63.P1.el6.centos will be installed
--> Processing Dependency: dhcp-common = 12:4.1.1-63.P1.el6.centos for package: 12:dhcp-4.1.1-63.P1.el6.centos.x86_64
--> Running transaction check
---> Package dhcp-common.x86_64 12:4.1.1-53.P1.el6.centos will be updated
--> Processing Dependency: dhcp-common = 12:4.1.1-53.P1.el6.centos for package: 12:dhclient-4.1.1-53.P1.el6.centos.x86_64
---> Package dhcp-common.x86_64 12:4.1.1-63.P1.el6.centos will be an update
--> Running transaction check
---> Package dhclient.x86_64 12:4.1.1-53.P1.el6.centos will be updated
---> Package dhclient.x86_64 12:4.1.1-63.P1.el6.centos will be an update
--> Finished Dependency Resolution

Dependencies Resolved

================================================================================
 Package          Arch        Version                        Repository    Size
================================================================================
Installing:
 dhcp             x86_64      12:4.1.1-63.P1.el6.centos      updates      824 k
Updating for dependencies:
 dhclient         x86_64      12:4.1.1-63.P1.el6.centos      updates      323 k
 dhcp-common      x86_64      12:4.1.1-63.P1.el6.centos      updates      145 k

Transaction Summary
================================================================================
Install       1 Package(s)
Upgrade       2 Package(s)

Total download size: 1.3 M
Is this ok [y/N]: y
Downloading Packages:
(1/3): dhclient-4.1.1-63.P1.el6.centos.x86_64.rpm        | 323 kB     00:00
(2/3): dhcp-4.1.1-63.P1.el6.centos.x86_64.rpm            | 824 kB     00:00
(3/3): dhcp-common-4.1.1-63.P1.el6.centos.x86_64.rpm     | 145 kB     00:00
--------------------------------------------------------------------------------
Total                                           2.0 MB/s | 1.3 MB     00:00
warning: rpmts_HdrFromFdno: Header V3 RSA/SHA1 Signature, key ID c105b9de: NOKEY
Retrieving key from file:///etc/pki/rpm-gpg/RPM-GPG-KEY-CentOS-6
Importing GPG key 0xC105B9DE:
 Userid : CentOS-6 Key (CentOS 6 Official Signing Key) <centos-6-key@centos.org>
 Package: centos-release-6-9.el6.12.3.x86_64 (@anaconda-CentOS-201703281317.x86_64/6.9)
 From   : /etc/pki/rpm-gpg/RPM-GPG-KEY-CentOS-6
Is this ok [y/N]: y
Running rpm_check_debug
Running Transaction Test
Transaction Test Succeeded
Running Transaction
  Updating   : 12:dhcp-common-4.1.1-63.P1.el6.centos.x86_64                 1/5
  Installing : 12:dhcp-4.1.1-63.P1.el6.centos.x86_64                        2/5
  Updating   : 12:dhclient-4.1.1-63.P1.el6.centos.x86_64                    3/5
  Cleanup    : 12:dhclient-4.1.1-53.P1.el6.centos.x86_64                    4/5
  Cleanup    : 12:dhcp-common-4.1.1-53.P1.el6.centos.x86_64                 5/5
  Verifying  : 12:dhcp-common-4.1.1-63.P1.el6.centos.x86_64                 1/5
  Verifying  : 12:dhcp-4.1.1-63.P1.el6.centos.x86_64                        2/5
  Verifying  : 12:dhclient-4.1.1-63.P1.el6.centos.x86_64                    3/5
  Verifying  : 12:dhcp-common-4.1.1-53.P1.el6.centos.x86_64                 4/5
  Verifying  : 12:dhclient-4.1.1-53.P1.el6.centos.x86_64                    5/5

Installed:
  dhcp.x86_64 12:4.1.1-63.P1.el6.centos

Dependency Updated:
  dhclient.x86_64 12:4.1.1-63.P1.el6.centos
  dhcp-common.x86_64 12:4.1.1-63.P1.el6.centos

Complete!
说明:dhcp实现的软件有dhcp和dnsmasq两个软件,我们这用的DHCP,yum安装DHCP服务器包后,我们再来写配置文件
[root@localhost ~]# cp /usr/share/doc/dhcp-4.1.1/dhcpd.conf.sample /etc/dhcp/dhcpd.conf
cp: overwrite `/etc/dhcp/dhcpd.conf'? y
说明:我们打开/etc/dhcp/dhcpd.conf,里面内容是注释,它告诉我们参照/usr/share/doc/dhcp-4.1.1/dhcpd.conf.sample文件来配置,于是乎我们就干脆把模板文件复制到/etc/dhcp/下并命名为dhcpd.conf,接下来在修改即可
# DHCP server to understand the network topology.

subnet 172.16.56.0 netmask 255.255.255.0 {
        range 172.16.56.100 172.16.56.200;
        option routers 172.16.56.5;
        option domain-name-servers 172.16.56.5;
        filename "pxelinux.0";
        next-server 172.16.56.5;
}
说明:我们要在配置文件中配置好dhcp分配的地址池(这个地址池必须要和主机在同一网段) ,网关,dns等,最重要的还要配置好TFTP服务器的地址,和引导系统的文件名称pxelinux.0,这样客户端才能够知道tftp服务器的地址和tftp上的那个文件是引导文件。range 后面跟地址池范围,option routers 指定网关,option domain-name-servers 指定dns地址 ,filename指定启动引导文件的名字,next-server 指定TFTP服务器地址。这里需要注意的是每行结束都需要有分号。当然我们可以用 service dhcpd configtest 来测试我们的配置文件是否存在语法错误。
接着我们配置好DHCP服务器后,就可以启动DHCP服务了
[root@localhost ~]# /etc/init.d/dhcpd start
Starting dhcpd:                                            [  OK  ]
[root@localhost ~]# ss -uln
State       Recv-Q Send-Q           Local Address:Port             Peer Address:Port
UNCONN      0      0                            *:67                          *:*
UNCONN      0      0                            *:68                          *:*
UNCONN      0      0                    127.0.0.1:737                         *:*
UNCONN      0      0                            *:55660                       *:*
UNCONN      0      0                            *:111                         *:*
UNCONN      0      0                            *:631                         *:*
UNCONN      0      0                            *:679                         *:*
UNCONN      0      0                           :::111                        :::*
UNCONN      0      0                           :::49813                      :::*
UNCONN      0      0                           :::679                        :::*
[root@localhost ~]#
说明:我们可以看到udp的67、68端口已经起来了,说明我们的DHCP服务器已经正常启动。
测试DHCP服务是否正常,客户端是否能够顺利拿到地址,在同一局域网里另外拿一台主机,在上面用dhclient 工具来拿地址
[root@host_A ~]# dhclient -d
Internet Systems Consortium DHCP Client 4.1.1-P1
Copyright 2004-2010 Internet Systems Consortium.
All rights reserved.
For info, please visit https://www.isc.org/software/dhcp/

Listening on LPF/eth0/00:0c:29:47:f6:ed
Sending on   LPF/eth0/00:0c:29:47:f6:ed
Sending on   Socket/fallback
DHCPREQUEST on eth0 to 255.255.255.255 port 67 (xid=0x758b581e)
DHCPACK from 172.16.56.5 (xid=0x758b581e)
bound to 172.16.56.100 -- renewal in 282 seconds.
说明:我们可以看到客户端已经拿到了地址,当然我们也可以在服务端看到那些地址是分配出去了,分配给谁,租期是好久等信息。
[root@localhost ~]# cat /var/lib/dhcpd/dhcpd.leases
# The format of this file is documented in the dhcpd.leases(5) manual page.
# This lease file was written by isc-dhcp-4.1.1-P1
server-duid "�00�01�00�01%Q205x�00�14)350366{";
lease 172.16.56.100 {
starts 0 2019/11/03 12:34:19;
ends 0 2019/11/03 12:44:19;
cltt 0 2019/11/03 12:34:19;
binding state active;
next binding state free;
hardware ethernet 00:0c:29:47:f6:ed;
}
[root@localhost ~]#
说明:在DHCP服务器的/var/lib/dhcpd/dhcpd.leases 文件中记录了服务器分配出去的地址,客户端的MAC 租期等信息。到此我们DHCP服务器的搭建就完成了。
接下来我们在来搭建tftp服务器。
[root@localhost yum.repos.d]# yum install -y tftp
Loaded plugins: fastestmirror, refresh-packagekit, security
Setting up Install Process
Loading mirror speeds from cached hostfile
Resolving Dependencies
--> Running transaction check
---> Package tftp.x86_64 0:0.49-8.el6 will be installed
--> Finished Dependency Resolution

Dependencies Resolved

=======================================================================================
 Package          Arch               Version                  Repository          Size
=======================================================================================
Installing:
 tftp             x86_64             0.49-8.el6               mybase              32 k

Transaction Summary
=======================================================================================
Install       1 Package(s)

Total download size: 32 k
Installed size: 45 k
Downloading Packages:
Running rpm_check_debug
Running Transaction Test
Transaction Test Succeeded
Running Transaction
  Installing : tftp-0.49-8.el6.x86_64                                              1/1
  Verifying  : tftp-0.49-8.el6.x86_64                                              1/1

Installed:
  tftp.x86_64 0:0.49-8.el6

Complete!
[root@localhost yum.repos.d]# yum install -y tftp-server
Loaded plugins: fastestmirror, refresh-packagekit, security
Setting up Install Process
Loading mirror speeds from cached hostfile
Resolving Dependencies
--> Running transaction check
---> Package tftp-server.x86_64 0:0.49-8.el6 will be installed
--> Processing Dependency: xinetd for package: tftp-server-0.49-8.el6.x86_64
--> Running transaction check
---> Package xinetd.x86_64 2:2.3.14-40.el6 will be installed
--> Finished Dependency Resolution

Dependencies Resolved

=======================================================================================
 Package              Arch            Version                    Repository       Size
=======================================================================================
Installing:
 tftp-server          x86_64          0.49-8.el6                 mybase           39 k
Installing for dependencies:
 xinetd               x86_64          2:2.3.14-40.el6            mybase          122 k

Transaction Summary
=======================================================================================
Install       2 Package(s)

Total download size: 161 k
Installed size: 317 k
Downloading Packages:
---------------------------------------------------------------------------------------
Total                                                  6.0 MB/s | 161 kB     00:00
Running rpm_check_debug
Running Transaction Test
Transaction Test Succeeded
Running Transaction
  Installing : 2:xinetd-2.3.14-40.el6.x86_64                                       1/2
  Installing : tftp-server-0.49-8.el6.x86_64                                       2/2
  Verifying  : 2:xinetd-2.3.14-40.el6.x86_64                                       1/2
  Verifying  : tftp-server-0.49-8.el6.x86_64                                       2/2

Installed:
  tftp-server.x86_64 0:0.49-8.el6

Dependency Installed:
  xinetd.x86_64 2:2.3.14-40.el6

Complete!
[root@localhost yum.repos.d]#
说明:TFTP服务器就只需要安装tftp-server这个包就可以了,tftp这个包是客户端工具,方便测试。我们装好TFTP可以用rpm -ql tftp-server命令来查看,这个包到底安装了些什么文件,装在什么地方去了
[root@localhost yum.repos.d]# rpm -ql tftp-server
/etc/xinetd.d/tftp
/usr/sbin/in.tftpd
/usr/share/doc/tftp-server-0.49
/usr/share/doc/tftp-server-0.49/CHANGES
/usr/share/doc/tftp-server-0.49/README
/usr/share/doc/tftp-server-0.49/README.security
/usr/share/doc/tftp-server-0.49/README.security.tftpboot
/usr/share/man/man8/in.tftpd.8.gz
/usr/share/man/man8/tftpd.8.gz
/var/lib/tftpboot
[root@localhost yum.repos.d]#
说明:/etc/xined.d/tftp 这个就是tftp的配置文件,因为tftp不是独立的守护进程,它是瞬时守护进程,有超级守护进程xinetd管理,所以它的配置文件在xinetd.d目录下;/usr/sbin/in.tftpd 这个文件就是tftp二进制主程序;/var/lib/tftpboot 这个目录就是tftp服务器的工作目录,我们上传下载的文件都是放在这个目录下
启动tftp服务器
[root@localhost ~]# chkconfig tftp on
[root@localhost ~]# chkconfig --list tftp
tftp            on
[root@localhost ~]# /etc/init.d/xinetd restart
Stopping xinetd:                                           [FAILED]
Starting xinetd:                                           [  OK  ]
[root@localhost ~]# ss -nul
State       Recv-Q Send-Q           Local Address:Port             Peer Address:Port
UNCONN      0      0                            *:67                          *:*
UNCONN      0      0                            *:69                          *:*
UNCONN      0      0                    127.0.0.1:737                         *:*
UNCONN      0      0                            *:55660                       *:*
UNCONN      0      0                            *:111                         *:*
UNCONN      0      0                            *:631                         *:*
UNCONN      0      0                            *:679                         *:*
UNCONN      0      0                           :::111                        :::*
UNCONN      0      0                           :::49813                      :::*
UNCONN      0      0                           :::679                        :::*
[root@localhost ~]#
说明:TFTP默认工作在udp的69号端口,可以看到69号端口已经启动。
测试:我们在TFTP服务器上放一些文件,看能不能下载下来,如果能,这我们的tftp服务器就搭建的没有问题
[root@localhost tmp]# echo "this is test file" >> f1
[root@localhost tmp]# ls
f1
[root@localhost tmp]# cp f1 /var/lib/tftpboot/
[root@localhost tmp]# ll /var/lib/tftpboot/
total 8
-rw-------. 1 root root 1591 Nov  3 21:06 anaconda-ks.cfg
-rw-r--r--. 1 root root   18 Nov  3 21:09 f1
[root@localhost tmp]# cd
[root@localhost ~]# ls
anaconda-ks.cfg  Documents  install.log         Music     Public     Videos
Desktop          Downloads  install.log.syslog  Pictures  Templates
[root@localhost ~]# tftp 172.16.56.5
tftp> get f1
tftp> q
[root@localhost ~]# ls
anaconda-ks.cfg  Documents  f1           install.log.syslog  Pictures  Templates
Desktop          Downloads  install.log  Music               Public    Videos
[root@localhost ~]# cat f1
this is test file
[root@localhost ~]#
说明:我们搭建的TFTP服务器器能够下载文件,至此TFTP服务器就搭建完毕。
接下来我们还需要搭建一个基于HTTP的网络yum仓库
[root@localhost yum.repos.d]# yum install httpd -y
Loaded plugins: fastestmirror, refresh-packagekit, security
Setting up Install Process
Loading mirror speeds from cached hostfile
Package httpd-2.2.15-59.el6.centos.x86_64 already installed and latest version
Nothing to do
[root@localhost yum.repos.d]# /etc/init.d/httpd start
Starting httpd: httpd: Could not reliably determine the server's fully qualified domain name, using localhost.localdomain for ServerName
                                                           [  OK  ]
[root@localhost yum.repos.d]# cd /var/www/html/
[root@localhost html]# ls
[root@localhost html]# mkdir centos/6/os/x86_64 -pv
mkdir: created directory `centos'
mkdir: created directory `centos/6'
mkdir: created directory `centos/6/os'
mkdir: created directory `centos/6/os/x86_64'
[root@localhost html]# mount /dev/sr0 /var/www/html/centos/6/os/x86_64/
mount: block device /dev/sr0 is write-protected, mounting read-only
[root@localhost html]# ls centos/6/os/x86_64/
CentOS_BuildTag  isolinux                  RPM-GPG-KEY-CentOS-Debug-6
EFI              Packages                  RPM-GPG-KEY-CentOS-Security-6
EULA             RELEASE-NOTES-en-US.html  RPM-GPG-KEY-CentOS-Testing-6
GPL              repodata                  TRANS.TBL
images           RPM-GPG-KEY-CentOS-6
[root@localhost html]#
说明:yum仓库的搭建请参考https://www.cnblogs.com/qiuhom-1874/p/11487456.html 这里不作过多解释
system-config-kickstart图形工具生成kickstart应答文件ks.cfg
1、先安装system-config-kickstart
[root@localhost ~]# yum install -y system-config-kickstart
2、在图形界面打开一个终端输入system-config-kickstart启动system-config-kickstart编辑器
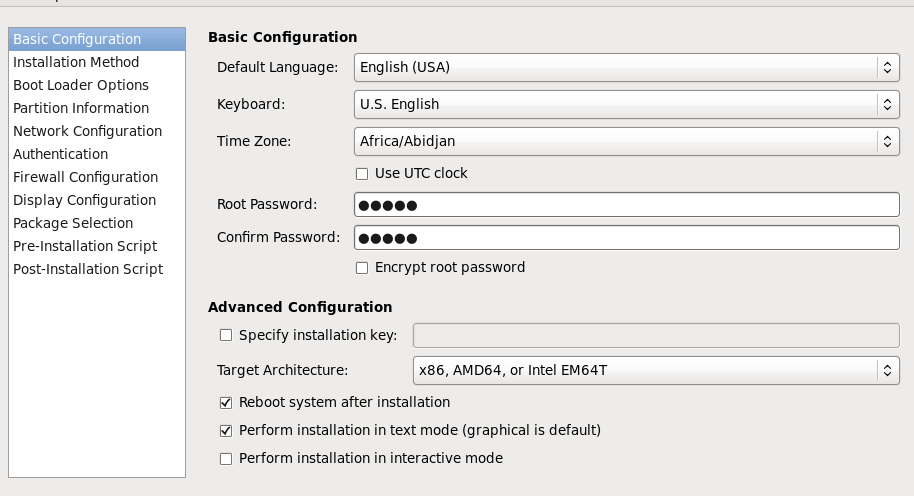
说明:上图是基本配置页面,里面可以指定系统的语言,键盘布局,时区的设定,root密码,安装平台,安装后是否重启,以什么模式安装。
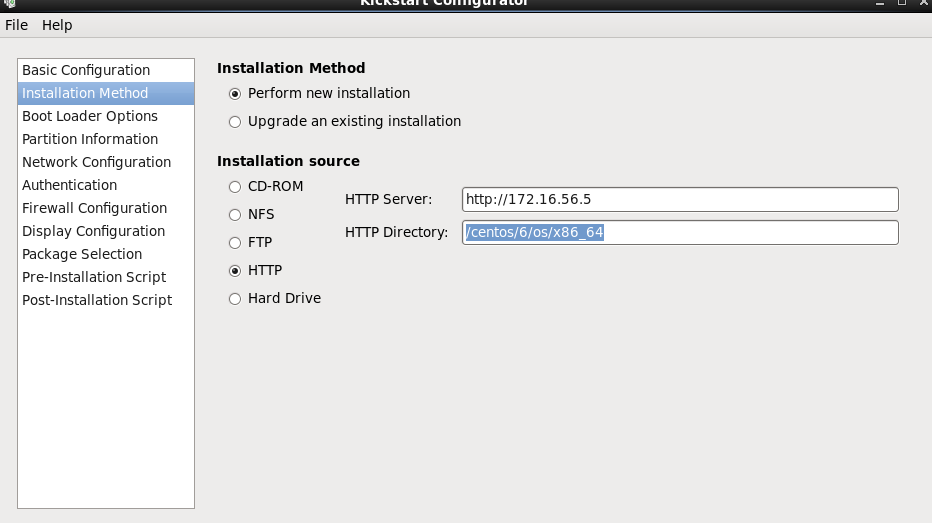
说明:上图是安装方法的配置,可以配置系统是新装还是更新,安装源,就是我们镜像存放的位置。
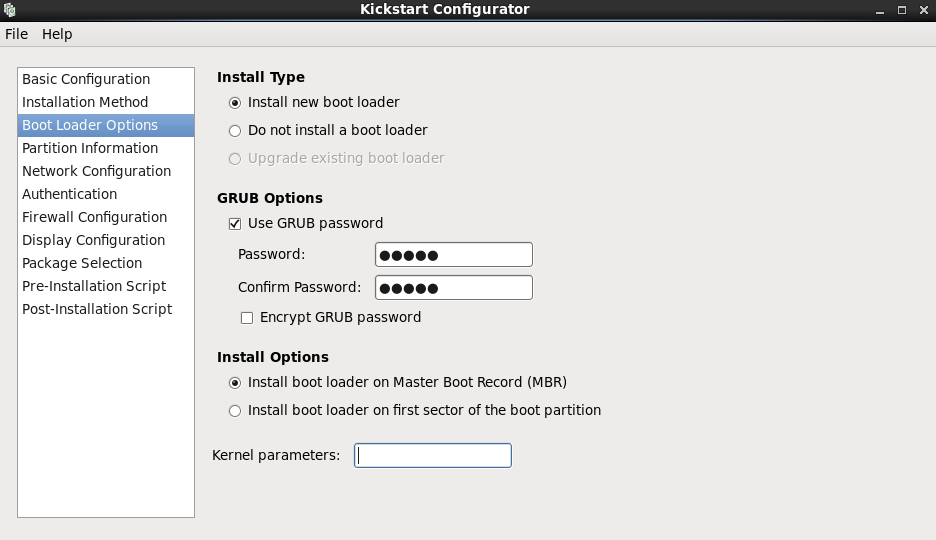
说明:上图是bootloader选项配置,在此页面可以配置bootloader安装类型,grub口令,boot loader安装在那个位置,还可以写内核参数。
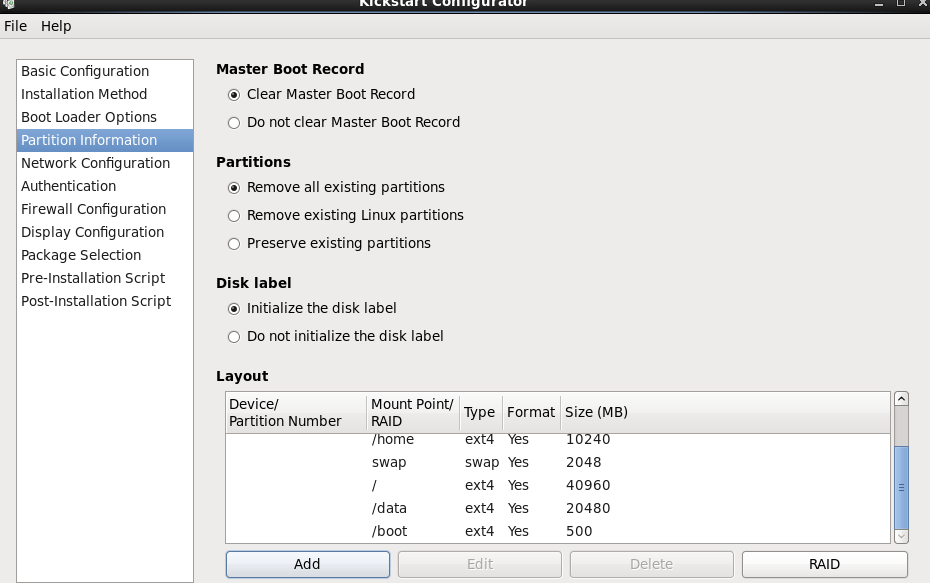
说明:上图是分区信息配置,在此页面可以配置清除原有MBR,是否清除原有的分区信息,是否初始化磁盘标签,以及分区策略,以及raid的配置
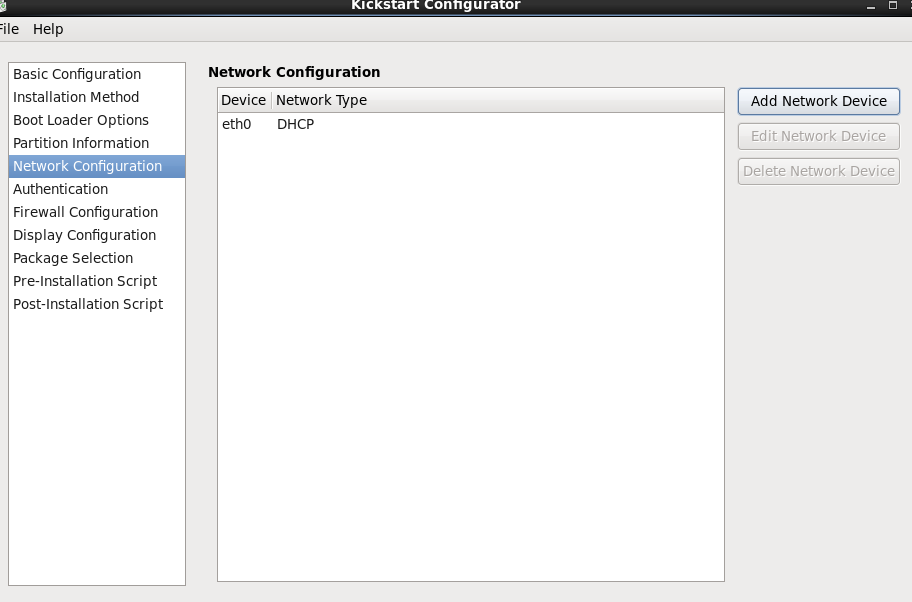
说明:此页面是网络配置页面

说明:此页面是认证方法的配置,一般我们不该它的默认配置,它默认配置是本地验证,也就是用/etc/passwd文件里的内容来验证,当然也可以根据自己的实际情况去配置,可以支持ldap,nis等验证
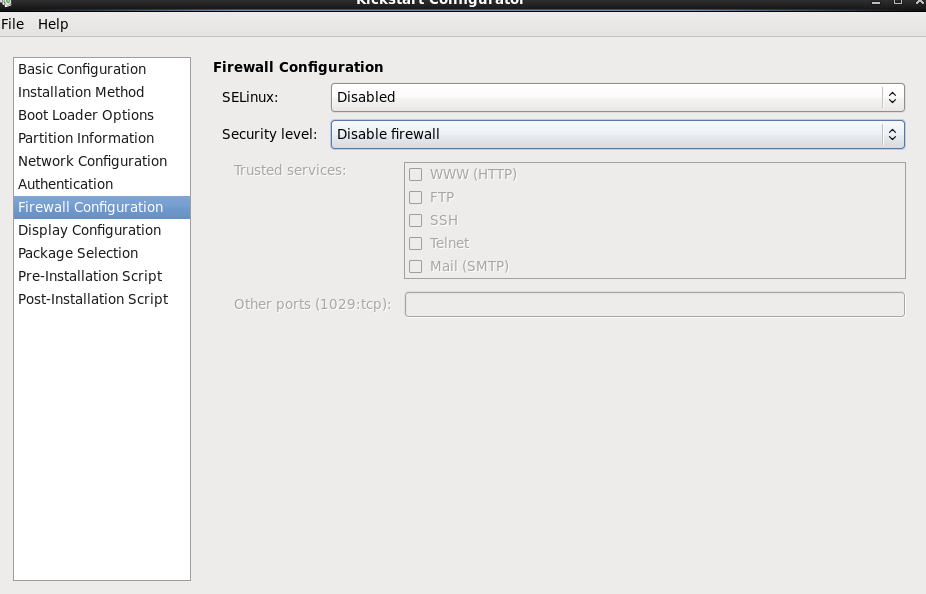
说明:此页面是防火墙和selinux配置页面

说明:此页面是显示配置,可以配置是否安装图形环境,是否第一次启动时初始化
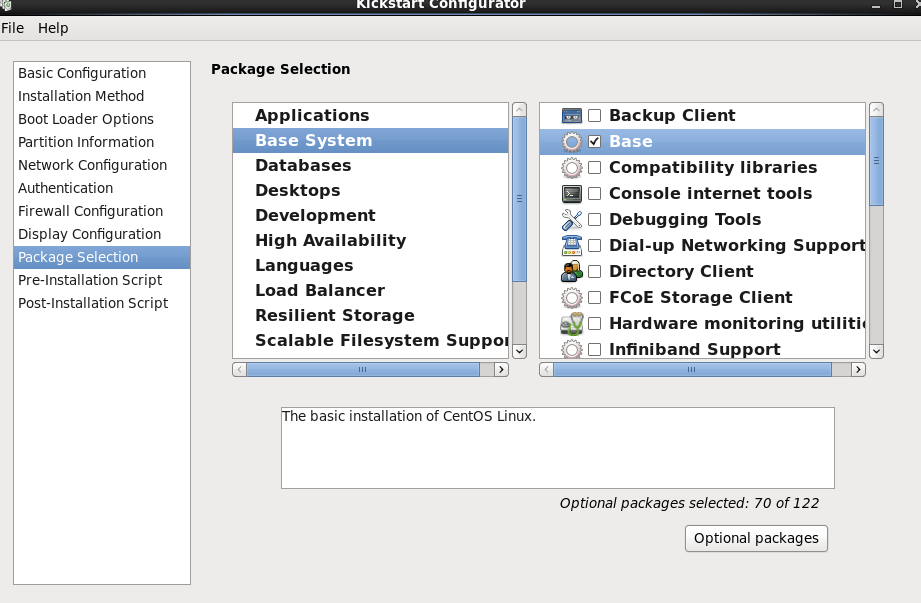
说明:以上页面上包的选择配置页面,我们需要装什么包就在里面打对勾就好

说明:此页面是我们写安装前的脚本,我们希望系统安装前需要干什么事可以用脚本的方式告诉它

说明:此页面是定制安装后需要跑的脚本内容,如上,我们写了一个yum仓库的配置,系统安装后自动就会有此仓库配置
配置好以上后我们找到文件按钮,然后点击里面的save ,然后选择位置,就可以把我们之前的选项生成一个kictstart文件

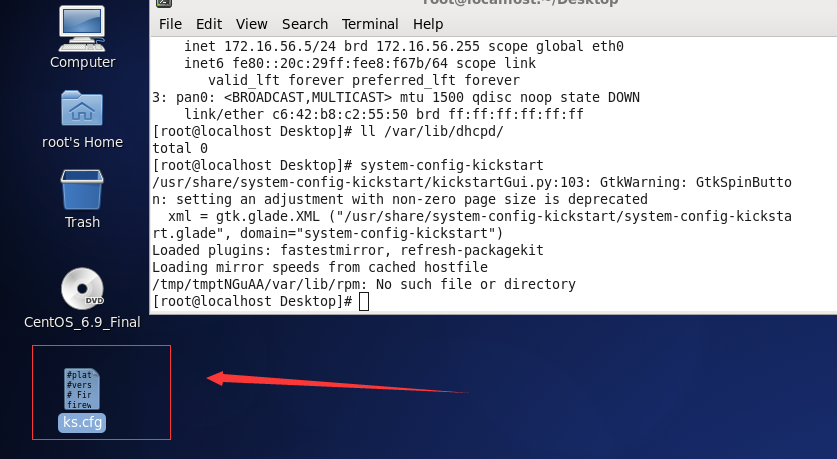
[root@localhost Desktop]# cat ks.cfg
#platform=x86, AMD64, or Intel EM64T
#version=DEVEL
# Firewall configuration
firewall --disabled
# Install OS instead of upgrade
install
# Use network installation
url --url="http://172.16.56.5/centos/6/os/x86_64"
# Root password
rootpw --plaintext admin
# System authorization information
auth  --useshadow  --passalgo=sha512
# Use text mode install
text
# System keyboard
keyboard us
# System language
lang en_US
# SELinux configuration
selinux --disabled
# Do not configure the X Window System
skipx
# Installation logging level
logging --level=info
# Reboot after installation
reboot
# System timezone
timezone  Africa/Abidjan
# Network information
network  --bootproto=dhcp --device=eth0 --onboot=on
# System bootloader configuration
bootloader --location=mbr --password="admin"
# Clear the Master Boot Record
zerombr
# Partition clearing information
clearpart --all --initlabel
# Disk partitioning information
part /home --fstype="ext4" --size=10240
part swap --fstype="swap" --size=2048
part / --fstype="ext4" --size=40960
part /data --fstype="ext4" --size=20480
part /boot --fstype="ext4" --size=500

%post
mkdir /etc/yum.repos.d/bak_repo
mv /etc/yum.repos.d/*.repo /etc/yum.repos.d/bak_repo
cat > /etc/yum.repos.d/myrepo.repo<< EOF
[mybase]
name=mybase
baseurl=http://172.16.56.5/centos/6/os/x86_64
gpgcheck=0
EOF
%end
%packages
@base
%end
至此我们用system-config-kickstart工具就制作好了我们的应答文件。
准备启动相关文件
[root@localhost tftpboot]# yum install -y syslinux
Loaded plugins: fastestmirror, refresh-packagekit, security
Setting up Install Process
Loading mirror speeds from cached hostfile
Resolving Dependencies
--> Running transaction check
---> Package syslinux.x86_64 0:4.04-3.el6 will be installed
--> Processing Dependency: syslinux-nonlinux for package: syslinux-4.04-3.el6.x86_64
--> Running transaction check
---> Package syslinux-nonlinux.noarch 0:4.04-3.el6 will be installed
--> Finished Dependency Resolution

Dependencies Resolved

=======================================================================================
 Package                    Arch            Version              Repository       Size
=======================================================================================
Installing:
 syslinux                   x86_64          4.04-3.el6           mybase          346 k
Installing for dependencies:
 syslinux-nonlinux          noarch          4.04-3.el6           mybase          584 k

Transaction Summary
=======================================================================================
Install       2 Package(s)

Total download size: 929 k
Installed size: 2.2 M
Downloading Packages:
---------------------------------------------------------------------------------------
Total                                                   26 MB/s | 929 kB     00:00
Running rpm_check_debug
Running Transaction Test
Transaction Test Succeeded
Running Transaction
  Installing : syslinux-nonlinux-4.04-3.el6.noarch                                 1/2
  Installing : syslinux-4.04-3.el6.x86_64                                          2/2
  Verifying  : syslinux-4.04-3.el6.x86_64                                          1/2
  Verifying  : syslinux-nonlinux-4.04-3.el6.noarch                                 2/2

Installed:
  syslinux.x86_64 0:4.04-3.el6

Dependency Installed:
  syslinux-nonlinux.noarch 0:4.04-3.el6

Complete!
[root@localhost tftpboot]# find / -name pxelinux.0
/usr/share/syslinux/pxelinux.0
[root@localhost tftpboot]#
说明:在centos7我需要安装syslinux这个包,因为这个包里有我们需要的pxelinux.0这个文件,而在centos6上需要安装syslinux-nolinux这个包,当然在centos6上安装syslinux这个包,默认会把它依赖的syslinux-nolinux这个包给安装上。所以我们在centos6上安装syslinux也是可以的,只不过我们要用find命令去查找才能知道pxelinux.0这个文件的具体位置,rpm -ql syslinux里是查不到的。当然我们推荐还是只装syslinux-nolinux这个包就好了。
[root@localhost tftpboot]# mkdir /var/lib/tftpboot/pxelinux.cfg
[root@localhost tftpboot]# pwd
/var/lib/tftpboot
[root@localhost tftpboot]# cp /usr/share/syslinux/pxelinux.0 .
[root@localhost tftpboot]# cp /misc/cd/images/pxeboot/{vmlinuz,initrd.img} .
[root@localhost tftpboot]# cp /misc/cd/isolinux/{boot.msg,vesamenu.c32,splash.jpg} .
[root@localhost tftpboot]# tree
.
├── boot.msg
├── initrd.img
├── pxelinux.0
├── pxelinux.cfg
├── splash.jpg
├── vesamenu.c32
└── vmlinuz

1 directory, 6 files
[root@localhost tftpboot]#
说明:我们需要vmlinuz(压缩的内核文件),initrd.img(根文件,存放系统启动需要挂载的驱动),pxelinux.0(系统引导文件,作用类似bootloader),boot.msg,vesamenu.c32,splash.jpg(这个图片就是我们装系统时选择怎么安装后面那个背景图片)
准备启动菜单文件
[root@localhost tftpboot]# cp /misc/cd/isolinux/isolinux.cfg pxelinux.cfg/default
[root@localhost tftpboot]# cat pxelinux.cfg/default
default vesamenu.c32
#prompt 1
timeout 60

display boot.msg

menu background splash.jpg
menu title Welcome to CentOS 6.9!
menu color border 0 #ffffffff #00000000
menu color sel 7 #ffffffff #ff000000
menu color title 0 #ffffffff #00000000
menu color tabmsg 0 #ffffffff #00000000
menu color unsel 0 #ffffffff #00000000
menu color hotsel 0 #ff000000 #ffffffff
menu color hotkey 7 #ffffffff #ff000000
menu color scrollbar 0 #ffffffff #00000000

label auto
  menu label ^Auto install  an  system
  menu default
  kernel vmlinuz
  append initrd=initrd.img ks=http://172.16.56.5/centos/6/ks/centos6.cfg
label local
  menu label Boot from ^local drive
  localboot 0xffff
[root@localhost tftpboot]#
说明:启动菜单在光盘的ioslinux目录下就有一个isolinux.cfg文件,这个文件定义了启动菜单内容,和ks自动安装脚本的位置。
测试
新建一个虚拟机,把网络和pxe服务器设置在同一局域网里,然后打开电源

说明:启动虚拟机时,寻找DHCP服务器

说明:找到DHCP服务器后,显示我们之前定制的菜单
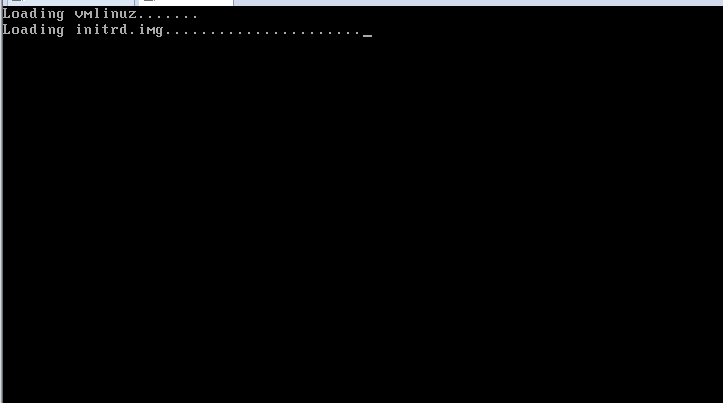
说明:加载vmlinuz和initrd.img文件
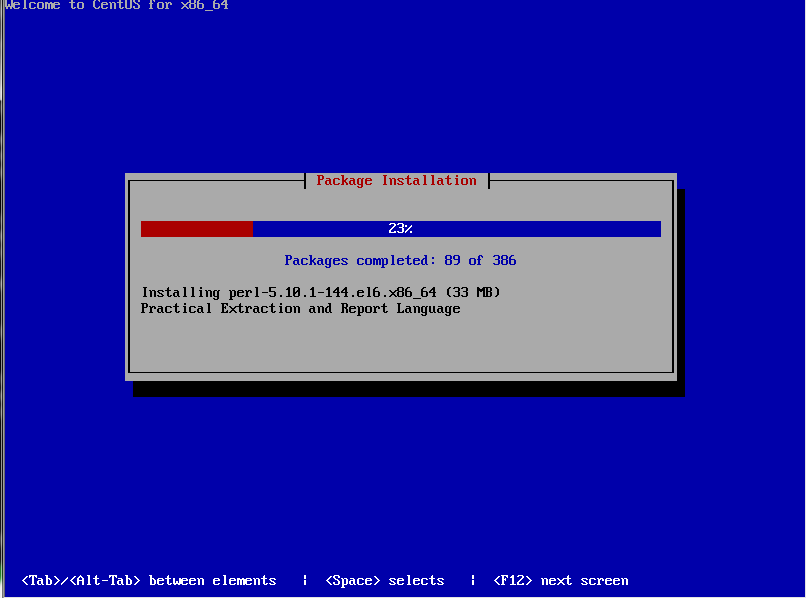
说明:自动安装我们选择需要装的包

说明:系统自动安装完毕,自动重启后,登录系统的界面。至此pxe自动安装系统环境我们就搭建完毕。
以上是用pxe安装centos6系统,接下来我们再说说安装centos7系统
pxe安装centos7系统和安装centos6系统流程和工作过程都是一样的
第一步安装系统所需要的包,并把相应的服务设置为开机启动
yum install httpd dhcp tftp-server syslinux -y
systemctl enable httpd dhcpd tftp
说明:若pxe服务器是centos7用以上命令
yum install httpd dhcp tftp-server syslinux -y
chkconfig httpd on
chkconfig dhcpd on
chkconfig tftp on
说明:若pxe服务器上centos6用以上命令
第二步准备好yum源,并启动httpd服务
mkdir /var/www/html/centos/7/os/x86_64/ -p
mount /dev/sr1 /var/www/html/centos/7/os/x86_64/

/etc/init.d/httpd   start
说明:在新加的光驱,要让系统识别,我们要用 echo '- - -' > /sys/class/scsi_host/host2/scan(有的机子上是host0)命令更新一下,不然lsblk看不到对应的设备,也就无法挂载
第三步配置好dhcp服务器,启动dhcpd,tftp服务,这个和上面有一样,这里就不再罗嗦
第四步准备ks文件,并放到yum仓库中
mkdir /var/www/html/centos/7/ks -p
cp centos7.cfg /var/www/html/centos/7/ks/
说明:制作做ks文件可以参照centos6上的做法,若pxe服务器是centos7 要注意一点的是在我们选择选择包的界面有可能出现的是空白页面无法选择,若出现这种问题,我们需要把自己的yum源名字改成development就可以了,其他步骤同centos6一样
第五步准备相应的文件
mkdir /var/lib/tftpboot/pxelinux.cfg/
cp /usr/share/syslinux/{menu.c32,pxelinux.0} /var/lib/tftpboot/
cp /var/www/html/centos/7/os/x86_64/ioslinux.cfg/{vmlinuxz,initrd.img} /var/lib/tftpboot/
cp /var/www/html/centos/7/os/x86_64/ioslinux.cfg/isolinux.cfg /var/lib/tftpboot/pxelinux.cfg/default
第六步准备启动菜单
vim /var/lib/tftpboot/pxelinux.cfg/default
default menu.c32
timeout 100
menu title PXE Install CentOS

label mini
  menu label ^Auto Install Mini CentOS 7
  kernel vmlinuz
  append initrd=initrd.img ks=http://192.168.0.218/centos/7/ks/centos7.cfg
至此pxe服务器自动安装centos7就搭建好了。测试和上面centos6是一样的,这里就不多阐述。