当我们在开发vue-cli项目的时候,通常前期需要将项目的地基搭建起来,然后才是开发项目,下面是我整理的关于搭建项目的具体步骤:
一、安装一个最初始的vue-cli项目,不清楚的可以访问这个链接 http://www.cnblogs.com/qiuchuanji/p/7662314.html,这是我整理的安装vue-cli的具体步骤
二、如何修改端口号和在项目启动的时候自行打开浏览器

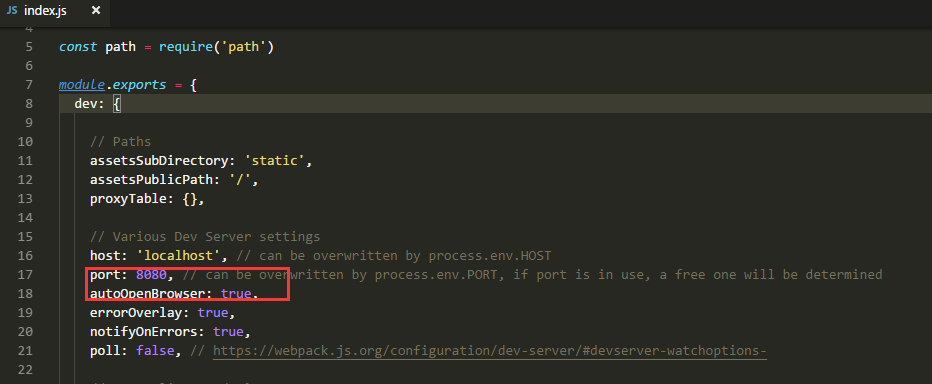
在config下面的index.js里面的,通过修改port可以修改端口号,autoOpenBrowser改为true,这样在项目启动时候就会自行打开浏览器
三、如果在创建项目的时候不小心创建了代码警告怎么办?
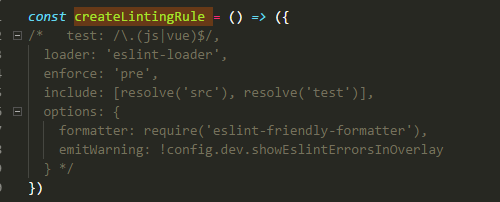
把build中的webpack.base.conf.js中的const createLintingRule中里面的内容都注释掉,这样就不会出现警告了

四、如何配置,在引入文件的时候不用去加入文件的后缀,
在build中的webpack.base.conf.js中的module.exports中的resolve里面的extensions加入需要去除的后缀名

五、如何配置路由?
在创建的时候会自行安装路由的,如果忘记安装,那么也可以自己配置
1.在src下面新建一个router文件夹,文件夹下面建立一个index.js文件
index.js里面具体代码如下
import Vue from 'vue'
import Router from 'vue-router'
import login from '@/page/login'

Vue.use(Router)

export default new Router({
  routes: [
    {
      path: '/',
      name: 'login',
      component: login
    }
  ]
})
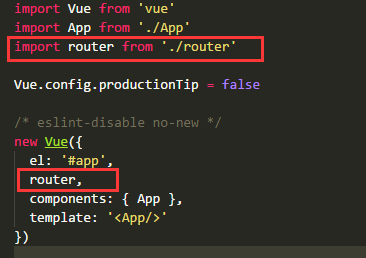
2.在main.js中将这个路由引入进来

六、设立公共的CSS文件,JS文件,使其在每个页面都能生效
1.关于公共的css
在src下面新建public.css,然后在main.js中引入进来 import '@/public.css',这样所有页面中都会使用这个样式了,如果只是部分页面需要,那还是不用用这种公共配置,在页面中引入就好了
2.关于公共的JS
通过浏览这个链接,http://www.cnblogs.com/qiuchuanji/p/8342336.html,这里有详细的关于公共的JS方法
七、配置axios,统一请求与返回,已经请求错误后的重定向,如果项目中有涉及到登陆的,一般都要在这进行统一配置
在src下面新建一个http文件夹,里面创建一个index.js来配置axios的各种参数,其中比较重要的是USER_TOKEN,这里做的是将token放到请求头中,传给后台,有token意味着有登陆信息,如果觉得不适合可以在这基础上进行修改。
代码如下:
import Vue from 'vue'
import axios from 'axios'
import router from '../router'

let http = axios.create({
  withCredentials: true,
  headers: {
    'content-type': 'application/json;charset=UTF-8'
  }
})
var base = {
  // url: 'http://192.168.10.223:6650/v1'
  url: 'http://192.168.10.205:6650/v1'
}
// 设置默认请求url
http.defaults.baseURL = base.url
// 添加请求拦截器
http.interceptors.request.use(config => {
  // 在发送请求之前做些什么
  let token = localStorage.getItem('USER_TOKEN')
  if (token !== null) {
    config.headers['X-Auth-Token'] = token
  }
  // http.defaults.headers.USER_TOKEN = localStorage.token
  return config
}, (error) => {
  // 对请求错误做些什么
  return Promise.reject(error)
})
// 添加响应拦截器
http.interceptors.response.use(function (response) {
  // 对响应数据做点什么
  let token = response.headers['x-auth-token']
  if (token) {
    localStorage.setItem('USER_TOKEN', token)
  }
  if (response.status === 200) {
    if (response.data && response.data.code === 401) {
      router.replace({path: '/'})
    }
  }
  return response
}, error => {
  if (error.response) {
    switch (error.response.status) {
      case 401:
        // 返回 401前往登陆
        router.replace({path: '/'})
    }
  }
  return Promise.reject(error.response.data)// 返回接口返回的错误信息
})
Vue.prototype.$axios = http

export default http
然后创建的一个depot.js来设置请求方法和返回数据接收,代码如下:
import axios from './index'

var depot = {

}

depot.get = function ({ url, config = {}, cb }) {
  axios.get(url, config).then((res) => {
    if (res.status === 200) {
      let result = res.data
      cb(result)
    }
  }).catch((error) => {
    console.log('请求错误:' + error)
  })
}

depot.post = function ({ url, data, cb }) {
  axios.post(url, data).then((res) => {
    if (res.status === 200) {
      if (res.status === 200) {
        let result = res.data
        cb(result)
      }
    }
  }).catch((error) => {
    console.log(error)
  })
}

export default () => {
  window.depot = depot
}
最后在main.js中引入:import depot from '@/http/depot',再调用---depot()
这样在每个页面中就能使用get,post两个方法来进行请求接口,使用方法如下:
depot.post({
  url: url,
  data: data,
  cb: (data) => {

  }

})

 depot.get({
  url: url,
  config: {
     params: {}
  },
  cb: (data) => {

  }
 })
方法不够可以自行添加。