单数据源多出口案例(选择器)
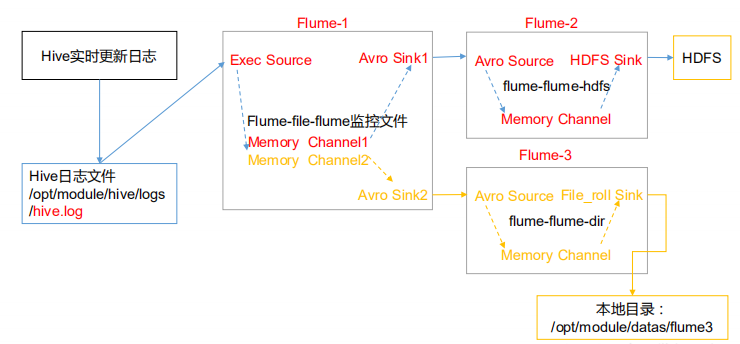
单 Source 多 Channel、Sink 如图 7-2 所示。

图 7-2 单 Source 多 Channel、Sink
1)案例需求:使用 Flume-1 监控文件变动,Flume-1 将变动内容传递给 Flume-2,Flume-2负责存储到 HDFS。同时 Flume-1 将变动内容传递给 Flume-3,Flume-3 负责输出到 LocalFileSystem。
2)需求分析:
3)实现步骤:
0.准备工作
在/opt/module/flume/job 目录下创建 group1 文件夹
[atguigu@hadoop102 job]$ cd group1/
在/opt/module/datas/目录下创建 flume3 文件夹
[atguigu@hadoop102 datas]$ mkdir flume3
1.创建 flume-file-flume.conf
配置 1 个接收日志文件的 source 和两个 channel、两个 sink,分别输送给 flume-flume-hdfs和 flume-flume-dir。
创建配置文件并打开
[atguigu@hadoop102 group1]$ touch flume-file-flume.conf
[atguigu@hadoop102 group1]$ vim flume-file-flume.conf
添加如下内容
# Name the components on this agent
a1.sources = r1
a1.sinks = k1 k2
a1.channels = c1 c2
# 将数据流复制给所有 channel
a1.sources.r1.selector.type = replicating
# Describe/configure the source
a1.sources.r1.type = exec
a1.sources.r1.command = tail -F /opt/module/hive/logs/hive.log
a1.sources.r1.shell = /bin/bash -c
# Describe the sink
a1.sinks.k1.type = avro
a1.sinks.k1.hostname = hadoop102
a1.sinks.k1.port = 4141
a1.sinks.k2.type = avro
a1.sinks.k2.hostname = hadoop102
a1.sinks.k2.port = 4142
# Describe the channel
a1.channels.c1.type = memory
a1.channels.c1.capacity = 1000
a1.channels.c1.transactionCapacity = 100
a1.channels.c2.type = memory
a1.channels.c2.capacity = 1000
a1.channels.c2.transactionCapacity = 100
# Bind the source and sink to the channel
a1.sources.r1.channels = c1 c2
a1.sinks.k1.channel = c1
a1.sinks.k2.channel = c2
注:Avro 是由 Hadoop 创始人 Doug Cutting 创建的一种语言无关的数据序列化和 RPC 框
架。
注:RPC(Remote Procedure Call)—远程过程调用,它是一种通过网络从远程计算机程
序上请求服务,而不需要了解底层网络技术的协议。
2.创建 flume-flume-hdfs.conf
配置上级 Flume 输出的 Source,输出是到 HDFS 的 Sink。
创建配置文件并打开
[atguigu@hadoop102 group1]$ touch flume-flume-hdfs.conf
[atguigu@hadoop102 group1]$ vim flume-flume-hdfs.conf
添加如下内容
# Name the components on this agent
a2.sources = r1
a2.sinks = k1
a2.channels = c1
# Describe/configure the source
a2.sources.r1.type = avro
a2.sources.r1.bind = hadoop102
a2.sources.r1.port = 4141
# Describe the sink
a2.sinks.k1.type = hdfs
a2.sinks.k1.hdfs.path = hdfs://hadoop102:9000/flume2/%Y%m%d/%H
#上传文件的前缀
a2.sinks.k1.hdfs.filePrefix = flume2- #是否按照时间滚动文件夹
a2.sinks.k1.hdfs.round = true
#多少时间单位创建一个新的文件夹
a2.sinks.k1.hdfs.roundValue = 1
#重新定义时间单位
a2.sinks.k1.hdfs.roundUnit = hour
#是否使用本地时间戳
a2.sinks.k1.hdfs.useLocalTimeStamp = true
#积攒多少个 Event 才 flush 到 HDFS 一次
a2.sinks.k1.hdfs.batchSize = 100
#设置文件类型,可支持压缩
a2.sinks.k1.hdfs.fileType = DataStream
#多久生成一个新的文件
a2.sinks.k1.hdfs.rollInterval = 600
#设置每个文件的滚动大小大概是 128M
a2.sinks.k1.hdfs.rollSize = 134217700
#文件的滚动与 Event 数量无关
a2.sinks.k1.hdfs.rollCount = 0
#最小冗余数
a2.sinks.k1.hdfs.minBlockReplicas = 1
# Describe the channel
a2.channels.c1.type = memory
a2.channels.c1.capacity = 1000
a2.channels.c1.transactionCapacity = 100
# Bind the source and sink to the channel
a2.sources.r1.channels = c1
a2.sinks.k1.channel = c1
3.创建 flume-flume-dir.conf
配置上级 Flume 输出的 Source,输出是到本地目录的 Sink。
创建配置文件并打开
[atguigu@hadoop102 group1]$ touch flume-flume-dir.conf
[atguigu@hadoop102 group1]$ vim flume-flume-dir.conf
添加如下内容
# Name the components on this agent
a3.sources = r1
a3.sinks = k1
a3.channels = c2
# Describe/configure the source
a3.sources.r1.type = avro
a3.sources.r1.bind = hadoop102
a3.sources.r1.port = 4142
# Describe the sink
a3.sinks.k1.type = file_roll
a3.sinks.k1.sink.directory = /opt/module/datas/flume3
# Describe the channel
a3.channels.c2.type = memory
a3.channels.c2.capacity = 1000
a3.channels.c2.transactionCapacity = 100
# Bind the source and sink to the channel
a3.sources.r1.channels = c2
a3.sinks.k1.channel = c2
提示:输出的本地目录必须是已经存在的目录,如果该目录不存在,并不会创建新的目录。
4.执行配置文件
分别开启对应配置文件:flume-flume-dir,flume-flume-hdfs,flume-file-flume。
[atguigu@hadoop102 flume]$ bin/flume-ng agent --conf conf/ --name
a3 --conf-file job/group1/flume-flume-dir.conf
[atguigu@hadoop102 flume]$ bin/flume-ng agent --conf conf/ --name
a2 --conf-file job/group1/flume-flume-hdfs.conf
[atguigu@hadoop102 flume]$ bin/flume-ng agent --conf conf/ --name
a1 --conf-file job/group1/flume-file-flume.conf
5.启动 Hadoop 和 Hive
[atguigu@hadoop102 hadoop-2.7.2]$ sbin/start-dfs.sh
[atguigu@hadoop103 hadoop-2.7.2]$ sbin/start-yarn.sh
[atguigu@hadoop102 hive]$ bin/hive
hive (default)>
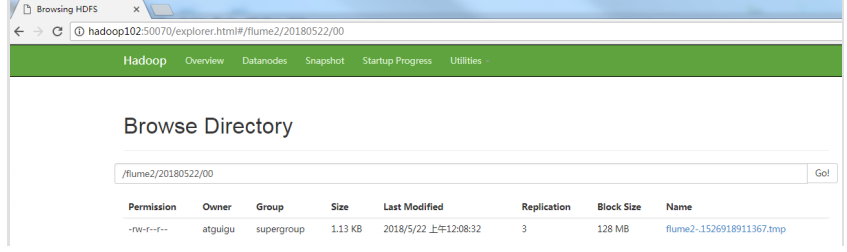
6.检查 HDFS 上数据
7 检查/opt/module/datas/flume3 目录中数据
[atguigu@hadoop102 flume3]$ ll
总用量 8 -rw-rw-r--. 1 atguigu atguigu 5942 5 月 22 00:09 1526918887550-3