标准与扩展ACL
1 案例1:配置标准ACL
1.1 问题
络调通后,保证网络是通畅的。同时也很可能出现未经授权的非法访问。企业网络既要解决连连通的问题,还要解决网络安全的问题。
- 配置标准ACL实现拒绝PC1(IP地址为192.168.1.1)对外问网络192.168.2.1的访问
1.2 方案
访问控制是网络安全防范和保护的主要策略,它的主要任务是保证网络资源不被非法使用和访问。它是保证网络安全最重要的核心策略之一。
访问控制列表(Access Control Lists,ACL)是应用在路由器接口的指令列表。这些指令列表用来告诉路由器哪能些数据包可以收、哪能数据包需要拒绝。至于数据包是被接收还是拒绝,可以由类似于源地址、目的地址、端口号等的特定指示条件来决定。
标准访问控制列表只能根据数据包的源IP地址决定是否允许通过。
网络拓扑如图-1所示:
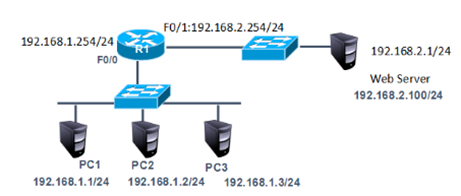
图-1
1.3 步骤
实现此案例需要按照如下步骤进行。
步骤一:在R1上配置接口IP
- tarena-R1(config)#interface f0/0
- tarena-R1(config-if)#ip address 192.168.1.254 255.255.255.0
- tarena-R1(config-if)#no shutdown
- tarena-R1(config-if)#interface f0/1
- tarena-R1(config-if)#ip address 192.168.2.254 255.255.255.0
- tarena-R1(config-if)#no shutdown
步骤二:测试主机到192.168.2.1的连通性
在实施ACL之前先检查网络是否能够正常通信,因为没有任何限制,网络应该是处于连通状态。
PC1测试如下所示:
- PC>ipconfig
- FastEthernet0 Connection:(default port)
- Link-local IPv6 Address.........: FE80::2E0:F7FF:FED6:54CC
- IP Address......................: 192.168.1.1
- Subnet Mask.....................: 255.255.255.0
- Default Gateway.................: 192.168.1.254
- PC>ping 192.168.2.100
- Pinging 192.168.2.100 with 32 bytes of data:
- Reply from 192.168.2.1: bytes=32 time=0ms TTL=126
- Reply from 192.168.2.1: bytes=32 time=0ms TTL=126
- Reply from 192.168.2.1: bytes=32 time=0ms TTL=126
- Reply from 192.168.2.1: bytes=32 time=0ms TTL=126
- Ping statistics for 192.168.2.1:
- Packets: Sent = 4, Received = 2, Lost = 2 (50% loss),
- Approximate round trip times in milli-seconds:
- Minimum = 0ms, Maximum = 0ms, Average = 0ms
- PC>
PC2测试如下所示:
- PC>ipconfig
- FastEthernet0 Connection:(default port)
- Link-local IPv6 Address.........: FE80::2D0:BAFF:FE98:9E29
- IP Address......................: 192.168.1.2
- Subnet Mask.....................: 255.255.255.0
- Default Gateway.................: 192.168.1.254
- PC>ping 192.168.2.1
- Pinging 192.168.2.1 with 32 bytes of data:
- Reply from 192.168.2.1: bytes=32 time=2ms TTL=126
- Reply from 192.168.2.1: bytes=32 time=0ms TTL=126
- Reply from 192.168.2.1: bytes=32 time=0ms TTL=126
- Reply from 192.168.2.1: bytes=32 time=0ms TTL=126
- Ping statistics for 192.168.2.1:
- Packets: Sent = 4, Received = 4, Lost = 0 (0% loss),
- Approximate round trip times in milli-seconds:
- Minimum = 0ms, Maximum = 2ms, Average = 0ms
- PC>
步骤三:在R1上配置标准访问控制列表,并应用到Fa0/0端口
ACL的匹配规则中,最后有一条隐含拒绝全部。如果语句中全部是拒绝条目,那么最后必须存在允许语句,否则所有数据通信都将被拒绝。
- tarena-R1(config)#access-list 1 deny host 192.168.1.1
- tarena-R1(config)#access-list 1 permit 192.168.1.0 0.0.0.255
- tarena-R1(config)#interface f0/0
- tarena-R1(config-if)#ip access-group 1 in
步骤四:分别在两台主机上测试到192.168.2.1的连通性
PC1测试如下所示:
- PC>ipconfig
- FastEthernet0 Connection:(default port)
- Link-local IPv6 Address.........: FE80::2E0:F7FF:FED6:54CC
- IP Address......................: 192.168.1.1
- Subnet Mask.....................: 255.255.255.0
- Default Gateway.................: 192.168.1.254
- PC>ping 192.168.2.1
- Pinging 192.168.2.1 with 32 bytes of data:
- Reply from 192.168.1.254: Destination host unreachable.
- Reply from 192.168.1.254: Destination host unreachable.
- Reply from 192.168.1.254: Destination host unreachable.
- Reply from 192.168.1.254: Destination host unreachable.
- Ping statistics for 192.168.2.1:
- Packets: Sent = 4, Received = 0, Lost = 4 (100% loss),
- PC>
PC2测试如下所示:
- PC>ipconfig
- FastEthernet0 Connection:(default port)
- Link-local IPv6 Address.........: FE80::207:ECFF:FE46:CAC0
- IP Address......................: 192.168.1.2
- Subnet Mask.....................: 255.255.255.0
- Default Gateway.................: 192.168.1.254
- PC>ping 192.168.2.1
- Pinging 192.168.2.1 with 32 bytes of data:
- Reply from 192.168.2.1: bytes=32 time=1ms TTL=127
- Reply from 192.168.2.1: bytes=32 time=0ms TTL=127
- Reply from 192.168.2.1: bytes=32 time=1ms TTL=127
- Reply from 192.168.2.1: bytes=32 time=0ms TTL=127
- Ping statistics for 192.168.2.1:
- Packets: Sent = 4, Received = 4, Lost = 0 (0% loss),
- Approximate round trip times in milli-seconds:
- Minimum = 0ms, Maximum = 1ms, Average = 0ms
- PC>
结果显示PC2(IP地址为192.168.1.2)可以正常访问192.168.2.1,而PC1(IP地址为192.168.1.1)已经被192.168.1.254(R1)拒绝。
步骤五:在R1上查看相关的ACL信息
- tarena-R1#show ip access-lists
- Standard IP access list 1
- 10 deny host 192.168.1.1 (4 match(es))
- 20 permit 192.168.1.0 0.0.0.255 (8 match(es)
2 案例2:配置扩展ACL
在网络中很有可能要允许或拒绝的并不是某一个源IP地址,而是根据目标地址或是协议来匹配。但是标准访问控制列表只能根据源IP地址来决定是否允许一个数据包通过。
2.1 问题
配置扩展ACL允许pc1访问pc4的www服务但拒绝访问PC4的其他服务,PC2、PC3无限制。
2.2 方案
为了实现更灵活、列精确的网络控制就需要用到扩展访问控制列表了。
扩展IP访问控制列表比标准IP访问控制列表具有更多的匹配项,包括协议类型、源地址、目的地址、源端口、目的端口、建立连接的和IP优先级等。
网络拓扑如图-2所示:
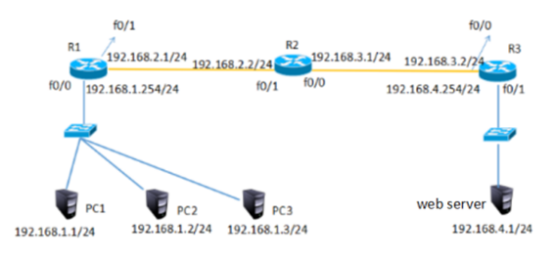
图-2
2.3 步骤
实现此案例需要按照如下步骤进行。
步骤一:在三台路由器中配置IP、RIP动态路由实现全网互通
- tarena-R1(config)#interface fastEthernet 0/0
- tarena-R1(config-if)#ip address 192.168.1.254 255.255.255.0
- tarena-R1(config-if)#no shutdown
- tarena-R1(config-if)#exit
- tarena-R1(config)#interface fastEthernet 0/1
- tarena-R1(config-if)#ip address 192.168.2.1 255.255.255.0
- tarena-R1(config-if)#no shutdown
- tarena-R1(config-if)#exit
- tarena-R1(config)#router rip
- tarena-R1(config-router)#no auto-summary
- tarena-R1(config-router)#version
- tarena-R1(config-router)#network 192.168.1.0
- tarena-R1(config-router)#network 192.168.2.0
- tarena-R2(config)#interface fastEthernet 0/1
- tarena-R2(config-if)#ip address 192.168.2.2 255.255.255.0
- tarena-R2(config-if)#no shutdown
- tarena-R2(config-if)#exit
- tarena-R2(config)#interface fastEthernet 0/0
- tarena-R2(config-if)#ip address 192.168.3.1 255.255.255.0
- tarena-R2(config-if)#exit
- tarena-R2(config)#router rip
- tarena-R2(config-router)#version 2
- tarena-R2(config-router)#no auto-summary
- tarena-R2(config-router)#network 192.168.2.0
- tarena-R2(config-router)#network 192.168.3.0
- tarena-R3(config)# interface fastEthernet 0/0
- tarena-R3(config-if)#ip add 192.168.3.2 255.255.255.0
- tarena-R3(config-if)#no shu
- tarena-R3(config-if)#exit
- tarena-R3(config)#interface fastEthernet 0/1
- tarena-R3(config-if)#ip address 192.168.4.254 255.255.255.0
- tarena-R3(config-if)#no shutdown
- tarena-R3(config-if)#exit
- tarena-R3(config)#router rip
- tarena-R3(config-router)#version 2
- tarena-R3(config-router)#no auto-summary
- tarena-R3(config-router)#network 192.168.3.0
- tarena-R3(config-router)#network 192.168.4.0
步骤二:开启192.168.4.1的http服务后在PC1、PC2和PC3上验证到Web Server的HTTP协议访问,均如图3所示:
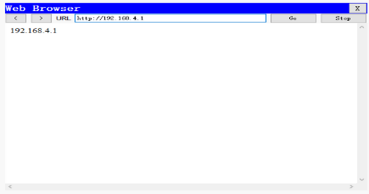
图-3
在没有配置扩展ACL的时候,主机均可以正常访问到Web Server。
步骤三:R1上配置扩展访问控制列表,PC1仅允许到Web Server的HTTP服务(不允许访问其他服务),PC2、PC3无限制
扩展ACL可以对数据包中的源、目标IP地址以及端口号进行检查,所以可以将该ACL放置在通信路径中的任一位置。但是,如果放到离目标近的地方,每台路由器都要对数据进行处理,会更多的消耗路由器和带宽资源。放到离源最近的路由器端口入方向直接就将拒绝数据丢弃,可以减少其他路由器的资源占用以及带宽占用。
- tarena-R1(config)#access-list 100 permit tcp host 192.168.1.1 host 192.168.4.1 eq 80
- tarena-R1(config)#access-list 100 deny ip host 192.168.1.1 host 192.168.4.1
- tarena-R1(config)#access-list 100 permit ip 192.168.1.0 0.0.0.255 host 192.168.4.1
- tarena-R1(config)#interface fastEthernet 0/0
- tarena-R1(config-if)#ip access-group 100 in
步骤四:在PC1上验证
- PC>ipconfig
- FastEthernet0 Connection:(default port)
- Link-local IPv6 Address.........: FE80::2E0:F7FF:FED6:54CC
- IP Address......................: 192.168.1.1
- Subnet Mask.....................: 255.255.255.0
- Default Gateway.................: 192.168.1.254
- PC>ping 192.168.4.1
- Pinging 192.168.4.1 with 32 bytes of data:
- Reply from 192.168.1.254: Destination host unreachable.
- Reply from 192.168.1.254: Destination host unreachable.
- Reply from 192.168.1.254: Destination host unreachable.
- Reply from 192.168.1.254: Destination host unreachable.
- Ping statistics for 192.168.4.1:
- Packets: Sent = 4, Received = 0, Lost = 4 (100% loss),
- PC>
HTTP协议的验证如图-4所示:
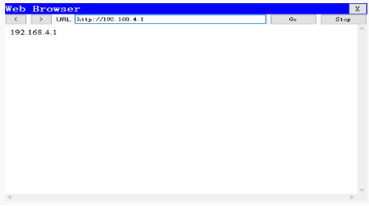
图-4
从输入结果可以验证,PC1到Web Server的http服务访问没有受到影响但不能ping通Web Server。
步骤五:在PC2上进行验证
- PC>ipconfig
- FastEthernet0 Connection:(default port)
- Link-local IPv6 Address.........: FE80::209:7CFF:FED5:B0E4
- IP Address......................: 192.168.1.2
- Subnet Mask.....................: 255.255.255.0
- Default Gateway.................: 192.168.1.254
- PC>ping 192.168.4.1
- Pinging 192.168.4.1 with 32 bytes of data:
- Reply from 192.168.4.1: bytes=32 time=0ms TTL=125
- Reply from 192.168.4.1: bytes=32 time=12ms TTL=125
- Reply from 192.168.4.1: bytes=32 time=13ms TTL=125
- Reply from 192.168.4.1: bytes=32 time=12ms TTL=125
- Ping statistics for 192.168.4.1:
- Packets: Sent = 4, Received = 4, Lost = 0 (0% loss),
- Approximate round trip times in milli-seconds:
- Minimum = 0ms, Maximum = 13ms, Average = 9ms
HTTP协议的验证,如图-5所示:
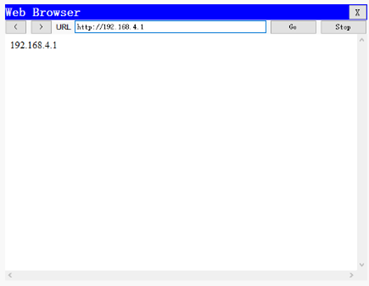
图-5
步骤六:在R1上查看相关的ACL信息
- tarena-R1#show ip access-lists
- Extended IP access list 100
- 10 permit tcp host 192.168.1.1 host 192.168.4.1 eq www (5 match(es))
- 20 deny ip host 192.168.1.1 host 192.168.4.1 (4 match(es))
- 30 permit ip 192.168.1.0 0.0.0.255 host 192.168.4.1 (8 match(es))
3 案例3:配置标准命名ACL
3.1 问题
使用基本编号的ACL没有实际意义,只有通过阅读具体的条目才能得知该ACL的作用。而且ACL的编号有限制,如传统的标准ACL用1~99表示,扩展ACL用100~199表示。
- 配置标准命名ACL实现192.168.1.0网段拒绝PC1访问外部网络,其他主机无限制。
3.2 方案
命名访问控制列表可以为ACL起一个有意义的名字,通过名称就可以得知该ACL要实现什么功能。同时,因为使用的是名称而不是数字,也就没有了ACL数量上的限制。
网络拓扑如图-6所示:
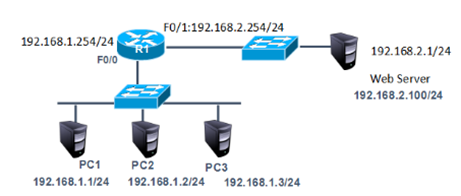
图-6
3.3 步骤
实现此案例需要按照如下步骤进行。
步骤一:将案例1配置标准ACL中的扩展访问控制列表移除,其他配置保留
- tarena-R1(config)#interface f0/0
- tarena-R1(config-if)#no ip access-group 1 in
- tarena-R1(config-if)#exit
- tarena-R1(config)#no access-list 1
步骤二:在R2上配置标准的命名访问控制列表
命名访问控制列表的配置总体上和用数字表示的ACL一样,但是更加灵活。
- tarena-R2(config)#ip access-list standard tedu
- tarena-R2(config-std-nacl)#deny host 192.168.1.1
- tarena-R2(config-std-nacl)#permit 192.168.1.0 0.0.0.255
- tarena-R2(config-std-nacl)#exit
- tarena-R2(config)#interface f0/0
- tarena-R2(config-if)#ip access-group tedu in
步骤三:分别在PC1和PC2上做连通性测试
PC2测试如下所示:
- PC>ipconfig
- FastEthernet0 Connection:(default port)
- Link-local IPv6 Address.........: FE80::2E0:F7FF:FED6:54CC
- IP Address......................: 192.168.1.2
- Subnet Mask.....................: 255.255.255.0
- Default Gateway.................: 192.168.0.1
- PC>ping 192.168.4.1
- Pinging 192.168.4.1 with 32 bytes of data:
- Reply from 192.168.4.1: bytes=32 time=0ms TTL=126
- Reply from 192.168.4.1: bytes=32 time=0ms TTL=126
- Reply from 192.168.4.1: bytes=32 time=0ms TTL=126
- Reply from 192.168.4.1: bytes=32 time=0ms TTL=126
- Ping statistics for 192.168.4.1:
- Packets: Sent = 4, Received = 4, Lost = 0 (0% loss),
- Approximate round trip times in milli-seconds:
- Minimum = 0ms, Maximum = 0ms, Average = 0ms
- PC>
PC1 测试如下所示:
- PC>ipconfig
- FastEthernet0 Connection:(default port)
- Link-local IPv6 Address.........: FE80::2D0:BAFF:FE98:9E29
- IP Address......................: 192.168.1.1
- Subnet Mask.....................: 255.255.255.0
- Default Gateway.................: 192.168.1.254
- PC>ping 192.168.4.1
- Pinging 192.168.4.1 with 32 bytes of data:
- Reply from 192.168.1.254: Destination host unreachable.
- Reply from 192.168.1.254: Destination host unreachable.
- Reply from 192.168.1.254: Destination host unreachable.
- Reply from 192.168.1.254: Destination host unreachable.
- Ping statistics for 192.168.4.1:
- Packets: Sent = 4, Received = 0, Lost = 4 (100% loss),
- PC>
输出结果表明,PC1的访问是正常的,而PC2到Web Server的访问被R2(IP地址为192.168.1.2)拒绝。
步骤四:在R1上查看相关的ACL信息
- tarena-R2#show ip access-lists
- Standard IP access list tedu
- 10 deny host 192.168.1.1 (4 match(es))
- 20 permit 192.168.1.0 0.0.0.255(4 match(es))
输出结果也表明,来自于PC1的数据包被拦截。
4 配置扩展命名ACL
4.1 问题
使用基本编号的ACL没有实际意义,只有通过阅读具体的条目才能得知该ACL的作用。而且ACL的编号有限制,如传统的标准ACL用1~99表示,扩展ACL用100~199表示。
- 配置扩展命名ACL允许PC1访问192.168.4.1的www服务但拒绝访问192.168.4.1的其他服务,PC2、PC3无限制。
4.2 方案
命名访问控制列表可以为ACL起一个有意义的名字,通过名称就可以得知该ACL要实现什么功能。同时,因为使用的是名称而不是数字,也就没有了ACL数量上的限制。
网络拓扑如图-7所示:
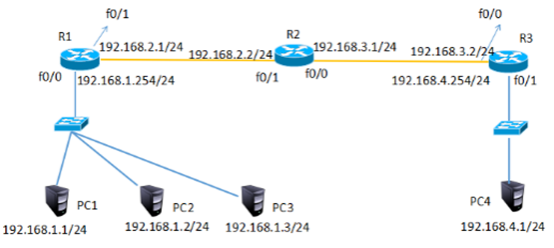
图-7
4.3 步骤
实现此案例需要按照如下步骤进行。
步骤一:将2配置扩展ACL中的扩展访问控制列表移除,其他配置保留
- tarena-R1(config)#no access-list 100 permit tcp host 192.168.1.1 host 192.168.4.1 eq www
- tarena-R1(config)#interface fastEthernet 0/0
- tarena-R1(config-if)#no ip access-group 100 in
步骤二:在R1上配置扩展命名访问控制列表
命名访问控制列表的配置总体上和用数字表示的ACL一样,但是更加灵活。
- tarena-R1(config)#ip access-list extended tarena
- tarena-R1(config-ext-nacl)#permit tcp host 192.168.1.1 host 192.168.4.1 eq 80
- tarena-R1(config-ext-nacl)#deny ip host 192.168.1.1 host 192.168.4.1
- tarena-R1(config-ext-nacl)#permit ip 192.168.1.0 0.0.0.255 host 192.168.4.1
- tarena-R1(config)#interface fastEthernet 0/0
- tarena-R2(config-if)#ip access-group tarena in
步骤三:在R1上查看相关的ACL信息
- tarena-R1#show ip access-lists
- Extended IP access list tarena
- 10 permit tcp host 192.168.1.1 host 192.168.4.1 eq www
- 20 deny ip host 192.168.1.1 host 192.168.4.1
- 30 permit ip 192.168.1.0 0.0.0.255 host 192.168.4.1
步骤四:在PC1上验证
- PC>ipconfig
- FastEthernet0 Connection:(default port)
- Link-local IPv6 Address.........: FE80::2E0:F7FF:FED6:54CC
- IP Address......................: 192.168.1.1
- Subnet Mask.....................: 255.255.255.0
- Default Gateway.................: 192.168.1.254
- PC>ping 192.168.4.1
- Pinging 192.168.4.1 with 32 bytes of data:
- Reply from 192.168.1.254: Destination host unreachable.
- Reply from 192.168.1.254: Destination host unreachable.
- Reply from 192.168.1.254: Destination host unreachable.
- Reply from 192.168.1.254: Destination host unreachable.
- Ping statistics for 192.168.4.1:
- Packets: Sent = 4, Received = 0, Lost = 4 (100% loss),
- PC>
- PC>
HTTP协议的验证如图-8所示:
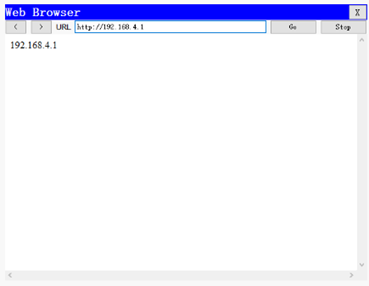
图-8
从输入结果可以验证,PC1到Web Server的http访问没有受到影响,但不能ping通192.168.4.1。
步骤五:在PC2上进行验证
- PC>ipconfig
- FastEthernet0 Connection:(default port)
- Link-local IPv6 Address.........: FE80::2E0:F7FF:FED6:54CC
- IP Address......................: 192.168.1.2
- Subnet Mask.....................: 255.255.255.0
- Default Gateway.................: 192.168.0.1
- PC>ping 192.168.4.1
- Pinging 192.168.4.1 with 32 bytes of data:
- Reply from 192.168.4.1: bytes=32 time=0ms TTL=126
- Reply from 192.168.4.1: bytes=32 time=0ms TTL=126
- Reply from 192.168.4.1: bytes=32 time=0ms TTL=126
- Reply from 192.168.4.1: bytes=32 time=0ms TTL=126
- Ping statistics for 192.168.4.1:
- Packets: Sent = 4, Received = 4, Lost = 0 (0% loss),
- Approximate round trip times in milli-seconds:
- Minimum = 0ms, Maximum = 0ms, Average = 0ms
- PC>
HTTP协议的验证,如图-9所示:

图-9