Ajax请求
1>解决跨域问题
1.1前端解决。只需要在vue.config.js中增加devServer节点增加代理:
const path = require("path");
const resolve = dir => path.join(__dirname, dir);
const BASE_URL = process.env.NODE_ENV === 'procution' ? '/iview-admin/' : '/'
module.exports = {
  lintOnSave: false,
  baseUrl: BASE_URL,
  chainWebpack: config => {
    config.resolve.alias.set("@",resolve('src')).set("_c",resolve('src/components'))
  },
  //打包时不生成.map文件
  productionSourceMap: false,
  //跨域配置
 devServer: {
    proxy:"http://localhost:4000"
 }
}
1.2后端解决,应用cors(Cross-Origin Resource Sharing)解决。
如果是node环境,可以这样写:
app.all("*",(req,res,next)=>{
    res.hearder("Access-Control-Allow-Origin","*");
    res.hearder("Access-Control-Allow-Headers","X-Requested-With,Content-Type");
    res.hearder("Access-Control-Allow-Methods","PUT,POST,GET,DELETE,OPTIONS");
});
如果是.net环境,在Global.asax中添加如下代码片段:
protected void Application_BeginRequest(object sender, EventArgs e)
{
  HttpContext.Current.Response.AddHeader("Access-Control-Allow-Origin", "*");
  if (HttpContext.Current.Request.HttpMethod == "OPTIONS")
  {
    HttpContext.Current.Response.AddHeader("Access-Control-Allow-Methods", "POST, PUT, DELETE");
    HttpContext.Current.Response.AddHeader("Access-Control-Allow-Headers", "Content-Type, Accept");
    HttpContext.Current.Response.AddHeader("Access-Control-Max-Age", "1728000");
    HttpContext.Current.Response.End();
  }
}
2>封装axios
下面用axios模拟一个ajax请求为例来对其进行封装:
后端采用node.js模拟一个接口,代码如下:
router.post('getUSerInfo', function(req, res, next) {
    console.log('请求成功');
    res.status(200).send({
        code: 200,
        data: {
            name: "Lison"
        }
    });
});
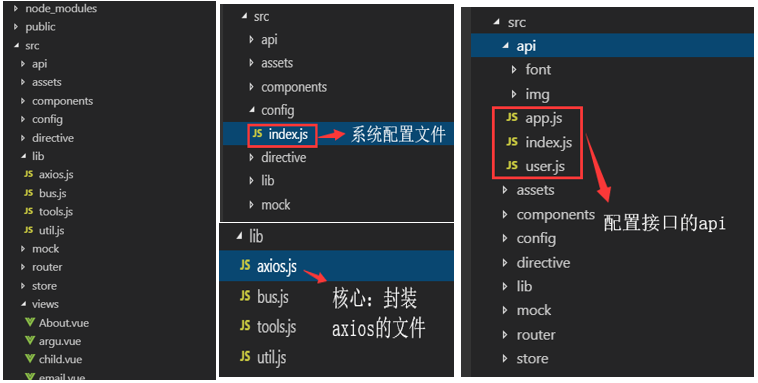
前端代码目录结构:

config/index.js:
export const baseURL =
  process.env.NODE_ENV == "production"
    ? "http://production.com"
    : "http://localhost:3000";
lib/axios.js:
import axios from "axios";
import { baseURL } from "@/config";
//ES6类的写法
class HttpRequest {
  //ES6默认参数
  constructor(baseUrl = baseURL) {
    this.baseUrl = baseUrl;
    this.queue = {}; //将请求都放到队列中
  }
  getInsideConfig() {
    const config = {
      baseURL: this.baseUrl,
      hearders: {
        //
      }
    };
    return config;
  }
  //封装拦截器
  interceptors(instance, url) {
    instance.interceptors.request.use(
      config => {
        //添加全局的loading
        //Object.keys() 方法会返回一个由一个给定对象的自身可枚举属性组成的数组
        if (!Object.keys(this.queue).length) {
          //spin.show
        }
        this.queue[url] = true;
        return config;
      },
      error => {
        return Promise.reject(error);
      }
    );
    instance.interceptors.response.use(
      res => {
        delete this.queue[url];
        const { data, status } = res;
        return { data, status };
      },
      error => {
        delete this.queue[url];
        return Promise.reject(error);
      }
    );
  }

  request(options) {
    debugger
    const instance = axios.create();
    /**
     * Object.assign() 方法用于将所有可枚举属性的值从一个或多个源对象复制到目标对象。它将返回目标对象。
     * const target = { a: 1, b: 2 };
     * const source = { b: 4, c: 5 };
     * const returnedTarget = Object.assign(target, source);
     * console.log(target);
     * expected output: Object { a: 1, b: 4, c: 5 }
     */
    options = Object.assign(this.getInsideConfig(), options);
    this.interceptors(instance, options.url);
    return instance(options);
  }
}

export default HttpRequest;
api/index.js
import HttpRequest from '@/lib/axios'
const axios = new HttpRequest()
export default axios
api/user.js
import axios from "./index";

export const getUserInfo = ({ userId }) => {
  debugger
  return axios.request({
    url: "/getUserInfo",
    method: "post",
    data: {
      userId
    }
  });
};
home.vue:
  <template>
  <div class="home">
    <b>{{ food }}</b>
    <button @click="getInfo">请求数据</button>
  </div>
</template>

  <script>
// @ is an alias to /src
import HelloWorld from "@/components/HelloWorld.vue";
import { getUserInfo } from '@/api/user'
export default {
  name: "home",
  components: {
    HelloWorld
  },
  props: {
    food: {
      type: String,
      default: "apple"
    }
  },
  beforeRouteEnter(to, from, next) {
    // 在渲染该组件的对应路由被 confirm 前调用
    // 不!能!获取组件实例 `this`
    // 因为当守卫执行前,组件实例还没被创建
    next(vm => {
      //若想使用实例,可使用这种方法
      console.log(vm);
    });
  },
  beforeRouteLeave(to, from, next) {
    // const leave = confirm('您确定要离开吗?')
    // if (leave) next()
    // else next(false)
    next();
  },
  methods: {
    getInfo() {
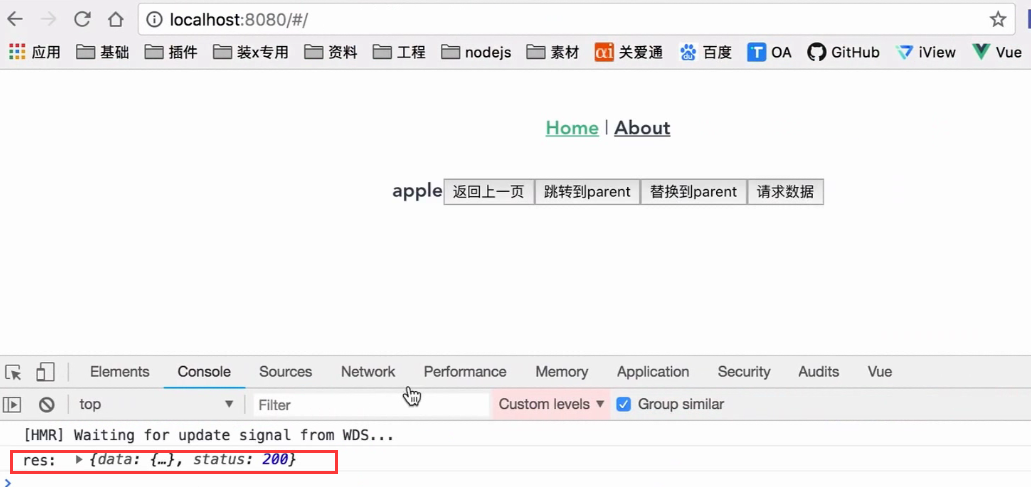
      getUserInfo({ userId: 21 }).then(res => {
        console.log("res: ", res);
      });
   }
  }
};
</script>
