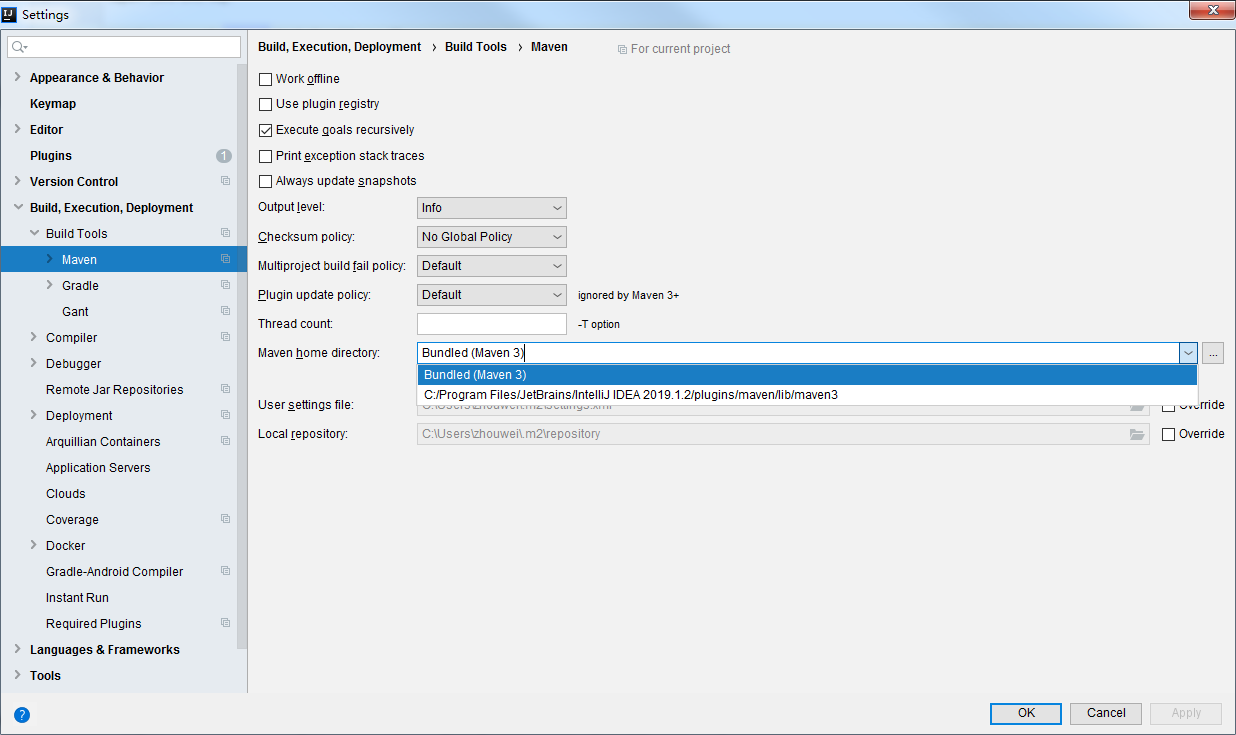
如果不知道maven安装路径IDEA中打File->Settings 再点Build->Maven右边看maven安装路径,打开这个路径,再打开conf/settings.xml文件

在xml中添加以下镜像地址,
<mirror>
    <id>alimaven</id>
    <name>aliyun maven</name>
    <url>http://maven.aliyun.com/nexus/content/groups/public/</url>
    <mirrorOf>central</mirrorOf>
</mirror>
<mirror>
    <id>alimaven</id>
    <mirrorOf>central</mirrorOf>
    <name>aliyun maven</name>
    <url>http://maven.aliyun.com/nexus/content/repositories/central/</url>
</mirror>

<mirror>
    <id>ibiblio</id>
    <mirrorOf>central</mirrorOf>
    <name>Human Readable Name for this Mirror.</name>
    <url>http://mirrors.ibiblio.org/pub/mirrors/maven2/</url>
</mirror>
<mirror>
    <id>jboss-public-repository-group</id>
    <mirrorOf>central</mirrorOf>
    <name>JBoss Public Repository Group</name>
    <url>http://repository.jboss.org/nexus/content/groups/public</url>
</mirror>

<mirror>
    <id>central</id>
    <name>Maven Repository Switchboard</name>
    <url>http://repo1.maven.org/maven2/</url>
    <mirrorOf>central</mirrorOf>
</mirror>
<mirror>
    <id>repo2</id>
    <mirrorOf>central</mirrorOf>
    <name>Human Readable Name for this Mirror.</name>
    <url>http://repo2.maven.org/maven2/</url>
</mirror>
手动导入的jar包如何导入到maven本地仓库
CMD进入jar所在目录,运行以下命令导入jar到本地仓库(以下演示导了多个)
mvn install:install-file -DgroupId=(com.公司名) -DartifactId=(公司名-包名) -Dversion=(版本) -Dpackaging=jar -Dfile=(jar的文件名)
mvn install:install-file -DgroupId=com.aspose -DartifactId=aspose-slides -Dversion=18.7 -Dpackaging=jar -Dfile=aspose-slides-18.7-jdk16.jar
mvn install:install-file -DgroupId=com.aspose -DartifactId=aspose-cells -Dversion=18.9 -Dpackaging=jar -Dfile=aspose-cells-18.9.jar
mvn install:install-file -DgroupId=com.aspose -DartifactId=aspose-words -Dversion=14.9.0 -Dpackaging=jar -Dfile=aspose-words-14.9.0-jdk16.jar
mvn install:install-file -DgroupId=com.aspose -DartifactId=aspose-email -Dversion=19.6 -Dpackaging=jar -Dfile=aspose-email-19.6-jdk16.jar

pom.xml文件添加节点
<!--手动导入的aspose-->
        <dependency>
            <groupId>com.aspose</groupId>
            <artifactId>aspose-slides</artifactId>
            <version>18.7</version>
        </dependency>
        <dependency>
            <groupId>com.aspose</groupId>
            <artifactId>aspose-cells</artifactId>
            <version>18.9</version>
        </dependency>
        <dependency>
            <groupId>com.aspose</groupId>
            <artifactId>aspose-words</artifactId>
            <version>14.9.0</version>
        </dependency>
        <dependency>
            <groupId>com.aspose</groupId>
            <artifactId>aspose-email</artifactId>
            <version>19.6</version>
        </dependency>