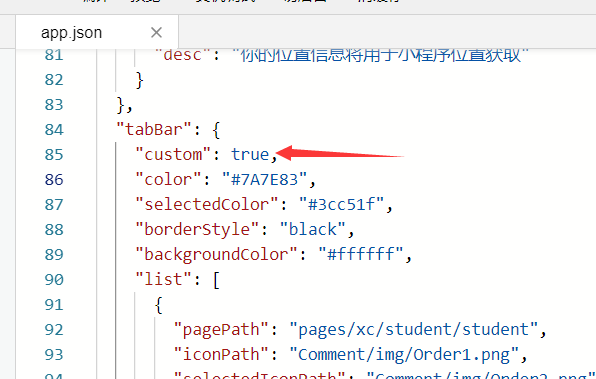
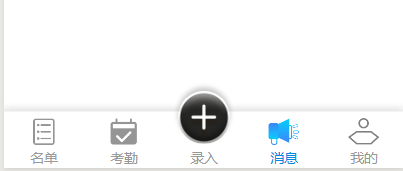
1.app.json文件“tabBar”里面“custom”设置为true。

2.新建custom-tab-bar文件夹在该文件下面新建index页面。(注意:custom-tab-bar必须与pages同级且命名必须这样写)

3.根据项目需求在custom-tab-bar下index页面写自己的自定义tabBer。
// custom-tab-bar/index.js
Component({
  /**
   * 组件的属性列表
   */
  properties: {

  },

  /**
   * 组件的初始数据
   */
  data: {
    selected: 0,
    color: "#999999",
    selectedColor: "#008adf",
    foot: [
      {
        "url": "/pages/xc/student/student",
        "iconPath": "/Comment/img/Order1.png",
        "selectedIconPath": "/Comment/img/Order2.png",
        "text": "名单"
      },
      {
        "url": "/pages/xc/index/index",
        "iconPath": "/Comment/img/kaoqin1_60px.png",
        "selectedIconPath": "/Comment/img/kaoqin2_60px.png",
        "text": "考勤"
      },
      {
        "url": "/pages/xc/student/Goaddstudent",
        "iconPath": "/Comment/img/anniu3_120px.png",
        "selectedIconPath": "/Comment/img/anniu3_120px.png",
        "text": "录入"
      },
      {
        "url": "/pages/xc/student/studentInfo",
        "iconPath": "/Comment/img/news1_60px.png",
        "selectedIconPath": "/Comment/img/news_60px.png",
        "text": "消息"
      },
      {
        "url": "/pages/xc/student/userLeading",
        "iconPath": "/Comment/img/My1_60px.png",
        "selectedIconPath": "/Comment/img/My_60px.png",
        "text": "我的"
      },
    ],
  },

  /**
   * 组件的方法列表
   */
  methods: {
    switchTab(e) {
      const data = e.currentTarget.dataset
      const url = data.path
      wx.switchTab({ url })
      this.setData({
        selected: data.index,
      })
    }
  }
})

<!--custom-tab-bar/index.wxml-->
<view class="foot-nav">
  <view wx:for="{{foot}}" data-path="{{item.url}}"  bindtap="switchTab" open-type="reLaunch" data-index="{{index}}" class="tab-bar-item">
    <view class="img-box">
      <image src="{{selected === index ? item.selectedIconPath : item.iconPath}}"></image>
    </view>
    <text style="color: {{selected === index ? selectedColor : color}}">{{item.text}}</text>
  </view>
</view>

/* custom-tab-bar/index.wxss */
.foot-nav {
  100%;
  height:110rpx;
  position: fixed;
  bottom: 0;
  z-index: 9999;
  border-top:2rpx solid #f4f4f4;
  box-sizing:border-box;
  color:#999;
  background:#fff;
  box-shadow:0px -5rpx 10rpx rgba(209, 209, 209, 0.3);
}
.foot-nav .tab-bar-item {
  position:relative;
 font-size:28rpx;
  20%;
  height:110rpx;
  display: inline-block;
  text-align: center;
  bottom:40rpx;
}
.foot-nav .tab-bar-item .img-box {
  top: 10rpx;
  position: relative;
}
.foot-nav .tab-bar-item:nth-child(3) .img-box {
  top: 4rpx;
  position: relative;
}
.foot-nav .tab-bar-item image {
  display: block;
  60rpx;
  height:60rpx;
  margin:0 auto;
}
.foot-nav navigator:nth-child(3){
  position: relative;
  top:-40rpx;
}
.foot-nav .tab-bar-item:nth-child(3) image{
  100rpx;
  height:100rpx;
  box-shadow:0px -5rpx 10rpx rgba(150, 150, 150, 0.5);
  border-radius:50%;
}

4.通过自定义组件提供的getTabBar 方法,可获取当前页面下的自定义 tabBar 组件实例,实现底部tabBar切换效果。
// pages/xc/student/student.js
const app = getApp()
Component({
  pageLifetimes: {
    show() {
      if (typeof this.getTabBar === 'function' &&
        this.getTabBar()) {
        this.getTabBar().setData({
          selected: 0
        })
      }
     wx.hideHomeButton();
    }
  },
})

// pages/xc/index/index.js
var app = getApp();
Component({
  pageLifetimes: {
    show() {
      if (typeof this.getTabBar === 'function' &&
        this.getTabBar()) {
        this.getTabBar().setData({
          selected: 1
        })
      }
      wx.hideHomeButton();
    }
  },
})

// pages/xc/student/Goaddstudent.js
var app = getApp();
Component({
  pageLifetimes: {
    show() {
      if (typeof this.getTabBar === 'function' &&
        this.getTabBar()) {
        this.getTabBar().setData({
          selected: 2
        })
      }
      wx.hideHomeButton();
    }
  },
})

// pages/xc/student/studentInfo
var app = getApp();
Component({
  pageLifetimes: {
    show() {
      if (typeof this.getTabBar === 'function' &&
        this.getTabBar()) {
        this.getTabBar().setData({
          selected: 3
        })
      }
      wx.hideHomeButton();
    }
  },
})

// pages/xc/student/userLeading
var app = getApp();
Component({
  pageLifetimes: {
    show() {
      if (typeof this.getTabBar === 'function' &&
        this.getTabBar()) {
        this.getTabBar().setData({
          selected: 4
        })
      }
      wx.hideHomeButton();
    }
  },
})